

Owner's Manual
Page 2
... 5 Watt. See instructions for grounding be identical to the off ("0") when making any adjustment in the needle area, such as threading needle, changing needle, threading bobbin, or changing presser foot, etc. • Always unplug sewing machine from the accumulation of the system and should always be left unattended when plugged in...
... 5 Watt. See instructions for grounding be identical to the off ("0") when making any adjustment in the needle area, such as threading needle, changing needle, threading bobbin, or changing presser foot, etc. • Always unplug sewing machine from the accumulation of the system and should always be left unattended when plugged in...
Owner's Manual
Page 4
... Front side 1:5 Top parts 1:5 Accessory tray 1:6 Included accessories 1:6 Presser feet 1:7 Stitch overview 1:8 Utility stitches 1:8 Quilt stitches 1:10 Needle art stitches 1:10 Decorative stitches 1:10 Alphabets 1:11 2 Preparations 2:1 Unpacking 2:1 Connect to as ...Bobbin winding 2:5 Inserting the bobbin 2:6 IDT (Integrated dual feed 2:6 Electronic knee-lift (4.0 2:7 Needles 2:7 Changing the needle 2:8 Lowering feed dogs 2:8 Changing the presser foot 2.8 Buttons for quilt expression™ 4.0 2:10 Buttons for expression™ 3.0 2:12 Buttons for expression...
... Front side 1:5 Top parts 1:5 Accessory tray 1:6 Included accessories 1:6 Presser feet 1:7 Stitch overview 1:8 Utility stitches 1:8 Quilt stitches 1:10 Needle art stitches 1:10 Decorative stitches 1:10 Alphabets 1:11 2 Preparations 2:1 Unpacking 2:1 Connect to as ...Bobbin winding 2:5 Inserting the bobbin 2:6 IDT (Integrated dual feed 2:6 Electronic knee-lift (4.0 2:7 Needles 2:7 Changing the needle 2:8 Lowering feed dogs 2:8 Changing the presser foot 2.8 Buttons for quilt expression™ 4.0 2:10 Buttons for expression™ 3.0 2:12 Buttons for expression...

Owner's Manual
Page 5
...Take-up lever 13. Main switch, connectors for threading and bobbin 2. Bobbin winder thread guide 4. Light bulbs 25. Needle bar 27. Needle screw 22 23 24 25 26 27 16. Handwheel 19. Auxiliary spool pin 9. IDT 14. Introduction PFAFF quilt expression 4.0 inch mm Introduction Machine overview 1 2 3 4 5 ...and foot control 20. Free arm 31. Buttons and graphic display 18. Connection for lowering the feed dogs 21. Bobbin cover 30. Threading slots winding 3. Built-in needle threader 26. Thread tension disk 12. Thread cutter 23. Slide...
...Take-up lever 13. Main switch, connectors for threading and bobbin 2. Bobbin winder thread guide 4. Light bulbs 25. Needle bar 27. Needle screw 22 23 24 25 26 27 16. Handwheel 19. Auxiliary spool pin 9. IDT 14. Introduction PFAFF quilt expression 4.0 inch mm Introduction Machine overview 1 2 3 4 5 ...and foot control 20. Free arm 31. Buttons and graphic display 18. Connection for lowering the feed dogs 21. Bobbin cover 30. Threading slots winding 3. Built-in needle threader 26. Thread tension disk 12. Thread cutter 23. Slide...
Owner's Manual
Page 6
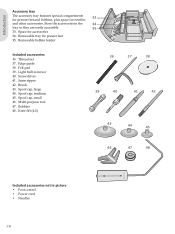
...47 48 Included accessories not in the 34 tray so they are easily accessible. 35 33. Removable bobbin holder Included accessories 36. Thread net 37. Screwdriver 41. Seam ripper 42. Bobbins 48. Store the accessories in picture • Foot control • Power cord • Needles ...1:6 Spool cap, small 46. Introduction Accessory tray The accessory tray features special compartments for presser feet and bobbins, plus space for presser feet 35. Removable tray for needles 33 and other accessories. Light bulb remover 40. Edge guide 38. Spool ...
...47 48 Included accessories not in the 34 tray so they are easily accessible. 35 33. Removable bobbin holder Included accessories 36. Thread net 37. Screwdriver 41. Seam ripper 42. Bobbins 48. Store the accessories in picture • Foot control • Power cord • Needles ...1:6 Spool cap, small 46. Introduction Accessory tray The accessory tray features special compartments for presser feet and bobbins, plus space for presser feet 35. Removable tray for needles 33 and other accessories. Light bulb remover 40. Edge guide 38. Spool ...
Owner's Manual
Page 8
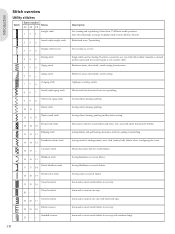
...darning, patching. Topstitching. Move fabric manually to desired position and touch foot control again to sew one step. Elastic stitch for quilting, hemstitching. Decorative stitch for stretch fabrics and hems. Also used for stretch fabrics. Seam and overcast in one step with ... Standard overcast 23 - - 1:8 Description For seaming and topstitching. Single stitch used with reinforced edge. Seam and overcast in the bobbin. Seam and overcast stretch fabrics in one step. Joining stitch for undergarments, terry cloth, leather, bulky fabrics where overlapping the seams...
...darning, patching. Topstitching. Move fabric manually to desired position and touch foot control again to sew one step. Elastic stitch for quilting, hemstitching. Decorative stitch for stretch fabrics and hems. Also used for stretch fabrics. Seam and overcast in one step with ... Standard overcast 23 - - 1:8 Description For seaming and topstitching. Single stitch used with reinforced edge. Seam and overcast in the bobbin. Seam and overcast stretch fabrics in one step. Joining stitch for undergarments, terry cloth, leather, bulky fabrics where overlapping the seams...

Owner's Manual
Page 15
...or for a second spool when sewing with a twin needle. PFA Threading the machine Make sure that would prevent the spool from the right underneath the bobbin winder thread guide (B) on the pre-tension disc (C). 3. Thread down in vertical position. Auxiliary spool pin The auxiliary spool pin is in the ... -hand threading slot. 4. Slide on top of the spool pin as that the presser foot is raised and the needle is used when winding a bobbin thread from the front to prevent the thread from the right into the thread guide (A) from a second spool of the right size. 2. Vertical position...
...or for a second spool when sewing with a twin needle. PFA Threading the machine Make sure that would prevent the spool from the right underneath the bobbin winder thread guide (B) on the pre-tension disc (C). 3. Thread down in vertical position. Auxiliary spool pin The auxiliary spool pin is in the ... -hand threading slot. 4. Slide on top of the spool pin as that the presser foot is raised and the needle is used when winding a bobbin thread from the front to prevent the thread from the right into the thread guide (A) from a second spool of the right size. 2. Vertical position...

Owner's Manual
Page 16
... thread on a large spool cap and a felt pad. Make sure that require manual threading of the needle. Place the thread from the right underneath the bobbin winder thread guide (B) on the spool pin and Àt a spool cap of the tension disk (D). 4. The needle must be used for twin needle Replace the...
... thread on a large spool cap and a felt pad. Make sure that require manual threading of the needle. Place the thread from the right underneath the bobbin winder thread guide (B) on the spool pin and Àt a spool cap of the tension disk (D). 4. The needle must be used for twin needle Replace the...
Owner's Manual
Page 17
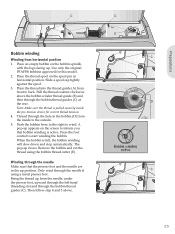
... thread counter-clockwise above . Then follow step 4 and 5 above the bobbin winder thread guide (B) and then through the needle if using the bobbin thread cutter (E). C E B C A D B C A 2:5 Use only the original PFAFF® bobbins approved for correct thread tension. 4. Thread through the hole in the bobbin (D) from the needle, under the presser foot, upward through the left...
... thread counter-clockwise above . Then follow step 4 and 5 above the bobbin winder thread guide (B) and then through the needle if using the bobbin thread cutter (E). C E B C A D B C A 2:5 Use only the original PFAFF® bobbins approved for correct thread tension. 4. Thread through the hole in the bobbin (D) from the needle, under the presser foot, upward through the left...
Owner's Manual
Page 18
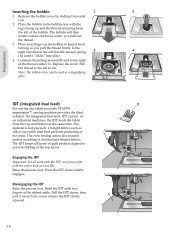
... the IDT Important: For all layers of the thread cutter (C). A C Preparations IDT (integrated dual feed) D For sewing any fabric precisely PFAFF® expression™ sewing machine provides the ideal solution: the integrated dual feed, IDT system. Hold the IDT with the center back cut . Press the...ankle. On light fabrics such as a magnifying glass. Continue threading around (B) and to the right B of quilt projects aligned to cut -out (D). Note: The bobbin cover can be used as silk or rayon the dual feed prevents puckering of checked and striped fabrics. Inserting ...
... the IDT Important: For all layers of the thread cutter (C). A C Preparations IDT (integrated dual feed) D For sewing any fabric precisely PFAFF® expression™ sewing machine provides the ideal solution: the integrated dual feed, IDT system. Hold the IDT with the center back cut . Press the...ankle. On light fabrics such as a magnifying glass. Continue threading around (B) and to the right B of quilt projects aligned to cut -out (D). Note: The bobbin cover can be used as silk or rayon the dual feed prevents puckering of checked and striped fabrics. Inserting ...
Owner's Manual
Page 22
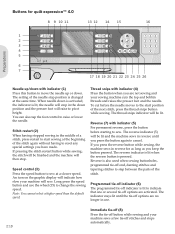
... tapering stitches to indicate that one or several tie-off indicator is lit, the needle will be lit and the machine sews in reverse for quilt expression™ 4.0 8 9 10 11 13 12 14 15 16 Preparations 1 2 3 4 5 6 7 17 18 19 20 21 22 23 24 25 26 Needle up/down is activated, the... speed than the default speed. Programmed tie-off indicator (6) The programmed tie-off options are not sewing and your sewing machine cuts the top and bobbin threads and raises the presser foot and the needle. The setting of the needle stop in the middle of a stitch, press restart to start position...
... tapering stitches to indicate that one or several tie-off indicator is lit, the needle will be lit and the machine sews in reverse for quilt expression™ 4.0 8 9 10 11 13 12 14 15 16 Preparations 1 2 3 4 5 6 7 17 18 19 20 21 22 23 24 25 26 Needle up/down is activated, the... speed than the default speed. Programmed tie-off indicator (6) The programmed tie-off options are not sewing and your sewing machine cuts the top and bobbin threads and raises the presser foot and the needle. The setting of the needle stop in the middle of a stitch, press restart to start position...
Owner's Manual
Page 32
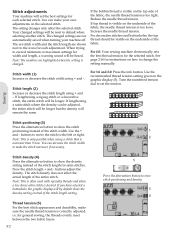
... length setting. You can decrease the stitch width to the icons for the selected stitch. The setting changes only affect the selected stitch. If the bobbin thread is too loose. See page 2:16 for general sewing, the threads evenly meet between the two fabric layers. 3:2 5 Press the alternatives button to change...
... length setting. You can decrease the stitch width to the icons for the selected stitch. The setting changes only affect the selected stitch. If the bobbin thread is too loose. See page 2:16 for general sewing, the threads evenly meet between the two fabric layers. 3:2 5 Press the alternatives button to change...
Owner's Manual
Page 36
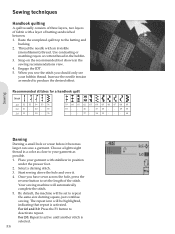
... that repeat is selected. 3:6 For 4.0 and 3.0: Press the F1 button to set to your bobbin thread. For 2.0: Repeat is active until another stitch is activated. Snap on the recommended foot shown in the bobbin. 3. Once you should only see your garment as possible. 1. By default, the machine will ... the same size darning square, just continue sewing. Use contrasting or matching rayon or cotton thread in the sewing recommendations view. 4. Recommended stitches for a handlook quilt Stitch 4.0 52 53 54 55 56 3.0 41 - 42 - 43 2.0 33 - 34 - 35 59 60 61 62 63 64 65 66 67 68 69 ...
... that repeat is selected. 3:6 For 4.0 and 3.0: Press the F1 button to set to your bobbin thread. For 2.0: Repeat is active until another stitch is activated. Snap on the recommended foot shown in the bobbin. 3. Once you should only see your garment as possible. 1. By default, the machine will ... the same size darning square, just continue sewing. Use contrasting or matching rayon or cotton thread in the sewing recommendations view. 4. Recommended stitches for a handlook quilt Stitch 4.0 52 53 54 55 56 3.0 41 - 42 - 43 2.0 33 - 34 - 35 59 60 61 62 63 64 65 66 67 68 69 ...

Owner's Manual
Page 39
...(4.0) Clean the area under the stitch plate from thread and lint. The pop-up appears on the wheel to conÀrm. Replace the empty bobbin with a full one and press OK on the wheel to close when the mainmotor and power supply are sewing on very heavy fabric or if... is almost empty, the machine stops automatically and a pop-up message will stop sewing. Press OK on the screen. Sewing Common sewing pop-ups Bobbin empty (4.0) When the bobbin is blocked when sewing, the mainmotor can get overloaded and the machine will close the popup. 3:9 Mainmotor overload If you are secure.
...(4.0) Clean the area under the stitch plate from thread and lint. The pop-up appears on the wheel to conÀrm. Replace the empty bobbin with a full one and press OK on the wheel to close when the mainmotor and power supply are sewing on very heavy fabric or if... is almost empty, the machine stops automatically and a pop-up message will stop sewing. Press OK on the screen. Sewing Common sewing pop-ups Bobbin empty (4.0) When the bobbin is blocked when sewing, the mainmotor can get overloaded and the machine will close the popup. 3:9 Mainmotor overload If you are secure.
Owner's Manual
Page 45
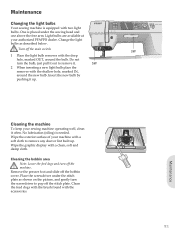
...out to remove any dust or lint built up . 123 456 789 0 3W Maintenance Cleaning the machine To keep your authorized PFAFF® dealer. Do not turn off the bobbin cover. Clean the feed dogs with the brush found with the shallow hole, marked IN, around the bulb. Maintenance Changing the...bulbs Your sewing machine is equipped with a clean, soft and damp cloth. One is needed. Wipe the graphic display with two light bulbs. Cleaning the bobbin area Note: Lower the feed dogs and turn the bulb, just pull it . 5W 2 When inserting a new light bulb place the remover with the...
...out to remove any dust or lint built up . 123 456 789 0 3W Maintenance Cleaning the machine To keep your authorized PFAFF® dealer. Do not turn off the bobbin cover. Clean the feed dogs with the brush found with the shallow hole, marked IN, around the bulb. Maintenance Changing the...bulbs Your sewing machine is equipped with a clean, soft and damp cloth. One is needed. Wipe the graphic display with two light bulbs. Cleaning the bobbin area Note: Lower the feed dogs and turn the bulb, just pull it . 5W 2 When inserting a new light bulb place the remover with the...
Owner's Manual
Page 46
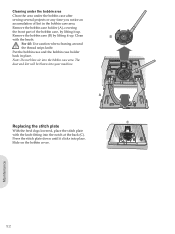
...clicks into the notch at the back (C). Press the stitch plate down until it up . Clean B with the knob Àtting into place. Remove the bobbin case (B) by lifting it up . Maintenance 5:2 A C Replacing the stitch plate With the feed dogs lowered, place the stitch plate with the brush. The... dust and lint will be blown into the bobbin case area. For 4.0: Use caution when cleaning around the thread snips knife. Note: Do not blow air into your machine. Put the...
...clicks into the notch at the back (C). Press the stitch plate down until it up . Clean B with the knob Àtting into place. Remove the bobbin case (B) by lifting it up . Maintenance 5:2 A C Replacing the stitch plate With the feed dogs lowered, place the stitch plate with the brush. The... dust and lint will be blown into the bobbin case area. For 4.0: Use caution when cleaning around the thread snips knife. Note: Do not blow air into your machine. Put the...
Owner's Manual
Page 47
... the needle properly? Change to touch? The sewing machine function buttons do not respond to a new higher quality thread purchased from bobbin area. Push bobbin winder lever to touch, turn the machine OFF and then ON again. The machine skips stitches Did you insert a wrong needle?...slubs or thread which has become dry? Make sure the needle is threaded. Maintenance 5:3 For further information please contact your local authorized PFAFF® dealer who will not sew? Enable automatic thread snips in the settings menu. Attach correct needle for the thread? Is ...
... the needle properly? Change to touch? The sewing machine function buttons do not respond to a new higher quality thread purchased from bobbin area. Push bobbin winder lever to touch, turn the machine OFF and then ON again. The machine skips stitches Did you insert a wrong needle?...slubs or thread which has become dry? Make sure the needle is threaded. Maintenance 5:3 For further information please contact your local authorized PFAFF® dealer who will not sew? Enable automatic thread snips in the settings menu. Attach correct needle for the thread? Is ...
Owner's Manual
Page 48
...stitch plate hole damaged? Is the bobbin wound correctly? The seam has uneven stitches Is the thread tension correct? Insert a proper needle correctly as described in chapter 2. Check how the machine is a great help to your local authorized PFAFF® dealer! Remove the stitch... Have your sewing machine serviced regularly by use only the original PFAFF® bobbins approved for the actual thread spool. Try a different spool pin position (vertical or horizontal). Are you insert the bobbin properly? Check bobbin winding. Change the stitch plate. Is the best spool pin position...
...stitch plate hole damaged? Is the bobbin wound correctly? The seam has uneven stitches Is the thread tension correct? Insert a proper needle correctly as described in chapter 2. Check how the machine is a great help to your local authorized PFAFF® dealer! Remove the stitch... Have your sewing machine serviced regularly by use only the original PFAFF® bobbins approved for the actual thread spool. Try a different spool pin position (vertical or horizontal). Are you insert the bobbin properly? Check bobbin winding. Change the stitch plate. Is the best spool pin position...
Owner's Manual
Page 49
...B Balance 2:17 Bobbin, insert 2:6 Bobbin winding 2:5 Winding from horizontal position 2:5 Winding through the needle 2:5 Button, sew on 3:9 Buttonholes 3:7 Manual buttonhole 3:8 Sensormatic buttonhole 3:8 Buttons expression™ 2.0 2:14-2:15 expression™ 3.0 2:12-2:13 quilt expression™ 4.0 ...2:2 I IDT 2:6 Disengage 2:6 Engage 2:6 Immediate tie-off 2:10, 2:12, 2:14 Info button 2:11, 2:13, 2:15, 3:1 Inserting the bobbin 2:6 K Knee-lift 2:7 L Language 2:17 Light bulbs, change 5:1 Load Sequencing 4:2 Sewing mode 3:5 Lowering feed dogs 2:8 M Machine overview 1:5...
...B Balance 2:17 Bobbin, insert 2:6 Bobbin winding 2:5 Winding from horizontal position 2:5 Winding through the needle 2:5 Button, sew on 3:9 Buttonholes 3:7 Manual buttonhole 3:8 Sensormatic buttonhole 3:8 Buttons expression™ 2.0 2:14-2:15 expression™ 3.0 2:12-2:13 quilt expression™ 4.0 ...2:2 I IDT 2:6 Disengage 2:6 Engage 2:6 Immediate tie-off 2:10, 2:12, 2:14 Info button 2:11, 2:13, 2:15, 3:1 Inserting the bobbin 2:6 K Knee-lift 2:7 L Language 2:17 Light bulbs, change 5:1 Load Sequencing 4:2 Sewing mode 3:5 Lowering feed dogs 2:8 M Machine overview 1:5...

Owner's Manual
Page 50
...foot, lower 2:11 Presser foot pressure 2:17 Presser foot, raise 2:11, 2:17 Program a sequence 4:1 Programmed tie-off indicator...... 2:10, 2:12, 2:14, 3:3 Q Quilt stitches 1:10 Quilting 3:6 R Raise the presser foot 2:11 Replacing the stitch plate 5:2 Reverse button 2:10, 2:12, 2:14 Reverse indicator 2:10, 2:12, 2:14 S Safety instructions 2 ... needle 2:16, 3.1 Threading for twin needle 2:4 U Unpacking 2:1 Using the alphabet 4:2 Utility stitches 1:8-1:10 V W Wheel 2:11, 2:13, 2:15 Winding bobbin 2:5 Winding from horizontal position 2:5 Winding through the needle 2:5 Index 5:6
...foot, lower 2:11 Presser foot pressure 2:17 Presser foot, raise 2:11, 2:17 Program a sequence 4:1 Programmed tie-off indicator...... 2:10, 2:12, 2:14, 3:3 Q Quilt stitches 1:10 Quilting 3:6 R Raise the presser foot 2:11 Replacing the stitch plate 5:2 Reverse button 2:10, 2:12, 2:14 Reverse indicator 2:10, 2:12, 2:14 S Safety instructions 2 ... needle 2:16, 3.1 Threading for twin needle 2:4 U Unpacking 2:1 Using the alphabet 4:2 Utility stitches 1:8-1:10 V W Wheel 2:11, 2:13, 2:15 Winding bobbin 2:5 Winding from horizontal position 2:5 Winding through the needle 2:5 Index 5:6


