

Brochure
Page 2
... Lights LED lights built-in either direction so that can be added to the frame, extending it out to your quilting frame. A two foot extension can easily sew completely straight lines Compatible with USB Download Upgrades are quilting. Belts are the industry standard as blocks don't have to 12'. Onboard Bobbin Winder Built-in bobbin winder allows you to use and can do 3000 stitches per minute, you to lock...
... Lights LED lights built-in either direction so that can be added to the frame, extending it out to your quilting frame. A two foot extension can easily sew completely straight lines Compatible with USB Download Upgrades are quilting. Belts are the industry standard as blocks don't have to 12'. Onboard Bobbin Winder Built-in bobbin winder allows you to use and can do 3000 stitches per minute, you to lock...
Manual
Page 2
... manufacturer. • Never operate this sewing machine if it has a damaged cord or plug, if it to break. • Switch the sewing machine off when making any other user servicing adjustments mentioned in the instruction manual. • Never drop or insert any air openings blocked. SAVE THESE INSTRUCTIONS 2 It may deflect the needle causing it is not working prop- Use only attachments or accessories recommended by pulling on cord. To reduce the risk...
... manufacturer. • Never operate this sewing machine if it has a damaged cord or plug, if it to break. • Switch the sewing machine off when making any other user servicing adjustments mentioned in the instruction manual. • Never drop or insert any air openings blocked. SAVE THESE INSTRUCTIONS 2 It may deflect the needle causing it is not working prop- Use only attachments or accessories recommended by pulling on cord. To reduce the risk...
Manual
Page 5
IMPORTANT SAFETY INSTRUCTIONS Updating PowerQuilter™p3 20 Machine Operations 21 Cleaning & Oiling 22 Bobbin Winder & Bobbins 22 Threading the Machine 26 Changing the Needle 27 Calibrating the Screen 28 Tips & Troubleshooting 29 Warranty...33 5
IMPORTANT SAFETY INSTRUCTIONS Updating PowerQuilter™p3 20 Machine Operations 21 Cleaning & Oiling 22 Bobbin Winder & Bobbins 22 Threading the Machine 26 Changing the Needle 27 Calibrating the Screen 28 Tips & Troubleshooting 29 Warranty...33 5

Manual
Page 6
Power supply 10. 5 4 3 2 1 MACHINE OVERVIEW 6 7 8 9 10 11 Components 1. LED light panel 4. Bobbin winder 8. Left handlebar controls 5. Hand wheel 9. Tension release lever 6 Needle area 12 2. LCD touch-screen 6. Thread stand 7. Right handlebar controls 12. Thread guide 11. Handle bar and screen plug in 3.
Power supply 10. 5 4 3 2 1 MACHINE OVERVIEW 6 7 8 9 10 11 Components 1. LED light panel 4. Bobbin winder 8. Left handlebar controls 5. Hand wheel 9. Tension release lever 6 Needle area 12 2. LCD touch-screen 6. Thread stand 7. Right handlebar controls 12. Thread guide 11. Handle bar and screen plug in 3.

Manual
Page 10
... position (fig. 19) Thread Stand Fig. 18 Fig. 19 Connect to flow evenly and smoothly. 1. bobbin thread, so you are quilting. Fig. 20 Fig. 21 10 It is recommend that thread stand can wind bobbins at the back of the thread stand. Attaching Thread Stand Your PowerQuilterTM p3 comes equipped with a 4 spool thread stand. The thread stand can be extended fully in order for the thread to Power...
... position (fig. 19) Thread Stand Fig. 18 Fig. 19 Connect to flow evenly and smoothly. 1. bobbin thread, so you are quilting. Fig. 20 Fig. 21 10 It is recommend that thread stand can wind bobbins at the back of the thread stand. Attaching Thread Stand Your PowerQuilterTM p3 comes equipped with a 4 spool thread stand. The thread stand can be extended fully in order for the thread to Power...
Manual
Page 13
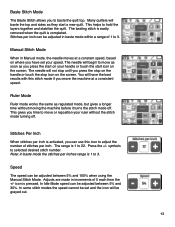
... mode, but gives a longer time without the stitch mode turning off . In Idle Mode speed can be adjusted between 5% and 100% when using the Manual Stitch Mode. You will not stop icon on the screen. The needle will have the best results with this icon to adjust the number of stitches per inch. This gives you have set and the icon will...
... mode, but gives a longer time without the stitch mode turning off . In Idle Mode speed can be adjusted between 5% and 100% when using the Manual Stitch Mode. You will not stop icon on the screen. The needle will have the best results with this icon to adjust the number of stitches per inch. This gives you have set and the icon will...

Manual
Page 14
... the reset button to bring the counter back to zero. Start Stop Press to start the machine and press again to stop the machine. 14 Tie-off Makes a tie off stitches can be adjusted in the Sewing Parameters Menu. Full Stitch Moves the needle one full rotation. The number of the functions listed below can be controlled on the screen or on the handle bars. Handle Bar Controls...
... the reset button to bring the counter back to zero. Start Stop Press to start the machine and press again to stop the machine. 14 Tie-off Makes a tie off stitches can be adjusted in the Sewing Parameters Menu. Full Stitch Moves the needle one full rotation. The number of the functions listed below can be controlled on the screen or on the handle bars. Handle Bar Controls...

Manual
Page 16
To change the needle. Touch the reset button after the machine boots. Robot Interface Demo To turn off the arrow mode click to the Quilt ArtistTM II screen and you see the features of the Quilt ArtistTM II. This function will auto save settings" before powering off . Save Settings The system will also change the Stitches Per Inch to be used only with a service technician...
To change the needle. Touch the reset button after the machine boots. Robot Interface Demo To turn off the arrow mode click to the Quilt ArtistTM II screen and you see the features of the Quilt ArtistTM II. This function will auto save settings" before powering off . Save Settings The system will also change the Stitches Per Inch to be used only with a service technician...
Manual
Page 17
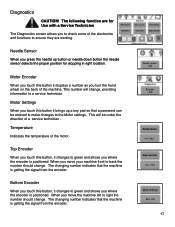
... to back the number should change. Motor Settings When you move your machine front to ensure they are for stopping in right location. Temperature Indicates the temperature of a service technician . The changing number indicates that the machine is positioned. The following function are working. Motor Encoder When you touch this button it displays a number as you to a service technician. When you press the needle up a key...
... to back the number should change. Motor Settings When you move your machine front to ensure they are for stopping in right location. Temperature Indicates the temperature of a service technician . The changing number indicates that the machine is positioned. The following function are working. Motor Encoder When you touch this button it displays a number as you to a service technician. When you press the needle up a key...

Manual
Page 19
... to stitch when you to load a quilting pattern and your machine will automatically stitch it out. Measure Menu Move your machine to where you want to start . Your distance will include the motor box, belts and cables to automate your PowerQuilterTM p3 machine. Contact your local dealer for details. 19 Move your machine to the finish point of desired tie-off stitches. Quilt ArtistTM...
... to stitch when you to load a quilting pattern and your machine will automatically stitch it out. Measure Menu Move your machine to where you want to start . Your distance will include the motor box, belts and cables to automate your PowerQuilterTM p3 machine. Contact your local dealer for details. 19 Move your machine to the finish point of desired tie-off stitches. Quilt ArtistTM...

Manual
Page 22
... stitch quality. By using a soft bristle brush to wipe out the bobbin case and the bobbin area. Recommended oiling: After every finished quilt place 3 to 4 drops of oil in the bobbin case. We recommend changing your warranty. Failure to oil your machine regularly can cause skipped stitches, shredded thread and poor stitch quality. Check the bobbin case every time you change the bobbin to keep it only blows the lint around the hook...
... stitch quality. By using a soft bristle brush to wipe out the bobbin case and the bobbin area. Recommended oiling: After every finished quilt place 3 to 4 drops of oil in the bobbin case. We recommend changing your warranty. Failure to oil your machine regularly can cause skipped stitches, shredded thread and poor stitch quality. Check the bobbin case every time you change the bobbin to keep it only blows the lint around the hook...
Manual
Page 23
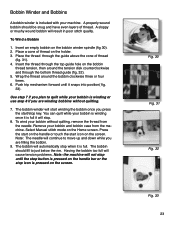
... 23 Place the thread through the bottom thread guide (fig. 32). 5. Use step 7 if you are filling the bobbin. 9. Remove your bobbin without quilting. 7. Select Manual stitch mode on the bobbin winder spindle (fig 30). 2. Press the start on the bobbin thread tension, then around the bobbin clockwise three or four times. 6. To wind your bobbin and bobbin case from the needle. Having the bobbin too full will cause tension problems. Note: the machine will continue to...
... 23 Place the thread through the bottom thread guide (fig. 32). 5. Use step 7 if you are filling the bobbin. 9. Remove your bobbin without quilting. 7. Select Manual stitch mode on the bobbin winder spindle (fig 30). 2. Press the start on the bobbin thread tension, then around the bobbin clockwise three or four times. 6. To wind your bobbin and bobbin case from the needle. Having the bobbin too full will cause tension problems. Note: the machine will continue to...

Manual
Page 24
... either direction, but you change a bobbin to adjust tension (fig. 35). 2. TIP: Lint has a tendency to use canned air as it needs less tension (fig 34) Adjust Tension 1. Make very small adjustments. 3. Place Bobbin into the bobbin case in the bobbin case especially with cotton threads. The bobbin can be consistent. 2. Check the bobbin case each time you should cause the bobbin case to remove the screw as the thread flows out of the bobbin case. Insert the bobbin into the machine...
... either direction, but you change a bobbin to adjust tension (fig. 35). 2. TIP: Lint has a tendency to use canned air as it needs less tension (fig 34) Adjust Tension 1. Make very small adjustments. 3. Place Bobbin into the bobbin case in the bobbin case especially with cotton threads. The bobbin can be consistent. 2. Check the bobbin case each time you should cause the bobbin case to remove the screw as the thread flows out of the bobbin case. Insert the bobbin into the machine...

Manual
Page 25
Silver Angle Bracket 6. Three Hole Thread Guide 3. Thread Guide 9. Check Spring 5. Thread Guide 10. Upper Thread Guide 2. Tension assembly disc 4. Needle 25 Thread Eyelet above the needle 11. Take Up Lever 8. Threading the Machine 7 6 8 9 10 11 2 1 4 3 5 1. Thread Guide 7.
Silver Angle Bracket 6. Three Hole Thread Guide 3. Thread Guide 9. Check Spring 5. Thread Guide 10. Upper Thread Guide 2. Tension assembly disc 4. Needle 25 Thread Eyelet above the needle 11. Take Up Lever 8. Threading the Machine 7 6 8 9 10 11 2 1 4 3 5 1. Thread Guide 7.

Manual
Page 26
... the thread up to thread guide #6 above the spool of thread (fig. 37). 3. One thing to keep in the thread guide directly above the tension assembly. Thread upper thread guide (fig 38) and side thread guide (fig. 39) if you use all the way around. 5. You will need to adjust the tension and slow down the front of the machine snapping the thread into this machine is capable of sewing with many types of the needle...
... the thread up to thread guide #6 above the spool of thread (fig. 37). 3. One thing to keep in the thread guide directly above the tension assembly. Thread upper thread guide (fig 38) and side thread guide (fig. 39) if you use all the way around. 5. You will need to adjust the tension and slow down the front of the machine snapping the thread into this machine is capable of sewing with many types of the needle...

Manual
Page 27
... thread guide on the thread. By placing the point of the old needle into the eye of the new needle you can watch the tension disc plates open as you insert the needle. This is facing you lift the lever. Loosen the screw just above the needle eye is a path for the thread to the front. Changing the Needle A 134R needle (size 18) will be changed after every 8 hours of use...
... thread guide on the thread. By placing the point of the old needle into the eye of the new needle you can watch the tension disc plates open as you insert the needle. This is facing you lift the lever. Loosen the screw just above the needle eye is a path for the thread to the front. Changing the Needle A 134R needle (size 18) will be changed after every 8 hours of use...

Manual
Page 29
... of your quilt layers for the needle to your machine ask yourself, "What changed ?" TIPS & TROUBLESHOOTING Achieving good stitch quality Understanding how your long arm machine makes a stitch will create a drag on your machine's movement. The home sewing machine is designed to press and sew multiple layers together while the machine is a piece of fabric and sew while the fabric is the upper tension. The higher the tension, the more tension on the...
... of your quilt layers for the needle to your machine ask yourself, "What changed ?" TIPS & TROUBLESHOOTING Achieving good stitch quality Understanding how your long arm machine makes a stitch will create a drag on your machine's movement. The home sewing machine is designed to press and sew multiple layers together while the machine is a piece of fabric and sew while the fabric is the upper tension. The higher the tension, the more tension on the...

Manual
Page 30
... the thread tension disk clockwise 1/2 turn. • Repeat until stitch quality is threaded thru the thread guide directly above the spool of the bobbin case? • Adjust the tension disk 1/2 turn counter clockwise. Tension Trouble shooting checklist • Is the presser foot lever down ? Remember the upper and lower thread play tug of war with the scarf facing the back of the quilt can make the quilt top pucker when you recently changed the needle...
... the thread tension disk clockwise 1/2 turn. • Repeat until stitch quality is threaded thru the thread guide directly above the spool of the bobbin case? • Adjust the tension disk 1/2 turn counter clockwise. Tension Trouble shooting checklist • Is the presser foot lever down ? Remember the upper and lower thread play tug of war with the scarf facing the back of the quilt can make the quilt top pucker when you recently changed the needle...

Manual
Page 31
... free of the quilt. You need to either increase the speed on the track and wheels. Elevating the take up into the back of the Machine • Check for more then 8 hours, replace the needle. • Check that your foot is not rolled too tight on the rails. or threads. Look at the check spring, does the thread lay in your fabric...
... free of the quilt. You need to either increase the speed on the track and wheels. Elevating the take up into the back of the Machine • Check for more then 8 hours, replace the needle. • Check that your foot is not rolled too tight on the rails. or threads. Look at the check spring, does the thread lay in your fabric...
PowerQuiltertm p3 Pillow Project
Page 2
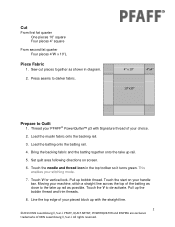
Set quilt area following directions on your choice. 2. Touch the needle and thread icon in diagram. 2. Touch the start on screen. 6. Touch V for vertical lock. Touch the V to Quilt 1. Pull up bobbin thread. Thread your PFAFF® PowerQuilter™ p3 with the straight line. 2 ©2013 KSIN Luxembourg ll, S.ar.l. Load the muslin fabric onto the backing rail. 3. Press seams to darker fabric. 4" x 10" 4"x4" 10"x10" Prepare to de...
Set quilt area following directions on your choice. 2. Touch the needle and thread icon in diagram. 2. Touch the start on screen. 6. Touch V for vertical lock. Touch the V to Quilt 1. Pull up bobbin thread. Thread your PFAFF® PowerQuilter™ p3 with the straight line. 2 ©2013 KSIN Luxembourg ll, S.ar.l. Load the muslin fabric onto the backing rail. 3. Press seams to darker fabric. 4" x 10" 4"x4" 10"x10" Prepare to de...


