
Owner's Manual
Page 2
... Electrical connection Foot control Disengaging motor Removing bobbin case and bobbin Disengaging the sewing mechanism Bobbin winding Inserting the bobbin Inserting the bobbin case Upper threading Threadingtheneedle Drawing up the ... 807 Utility stitches, models 802 to 807 Stretch stitches, models 806, 807 Thread tensions Changing the needle Reverse sewing Dropping the machine feed Changing the sewing foot Sewing feet Special sewing feet Buttonhole settings Sewing buttonholes Fitting detachable workplate Changing the light bulb Cleaning and oiling Trouble shooting Page 1 1 2 2 3 3...
... Electrical connection Foot control Disengaging motor Removing bobbin case and bobbin Disengaging the sewing mechanism Bobbin winding Inserting the bobbin Inserting the bobbin case Upper threading Threadingtheneedle Drawing up the ... 807 Utility stitches, models 802 to 807 Stretch stitches, models 806, 807 Thread tensions Changing the needle Reverse sewing Dropping the machine feed Changing the sewing foot Sewing feet Special sewing feet Buttonhole settings Sewing buttonholes Fitting detachable workplate Changing the light bulb Cleaning and oiling Trouble shooting Page 1 1 2 2 3 3...
Owner's Manual
Page 4
...12 Reverse feed control 13 Base (on portable machines) 14 Needle plate 15 Bed cover 16 Sewing foot holder with sewing foot 17 Sewing foot retaining screw 18 Presser bar with thread cutter 19 Needle thread tension 20 Presser bar lifter (on back of your sewing machine 1 Take-up lever 2 Thread guide 3 Bobbin... tension stud (for United Kingdom only! b) Make sure you unplug the lead whenever you have to change the needle, sewing foot, bobbin or needle plate, or when you clean or oil...
...12 Reverse feed control 13 Base (on portable machines) 14 Needle plate 15 Bed cover 16 Sewing foot holder with sewing foot 17 Sewing foot retaining screw 18 Presser bar with thread cutter 19 Needle thread tension 20 Presser bar lifter (on back of your sewing machine 1 Take-up lever 2 Thread guide 3 Bobbin... tension stud (for United Kingdom only! b) Make sure you unplug the lead whenever you have to change the needle, sewing foot, bobbin or needle plate, or when you clean or oil...

Owner's Manual
Page 5
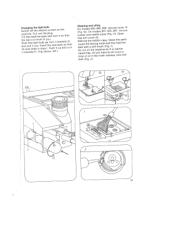
Foot control receptacle Remove this proce dure, making sure the bottom of the cover (G), move them back up (H) and then remove the cover (I). Before putting the machine away after sewing replace the receptacle in the slot. To replace the cover, reverse this receptacle from the machine for sewing. On models 800, 802 and 806 place it into the free arm. 7 -/ 800,802,806 4/- J 1 Removing the carrying case cover Open the hinges on models 801, 803 and 807 push it on the bed plate, and on both sides of the hinge catches properly in its original position.
Foot control receptacle Remove this proce dure, making sure the bottom of the cover (G), move them back up (H) and then remove the cover (I). Before putting the machine away after sewing replace the receptacle in the slot. To replace the cover, reverse this receptacle from the machine for sewing. On models 800, 802 and 806 place it into the free arm. 7 -/ 800,802,806 4/- J 1 Removing the carrying case cover Open the hinges on models 801, 803 and 807 push it on the bed plate, and on both sides of the hinge catches properly in its original position.
Owner's Manual
Page 6
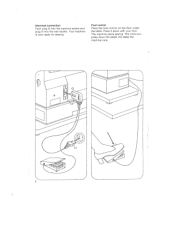
Foot control Place the foot control on the floor under the table. Your machine is now ready for sewing. Press it down the pedal, the faster the machine runs. 2 The machine starts sewing. The more you press down with your foot. Electrical connection Push plug G into the machine socket and plug H into the wall socket.
Foot control Place the foot control on the floor under the table. Your machine is now ready for sewing. Press it down the pedal, the faster the machine runs. 2 The machine starts sewing. The more you press down with your foot. Electrical connection Push plug G into the machine socket and plug H into the wall socket.
Owner's Manual
Page 17
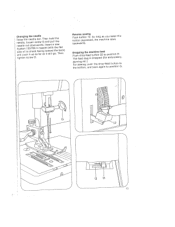
Reverse sewing Push button 12. As long as you button depressed, the machine keep sews this backwards. embroidery, darning etc.) For sewing, push the the bottom, and back drop-feed button again to position to The feed dog is dropped (for position H. CRnSnsaieneyhadeedisaesddtneellpogemeutfi,hnsoielhg1tous3otnti0sthsedh/eee7uoand0pwnnl5kesenaceswHrbfdeaaaflnwcarrei.rdenesTGag.dshlaIteeoinntnwsd(wewhairlpiortltdulhadlgltotnhhtt.heeheweTebfhlaaectnk) tighten screw G. Dropping the machine feed Push drop-feed button 22 to G. '4 GH 13
Reverse sewing Push button 12. As long as you button depressed, the machine keep sews this backwards. embroidery, darning etc.) For sewing, push the the bottom, and back drop-feed button again to position to The feed dog is dropped (for position H. CRnSnsaieneyhadeedisaesddtneellpogemeutfi,hnsoielhg1tous3otnti0sthsedh/eee7uoand0pwnnl5kesenaceswHrbfdeaaaflnwcarrei.rdenesTGag.dshlaIteeoinntnwsd(wewhairlpiortltdulhadlgltotnhhtt.heeheweTebfhlaaectnk) tighten screw G. Dropping the machine feed Push drop-feed button 22 to G. '4 GH 13
Owner's Manual
Page 23
...the light bulb up, turn it towards bulb so up and G that the top is in slots I. H>. Clean round the sewing hook and the the parts machine fDdneraoeondpnceowo-tifftrohoeiliela.thisnAeolftlhtmyebaorcuhuhosihohnakev(eFraaisgtco.eitwId)i.oas ymisnaopiwuntteaand then (Fig. Remove the bobbin case. below, left.) Cleaning and oiling On models 800...so that turn it and pull it towards H. (Fig. Push it out. On models 801, screws and needle plate remove cover 15 803, 807: remove (Fig. Open free arm cover 24. Insert the new its pins slide in front of you. G). Changing the ...
...the light bulb up, turn it towards bulb so up and G that the top is in slots I. H>. Clean round the sewing hook and the the parts machine fDdneraoeondpnceowo-tifftrohoeiliela.thisnAeolftlhtmyebaorcuhuhosihohnakev(eFraaisgtco.eitwId)i.oas ymisnaopiwuntteaand then (Fig. Remove the bobbin case. below, left.) Cleaning and oiling On models 800...so that turn it and pull it towards H. (Fig. Push it out. On models 801, screws and needle plate remove cover 15 803, 807: remove (Fig. Open free arm cover 24. Insert the new its pins slide in front of you. G). Changing the ...


