
Owner's Manual
Page 3
...Threading the right looper Threading the left looper / threading slide Threading the left and right needle Needle threader Thread reel change on safety How to observe during sewing Thread cutter Securing the seam Setting the standard thread tensions Possibilities requiring thread tension corrections 3-thread overecige seam Engaging and disengaging Thread tension adjustment the for converter (Hobbylock sewing with 1 needle 788...17 • . . 18 19 21,22 26,27 32 42 43 1 threads Thread chart Adjusting the stitch length Adjusting the differential feed (Hobbylock 788) - .
...Threading the right looper Threading the left looper / threading slide Threading the left and right needle Needle threader Thread reel change on safety How to observe during sewing Thread cutter Securing the seam Setting the standard thread tensions Possibilities requiring thread tension corrections 3-thread overecige seam Engaging and disengaging Thread tension adjustment the for converter (Hobbylock sewing with 1 needle 788...17 • . . 18 19 21,22 26,27 32 42 43 1 threads Thread chart Adjusting the stitch length Adjusting the differential feed (Hobbylock 788) - .
Owner's Manual
Page 5
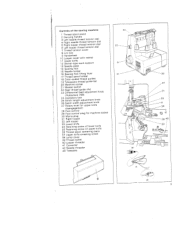
... switch 22 23 Rear thread guide (4x) Differential feed adjustment knob (Hobbylock 788) 24 25 26 Accessory box Stitch length adjustment knob Seam width adjustment knob 27 Rotary lever for upper knife disengagement 28 29 Foot Foot control control plug for machine socket 30 Mains plug 31 Right looper 32 Left looper 33 34 35 36...
... switch 22 23 Rear thread guide (4x) Differential feed adjustment knob (Hobbylock 788) 24 25 26 Accessory box Stitch length adjustment knob Seam width adjustment knob 27 Rotary lever for upper knife disengagement 28 29 Foot Foot control control plug for machine socket 30 Mains plug 31 Right looper 32 Left looper 33 34 35 36...
Owner's Manual
Page 9
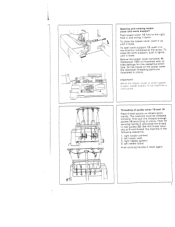
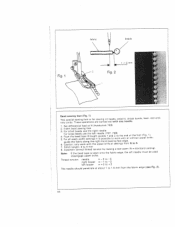
...power supply to colors. Behind the looper cover converter 41 (Hobbylock 788) is inrorrupted. lmportantl While the ooøer cover or work support s open work support, push it lightly until it in colors. First pull the threads through guides 18 according to the machine...slide settings for the respective stitch type. Set the thread tensi ons at N and thread the machine in rear guides 22. left looper (redl 3. right needle (green) 4. right looper (yellowl 2. Threading of the looper cover the individual threading paths are illustrated in the direction indicated by the ...
...power supply to colors. Behind the looper cover converter 41 (Hobbylock 788) is inrorrupted. lmportantl While the ooøer cover or work support s open work support, push it lightly until it in colors. First pull the threads through guides 18 according to the machine...slide settings for the respective stitch type. Set the thread tensi ons at N and thread the machine in rear guides 22. left looper (redl 3. right needle (green) 4. right looper (yellowl 2. Threading of the looper cover the individual threading paths are illustrated in the direction indicated by the ...
Owner's Manual
Page 20
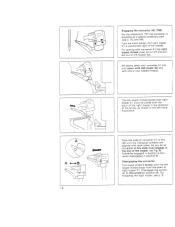
A +-.B 18 Engaging the converter (HL 788) For the Hobbylock 787 the converter is positioned right of the looper, see Fig. All seams sewn with converter 41 are aligned with left until right looper 31 is available as shown in the left looper thread placed over the point of the right looper in the direction of right looper 31. A. Converter engaged = position A Con...
A +-.B 18 Engaging the converter (HL 788) For the Hobbylock 787 the converter is positioned right of the looper, see Fig. All seams sewn with converter 41 are aligned with left until right looper 31 is available as shown in the left looper thread placed over the point of the right looper in the direction of right looper 31. A. Converter engaged = position A Con...
Owner's Manual
Page 46
... 1 .5 mm from the fabric edge (see Fig. 2). 44 Thread tension: needle = -3 to -5 right looper = -1 to +3 The needle should penetrate at N (Hobbylock 788) 2. sewing foot is sewn onto the fabric edge, the left looper = ÷2 to -3 left needle must be used (disengage upper knife). without upper N to 4 mm Ascertain correct thread tension by making a test seam (N = standard setting), Note...
... 1 .5 mm from the fabric edge (see Fig. 2). 44 Thread tension: needle = -3 to -5 right looper = -1 to +3 The needle should penetrate at N (Hobbylock 788) 2. sewing foot is sewn onto the fabric edge, the left looper = ÷2 to -3 left needle must be used (disengage upper knife). without upper N to 4 mm Ascertain correct thread tension by making a test seam (N = standard setting), Note...
Owner's Manual
Page 51
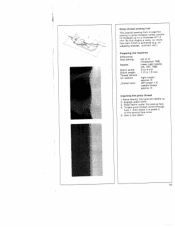
Engage upper knife. N Inserting the gimp thread 1 .Raise sewing foot and set at N (Hobbylock 788) insert right needle (HL 787, 788) 3 to 4 mm 1.0 to a thickness of the sewing foot shoe. 5. Place fabric under the sewing foot. 4. By this means...of 1.0 mm. Preparing the machine Differential feed setting: Needle: Stitch width: Stitch length: Thread tension (cf. Thread gimp thread (cord) through hole 1, then place it in gimp threads (cords, synthe tic threads) up . 2. 3. N left looper + 5 needle thread approx. Sew a test seam. 49 section ,,Rolled hem): set needle up to 1.5...
Engage upper knife. N Inserting the gimp thread 1 .Raise sewing foot and set at N (Hobbylock 788) insert right needle (HL 787, 788) 3 to 4 mm 1.0 to a thickness of the sewing foot shoe. 5. Place fabric under the sewing foot. 4. By this means...of 1.0 mm. Preparing the machine Differential feed setting: Needle: Stitch width: Stitch length: Thread tension (cf. Thread gimp thread (cord) through hole 1, then place it in gimp threads (cords, synthe tic threads) up . 2. 3. N left looper + 5 needle thread approx. Sew a test seam. 49 section ,,Rolled hem): set needle up to 1.5...


