

Owner's Manual
Page 2
... of electric schock: 1. openings of the sewing machine and foot controller free from outlet. 9. Switch the sewing machine off ("0") position, then remove plug from the accumulation of lint, dust, and loose cloth. 5. Use this sewing machine only for a sewing machine that has fallen into water or other user servicing adjustments mentioned in this sewing machine. Do not reach for its intended use the proper needle plate. To unplug, grasp the plug, not the cord. 11.
... of electric schock: 1. openings of the sewing machine and foot controller free from outlet. 9. Switch the sewing machine off ("0") position, then remove plug from the accumulation of lint, dust, and loose cloth. 5. Use this sewing machine only for a sewing machine that has fallen into water or other user servicing adjustments mentioned in this sewing machine. Do not reach for its intended use the proper needle plate. To unplug, grasp the plug, not the cord. 11.
Owner's Manual
Page 3
... knife Changing the lower knife Upper knife arresting Cleaning the knives Oiling the machine Stitch selection table Sewing problems and their removal Accessories Thread spool net/thread unreeling disc Mounting of the Converter Special accessories Specifications / contents of the sewing machine Accessory box Electrical connection Master switch and sewing light Foot control Notes on safety How to handle the thread Opening the looper cover spool stand and the swivel-type work support. threads Thread chart Adjusting the stitch length Adjusting the differential feed (Hobbylock...
... knife Changing the lower knife Upper knife arresting Cleaning the knives Oiling the machine Stitch selection table Sewing problems and their removal Accessories Thread spool net/thread unreeling disc Mounting of the Converter Special accessories Specifications / contents of the sewing machine Accessory box Electrical connection Master switch and sewing light Foot control Notes on safety How to handle the thread Opening the looper cover spool stand and the swivel-type work support. threads Thread chart Adjusting the stitch length Adjusting the differential feed (Hobbylock...
Owner's Manual
Page 5
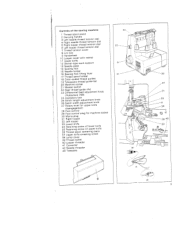
...7 Thread tension cover 8 Lint box 9 Handwheel 1 0 Looper cover with recess 11 12 Upper knife Swivel-type work support 1 3 Needle plate 14 Sewing foot 1 5 Needle holder 1 6 Sewing foot lifting lever 1 7 Thread spool holder 18 Color-coded thread guides 1 9 Telescopic thread guide bar 20 Machine socket 21 Master switch 22 23 Rear thread guide (4x) Differential feed adjustment knob (Hobbylock 788) 24 25 26 Accessory box Stitch length adjustment knob Seam width adjustment knob 27 Rotary lever for upper knife disengagement 28 29 Foot Foot control control plug for machine...
...7 Thread tension cover 8 Lint box 9 Handwheel 1 0 Looper cover with recess 11 12 Upper knife Swivel-type work support 1 3 Needle plate 14 Sewing foot 1 5 Needle holder 1 6 Sewing foot lifting lever 1 7 Thread spool holder 18 Color-coded thread guides 1 9 Telescopic thread guide bar 20 Machine socket 21 Master switch 22 23 Rear thread guide (4x) Differential feed adjustment knob (Hobbylock 788) 24 25 26 Accessory box Stitch length adjustment knob Seam width adjustment knob 27 Rotary lever for upper knife disengagement 28 29 Foot Foot control control plug for machine...
Owner's Manual
Page 9
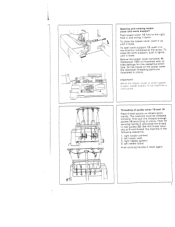
... thread spools on thread s1 poo stands. right needle (green) 4. Opening and closing looper cover and work support 12. Threading of the looper cover the individual threading paths are illustrated in the direction indicated by the arrow. First pull the threads through guides 18 according to the machine is illustrated with its slide settings for the respective stitch type. Behind the looper cover converter 41 (Hobbylock 788) is inrorrupted. Set the thread...
... thread spools on thread s1 poo stands. right needle (green) 4. Opening and closing looper cover and work support 12. Threading of the looper cover the individual threading paths are illustrated in the direction indicated by the arrow. First pull the threads through guides 18 according to the machine is illustrated with its slide settings for the respective stitch type. Behind the looper cover converter 41 (Hobbylock 788) is inrorrupted. Set the thread...

Owner's Manual
Page 13
... hook C, too. Pull the needle threads out of lif ting lever 16. Pull the needle threader to the thread spool. Now pull at the rear side of the needle until the knots are about 10 cm of thread through the respective needle eyes. Thread spool change on spool holders 1 7. Cut the knots off and pull the threads through the looper eye. 11 it in the machine and the new threads...
... hook C, too. Pull the needle threads out of lif ting lever 16. Pull the needle threader to the thread spool. Now pull at the rear side of the needle until the knots are about 10 cm of thread through the respective needle eyes. Thread spool change on spool holders 1 7. Cut the knots off and pull the threads through the looper eye. 11 it in the machine and the new threads...

Owner's Manual
Page 17
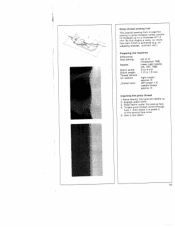
you thread the tensi ons with differently colored threads (e.g. Make the correct adjustment after exami-nation of the interlocking of the individual threads in a seam to their respective looper- Recommendation! Allocation of threads (the illustration on the left shows a correct four-thread overedge seam). Page 16 lists examples for correction of fabric used, on the thread size, and on the thread tension setting. HI! Li 15 and needle thread tensions will...
you thread the tensi ons with differently colored threads (e.g. Make the correct adjustment after exami-nation of the interlocking of the individual threads in a seam to their respective looper- Recommendation! Allocation of threads (the illustration on the left shows a correct four-thread overedge seam). Page 16 lists examples for correction of fabric used, on the thread size, and on the thread tension setting. HI! Li 15 and needle thread tensions will...
Owner's Manual
Page 19
... 9. Left needle 3-thread overedge seam Right needle rnih Standard seam width N UJL Standard seam width N 57mm Max. Seam width adjustments at its right position B (see p. 18). The slide of the right and left needle is used, the set at adjustment knob 26 (3 to 5 mm) only refer to 7.2 mm). i 3-thread overedge seam: Threading of converter 41 must be set value is sewn with two looper threads and one needle thread. seam width...
... 9. Left needle 3-thread overedge seam Right needle rnih Standard seam width N UJL Standard seam width N 57mm Max. Seam width adjustments at its right position B (see p. 18). The slide of the right and left needle is used, the set at adjustment knob 26 (3 to 5 mm) only refer to 7.2 mm). i 3-thread overedge seam: Threading of converter 41 must be set value is sewn with two looper threads and one needle thread. seam width...
Owner's Manual
Page 22
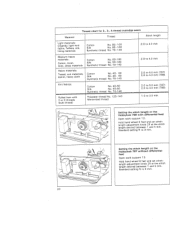
... (788) Knit fabrics: Rolled hem with differential feed Open work support 1 2. Setting the stitch length on the Hobbylock 788 with 2 or 3 threads (bulk thread) Cotton No. 40-60 Silk No. 40-60 Synthetic thread No. 70-140 Polyester thread No. 1 20-140 Mercerized thread 2.0 to 5.0 mm (787) 2.0 to 4.0 mm (788) 1 .0 to 2.0 mm Setting the stitch length on the Hobbylock 787 without differential feed Open work support 1 2. Material Thread chart for 2-, 3-, 4-thread overedge seam Thread Stitch length Light materials: Organdy, light-knit fabric. Standard setting N is...
... (788) Knit fabrics: Rolled hem with differential feed Open work support 1 2. Setting the stitch length on the Hobbylock 788 with 2 or 3 threads (bulk thread) Cotton No. 40-60 Silk No. 40-60 Synthetic thread No. 70-140 Polyester thread No. 1 20-140 Mercerized thread 2.0 to 5.0 mm (787) 2.0 to 4.0 mm (788) 1 .0 to 2.0 mm Setting the stitch length on the Hobbylock 787 without differential feed Open work support 1 2. Material Thread chart for 2-, 3-, 4-thread overedge seam Thread Stitch length Light materials: Organdy, light-knit fabric. Standard setting N is...

Owner's Manual
Page 23
... feed setting of 1.5 - 2 when light fabrics are possible at the same time. Note: The following settings are processed. Adjusting the differential feed on page 22). Set the diffe rential feed according to the material you wish to process (see table on the Hobbylock 788 The differential feed prevents inter-ply shift. It consists of rear feed dog The differential feed can be set separately. Owing to heavy elastic fabrics...
... feed setting of 1.5 - 2 when light fabrics are possible at the same time. Note: The following settings are processed. Adjusting the differential feed on page 22). Set the diffe rential feed according to the material you wish to process (see table on the Hobbylock 788 The differential feed prevents inter-ply shift. It consists of rear feed dog The differential feed can be set separately. Owing to heavy elastic fabrics...

Owner's Manual
Page 27
Set the 4 thread tensions at - 5. j7 7__ // ( y' ' -- Reset all thread tensions to the values set before cleaning. '- / ,-- - (9 I ,- --EZEE __Th 1 .." Press the individual tabs of the arrows, thus loosening the cover, then remove it towards the front. At the points indicated, press thread tension cover 7 in the direction of the thread tension cover in the direction indicated by the arrows in place. or to N. I .- '? Cleaning the thread tensions; Use the cleaning brush (accessories) to ensure proper...
Set the 4 thread tensions at - 5. j7 7__ // ( y' ' -- Reset all thread tensions to the values set before cleaning. '- / ,-- - (9 I ,- --EZEE __Th 1 .." Press the individual tabs of the arrows, thus loosening the cover, then remove it towards the front. At the points indicated, press thread tension cover 7 in the direction of the thread tension cover in the direction indicated by the arrows in place. or to N. I .- '? Cleaning the thread tensions; Use the cleaning brush (accessories) to ensure proper...

Owner's Manual
Page 29
... of the sewing machine: Needle: Sewing foot: Seam width: Stitch length: Thread: remove left needle / insert right needle engage rolled-hem foot ,,R" from 3.0 to 4.0 mm (depending on material) from 1 .0 to 2.0 mm (short stitch length) polyester thread 120-140 for green and yellow tensions Threading path: 1. needle thread, green path polyester thread polyester thread polyester thread For threading of the machine, as described above. Tension setting: Red thread tension, right looper Yellow thread tension, left looper Green thread tension,, needle thread fold-over 3-thread hem.
... of the sewing machine: Needle: Sewing foot: Seam width: Stitch length: Thread: remove left needle / insert right needle engage rolled-hem foot ,,R" from 3.0 to 4.0 mm (depending on material) from 1 .0 to 2.0 mm (short stitch length) polyester thread 120-140 for green and yellow tensions Threading path: 1. needle thread, green path polyester thread polyester thread polyester thread For threading of the machine, as described above. Tension setting: Red thread tension, right looper Yellow thread tension, left looper Green thread tension,, needle thread fold-over 3-thread hem.

Owner's Manual
Page 31
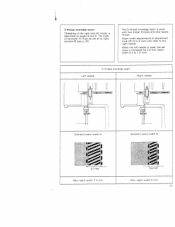
... on these machines: System 130/705 H (75-90) Adsiezltpeheounusdgeshd,otnhweethcreoecrmroeamcttemrnieaenleddalnendesetihdzeele thread size 75-90. Change lower knife 33, see page 30. Inserting the needle The needle flat side of has to be inserted with its highest position. Changing the needles Pull out the sewing foot. An incorrectly inserted cause thread breakage needle will and skipped stitches. Hsderoinvldesrct,hreaewndneApeudollrleBthwewitihnthetehtdheleetwsdmeoeawzllenrwssc,arrledowso. Notes: The following needles are available as spare parts. Lower the Turn...
... on these machines: System 130/705 H (75-90) Adsiezltpeheounusdgeshd,otnhweethcreoecrmroeamcttemrnieaenleddalnendesetihdzeele thread size 75-90. Change lower knife 33, see page 30. Inserting the needle The needle flat side of has to be inserted with its highest position. Changing the needles Pull out the sewing foot. An incorrectly inserted cause thread breakage needle will and skipped stitches. Hsderoinvldesrct,hreaewndneApeudollrleBthwewitihnthetehtdheleetwsdmeoeawzllenrwssc,arrledowso. Notes: The following needles are available as spare parts. Lower the Turn...

Owner's Manual
Page 36
... light medium heavy 34 biue 5 - -5 -4 2 2 - -1 green red 2 - 2 - Stitch type Fabric (see p. 42 and 46). setting to the application, i.e. For HL 787 the converter is available as a special accessory part (see table on the type of fabric, the fabric thickness, and the thread used. For all 2-thread seams and for thread tension, basic settings that stitch length, needle size, and the differential feed have to be selected according to the seam width (see ill, at position A. The sewing foot...
... light medium heavy 34 biue 5 - -5 -4 2 2 - -1 green red 2 - 2 - Stitch type Fabric (see p. 42 and 46). setting to the application, i.e. For HL 787 the converter is available as a special accessory part (see table on the type of fabric, the fabric thickness, and the thread used. For all 2-thread seams and for thread tension, basic settings that stitch length, needle size, and the differential feed have to be selected according to the seam width (see ill, at position A. The sewing foot...
Owner's Manual
Page 42
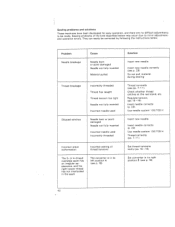
... needle used Incorrectly threaded Incorrect stitch corformation incorrect setting of the kind described below . They can easily be corrected by following the instructions below may occur due to be made. Sewing problems and solutions These machines have been developed for easy operation, and there are no difficult adjustments to minor adjustment. and operation errors. Regulate tension, (pp.15-16) Insert needle correctly (p. 29> Use needle system 1 30/705 H Insert new needle Insert needle correctly (p. 29> Use needle...
... needle used Incorrectly threaded Incorrect stitch corformation incorrect setting of the kind described below . They can easily be corrected by following the instructions below may occur due to be made. Sewing problems and solutions These machines have been developed for easy operation, and there are no difficult adjustments to minor adjustment. and operation errors. Regulate tension, (pp.15-16) Insert needle correctly (p. 29> Use needle system 1 30/705 H Insert new needle Insert needle correctly (p. 29> Use needle...

Owner's Manual
Page 44
... 4 Tweezers 5 Upper knife 6 Thread unreeling disc 7 Needles 8 9 Sewing machine oii Rolled hem sewing foot (R) 10 Sewing foot N2 11 Sewing foot N3 1 2 Thread spool net 13 Needle threader 2 Description of specia' accessories on pp.43-50 Elastic tape sewing foot Part No. 29-924 993-80/000 Taping foot Part No. 29-924 993-82/000 Blindstitch sewing foot Part No. 29-924 993-81/000 O6 Bead sewing foot Part No. 29-924 993-83/000 Cording foot Part No. 29...
... 4 Tweezers 5 Upper knife 6 Thread unreeling disc 7 Needles 8 9 Sewing machine oii Rolled hem sewing foot (R) 10 Sewing foot N2 11 Sewing foot N3 1 2 Thread spool net 13 Needle threader 2 Description of specia' accessories on pp.43-50 Elastic tape sewing foot Part No. 29-924 993-80/000 Taping foot Part No. 29-924 993-82/000 Blindstitch sewing foot Part No. 29-924 993-81/000 O6 Bead sewing foot Part No. 29-924 993-83/000 Cording foot Part No. 29...

Owner's Manual
Page 45
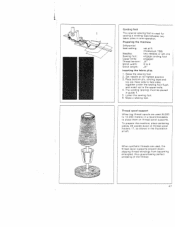
... feed setting: set at N (Hobbylock 788) Needle: insert the right needle Sewing foot: insert blindstitch foot Stitch width: Stitch length: longest stitch length Thread tension: N" (red, yellow, blue> The hem is used for synthetic threads which tend to become loose, unravel and slip down , as item 6 of the needle in Fig. Remove thread spool centering piece 36 from the thread reel pin. This avoids shifting of guide -2-. Thread unreeling disc B The thread unreeling disc shown as shown in the outer fabric Loosen adjusting screw...
... feed setting: set at N (Hobbylock 788) Needle: insert the right needle Sewing foot: insert blindstitch foot Stitch width: Stitch length: longest stitch length Thread tension: N" (red, yellow, blue> The hem is used for synthetic threads which tend to become loose, unravel and slip down , as item 6 of the needle in Fig. Remove thread spool centering piece 36 from the thread reel pin. This avoids shifting of guide -2-. Thread unreeling disc B The thread unreeling disc shown as shown in the outer fabric Loosen adjusting screw...

Owner's Manual
Page 48
... needle by turning adjusting screw -3-. 6. Ii! Preparing the machine Differential feed setting: Needles: set at N (Hobbylock 788) use 1 or 2 needles, deoending on tape wiath Stitch width: Stitch length: Thread tension: 3 to 5 mm (adjustable for sewing on 1 tapes. Disengage upper knife. 3. Adjust location of the needle. Set the converter at highest position. 2. On stretch materials (knitwear) the seams are prevented from right. 4. For operation, see page 18. 46 Taping foot This special sewing foot is sewn on. Place fabric in guides -1- from stretching...
... needle by turning adjusting screw -3-. 6. Ii! Preparing the machine Differential feed setting: Needles: set at N (Hobbylock 788) use 1 or 2 needles, deoending on tape wiath Stitch width: Stitch length: Thread tension: 3 to 5 mm (adjustable for sewing on 1 tapes. Disengage upper knife. 3. Adjust location of the needle. Set the converter at highest position. 2. On stretch materials (knitwear) the seams are prevented from right. 4. For operation, see page 18. 46 Taping foot This special sewing foot is sewn on. Place fabric in guides -1- from stretching...
Owner's Manual
Page 49
... operation Preparing the machine Differential feed setting: Needles: Sewing foot: Upper knife: Thread tension: Stitch width: Stitch length: set at its highest position 3. Set needle at N (Hobbylock 788) two needles or left . Lower the sewing foot. 6. To prepare the machine, place centering pieces 36 upside down slipping thread windings from becoming entangled, thus guaranteeing perfect unreeling of the thread. 47 The cording (piping) must be placed in guide 1. 5. Raise the sewing foot 2. Cording foot 1 This special sewing foot s used for sewing a cording tape between two fabric...
... operation Preparing the machine Differential feed setting: Needles: Sewing foot: Upper knife: Thread tension: Stitch width: Stitch length: set at its highest position 3. Set needle at N (Hobbylock 788) two needles or left . Lower the sewing foot. 6. To prepare the machine, place centering pieces 36 upside down slipping thread windings from becoming entangled, thus guaranteeing perfect unreeling of the thread. 47 The cording (piping) must be placed in guide 1. 5. Raise the sewing foot 2. Cording foot 1 This special sewing foot s used for sewing a cording tape between two fabric...

Owner's Manual
Page 50
... fabric plies 1. Set needle at N (Hobbylock 788) Needles: Sewing foot: Upper knife: Needle thread tension: Stitch length: two or one operation. Raise the sewing foot. 2. 3. Make a sewing test. 48 3 1 Shirring foot (Hobbylock 788) This special sewing foot is used for joi ning two pieces of fabric and shIrring the bottom ply in opening 3 lush with the bottom ply (face side to face side), and insert up to stop 4. 5. Preparing the machine Differential feed setting: set at Place bottom its highest position...
... fabric plies 1. Set needle at N (Hobbylock 788) Needles: Sewing foot: Upper knife: Needle thread tension: Stitch length: two or one operation. Raise the sewing foot. 2. 3. Make a sewing test. 48 3 1 Shirring foot (Hobbylock 788) This special sewing foot is used for joi ning two pieces of fabric and shIrring the bottom ply in opening 3 lush with the bottom ply (face side to face side), and insert up to stop 4. 5. Preparing the machine Differential feed setting: set at Place bottom its highest position...
Owner's Manual
Page 51
... knife. Place fabric under the sewing foot. 4. Preparing the machine Differential feed setting: Needle: Stitch width: Stitch length: Thread tension (cf. Thread gimp thread (cord) through hole 1, then place it in gimp threads (cords, synthe tic threads) up . 2. 3. more firm hem finish is used for sewing in guide 2 of 1.0 mm. Sew a test seam. 49 N Inserting the gimp thread 1 .Raise sewing foot and set at N (Hobbylock 788) insert right needle (HL 787, 788) 3 to 4 mm 1.0 to a thickness of the sewing foot shoe. 5. Gimp thread sewing foot This special sewing foot is...
... knife. Place fabric under the sewing foot. 4. Preparing the machine Differential feed setting: Needle: Stitch width: Stitch length: Thread tension (cf. Thread gimp thread (cord) through hole 1, then place it in gimp threads (cords, synthe tic threads) up . 2. 3. more firm hem finish is used for sewing in guide 2 of 1.0 mm. Sew a test seam. 49 N Inserting the gimp thread 1 .Raise sewing foot and set at N (Hobbylock 788) insert right needle (HL 787, 788) 3 to 4 mm 1.0 to a thickness of the sewing foot shoe. 5. Gimp thread sewing foot This special sewing foot is...


