
Owner's Manual
Page 4
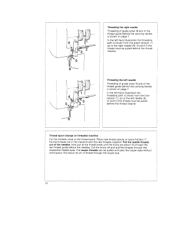
... sewing light Foot control Notes on safety Installing the thread spool stand Opening the looper cover Threading guide wires 18 and the thread guides behind the carrying handle . 4-thread overedge seam Threading the right looper Threading the left looper Threading the left and right needle Thread reel change on hobbylock 784 and 786 Adjusting the differential feed (hobbyfock 786) . . Disengaging...
... sewing light Foot control Notes on safety Installing the thread spool stand Opening the looper cover Threading guide wires 18 and the thread guides behind the carrying handle . 4-thread overedge seam Threading the right looper Threading the left looper Threading the left and right needle Thread reel change on hobbylock 784 and 786 Adjusting the differential feed (hobbyfock 786) . . Disengaging...
Owner's Manual
Page 5
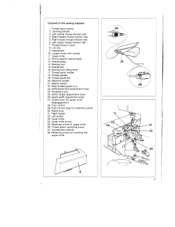
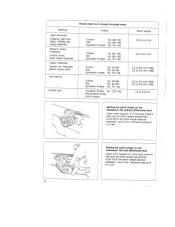
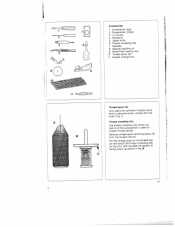
I Controls of the sewing machine 1 Thread spool stand 2 Carrying handle 3 Left needle thread tension dial 4 Right needle thread tension dial 5 Right looper thread tension dial 6 Left looper thread tension dial 7 Thread tension cover 8 Lint box 9 Handwheel 10 Looper cover with recess 11 Upper knife 12 Work support (swivel-...13 Needle plate 14 Sewing foot 15 Needle bar 16 Sewing foot lifting lever 17 Thread spool holder 18 Thread guides 19 Thread guide bar 20 Machine socket 21 Master switch 22 Rear thread guide (4 x) 23 Differential feed adjustment knob 24 Accessory box 25 Stitch length adjustment...
I Controls of the sewing machine 1 Thread spool stand 2 Carrying handle 3 Left needle thread tension dial 4 Right needle thread tension dial 5 Right looper thread tension dial 6 Left looper thread tension dial 7 Thread tension cover 8 Lint box 9 Handwheel 10 Looper cover with recess 11 Upper knife 12 Work support (swivel-...13 Needle plate 14 Sewing foot 15 Needle bar 16 Sewing foot lifting lever 17 Thread spool holder 18 Thread guides 19 Thread guide bar 20 Machine socket 21 Master switch 22 Rear thread guide (4 x) 23 Differential feed adjustment knob 24 Accessory box 25 Stitch length adjustment...

Owner's Manual
Page 8
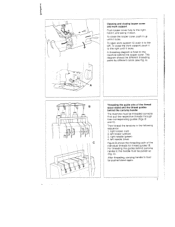
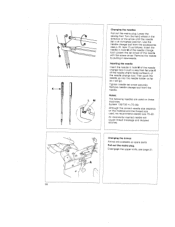
Push thread guiding part 18 into guide bar 19. Pull up to the screw head. Tighten 4 / - Insert thread spool stand 1 from the top. ______I / A Installing the thread spool stand Loosen clamp screw A a little and pull washer up guide bar and align it so that I thread guides 18 are exactly above the spool holders. 6 Insert four thread spool holders 17 with centering pieces 36 fully in the holes of the thread spool stand. clamp screw A securely.
Push thread guiding part 18 into guide bar 19. Pull up to the screw head. Tighten 4 / - Insert thread spool stand 1 from the top. ______I / A Installing the thread spool stand Loosen clamp screw A a little and pull washer up guide bar and align it so that I thread guides 18 are exactly above the spool holders. 6 Insert four thread spool holders 17 with centering pieces 36 fully in the holes of the thread spool stand. clamp screw A securely.
Owner's Manual
Page 9
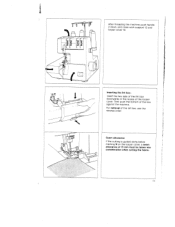
... must be pushed down . B and C). C). A threacing diagram is fixed to the right until it locks. This diagram shows the different threading paths by different colors (see Fig. First pull the respective threads through their corresponding guides (Figs. I n E1 H Opening and closing looper cover and work support 12, push it to the left...
... must be pushed down . B and C). C). A threacing diagram is fixed to the right until it locks. This diagram shows the different threading paths by different colors (see Fig. First pull the respective threads through their corresponding guides (Figs. I n E1 H Opening and closing looper cover and work support 12, push it to the left...
Owner's Manual
Page 10
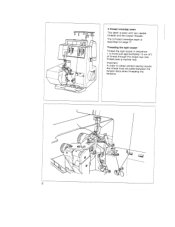
21 - 3 4 - 75 - 4-thread overedge seam This seam is described on page 17. Important: In order to 9 and pull approximately 10 cm (4") of thread through the looper eye (the thread path is marked red). If' 5, /2 / 8 1 5 H 6 8 Threading the right looper: Thread the right looper in sequence 1 to obtain perfect sewing results, the thread must be pulled between the tension discs when threading the tensions. The 3-thread overedge seam is sewn with two needle threads and two looper threads.
21 - 3 4 - 75 - 4-thread overedge seam This seam is described on page 17. Important: In order to 9 and pull approximately 10 cm (4") of thread through the looper eye (the thread path is marked red). If' 5, /2 / 8 1 5 H 6 8 Threading the right looper: Thread the right looper in sequence 1 to obtain perfect sewing results, the thread must be pulled between the tension discs when threading the tensions. The 3-thread overedge seam is sewn with two needle threads and two looper threads.
Owner's Manual
Page 12
... from the green tension (1> up to the left -hand illustration the threading path is shown on page 7. .1 H- •f? 3 111.3 rrc 2 -3 5 Threading the right needle Threading of guide wires 18 and of the thread guide behind the carrying handle is shown from the blue tension (1) up...of the needles. Place new thread spools on threaded machine Cut the threads close to the thread spool. Tie the threads still in the machine and the new threads together. The looper threads can be pulled behind the thread retainer. In the left needle (6>. Thread spool change on spool holders 17...
... from the green tension (1> up to the left -hand illustration the threading path is shown on page 7. .1 H- •f? 3 111.3 rrc 2 -3 5 Threading the right needle Threading of guide wires 18 and of the thread guide behind the carrying handle is shown from the blue tension (1) up...of the needles. Place new thread spools on threaded machine Cut the threads close to the thread spool. Tie the threads still in the machine and the new threads together. The looper threads can be pulled behind the thread retainer. In the left needle (6>. Thread spool change on spool holders 17...
Owner's Manual
Page 13
I -J / / Inserting the lint box: downwards the cover. looper cover 10. Then push the bottom of the box against the machine. I After threading the machine, push handle 2 down, and close work support 12 and - the lint box, use the I Seam allowance If the cutting is guided along below 1
I -J / / Inserting the lint box: downwards the cover. looper cover 10. Then push the bottom of the box against the machine. I After threading the machine, push handle 2 down, and close work support 12 and - the lint box, use the I Seam allowance If the cutting is guided along below 1
Owner's Manual
Page 14
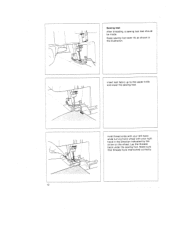
Insert test fabric up to the upper knife and lower the sewing foot. I I 'N I I / / . / -- - . . Make sure that threads have interlocked correctly. 12 Sewing test After threading, a sewing test test should be made. Raise sewing foot lever 16, as shown in the direction indicated by the arrow on the wheel. Lay the threads back under the sewing foot. - - 'I \\ Hold thread ends with your left hand while turning hand wheel with your right hand in the illustration.
Insert test fabric up to the upper knife and lower the sewing foot. I I 'N I I / / . / -- - . . Make sure that threads have interlocked correctly. 12 Sewing test After threading, a sewing test test should be made. Raise sewing foot lever 16, as shown in the direction indicated by the arrow on the wheel. Lay the threads back under the sewing foot. - - 'I \\ Hold thread ends with your left hand while turning hand wheel with your right hand in the illustration.
Owner's Manual
Page 16
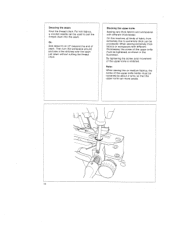
... screw, axial movement of seam. For knit fabrics, a crochet needle can be tightened, as shown in the illustration. Securing the seam: Knot the thread chain. When sewing extremely thick fabrics or workpieces with different thicknesses: On this machine, all kinds of the upper knife holder must be used to... extremely thick can move axially. 14 Note: When sewing thin or medium fabrics, the screw of fabric from extremely thin to pull the thread chain into the seam. Or: Sew about 2 turns, so that the upper knife can be loosened by about 5 cm (2") beyond the end ...
... screw, axial movement of seam. For knit fabrics, a crochet needle can be tightened, as shown in the illustration. Securing the seam: Knot the thread chain. When sewing extremely thick fabrics or workpieces with different thicknesses: On this machine, all kinds of the upper knife holder must be used to... extremely thick can move axially. 14 Note: When sewing thin or medium fabrics, the screw of fabric from extremely thin to pull the thread chain into the seam. Or: Sew about 2 turns, so that the upper knife can be loosened by about 5 cm (2") beyond the end ...

Owner's Manual
Page 18
Top side DC Reverse side The right looper thread C is too tight (red thread tension> or the left looper thread D is too tight (yellow thread tension) or the right looper thread C too loose (red thread tension). 16 When turned in (+) direction, the tension is too loose (blue thread tension). J The right needle thread B is decreased. The left looper thread D too loose (yellow thread tension). - The left needle thread A is increased. Correcting the thread tensions When the thread tension is turned in (-) direction it is too loose (green thread tension).
Top side DC Reverse side The right looper thread C is too tight (red thread tension> or the left looper thread D is too tight (yellow thread tension) or the right looper thread C too loose (red thread tension). 16 When turned in (+) direction, the tension is too loose (blue thread tension). J The right needle thread B is decreased. The left looper thread D too loose (yellow thread tension). - The left needle thread A is increased. Correcting the thread tensions When the thread tension is turned in (-) direction it is too loose (green thread tension).

Owner's Manual
Page 19
The left or right needle must be removed. seam width 7.2 mm Standard seam width N 3.5 mm Max. fl Left needle 3-thread overedge seam Right needle !J Standard seam width N * 5,7 mm Max. seam width 5 mm 17 I 3-thread overedge seam: The with 3-thread overedge seam two looper threads and is sewn one needle thread.
The left or right needle must be removed. seam width 7.2 mm Standard seam width N 3.5 mm Max. fl Left needle 3-thread overedge seam Right needle !J Standard seam width N * 5,7 mm Max. seam width 5 mm 17 I 3-thread overedge seam: The with 3-thread overedge seam two looper threads and is sewn one needle thread.
Owner's Manual
Page 20
... 40-60 No. 40-60 No. 70-140 Cotton Silk Synthetic thread No. 40-60 No. 40-60 No. 70-140 Polyester thread No. 120-140 Mercerized thread (bulk thread) Stitch length 2.0 to 4.0 mm 2.0 to 4.0 mm 2.0 to 5.0 mm (784) 2.0 to 4.0 mm (786) 2.0 to 5.0 mm (784) 2.0 to 4.0 mm (786) 1.0 to 2.0 mm ,J ... desired between 1 and 4 mm. Setting the stitch length on the hobbylock 786 with differential feed Open work support 12. Standard setting N Standard setting N is3mm. / / - / c\L-_ t/>7 A . .i,___c( Setting the stitch length on the hobbylock 784 without differential feed Open work support 12.
... 40-60 No. 40-60 No. 70-140 Cotton Silk Synthetic thread No. 40-60 No. 40-60 No. 70-140 Polyester thread No. 120-140 Mercerized thread (bulk thread) Stitch length 2.0 to 4.0 mm 2.0 to 4.0 mm 2.0 to 5.0 mm (784) 2.0 to 4.0 mm (786) 2.0 to 5.0 mm (784) 2.0 to 4.0 mm (786) 1.0 to 2.0 mm ,J ... desired between 1 and 4 mm. Setting the stitch length on the hobbylock 786 with differential feed Open work support 12. Standard setting N Standard setting N is3mm. / / - / c\L-_ t/>7 A . .i,___c( Setting the stitch length on the hobbylock 784 without differential feed Open work support 12.

Owner's Manual
Page 23
... in the hole of the axial upper knife guide fully to the right, hold it, and turn it may be necessary to re-adjust the thread tension. 21 cA - The desired seam width is set with N (3.5 mm). If necessary, loosen screw 38 for blocking the upper knife, see page 14, Sew...
... in the hole of the axial upper knife guide fully to the right, hold it, and turn it may be necessary to re-adjust the thread tension. 21 cA - The desired seam width is set with N (3.5 mm). If necessary, loosen screw 38 for blocking the upper knife, see page 14, Sew...

Owner's Manual
Page 25
... bulb of the housing. 23 Inserting the light bulb: Insert the new bulb (15 Watt max.) with both hands to the right. Cleaning the thread tensions: Pull thread tension cover 7 with the pins in retainers A of the sewing light is situated. Removing the light bulb: Push the light bulb upwards and turn...
... bulb of the housing. 23 Inserting the light bulb: Insert the new bulb (15 Watt max.) with both hands to the right. Cleaning the thread tensions: Pull thread tension cover 7 with the pins in retainers A of the sewing light is situated. Removing the light bulb: Push the light bulb upwards and turn...
Owner's Manual
Page 27
... set higher or lower. Tension setting: YRGeerldeloetwnhrttehharrdeeaatddenttseeinnossniio,onnri,,gnhletefetlodlooleoppethrerread Depending on material and thread, the respective thread tension must be set higher or lower. 25 Thread: bulk thread - ster thread. Depending on material and thread, the round edge, Fig. right looper, red path polyester thread 2. 3. "N" to approx. "N" approx. "N" +5 approx. "N" to - 1 approx. 'N" to 11. right looper, red path...
... set higher or lower. Tension setting: YRGeerldeloetwnhrttehharrdeeaatddenttseeinnossniio,onnri,,gnhletefetlodlooleoppethrerread Depending on material and thread, the respective thread tension must be set higher or lower. 25 Thread: bulk thread - ster thread. Depending on material and thread, the round edge, Fig. right looper, red path polyester thread 2. 3. "N" to approx. "N" approx. "N" +5 approx. "N" to - 1 approx. 'N" to 11. right looper, red path...
Owner's Manual
Page 28
... Changing the knives are used on these machines: System 130/705 H (75-90) Although the correct needle size depends on the material and the thread size used, we recommend needle size 75-90. Disengage the upper knife, see p. 31, tern 11) as follows: Insert the needle in the... direction of the needle change tool. Remove the needle by pulling it will cause thread breakage and skipped stitches. -,/y - ___;_ . \c;;-rI - An incorrectly inserted needle will go. Use the needle change tool from the accessories (see page ...
... Changing the knives are used on these machines: System 130/705 H (75-90) Although the correct needle size depends on the material and the thread size used, we recommend needle size 75-90. Disengage the upper knife, see p. 31, tern 11) as follows: Insert the needle in the... direction of the needle change tool. Remove the needle by pulling it will cause thread breakage and skipped stitches. -,/y - ___;_ . \c;;-rI - An incorrectly inserted needle will go. Use the needle change tool from the accessories (see page ...
Owner's Manual
Page 32
...pages 7-10). Insert needle correctly (page 26). Incorrectly threaded. Thread correctly (see page 26). Use needle system 130/705 H Thread correctly (pages 7-10). Incorrect setting of thread tensions. Thread has caught due to be corrected by following the instructions ...or point damaged. Insert needle correctly (page 26). Sewing problems of the kind described below . Thread breakage Incorrectly threaded. Incorrect needle used . Puckered seams 30 Thread tension too tight. Needle not fully inserted. Material pulled. Regulate tension. (pages 15, 1...
...pages 7-10). Insert needle correctly (page 26). Incorrectly threaded. Thread correctly (see page 26). Use needle system 130/705 H Thread correctly (pages 7-10). Incorrect setting of thread tensions. Thread has caught due to be corrected by following the instructions ...or point damaged. Insert needle correctly (page 26). Sewing problems of the kind described below . Thread breakage Incorrectly threaded. Incorrect needle used . Puckered seams 30 Thread tension too tight. Needle not fully inserted. Material pulled. Regulate tension. (pages 15, 1...
Owner's Manual
Page 33
... II#ICIIIII*IIIiIlI, Bfl E '1 Accessories 1 Screwdriver (big) t 2 Screwdriver (small) 3 Lint brush 4 Tweezers 5 Upper knife 6 Thread unreeling disc 7 Needles 8 Sewing machine oil I 9 Rolled hem sewing foot 10 Thread spool net 11 Needle change tool I item 6 of the accessories is used for synthetic... threads which 1 tend to become loose, unravel and slip down , as I Thread spool net Very useful for smaller thread spools. Thread unreeling disc The thread unreeling disc ...
... II#ICIIIII*IIIiIlI, Bfl E '1 Accessories 1 Screwdriver (big) t 2 Screwdriver (small) 3 Lint brush 4 Tweezers 5 Upper knife 6 Thread unreeling disc 7 Needles 8 Sewing machine oil I 9 Rolled hem sewing foot 10 Thread spool net 11 Needle change tool I item 6 of the accessories is used for synthetic... threads which 1 tend to become loose, unravel and slip down , as I Thread spool net Very useful for smaller thread spools. Thread unreeling disc The thread unreeling disc ...
Owner's Manual
Page 34
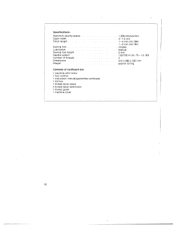
no . 75- Specifications: Maximum sewing speed Seam width Stitch length Sewing foot Lubrication Sewing foot height Needle system Number of threads Dimensions Weight Contents of cardboard box 1 machine with motor 1 foot control 1 instruction manual/guarantee certificate 1 lint box 1 thread spool stand 4 thread spool stand bars 1 thread guide 1 machine cover 1.300 stitches/mm. 3-7.2mm 1 -4 mm (HL-786) 1 -5 mm (HL-784) Hinged Manual 5mm 130/705 H (no . 90) 4 315 x 280 x 330mm approx. 8.0 kg 32
no . 75- Specifications: Maximum sewing speed Seam width Stitch length Sewing foot Lubrication Sewing foot height Needle system Number of threads Dimensions Weight Contents of cardboard box 1 machine with motor 1 foot control 1 instruction manual/guarantee certificate 1 lint box 1 thread spool stand 4 thread spool stand bars 1 thread guide 1 machine cover 1.300 stitches/mm. 3-7.2mm 1 -4 mm (HL-786) 1 -5 mm (HL-784) Hinged Manual 5mm 130/705 H (no . 90) 4 315 x 280 x 330mm approx. 8.0 kg 32


