
Owner's Manual
Page 4
...31 32 32 Disengaging the upper knife Adjusting the seam width Changing the sewing foot Changing the light bulb Cleaning the thread tensions Rolled hems Changing the needles Changing the knives Changing the upper knife Changing the lower knife Oiling the machine Sewing problems ...their removal Accessories Thread spool net/thread unreeling disc Specifications Contents of the upper knite Setting the standard thread tensions Correcting the thread tensions 3-thread overedge seam Thread chart Adjusting the stitch length on hobbylock 784 and 786 Adjusting the differential feed (hobbyfock 786) . .
...31 32 32 Disengaging the upper knife Adjusting the seam width Changing the sewing foot Changing the light bulb Cleaning the thread tensions Rolled hems Changing the needles Changing the knives Changing the upper knife Changing the lower knife Oiling the machine Sewing problems ...their removal Accessories Thread spool net/thread unreeling disc Specifications Contents of the upper knite Setting the standard thread tensions Correcting the thread tensions 3-thread overedge seam Thread chart Adjusting the stitch length on hobbylock 784 and 786 Adjusting the differential feed (hobbyfock 786) . .
Owner's Manual
Page 5
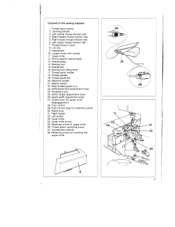
I Controls of the sewing machine 1 Thread spool stand 2 Carrying handle 3 Left needle thread tension dial 4 Right needle thread tension dial 5 Right looper thread tension dial 6 Left looper thread tension dial 7 Thread tension cover 8 Lint box 9 Handwheel 10 Looper cover with recess 11 Upper knife 12 Work support (swivel-type) 13 Needle plate 14 Sewing foot 15...
I Controls of the sewing machine 1 Thread spool stand 2 Carrying handle 3 Left needle thread tension dial 4 Right needle thread tension dial 5 Right looper thread tension dial 6 Left looper thread tension dial 7 Thread tension cover 8 Lint box 9 Handwheel 10 Looper cover with recess 11 Upper knife 12 Work support (swivel-type) 13 Needle plate 14 Sewing foot 15...
Owner's Manual
Page 9
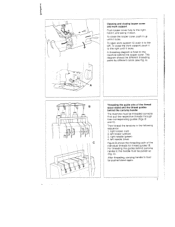
... open work support 12, push it to the machine behind the carrying handle The machine must be threaded correctly. right looper (red) 2. Then thread the tensions in the following sequence: 1. C). hold it, and swing it locks. A threacing diagram is fixed to the left looper (yellow) 3. left . For threading the guides oehind...
... open work support 12, push it to the machine behind the carrying handle The machine must be threaded correctly. right looper (red) 2. Then thread the tensions in the following sequence: 1. C). hold it, and swing it locks. A threacing diagram is fixed to the left looper (yellow) 3. left . For threading the guides oehind...
Owner's Manual
Page 10
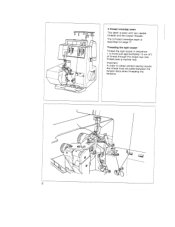
Threading the right looper: Thread the right looper in sequence 1 to obtain perfect sewing results, the thread must be pulled between the tension discs when threading the tensions. If' 5, /2 / 8 1 5 H 6 8 Important: In order to 9 and pull approximately 10 cm (4") of thread through the looper eye (the thread path is described on page 17. The 3-thread overedge seam is marked red). 21 - 3 4 - 75 - 4-thread overedge seam This seam is sewn with two needle threads and two looper threads.
Threading the right looper: Thread the right looper in sequence 1 to obtain perfect sewing results, the thread must be pulled between the tension discs when threading the tensions. If' 5, /2 / 8 1 5 H 6 8 Important: In order to 9 and pull approximately 10 cm (4") of thread through the looper eye (the thread path is described on page 17. The 3-thread overedge seam is marked red). 21 - 3 4 - 75 - 4-thread overedge seam This seam is sewn with two needle threads and two looper threads.
Owner's Manual
Page 12
... thread must be pulled behind the thread retainer. •L!J :'1i : Ll rk Threading the left -hand illustration the threading path is shown from the green tension (1> up to the thread spool. Now pull at the thread ends until past the last thread guide before the needles. .1 H- •f? 3 111.3 rrc 2 -3 5 Threading the... 17. Place new thread spools on threaded machine Cut the threads close to the left -hand illustration the threading path is shown from the blue tension (1) up to the right needle (6>. In the left needle (6>.
... thread must be pulled behind the thread retainer. •L!J :'1i : Ll rk Threading the left -hand illustration the threading path is shown from the green tension (1> up to the thread spool. Now pull at the thread ends until past the last thread guide before the needles. .1 H- •f? 3 111.3 rrc 2 -3 5 Threading the... 17. Place new thread spools on threaded machine Cut the threads close to the left -hand illustration the threading path is shown from the blue tension (1) up to the right needle (6>. In the left needle (6>.

Owner's Manual
Page 18
The left needle thread A is too tight (yellow thread tension) or the right looper thread C too loose (red thread tension). 16 The left looper thread D too loose (yellow thread tension). - J The right needle thread B is decreased. When turned in (+) direction, the tension is too tight (red thread tension> or the left looper thread D is too loose (blue thread tension). Correcting the thread tensions When the thread tension is turned in (-) direction it is too loose (green thread tension). Top side DC Reverse side The right looper thread C is increased.
The left needle thread A is too tight (yellow thread tension) or the right looper thread C too loose (red thread tension). 16 The left looper thread D too loose (yellow thread tension). - J The right needle thread B is decreased. When turned in (+) direction, the tension is too tight (red thread tension> or the left looper thread D is too loose (blue thread tension). Correcting the thread tensions When the thread tension is turned in (-) direction it is too loose (green thread tension). Top side DC Reverse side The right looper thread C is increased.

Owner's Manual
Page 23
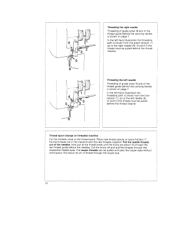
... lever 27 of the axial upper knife guide fully to the right, hold it, and turn it may be necessary to re-adjust the thread tension. 21 Note: After adjusting the seam width, it forwards until pin A engages in the hole of the knife. When processing thick fabrics, securely tighten screw...
... lever 27 of the axial upper knife guide fully to the right, hold it, and turn it may be necessary to re-adjust the thread tension. 21 Note: After adjusting the seam width, it forwards until pin A engages in the hole of the knife. When processing thick fabrics, securely tighten screw...

Owner's Manual
Page 25
... bulb: Push the light bulb upwards and turn it fully to remove dust and lint from between the tensions. Cleaning the thread tensions: Pull thread tension cover 7 with the accessories to the left. Replace the thread tension cover by engageing the tabs of arrow) and remove it , the light bulb of the housing. 23...
... bulb: Push the light bulb upwards and turn it fully to remove dust and lint from between the tensions. Cleaning the thread tensions: Pull thread tension cover 7 with the accessories to the left. Replace the thread tension cover by engageing the tabs of arrow) and remove it , the light bulb of the housing. 23...
Owner's Manual
Page 27
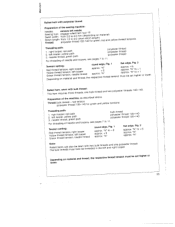
...: Needle: Sewing foot: Seam width: Stitch length: Thread: reffperrnooomgmmlyaoegv31see..t00elrreottooflttlhe42rnd..e00eahedm(edsmlmh1eo2f0r(ot-does1ttp4i"et0cRnhf"doirlneggnrgeotehnn),mraetderiaanld) yellow thread tensions Threading path: polyester thread 1. "N" flat edge, Fig. Thread: bulk thread - "N" 2 +5 Note: Rolled hems can...with bulk thread: three threads, one bulk thread and two polyester threads 120-140. red tension polyester thread 120-140 for green and yellow tensions Threading path: 1. right looper, red path 2. 3, left looper, yellow path needle thread,...
...: Needle: Sewing foot: Seam width: Stitch length: Thread: reffperrnooomgmmlyaoegv31see..t00elrreottooflttlhe42rnd..e00eahedm(edsmlmh1eo2f0r(ot-does1ttp4i"et0cRnhf"doirlneggnrgeotehnn),mraetderiaanld) yellow thread tensions Threading path: polyester thread 1. "N" flat edge, Fig. Thread: bulk thread - "N" 2 +5 Note: Rolled hems can...with bulk thread: three threads, one bulk thread and two polyester threads 120-140. red tension polyester thread 120-140 for green and yellow tensions Threading path: 1. right looper, red path 2. 3, left looper, yellow path needle thread,...
Owner's Manual
Page 32
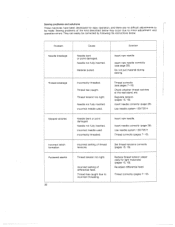
...). Incorrect needle used . Check whether thread catches at the reel stand, etc. Insert needle correctly (page 26). Reduce thread tension (espe cially for easy operation, and there are no difficult adjustments to be corrected by following the instructions below may occur due... to incorrect threading. Solution Insert new needle. Incorrect needle used . Incorrect setting of thread tensions. Sewing problems of the kind described below . Thread has caught. Thread correctly (see page 26). Problem ______ Needle breakage ...
...). Incorrect needle used . Check whether thread catches at the reel stand, etc. Insert needle correctly (page 26). Reduce thread tension (espe cially for easy operation, and there are no difficult adjustments to be corrected by following the instructions below may occur due... to incorrect threading. Solution Insert new needle. Incorrect needle used . Incorrect setting of thread tensions. Sewing problems of the kind described below . Thread has caught. Thread correctly (see page 26). Problem ______ Needle breakage ...


