
Owner's Manual
Page 1
77" OPERATiNG iNSTRUCTION
77" OPERATiNG iNSTRUCTION
Owner's Manual
Page 2
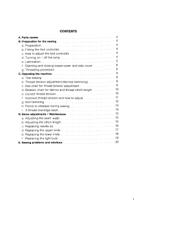
Parts names 2 B. Preparation 4 b. Turning on / off the lamp 4 e. Labrication 5 f. Incorrect thread tension and how to adjust the foot controller 4 d. Roll hemming 12 h. Adjusting the seam width 15 b. Replacing the upper knife 17 e. Fitting the foot controller 4 c. Opening and closing looper cover and side cover 6 g. Test sewing 9 b. Replacing needle (s) 16 d. CONTENTS A. How to adjust 11 g. Correct thread tension 10 1. Replacing the light bulb 19 E. Operating the machine 9 a. Some adjustments / Maintenance 15 a. Relation ...
Parts names 2 B. Preparation 4 b. Turning on / off the lamp 4 e. Labrication 5 f. Incorrect thread tension and how to adjust the foot controller 4 d. Roll hemming 12 h. Adjusting the seam width 15 b. Replacing the upper knife 17 e. Fitting the foot controller 4 c. Opening and closing looper cover and side cover 6 g. Test sewing 9 b. Replacing needle (s) 16 d. CONTENTS A. How to adjust 11 g. Correct thread tension 10 1. Replacing the light bulb 19 E. Operating the machine 9 a. Some adjustments / Maintenance 15 a. Relation ...

Owner's Manual
Page 4
• Accessories Accessories case Screw driver Screw driver (For needle) Tweezers • Specifications Maximum speed Overlock seam width Stitch length Presser foot Presser foot lift Needle Number of threads Lubrication Dimentions Net weight 1 300 s.p.m. 35mm (standard) 1.0 5.0mm Hinged 5mm 130/705H No.75- No.90 4 Manual 278(W) x 264(D) >< 310(H) 7Kg Brush for dusting Roll hemming presser foot Upper knife Thread stripping discs (4 pcs.) Oiler • Looper mechanism Needle • Controller Dust cover 3
• Accessories Accessories case Screw driver Screw driver (For needle) Tweezers • Specifications Maximum speed Overlock seam width Stitch length Presser foot Presser foot lift Needle Number of threads Lubrication Dimentions Net weight 1 300 s.p.m. 35mm (standard) 1.0 5.0mm Hinged 5mm 130/705H No.75- No.90 4 Manual 278(W) x 264(D) >< 310(H) 7Kg Brush for dusting Roll hemming presser foot Upper knife Thread stripping discs (4 pcs.) Oiler • Looper mechanism Needle • Controller Dust cover 3
Owner's Manual
Page 5
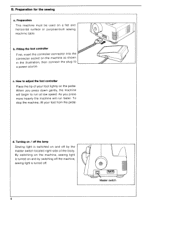
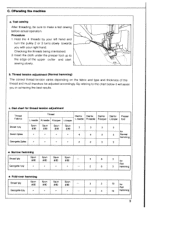
... Sewing light is turned off by switching off the machine, sewing light is switched on the pedal. c. b. By switching on the machine, sewing light is turned on and by the master switch located right side of your foot from the pedal. Fitting the foot controller First, insert the controller connector into the connector socket on a flat and horizontal surface or purpose-built sewing machine table. How to adjust the foot controller...
... Sewing light is turned off by switching off the machine, sewing light is switched on the pedal. c. b. By switching on the machine, sewing light is turned on and by the master switch located right side of your foot from the pedal. Fitting the foot controller First, insert the controller connector into the connector socket on a flat and horizontal surface or purpose-built sewing machine table. How to adjust the foot controller...
Owner's Manual
Page 6
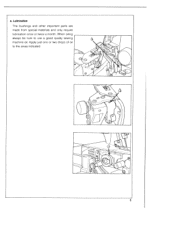
Apply just one or two drops of oil to use a good quality sewing machine oil. Lubrication The bushings and other important parts are made from special materials and only require lubrication once or twice a month. e. When oiling always be sure to the areas indicated. 5
Apply just one or two drops of oil to use a good quality sewing machine oil. Lubrication The bushings and other important parts are made from special materials and only require lubrication once or twice a month. e. When oiling always be sure to the areas indicated. 5
Owner's Manual
Page 7
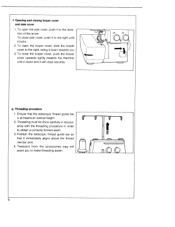
... immediately aligns above the thread reel bar pins. 4. Threading must be done carefully in accord ance with the threading procedure in order to the direc tion of the arrow. Position the telescopic thread guide bar so that the telescopic thread guide bar is at maximum vertical height. 2. To close the looper cover, push the looper cover upwards lightly towards the machine until it locks. 2. Ensure that it...
... immediately aligns above the thread reel bar pins. 4. Threading must be done carefully in accord ance with the threading procedure in order to the direc tion of the arrow. Position the telescopic thread guide bar so that the telescopic thread guide bar is at maximum vertical height. 2. To close the looper cover, push the looper cover upwards lightly towards the machine until it locks. 2. Ensure that it...

Owner's Manual
Page 9
... on those illustrated on the Tension Dial Diagram (4), this will identify the threads being used . Once you are satisfied that different coloured threads are used. Be careful when passing these threads through the machine, so as to avoid any breakage of thread that are to be helpful in the initial stage, (before commencing to sew with respective needle and looper. Then proceed to...
... on those illustrated on the Tension Dial Diagram (4), this will identify the threads being used . Once you are satisfied that different coloured threads are used. Be careful when passing these threads through the machine, so as to avoid any breakage of thread that are to be helpful in the initial stage, (before commencing to sew with respective needle and looper. Then proceed to...
Owner's Manual
Page 10
... *80 3 Georgette i • • • - 2 6 3 for Roll 6 3 hemming 3 10 for Roll 3 10 hemming 9 OPerating the machine a. Procedure 1. Thread tension adjustment (Normal hemming) The correct thread tension varies depending on the fabric and type and thickness of the upper cutter and start sewing slowly. b. Test sewing After threading, be sure to the edge of the thread and must therefore be adjusted accordingly. Checking the threads being interlocked. 2. By refering to the chart...
... *80 3 Georgette i • • • - 2 6 3 for Roll 6 3 hemming 3 10 for Roll 3 10 hemming 9 OPerating the machine a. Procedure 1. Thread tension adjustment (Normal hemming) The correct thread tension varies depending on the fabric and type and thickness of the upper cutter and start sewing slowly. b. Test sewing After threading, be sure to the edge of the thread and must therefore be adjusted accordingly. Checking the threads being interlocked. 2. By refering to the chart...

Owner's Manual
Page 11
Relation chart for fadrica and thread stitch length Normal h.nimlng Roll mg Fabrics Light Organdy, light-knit fabric, Taffeta, silk,lining materials Mdlum Cotton, tricot, linen, dress materials H.avy Tweed, suit materials, denim, heavy cloth KnIt tadrica george tte c Thr.ad Cotton No.80-100 Silk No.80-100 Synthetic thread No.80 Cotton No.60-100 Silk No...
Relation chart for fadrica and thread stitch length Normal h.nimlng Roll mg Fabrics Light Organdy, light-knit fabric, Taffeta, silk,lining materials Mdlum Cotton, tricot, linen, dress materials H.avy Tweed, suit materials, denim, heavy cloth KnIt tadrica george tte c Thr.ad Cotton No.80-100 Silk No.80-100 Synthetic thread No.80 Cotton No.60-100 Silk No...

Owner's Manual
Page 12
The sketch shows the right needle thread tension is too loose. 4. The sketch shows the right looper thread tension is too loose. 3. The sketch shows the left looper thread tension is too loose. 2. The sketch shows the left needle thread tension is too loose. 11 f. Incorrect thread tension and how to adjust 1.
The sketch shows the right needle thread tension is too loose. 4. The sketch shows the right looper thread tension is too loose. 3. The sketch shows the left looper thread tension is too loose. 2. The sketch shows the left needle thread tension is too loose. 11 f. Incorrect thread tension and how to adjust 1.
Owner's Manual
Page 13
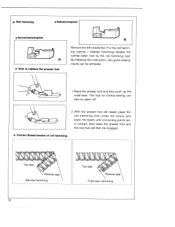
... lever. By following this instruction, very good sewing results can then be taken off. 2. The foot for normal sewing can be engaged. • Correct thread tension of roll hemming Top side Narrow hemming 12 Top side Fold-over hemming With the presser foot still raised, place the roll hemming foot under the shank and lower the shank until connecting points are in contact, then lower the presser foot and the new foot...
... lever. By following this instruction, very good sewing results can then be taken off. 2. The foot for normal sewing can be engaged. • Correct thread tension of roll hemming Top side Narrow hemming 12 Top side Fold-over hemming With the presser foot still raised, place the roll hemming foot under the shank and lower the shank until connecting points are in contact, then lower the presser foot and the new foot...

Owner's Manual
Page 14
... during sewing • Place the fabric under the cutter and lower the foot before commencing to sew. • Then slowly sew the first few stitches, the fabric will sew from fine to very heavy fabrics. h. When sewing very heavy fabrics, tighten the upper knife screw. (see illustration). • Caution: When sewing fine fabrics, remember to avoid the possibility of breaking the needles. Caution pushing or pulling of the seam then...
... during sewing • Place the fabric under the cutter and lower the foot before commencing to sew. • Then slowly sew the first few stitches, the fabric will sew from fine to very heavy fabrics. h. When sewing very heavy fabrics, tighten the upper knife screw. (see illustration). • Caution: When sewing fine fabrics, remember to avoid the possibility of breaking the needles. Caution pushing or pulling of the seam then...
Owner's Manual
Page 15
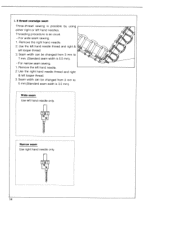
...). Narrow seam Use right hand needle only. Seam width can be changed from 3 mm to 7 mm. (Standard seam width is 5.5 mm). El Iii Ii 14 Remove the left looper thread. 3. Use the left hand needle thread and right & left hand needle. 2. Remove the right hand needle. 2. For narrow seam sewing. 1. Use the right hand needle thread and right & left hand needles. Threading procedure is as usuaJ. For wide seam sewing. 1. i. 3 thread overedge seam Three-thread sewing is...
...). Narrow seam Use right hand needle only. Seam width can be changed from 3 mm to 7 mm. (Standard seam width is 5.5 mm). El Iii Ii 14 Remove the left looper thread. 3. Use the left hand needle thread and right & left hand needle. 2. Remove the right hand needle. 2. For narrow seam sewing. 1. Use the right hand needle thread and right & left hand needles. Threading procedure is as usuaJ. For wide seam sewing. 1. i. 3 thread overedge seam Three-thread sewing is...

Owner's Manual
Page 16
... dial. Wide Narrow seam width seam width After adjusting the seam width, it may be adjusted from 3.0mm to reset the thread tension. To change the stitch length, open the side cover. 2. It can be necessary to 5.0mm when using the different materials. 1. Adjusting the stitch length 1. To make the stitch length shorter select a lower number. 4. After making the adjustment, tighten the feed regulator nut and close the side cover. 15 Open the side cover and looper cover. To make the stitch length...
... dial. Wide Narrow seam width seam width After adjusting the seam width, it may be adjusted from 3.0mm to reset the thread tension. To change the stitch length, open the side cover. 2. It can be necessary to 5.0mm when using the different materials. 1. Adjusting the stitch length 1. To make the stitch length shorter select a lower number. 4. After making the adjustment, tighten the feed regulator nut and close the side cover. 15 Open the side cover and looper cover. To make the stitch length...
Owner's Manual
Page 17
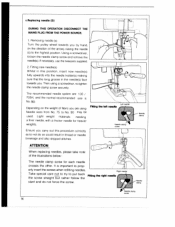
... below: The needle clamp screw for heavier weights. The recommended needle system are using a screwdriver, re-tighten the needle clamp screw securely. Using a screwdriver, loosen the needle clamp screw and remove the needle(s). Ensure you carry out this position, insert new needle(s) fully upwards into the needle holder(s) making sure that the long groove in the direction of the arrow), raising the needle (s) to No. 90 may be used. c.Replacing needle (S) DURING THIS OPERATION DISCONNECT THE MAINS...
... below: The needle clamp screw for heavier weights. The recommended needle system are using a screwdriver, re-tighten the needle clamp screw securely. Using a screwdriver, loosen the needle clamp screw and remove the needle(s). Ensure you carry out this position, insert new needle(s) fully upwards into the needle holder(s) making sure that the long groove in the direction of the arrow), raising the needle (s) to No. 90 may be used. c.Replacing needle (S) DURING THIS OPERATION DISCONNECT THE MAINS...
Owner's Manual
Page 18
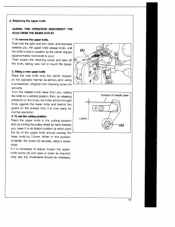
... point the tip of needle plate 17 Turn the release knob away from you , the upper knife release knob, until the knife is now ready for normal operation. 3. To set the cutting position: Place the upper knife in the cutting position and, by turning the pulley wheel by releasing pressure on the presser foot. Replacing the upper knife DURING THIS OPERATION DISCONNECT THE PLUG...
... point the tip of needle plate 17 Turn the release knob away from you , the upper knife release knob, until the knife is now ready for normal operation. 3. To set the cutting position: Place the upper knife in the cutting position and, by turning the pulley wheel by releasing pressure on the presser foot. Replacing the upper knife DURING THIS OPERATION DISCONNECT THE PLUG...
Owner's Manual
Page 19
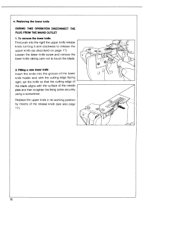
... its working position by means of the needle plate and then re-tighten the fixing screw securely. e. Fitting a new lower knife Insert the knife into the right the upper knile release knob turning it anti-clockwise to release the upper knife (as described on page 1 7) Loosen the lower knife screw and remove the lower knife, taking care not to touch the blade. 2. using a screwdriver. Replacing the lower knife...
... its working position by means of the needle plate and then re-tighten the fixing screw securely. e. Fitting a new lower knife Insert the knife into the right the upper knile release knob turning it anti-clockwise to release the upper knife (as described on page 1 7) Loosen the lower knife screw and remove the lower knife, taking care not to touch the blade. 2. using a screwdriver. Replacing the lower knife...
Owner's Manual
Page 20
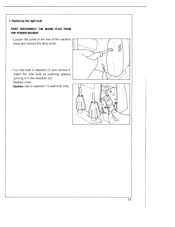
Caution: Use a maximum 1 5 watt bulb only. 19 Replace cover. f. Replacing the light bulb FIRST DISCONNECT THE MAINS PLUG FROM THE POWER SOURCE • Loosen the screw of the rear of the machine body and remove the lamp cover. • Turn the bulb in direction (1) and remove it in the direction (2). Insert the new bulb by pushing upward, turning it .
Caution: Use a maximum 1 5 watt bulb only. 19 Replace cover. f. Replacing the light bulb FIRST DISCONNECT THE MAINS PLUG FROM THE POWER SOURCE • Loosen the screw of the rear of the machine body and remove the lamp cover. • Turn the bulb in direction (1) and remove it in the direction (2). Insert the new bulb by pushing upward, turning it .
Owner's Manual
Page 21
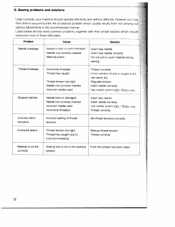
.... Insert new needle correctly. Puckered seams Thread tension too tight Thread has caught due to time encounter the occasional problem which shouki overcome most of thread tensions Set thread tensions correctly. Thread breakage Skipped stitches Incorrectly threaded Thread has caught Thread tension too tight Needle not correctly inserted Incorrect needle used Needle bent or damaged Needle not correctly inserted Incorrect needle used Incorrectly threaded Thread correctly. However you my from not carrying uiit various adjustments in the working Push the presser foot lever down...
.... Insert new needle correctly. Puckered seams Thread tension too tight Thread has caught due to time encounter the occasional problem which shouki overcome most of thread tensions Set thread tensions correctly. Thread breakage Skipped stitches Incorrectly threaded Thread has caught Thread tension too tight Needle not correctly inserted Incorrect needle used Needle bent or damaged Needle not correctly inserted Incorrect needle used Incorrectly threaded Thread correctly. However you my from not carrying uiit various adjustments in the working Push the presser foot lever down...


