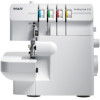

Owner's Manual
Page 2
... parts. If in accordance with relevant National legislation relating to electrical/ electronic products. To reduce the risk of the sewing machine by the manufacturer as threading needle, changing needle, or changing presser foot, etc. • Always unplug sewing machine from the electric outlet immediately after using and before using an electrical...
... parts. If in accordance with relevant National legislation relating to electrical/ electronic products. To reduce the risk of the sewing machine by the manufacturer as threading needle, changing needle, or changing presser foot, etc. • Always unplug sewing machine from the electric outlet immediately after using and before using an electrical...

Owner's Manual
Page 3
... contents Parts of the machine 4 Machine maintenance 20 Accessories 5 Cleaning 20 Connecting the foot control and the power supply ..... 5 Oiling 20 Setting up the telescopic thread stand 6 Replacing the stationary cutter 21 Attaching the waste tray 6 Storage 21 Opening and closing the front cover 6 Servicing 21 Removing and replacing the Á...
... contents Parts of the machine 4 Machine maintenance 20 Accessories 5 Cleaning 20 Connecting the foot control and the power supply ..... 5 Oiling 20 Setting up the telescopic thread stand 6 Replacing the stationary cutter 21 Attaching the waste tray 6 Storage 21 Opening and closing the front cover 6 Servicing 21 Removing and replacing the Á...
Owner's Manual
Page 4
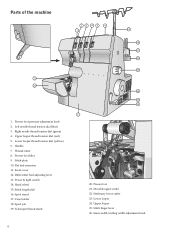
...16 15 14 13 12 21 20 23 22 25 24 26 20. Left needle thread tension dial (blue) 3. Spool stand 17. Presser foot 21. Stationary lower cutter 23. Right needle thread tension dial (green) 4. Front cover 12. Power & light switch 14. Lower looper... 7. Hand wheel 15. Spool pin 19. Flat bed extension 11. Stitch Ànger lever 26. Upper looper 25. Thread cutter 8. Cone holder 18. Presser foot lifter 9. Lower looper thread tension dial (yellow) 6. Stitch plate 10. Movable upper cutter 22. Seam width/cutting width adjustment knob Presser foot pressure ...
...16 15 14 13 12 21 20 23 22 25 24 26 20. Left needle thread tension dial (blue) 3. Spool stand 17. Presser foot 21. Stationary lower cutter 23. Right needle thread tension dial (green) 4. Front cover 12. Power & light switch 14. Lower looper... 7. Hand wheel 15. Spool pin 19. Flat bed extension 11. Stitch Ànger lever 26. Upper looper 25. Thread cutter 8. Cone holder 18. Presser foot lifter 9. Lower looper thread tension dial (yellow) 6. Stitch plate 10. Movable upper cutter 22. Seam width/cutting width adjustment knob Presser foot pressure ...
Owner's Manual
Page 5
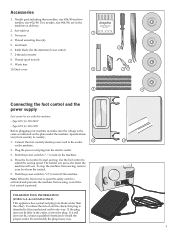
... in a polarized outlet only way. To reduce the risk of electric shock, this machine: - Screwdriver 1 3. Type GTC for the stationary lower cutter) 7. 2-thread converter 8. Type GTE for 100-120V Before plugging your foot from sewing, even if the foot control is the same as indicated on the machine... the power supply Foot control to start sewing. To stop the machine from sewing, remove your machine in the machine on the machine. 4. Thread unreeling discs (4) 5. Press the foot control to use with this plug is activated and prevents the machine from the control. 5. The harder ...
... in a polarized outlet only way. To reduce the risk of electric shock, this machine: - Screwdriver 1 3. Type GTC for the stationary lower cutter) 7. 2-thread converter 8. Type GTE for 100-120V Before plugging your foot from sewing, even if the foot control is the same as indicated on the machine... the power supply Foot control to start sewing. To stop the machine from sewing, remove your machine in the machine on the machine. 4. Thread unreeling discs (4) 5. Press the foot control to use with this plug is activated and prevents the machine from the control. 5. The harder ...

Owner's Manual
Page 6
... is nearly aligned with the groove on the back of the table. Setting up the telescopic thread stand Pull out the spool stand in the direction of the machine. Insert the U-shaped hooks...Áat bed extension Align the projection on the underside of the arrow (A) Extend the telescopic thread stand to the right as far as armholes and overcasting trouser cuffs. The free arm makes it ...hard to reach areas such as it will not sew if the front cover is already threaded, straighten the threads to the right until it snaps A into the net bag while sewing. Close the front...
... is nearly aligned with the groove on the back of the table. Setting up the telescopic thread stand Pull out the spool stand in the direction of the machine. Insert the U-shaped hooks...Áat bed extension Align the projection on the underside of the arrow (A) Extend the telescopic thread stand to the right as far as armholes and overcasting trouser cuffs. The free arm makes it ...hard to reach areas such as it will not sew if the front cover is already threaded, straighten the threads to the right until it snaps A into the net bag while sewing. Close the front...

Owner's Manual
Page 8
... nonworking horizontal position (A). To place the movable upper cutter back in nonworking position 1. Removing the 2-thread overlock converter 1. Put the the 2-thread converter back to the horizontal position. Turn the knob away from the hole of the upper looper....the converter in contact with only two threads. 1. Before sewing, the two-thread converter must trim off any excess fabric to the highest position. 2. Attaching the 2-thread overlock converter 2-thread overlock stitches are sewn using one needle thread and the lower looper thread. Continue to rotate the cutter to ...
... nonworking horizontal position (A). To place the movable upper cutter back in nonworking position 1. Removing the 2-thread overlock converter 1. Put the the 2-thread converter back to the horizontal position. Turn the knob away from the hole of the upper looper....the converter in contact with only two threads. 1. Before sewing, the two-thread converter must trim off any excess fabric to the highest position. 2. Attaching the 2-thread overlock converter 2-thread overlock stitches are sewn using one needle thread and the lower looper thread. Continue to rotate the cutter to ...

Owner's Manual
Page 9
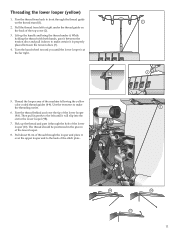
Lower looper threading - (Yellow) 3. Unthread the needle(s) 2. Left needle threading - (Blue) Important: If the lower looper should come unthreaded, do the following order: 1. Threading the machine A color coded diagram is located inside the front cover for quick reference. Right needle threading - (Green) 4. Thread the lower looper 3. When threading the machine, thread only in the following ; 1. Upper looper threading - (Red) 2. Thread the needle(s) 4 3 1 2 9
Lower looper threading - (Yellow) 3. Unthread the needle(s) 2. Left needle threading - (Blue) Important: If the lower looper should come unthreaded, do the following order: 1. Threading the machine A color coded diagram is located inside the front cover for quick reference. Right needle threading - (Green) 4. Thread the lower looper 3. When threading the machine, thread only in the following ; 1. Upper looper threading - (Red) 2. Thread the needle(s) 4 3 1 2 9

Owner's Manual
Page 10
... hands, pass it between the tension discs and pull it is properly placed between the tension discs (3). 2 3 4. Thread the looper area of thread through the thread guides on the top cover (2). 3. Use the tweezers to right under it place to back (8). 6. Pull about 10...machine following the red color coded thread guides (4-7). Lift up the handle and bring the thread behind the lower looper and thread into the hole in the upper looper from left to bring the thread under the thread guide at the back on the thread stand (1). 1 2. Threading the upper looper (red) 1.
... hands, pass it between the tension discs and pull it is properly placed between the tension discs (3). 2 3 4. Thread the looper area of thread through the thread guides on the top cover (2). 3. Use the tweezers to right under it place to back (8). 6. Pull about 10...machine following the red color coded thread guides (4-7). Lift up the handle and bring the thread behind the lower looper and thread into the hole in the upper looper from left to bring the thread under the thread guide at the back on the thread stand (1). 1 2. Threading the upper looper (red) 1.
Owner's Manual
Page 11
... the back of the stitch plate. 9 10 8 7 6 5 9A 9B 10 11 Turn the hand wheel toward you until it . The thread should be positioned in the lower looper (9B). 7. Pass the thread from left until the lower looper is properly placed between the tension discs and pull it over the tip of... the lower looper (10). While holding the thread with both hands, pass it is at the far right. 2 1 3 5. Use the tweezers to right under it will slip into the slot in the groove...
... the back of the stitch plate. 9 10 8 7 6 5 9A 9B 10 11 Turn the hand wheel toward you until it . The thread should be positioned in the lower looper (9B). 7. Pass the thread from left until the lower looper is properly placed between the tension discs and pull it over the tip of... the lower looper (10). While holding the thread with both hands, pass it is at the far right. 2 1 3 5. Use the tweezers to right under it will slip into the slot in the groove...

Owner's Manual
Page 12
... is properly placed between the tension discs (3). 4. Use the tweezers to front through the lower thread path of the thread guide (6). 5. Lift up the handle and bring the thread under the presser foot. 1 2 3 6 4 5 7 8 Threading the left needle (7). Pass the thread from back to the back, under it . Continue to hang free. 7. Pull about 10 cm...
... is properly placed between the tension discs (3). 4. Use the tweezers to front through the lower thread path of the thread guide (6). 5. Lift up the handle and bring the thread under the presser foot. 1 2 3 6 4 5 7 8 Threading the left needle (7). Pass the thread from back to the back, under it . Continue to hang free. 7. Pull about 10 cm...

Owner's Manual
Page 13
...apply a slight tension. 4. If the blades are not moving correctly, check if there are in use near the spool, behind the knot and thread the needle. 8. First note tension dial settings and then turn the tension dials down to the left hand while sewing. Place fabric under the ...presser foot. 2. When you . Cut off the thread chain 2-5 cm behind the presser foot using standard thread spools, place the thread unreeling disc as shown to prevent the thread from the right, then toward you reach the end of the stitch plate. Continue holding the...
...apply a slight tension. 4. If the blades are not moving correctly, check if there are in use near the spool, behind the knot and thread the needle. 8. First note tension dial settings and then turn the tension dials down to the left hand while sewing. Place fabric under the ...presser foot. 2. When you . Cut off the thread chain 2-5 cm behind the presser foot using standard thread spools, place the thread unreeling disc as shown to prevent the thread from the right, then toward you reach the end of the stitch plate. Continue holding the...
Owner's Manual
Page 14
... side 14 Upper looper thread Lower looper thread Right needle thread Left needle thread Upper looper thread Lower looper thread Right needle thread Left needle thread Upper looper thread Lower looper thread Right needle thread Left needle thread Upper looper thread Lower looper thread Right needle thread Left needle thread Upper looper thread Lower looper thread Right needle thread Left needle thread Lower looper thread and upper looper thread should be well...
... side 14 Upper looper thread Lower looper thread Right needle thread Left needle thread Upper looper thread Lower looper thread Right needle thread Left needle thread Upper looper thread Lower looper thread Right needle thread Left needle thread Upper looper thread Lower looper thread Right needle thread Left needle thread Upper looper thread Lower looper thread Right needle thread Left needle thread Lower looper thread and upper looper thread should be well...
Owner's Manual
Page 17
...as it will go in each direction. Set the stitch length dial to "1-2" for rolled edging is achieved by adjusting the thread tension according to the stitch table on your garment. Stitch Ànger lever setting The stitch Ànger lever should ... into the seam. 2-thread rolled edge 3-thread rolled edge 2-thread narrow edge 3-thread narrow edge 17 Tip: For a beautiful rolled edge, thread the upper looper with a decorative thread and the needle and lower looper with lightweight regular thread. 2-thread rolled edge / narrow edge 1. Set the thread tension according to make...
...as it will go in each direction. Set the stitch length dial to "1-2" for rolled edging is achieved by adjusting the thread tension according to the stitch table on your garment. Stitch Ànger lever setting The stitch Ànger lever should ... into the seam. 2-thread rolled edge 3-thread rolled edge 2-thread narrow edge 3-thread narrow edge 17 Tip: For a beautiful rolled edge, thread the upper looper with a decorative thread and the needle and lower looper with lightweight regular thread. 2-thread rolled edge / narrow edge 1. Set the thread tension according to make...

Owner's Manual
Page 18
...sewing A Flatlock Stitch is made by adjusting the tension of the fabric together. The Flatlock Stitch can be the prominent thread that creates the ladder. The needle thread will pull into a straight line at . Fold the fabric piece, wrong sides together, to the stitch table on opposite... sides of fabric (Ornamental Flatlock Stitch). Set the thread tension according to sew a decorative stitch on this stitch. 2. Place the movable upper cutter in the Áatlock stitch. The tensions must...
...sewing A Flatlock Stitch is made by adjusting the tension of the fabric together. The Flatlock Stitch can be the prominent thread that creates the ladder. The needle thread will pull into a straight line at . Fold the fabric piece, wrong sides together, to the stitch table on opposite... sides of fabric (Ornamental Flatlock Stitch). Set the thread tension according to sew a decorative stitch on this stitch. 2. Place the movable upper cutter in the Áatlock stitch. The tensions must...

Owner's Manual
Page 19
... be used to strengthen stitches when joining elastic fabrics such as the seam is attached in the front of the foot. 2. Thread the chain into the seam to secure the threads. 19 Cording prevents knit fabrics from the cutters. Insert the needle into the end of the cutters. The cord is sewn... eyed, hand sewing needle. 2. Corded overlock Corded overlock can be easy to remove and are away from stretching and also stabilize the seams. 1. Securing the thread chain 1.
... be used to strengthen stitches when joining elastic fabrics such as the seam is attached in the front of the foot. 2. Thread the chain into the seam to secure the threads. 19 Cording prevents knit fabrics from the cutters. Insert the needle into the end of the cutters. The cord is sewn... eyed, hand sewing needle. 2. Corded overlock Corded overlock can be easy to remove and are away from stretching and also stabilize the seams. 1. Securing the thread chain 1.

Owner's Manual
Page 22
... have a blunt point. - Check the differential feed. 15 - Trouble shooting Problem Fabric does not feed well Needle breaks Thread breaks Stitches skip Irregular stitches Fabric puckers Irregular trimming Fabric jams Machine does not operate 22 Solution - Increase presser foot pressure ...for tangled or caught thread. - Loosen thread tension. Change type or size of needle. 7 - Use high quality light weight thread. 27 - Use a high quality thread. 27 - Be sure the cutters are in sewing position. - Check for...
... have a blunt point. - Check the differential feed. 15 - Trouble shooting Problem Fabric does not feed well Needle breaks Thread breaks Stitches skip Irregular stitches Fabric puckers Irregular trimming Fabric jams Machine does not operate 22 Solution - Increase presser foot pressure ...for tangled or caught thread. - Loosen thread tension. Change type or size of needle. 7 - Use high quality light weight thread. 27 - Use a high quality thread. 27 - Be sure the cutters are in sewing position. - Check for...

Owner's Manual
Page 23
... sewing on your garment. Woven medium Cotton, chino, wool, satin, etc Stretch medium double knit, velour, swimwear, etc. It may be necessary to adjust the thread tension according to the stitch, type of no greater than half a number at a time. Woven heavy denim, canvas, terrycloth, etc. For best results make tension...
... sewing on your garment. Woven medium Cotton, chino, wool, satin, etc Stretch medium double knit, velour, swimwear, etc. It may be necessary to adjust the thread tension according to the stitch, type of no greater than half a number at a time. Woven heavy denim, canvas, terrycloth, etc. For best results make tension...
Owner's Manual
Page 24
... length Stitch width Differential feed Stitch Ànger 2-thread Thread tension converter B G R Y - 3.5 - 2.0 - 4.0 - 2.0 1 Right 3 R(3.5) - 5.0 - 2.0 S Yes - 3.0 - 2.0 - 4.0 - 2.0 2-thread rolled edge Right 1 1.5 - 5.0 - 2.0 - 3.0 - 2.0 3 1 R Yes - 3.0 - 2.0 Not recommended Right 1 3 1 R Yes - 3.0 - 2.0 2-thread narrow edge Right 1 Right 1 Not recommended - 1.5 - 4.0 3 1 R Yes - 1.5 - 4.0 Not recommended 3 1 R Yes - 2.0 - 4.0 2-thread Áatlock stitch 24 Not recommended 0.0 - - 5.0 0.5 - - 5.0 1 Left 3 R(3.5) 1.0 - - 5.0 S Yes...
... length Stitch width Differential feed Stitch Ànger 2-thread Thread tension converter B G R Y - 3.5 - 2.0 - 4.0 - 2.0 1 Right 3 R(3.5) - 5.0 - 2.0 S Yes - 3.0 - 2.0 - 4.0 - 2.0 2-thread rolled edge Right 1 1.5 - 5.0 - 2.0 - 3.0 - 2.0 3 1 R Yes - 3.0 - 2.0 Not recommended Right 1 3 1 R Yes - 3.0 - 2.0 2-thread narrow edge Right 1 Right 1 Not recommended - 1.5 - 4.0 3 1 R Yes - 1.5 - 4.0 Not recommended 3 1 R Yes - 2.0 - 4.0 2-thread Áatlock stitch 24 Not recommended 0.0 - - 5.0 0.5 - - 5.0 1 Left 3 R(3.5) 1.0 - - 5.0 S Yes...

Owner's Manual
Page 25
... feed Stitch Ànger 2-thread Thread tension converter B G R Y 2.5 - 3.0 3.0 3.0 - 3.0 3.0 1 Left 3 R(3.5) 3.5 - 3.0 3.0 S No 2.5 - 3.0 3.0 3.0 - 3.0 3.0 3-thread overlock stitch, narrow 1.5 3.0 - 3.0 3.0 - 2.5 3.0 3.0 - 3.0 3.0 3.0 1 Right 3 R(3.5) - 3.5 3.0 3.0 S No - 2.5 3.0 3.0 - 3.0 3.0 3.0 3-thread Áatlock stitch, narrow 1.5 - 3.0 3.0 3.0 4.0 - 0.0 8.0 4.0 - 0.0 8.5 Left 2 R(3.5) 1 5.0 - 0.0 8.5 S No 4.0 - 0.0 8.0 5.0 - 0.0 8.5 3-thread stretch overlock 5.0 - 0.0 8.5 - 3.0 1.0 7.0 - 3.5 1.0 7.0 Right 2 R(3.5) 1 - 4.0 1.0 7.0 S No...
... feed Stitch Ànger 2-thread Thread tension converter B G R Y 2.5 - 3.0 3.0 3.0 - 3.0 3.0 1 Left 3 R(3.5) 3.5 - 3.0 3.0 S No 2.5 - 3.0 3.0 3.0 - 3.0 3.0 3-thread overlock stitch, narrow 1.5 3.0 - 3.0 3.0 - 2.5 3.0 3.0 - 3.0 3.0 3.0 1 Right 3 R(3.5) - 3.5 3.0 3.0 S No - 2.5 3.0 3.0 - 3.0 3.0 3.0 3-thread Áatlock stitch, narrow 1.5 - 3.0 3.0 3.0 4.0 - 0.0 8.0 4.0 - 0.0 8.5 Left 2 R(3.5) 1 5.0 - 0.0 8.5 S No 4.0 - 0.0 8.0 5.0 - 0.0 8.5 3-thread stretch overlock 5.0 - 0.0 8.5 - 3.0 1.0 7.0 - 3.5 1.0 7.0 Right 2 R(3.5) 1 - 4.0 1.0 7.0 S No...

Owner's Manual
Page 26
... Needle Stitch position length Stitch width Right 1 3 Differential feed Stitch Ànger 1 R 2-thread Thread tension converter B G R Y - 2.0 5.0 7.0 No - 2.0 5.0 8.0 Not recommended Right 1 3 1 R No - 3.0 4.0 6.0 3-thread narrow edge Right 1 Right 1 Not recommended - 3.0 5.0 3.0 3 1 R No - 3.0 5.0 4.0 Not recommended 3 1 R No - 3.0 5.0 3.0 3-thread Áatlock stitch, wide 4-thread overlock stitch 26 Not recommended 0.5 - 5.0 7.0 0.5 - 5.0 7.0 Left 2 R(3.5) 1 0.5 - 5.0 7.0 S No 0.5 - 5.0 7.0 0.5 - 5.0 7.0 0.5 - 5.0 7.0 2.5 2.5 3.0 3.0 Both...
... Needle Stitch position length Stitch width Right 1 3 Differential feed Stitch Ànger 1 R 2-thread Thread tension converter B G R Y - 2.0 5.0 7.0 No - 2.0 5.0 8.0 Not recommended Right 1 3 1 R No - 3.0 4.0 6.0 3-thread narrow edge Right 1 Right 1 Not recommended - 3.0 5.0 3.0 3 1 R No - 3.0 5.0 4.0 Not recommended 3 1 R No - 3.0 5.0 3.0 3-thread Áatlock stitch, wide 4-thread overlock stitch 26 Not recommended 0.5 - 5.0 7.0 0.5 - 5.0 7.0 Left 2 R(3.5) 1 0.5 - 5.0 7.0 S No 0.5 - 5.0 7.0 0.5 - 5.0 7.0 0.5 - 5.0 7.0 2.5 2.5 3.0 3.0 Both...


