
Owner's Manual
Page 4
...nella presa a muro. Ribaltare Ia mani glia. Togliere il reostato dalla macchina. Electrical connection: Set the foot control on the floor. Sortir le rheostat a pédale P de Ia machine. Lift off cover. Actionner l'interrupteur general R. Pour le ranger, procéder comme indique sur 'illustration. Press...the rear. Take foot control P out of the machine. Stecker P in die Maschine, und Stecker Q in the illustration. Brancher Ia fiche P dans Ia machine et Ia fiche 0 dans Ia prise murale. Premere I'interruttore prin cipale. Insert plug P in the machine and plug 0 in...
...nella presa a muro. Ribaltare Ia mani glia. Togliere il reostato dalla macchina. Electrical connection: Set the foot control on the floor. Sortir le rheostat a pédale P de Ia machine. Lift off cover. Actionner l'interrupteur general R. Pour le ranger, procéder comme indique sur 'illustration. Press...the rear. Take foot control P out of the machine. Stecker P in die Maschine, und Stecker Q in the illustration. Brancher Ia fiche P dans Ia machine et Ia fiche 0 dans Ia prise murale. Premere I'interruttore prin cipale. Insert plug P in the machine and plug 0 in...

Owner's Manual
Page 10
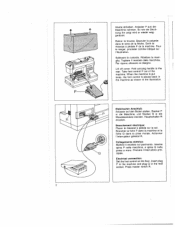
...si rin forza). Ausschnitt S mul3 dabei nach oben zeigeri. Raise latch Q and push the bobbin case onto stud R as far as it will go, making sure cutout S points upwards. 8 Sie mul3 stufenweise niedersinken. (Einstell schraube P nach links...Tension du til de canette: Laisser a pendre Ia boile canette garnie au fil de Ia canette. Relever le loquet et glisser Ia bolte canette, l'ouver a lure S en haul, fond sur le tourillon ft Come inserire Ia capsula della spolina: • Disinserire l'interruttore principale 8. L'aper tura S deve essere rivolta verso l'alto. • Inserting the bobbin case...
...si rin forza). Ausschnitt S mul3 dabei nach oben zeigeri. Raise latch Q and push the bobbin case onto stud R as far as it will go, making sure cutout S points upwards. 8 Sie mul3 stufenweise niedersinken. (Einstell schraube P nach links...Tension du til de canette: Laisser a pendre Ia boile canette garnie au fil de Ia canette. Relever le loquet et glisser Ia bolte canette, l'ouver a lure S en haul, fond sur le tourillon ft Come inserire Ia capsula della spolina: • Disinserire l'interruttore principale 8. L'aper tura S deve essere rivolta verso l'alto. • Inserting the bobbin case...

Owner's Manual
Page 12
... et le releveur de fit se trouvent nouveau en position haute. Girare it fib inferiore in posizione superiore. Putt out the bobbin thread by means of the needle thread. und Unterfaden nach rechts unter den Nähfub3 ...ed inferiore sotto it fib superiore. Place both threads towards you and sew a stitch until both needle and take-up lever are posi tioned up the bobbin thread: Hold the needle thread taut. Close free-arm cover 19. 10 Coucher les deux fits vers l'... wheel towards the right under the sewing foot (approx 10 cm). Verschbul3klappe 19 schlieBen. Chiudere to sportelbo 19.
... et le releveur de fit se trouvent nouveau en position haute. Girare it fib inferiore in posizione superiore. Putt out the bobbin thread by means of the needle thread. und Unterfaden nach rechts unter den Nähfub3 ...ed inferiore sotto it fib superiore. Place both threads towards you and sew a stitch until both needle and take-up lever are posi tioned up the bobbin thread: Hold the needle thread taut. Close free-arm cover 19. 10 Coucher les deux fits vers l'... wheel towards the right under the sewing foot (approx 10 cm). Verschbul3klappe 19 schlieBen. Chiudere to sportelbo 19.

Owner's Manual
Page 17
La cucitura iridietro Premere ii tasto 23. Finchè II tasto rimane premuto Ia macchina cuce indietro. Reverse sewing Press button 23. Couture en marche arrière Abaisser Ia touche 23. RUckwärtsnähen Die Taste 23 niederdrücken. As long as you hold this button the machine sews back wards. 15 Solange die Taste gedruckt wird, nãht die Maschine rückwärts. La machine coud en arrière aussi longtemps que a touche est maintenue en bas.
La cucitura iridietro Premere ii tasto 23. Finchè II tasto rimane premuto Ia macchina cuce indietro. Reverse sewing Press button 23. Couture en marche arrière Abaisser Ia touche 23. RUckwärtsnähen Die Taste 23 niederdrücken. As long as you hold this button the machine sews back wards. 15 Solange die Taste gedruckt wird, nãht die Maschine rückwärts. La machine coud en arrière aussi longtemps que a touche est maintenue en bas.

Owner's Manual
Page 22
...• (système 130/705 H): Mettre Ia a machine hors circuit I'interrupteur general 8. Togliere l'ago. Dropping the feed dog Open free arm cover 19. Schraube P lösen. Neue Nadel (flache Kol ...Changing the needle • (System 130/705 H): Switch off master switch 8. Tighten the screw. Versenkschjeber nach R schieben = versenkt, nach 0 schieben = zum Nhhen. Desserrer Ia vis P et ret irer laiguille. Allentare Ia vite P. Transporteur versenken Klappe 19 öffnen. Push the dropfeed control toward R (feed dog dropped) or toward 0 (sewing position). 20 Loosen screw...
...• (système 130/705 H): Mettre Ia a machine hors circuit I'interrupteur general 8. Togliere l'ago. Dropping the feed dog Open free arm cover 19. Schraube P lösen. Neue Nadel (flache Kol ...Changing the needle • (System 130/705 H): Switch off master switch 8. Tighten the screw. Versenkschjeber nach R schieben = versenkt, nach 0 schieben = zum Nhhen. Desserrer Ia vis P et ret irer laiguille. Allentare Ia vite P. Transporteur versenken Klappe 19 öffnen. Push the dropfeed control toward R (feed dog dropped) or toward 0 (sewing position). 20 Loosen screw...
Owner's Manual
Page 30
... is used a 3-ampere fuse has to be fitted. 28 The wire which is coloured brown must be connected to the terminal which is marked with the letter N or coloured black. Safety rules valid for the united Kingdom only The wires in this mains lead are coloured according to the following code: Blue...: Neutral Brown: Live As the colours of the wires in the mains lead of this appliance may not corre spond with the colour coding of the ter minals in your plug, proceed as follows: the wire which is coloured blue must be connected to the terminal which is marked ...
... is used a 3-ampere fuse has to be fitted. 28 The wire which is coloured brown must be connected to the terminal which is marked with the letter N or coloured black. Safety rules valid for the united Kingdom only The wires in this mains lead are coloured according to the following code: Blue...: Neutral Brown: Live As the colours of the wires in the mains lead of this appliance may not corre spond with the colour coding of the ter minals in your plug, proceed as follows: the wire which is coloured blue must be connected to the terminal which is marked ...
Owner's Manual
Page 31
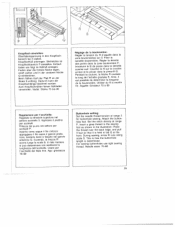
... sewing buttonholes use light sewing thread. Usare per occhielti P. Set the stitch density at range 3 for buttonhole sewing. Nadet: Stärke 70 bis 80 Reglage de Ia boutonniere: Régler Ia tension du fit d'aiguille dans Ia zone boutonnières sur 3. Knopflochful3 anbringen. Pendant a couture, a flèche R coulisse le long de l'échelle graduee S. Ago: grossezza 70-80 Buttonhole setting: Set the needle thread tension...
... sewing buttonholes use light sewing thread. Usare per occhielti P. Set the stitch density at range 3 for buttonhole sewing. Nadet: Stärke 70 bis 80 Reglage de Ia boutonniere: Régler Ia tension du fit d'aiguille dans Ia zone boutonnières sur 3. Knopflochful3 anbringen. Pendant a couture, a flèche R coulisse le long de l'échelle graduee S. Ago: grossezza 70-80 Buttonhole setting: Set the needle thread tension...

Owner's Manual
Page 35
... ed inferiore (3) e avvolgere il gambo (4) e annodare i fili. Lower the needle into the right hole of the button. Pull the needle and bobbin threads through (3). Sewing on buttons with clear-view foot Stitch: D Feed: Dropped Thread: Fine sewing thread Place the button in the location marked beforehand and push it under the sewing foot holder. Place a match on buttons Sewing foot: Without sewing foot or with stems (for large buttons in maniera che l'ago, girando ii volantino...
... ed inferiore (3) e avvolgere il gambo (4) e annodare i fili. Lower the needle into the right hole of the button. Pull the needle and bobbin threads through (3). Sewing on buttons with clear-view foot Stitch: D Feed: Dropped Thread: Fine sewing thread Place the button in the location marked beforehand and push it under the sewing foot holder. Place a match on buttons Sewing foot: Without sewing foot or with stems (for large buttons in maniera che l'ago, girando ii volantino...

Owner's Manual
Page 39
... e tenerlo fermo. Premere in senso 0. Insert the new bulb so that the pins enter slots R, push the bulb upwards and turn it out. Fuhrungslineal etwas ...schrag in maniera che i perni entrino nelle fessure R. Die Gluhlampe hochdrücken und nach Q drehen. Press down the housing of the machine. Pousser l'ampoule vers le haut et Ia tourner vers Q. Changing the bulb... in den Schlitzen R glei ten. Push the bulb upwards, then in direction P and pull it in the head of the...
... e tenerlo fermo. Premere in senso 0. Insert the new bulb so that the pins enter slots R, push the bulb upwards and turn it out. Fuhrungslineal etwas ...schrag in maniera che i perni entrino nelle fessure R. Die Gluhlampe hochdrücken und nach Q drehen. Press down the housing of the machine. Pousser l'ampoule vers le haut et Ia tourner vers Q. Changing the bulb... in den Schlitzen R glei ten. Push the bulb upwards, then in direction P and pull it in the head of the...

Owner's Manual
Page 42
... di guida e tissarlo in ladies' slacks For machine setting see page 34. Alzare il piedino, chiudere a cerniera. Abbassare ii piedi no e terminare a cucitura. Pin facing strip S to the underside and stitch it down at the same time as it will go. Close the zip. Q).... seam line. Baste left as far as you sew the zip. Open zip. Lower the zipper foot and finish sewing the seam. Press the edges of the seam leave the needle down in the fabric, raise the zipper foot, open the zip, lower the zipper foot again and finish sewing the seam. Shortly before the end of the zip seam with...
... di guida e tissarlo in ladies' slacks For machine setting see page 34. Alzare il piedino, chiudere a cerniera. Abbassare ii piedi no e terminare a cucitura. Pin facing strip S to the underside and stitch it down at the same time as it will go. Close the zip. Q).... seam line. Baste left as far as you sew the zip. Open zip. Lower the zipper foot and finish sewing the seam. Press the edges of the seam leave the needle down in the fabric, raise the zipper foot, open the zip, lower the zipper foot again and finish sewing the seam. Shortly before the end of the zip seam with...

Owner's Manual
Page 54
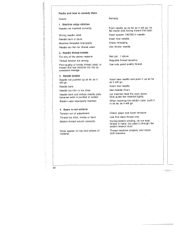
Needle chart Using the adequate needle guarantees a better working up of the material. Medium ball point Heavy ball point Stretch-fabric needle. Light ball point Medium ball point Universal needle for - Wide-meshed corsetry, Lycra, Simplex and Lastex. Narrow twist point Leather, suede, calf and goatskin leathers. Coarse knitted fabrics, Lastex, double jersey fabrics, Quiana and Simplex. -- Light ball point, long eye Seams topstitched with...
Needle chart Using the adequate needle guarantees a better working up of the material. Medium ball point Heavy ball point Stretch-fabric needle. Light ball point Medium ball point Universal needle for - Wide-meshed corsetry, Lycra, Simplex and Lastex. Narrow twist point Leather, suede, calf and goatskin leathers. Coarse knitted fabrics, Lastex, double jersey fabrics, Quiana and Simplex. -- Light ball point, long eye Seams topstitched with...

Owner's Manual
Page 55
... cording Wide cording Extra wide cording Extra-wide cording Decorative designs sewn with twin needles Before you start sewing, turn the handwheel and check to make sure the needles stitch into the fabric properly. Decorative and zigzag patterns 130/705 H-ZWI . 80 0.5-1.5mm . 80 0.5-1.5mm 80 0.5-1.5 mm wide narrow narrow Special hemstitching twin needle Ii 130/705 JJ H-ZWI-Ho 80 100 I 53 ____ Needle chart System & No. Stitch length...
... cording Wide cording Extra wide cording Extra-wide cording Decorative designs sewn with twin needles Before you start sewing, turn the handwheel and check to make sure the needles stitch into the fabric properly. Decorative and zigzag patterns 130/705 H-ZWI . 80 0.5-1.5mm . 80 0.5-1.5mm 80 0.5-1.5 mm wide narrow narrow Special hemstitching twin needle Ii 130/705 JJ H-ZWI-Ho 80 100 I 53 ____ Needle chart System & No. Stitch length...
Owner's Manual
Page 62
.... Insert new needle and push it up as far as it will go . Thread machine properly and check both tensions. 60 Needle thread breaks For any of material. Needle breaks Needle not pushed up as far as it will go . During bobbin winding, do not hold thread in as far as it will go . Wrong needle used . 2. Machine threaded improperly. Needle bent and strikes needle plate because work alone. See Needle Chart. Check upper and lower tensions...
.... Insert new needle and push it up as far as it will go . Thread machine properly and check both tensions. 60 Needle thread breaks For any of material. Needle breaks Needle not pushed up as far as it will go . During bobbin winding, do not hold thread in as far as it will go . Wrong needle used . 2. Machine threaded improperly. Needle bent and strikes needle plate because work alone. See Needle Chart. Check upper and lower tensions...

Owner's Manual
Page 63
Cause: Remedy: 5. Remove needle plate and clean out lint. Feed dog dropped. (Drop-feed control is at all Lint has accumulated between tooth rows of oil into hook raceway. 7. This is a piece of fabric under the sewing foot. Machine feeds irregularly or not at right.) Flick drop-feed control to switch off the master switch. Machine runs with difficulty Thread ends in hook raceway. Remove thread ends and put a drop of feed dog. If you leave the machine, even for...
Cause: Remedy: 5. Remove needle plate and clean out lint. Feed dog dropped. (Drop-feed control is at all Lint has accumulated between tooth rows of oil into hook raceway. 7. This is a piece of fabric under the sewing foot. Machine feeds irregularly or not at right.) Flick drop-feed control to switch off the master switch. Machine runs with difficulty Thread ends in hook raceway. Remove thread ends and put a drop of feed dog. If you leave the machine, even for...
Owner's Manual
Page 70
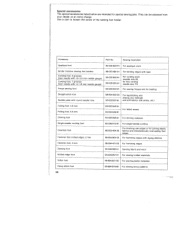
... For sewing fancy patterns 68 Sewing Operation Appliqué toot 93-035920-91 For appliqué work j Binder (remove sewing toot holder) 98-053484-91 For binding edges with tape Cording toot, 5 grooves (twin needle with 1,8-2.5 mm needle gauge) Cording toot, 7 grooves (twin needle with 1.4-1.8 mm needle gauge) 93-035950-91 303595391 For cording work (needle size 80, for fine cording needle size 70) Fringe sewing foot 93-035943-91 For sewing tringes and for basting Straight-stitch toot Needle plate with round needle hole...
... For sewing fancy patterns 68 Sewing Operation Appliqué toot 93-035920-91 For appliqué work j Binder (remove sewing toot holder) 98-053484-91 For binding edges with tape Cording toot, 5 grooves (twin needle with 1,8-2.5 mm needle gauge) Cording toot, 7 grooves (twin needle with 1.4-1.8 mm needle gauge) 93-035950-91 303595391 For cording work (needle size 80, for fine cording needle size 70) Fringe sewing foot 93-035943-91 For sewing tringes and for basting Straight-stitch toot Needle plate with round needle hole...


