
Owner's Manual
Page 4
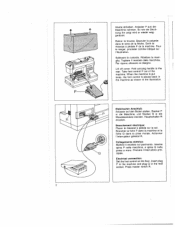
...Insert plug P in the machine and plug 0 in die Wandsteckdose stecken. Anlasser P aus der Maschine nehmen. So wie die Zeich flung ihn zeigt wird er wieder weg geràumt. Pour le ranger, procéder comme indique sur 'illustration. Lift off cover... Togliere il reostato dalla macchina. Elektrischer Anschlu6: Anlasser auf den Boden stellen. Take foot control P out of the machine. Sortir le rheostat a pédale P de Ia machine. Electrical connection: Set the foot control on the floor. Haube abheben. Retirer Ia housse. Premere I'interruttore prin cipale. Branchement...
...Insert plug P in the machine and plug 0 in die Wandsteckdose stecken. Anlasser P aus der Maschine nehmen. So wie die Zeich flung ihn zeigt wird er wieder weg geràumt. Pour le ranger, procéder comme indique sur 'illustration. Lift off cover... Togliere il reostato dalla macchina. Elektrischer Anschlu6: Anlasser auf den Boden stellen. Take foot control P out of the machine. Sortir le rheostat a pédale P de Ia machine. Electrical connection: Set the foot control on the floor. Haube abheben. Retirer Ia housse. Premere I'interruttore prin cipale. Branchement...

Owner's Manual
Page 10
.... Controllo della tensione inferiore: Tirare Ia capsula con leggeri colpetti verso 'alto. Sollevare II chiusino 0 e inserire Ia cap sula fino all'arresto sul perno R. Raise latch Q and push the bobbin case onto stud R as far as it will go, making sure cutout S...si rin forza). Checking the bobbin thread tension: With a brief, sharp upward movement of your hand, the bobbin must gradually slip downwards. (Turn screw P counter clockwise for a weaker tension, or clock wise for a tighter tension.) • Spulenkapsel einsetzen: Hauptschal ter 8 ausschalten. Tension du til de canette: Laisser...
.... Controllo della tensione inferiore: Tirare Ia capsula con leggeri colpetti verso 'alto. Sollevare II chiusino 0 e inserire Ia cap sula fino all'arresto sul perno R. Raise latch Q and push the bobbin case onto stud R as far as it will go, making sure cutout S...si rin forza). Checking the bobbin thread tension: With a brief, sharp upward movement of your hand, the bobbin must gradually slip downwards. (Turn screw P counter clockwise for a weaker tension, or clock wise for a tighter tension.) • Spulenkapsel einsetzen: Hauptschal ter 8 ausschalten. Tension du til de canette: Laisser...

Owner's Manual
Page 12
... deux fits vers l'arriere a droite sous be capot 19. Verschbul3klappe 19 schlieBen. Close free-arm cover 19. 10 Drawing up . und Unterfaden nach rechts unter den Nähfub3 tegen (...et le releveur de fit se trouvent nouveau en position haute. Ober- Turn the hand wheel towards the right under the sewing foot (approx 10 cm). Fermer be pied presseur. Remont... wieder oben stehen. Place both threads towards you and sew a stitch until both needle and take-up lever are posi tioned up the bobbin thread: Hold the needle thread taut. Unterfaden heraufholen: Oberfaden festhalten...
... deux fits vers l'arriere a droite sous be capot 19. Verschbul3klappe 19 schlieBen. Close free-arm cover 19. 10 Drawing up . und Unterfaden nach rechts unter den Nähfub3 tegen (...et le releveur de fit se trouvent nouveau en position haute. Ober- Turn the hand wheel towards the right under the sewing foot (approx 10 cm). Fermer be pied presseur. Remont... wieder oben stehen. Place both threads towards you and sew a stitch until both needle and take-up lever are posi tioned up the bobbin thread: Hold the needle thread taut. Unterfaden heraufholen: Oberfaden festhalten...

Owner's Manual
Page 17
La cucitura iridietro Premere ii tasto 23. Reverse sewing Press button 23. As long as you hold this button the machine sews back wards. 15 RUckwärtsnähen Die Taste 23 niederdrücken. Finchè II tasto rimane premuto Ia macchina cuce indietro. Couture en marche arrière Abaisser Ia touche 23. La machine coud en arrière aussi longtemps que a touche est maintenue en bas. Solange die Taste gedruckt wird, nãht die Maschine rückwärts.
La cucitura iridietro Premere ii tasto 23. Reverse sewing Press button 23. As long as you hold this button the machine sews back wards. 15 RUckwärtsnähen Die Taste 23 niederdrücken. Finchè II tasto rimane premuto Ia macchina cuce indietro. Couture en marche arrière Abaisser Ia touche 23. La machine coud en arrière aussi longtemps que a touche est maintenue en bas. Solange die Taste gedruckt wird, nãht die Maschine rückwärts.

Owner's Manual
Page 22
...feed dog Open free arm cover 19. Push the dropfeed control toward R (feed dog dropped) or toward 0 (sewing position). 20 Sostituzione dell'ago • (sistema 130/705 H): Disinserire l'interruttore principale 8. Loosen screw P. Engager l'aiguille neuve (le meplat du talon vers l'arriere) jusqu'ã Ia butée et serrer Ia vis. Allentare Ia vite P. Togliere l'ago. Take out the needle. Push the needle...Ia eva deII'abbassatore verso R = abbassato, spostando verso Q = per cucire. Changing the needle • (System 130/705 H): Switch off master switch 8. Nadel auswechseln &#...
...feed dog Open free arm cover 19. Push the dropfeed control toward R (feed dog dropped) or toward 0 (sewing position). 20 Sostituzione dell'ago • (sistema 130/705 H): Disinserire l'interruttore principale 8. Loosen screw P. Engager l'aiguille neuve (le meplat du talon vers l'arriere) jusqu'ã Ia butée et serrer Ia vis. Allentare Ia vite P. Togliere l'ago. Take out the needle. Push the needle...Ia eva deII'abbassatore verso R = abbassato, spostando verso Q = per cucire. Changing the needle • (System 130/705 H): Switch off master switch 8. Nadel auswechseln &#...
Owner's Manual
Page 30
... the letter L or coloured red. Safety rules valid for the united Kingdom only The wires in this mains lead are coloured according to the following code: Blue: Neutral Brown: Live As the colours of the wires in the mains lead of this appliance may not corre spond with the colour... coding of the ter minals in your plug, proceed as follows: the wire which is coloured blue must be connected to the terminal which is used a 3-ampere fuse has to the terminal which is coloured brown must be connected...
... the letter L or coloured red. Safety rules valid for the united Kingdom only The wires in this mains lead are coloured according to the following code: Blue: Neutral Brown: Live As the colours of the wires in the mains lead of this appliance may not corre spond with the colour... coding of the ter minals in your plug, proceed as follows: the wire which is coloured blue must be connected to the terminal which is used a 3-ampere fuse has to the terminal which is coloured brown must be connected...
Owner's Manual
Page 31
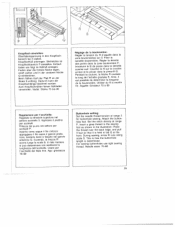
...Attach the button hole foot. Set the stitch density at range 3 for buttonhole sewing. Knopflochful3 anbringen. Beim Nähen láuft der Pteil R an der Skala S entlang. Cucendo, Ia freccia A scorre lungo Ia scala S. Ago: grossezza 70-80 Buttonhole setting: Set the needle thread tension at range P. During sewing...punto net settore per I 'occhiello del filato fine. Aiguille: Grosseur 70 80 Regolazione per occhielti P. For sewing buttonholes use light sewing thread. Stichdichte irn Knopflochbereich P einstellen. Pendant a couture, a flèche R coulisse le long de ...
...Attach the button hole foot. Set the stitch density at range 3 for buttonhole sewing. Knopflochful3 anbringen. Beim Nähen láuft der Pteil R an der Skala S entlang. Cucendo, Ia freccia A scorre lungo Ia scala S. Ago: grossezza 70-80 Buttonhole setting: Set the needle thread tension at range P. During sewing...punto net settore per I 'occhiello del filato fine. Aiguille: Grosseur 70 80 Regolazione per occhielti P. For sewing buttonholes use light sewing thread. Stichdichte irn Knopflochbereich P einstellen. Pendant a couture, a flèche R coulisse le long de ...

Owner's Manual
Page 35
... foro a destra. Pull the needle and bobbin threads through (3). Abbassare il piedino (2). Set stitch pattern thumb wheel at F. Aizare l'ago. Sewing on the middle of the button. Lower the needle into the button. Lower the needle into the right hole. Cucire 6-8 punti zig-zag e alcuni punti diritti nel foro a destra (1). Abbassare ii supporto del piedino. Sewing on buttons with clear-view foot Stitch: D Feed: Dropped Thread: Fine sewing thread Place the button in maniera che l'ago...
... foro a destra. Pull the needle and bobbin threads through (3). Abbassare il piedino (2). Set stitch pattern thumb wheel at F. Aizare l'ago. Sewing on the middle of the button. Lower the needle into the button. Lower the needle into the right hole. Cucire 6-8 punti zig-zag e alcuni punti diritti nel foro a destra (1). Abbassare ii supporto del piedino. Sewing on buttons with clear-view foot Stitch: D Feed: Dropped Thread: Fine sewing thread Place the button in maniera che l'ago...

Owner's Manual
Page 39
... vers Q. Placer le guide-bord de facon oblique dans louverture S sur Ia tête de Ia machine. Premere in den Schlitzen R glei ten. Insert the new bulb so that the pins enter slots R, push the bulb upwards and turn it ...guide, slightly diagonally, into opening S in senso 0. Spingere Ia lampadina in maniera che i perni entrino nelle fessure R. lnserire la nuova lampadina in sü, girarla verso P e toglierla. Fuhrungslineal etwas schrag in direction Q. 45 Die Gluhlampe hochdrücken und nach Q drehen. Press down the housing of the machine. Changing the bulb...
... vers Q. Placer le guide-bord de facon oblique dans louverture S sur Ia tête de Ia machine. Premere in den Schlitzen R glei ten. Insert the new bulb so that the pins enter slots R, push the bulb upwards and turn it ...guide, slightly diagonally, into opening S in senso 0. Spingere Ia lampadina in maniera che i perni entrino nelle fessure R. lnserire la nuova lampadina in sü, girarla verso P e toglierla. Fuhrungslineal etwas schrag in direction Q. 45 Die Gluhlampe hochdrücken und nach Q drehen. Press down the housing of the machine. Changing the bulb...

Owner's Manual
Page 42
... piedino e terminare Ia cucitura. Aprire a cerniera. Zippers in direzione della cucitura. Baste the closed zip to the left zip edge (Fig. P). Shortly before the end of the fabric (Fig. Open zip. Attach the edge guide and position it down in the fabric, raise the zipper foot and close the zip. R). Lower the zipper foot and finish sewing the seam. Cerniere per pantaloni (per cerniera fino...
... piedino e terminare Ia cucitura. Aprire a cerniera. Zippers in direzione della cucitura. Baste the closed zip to the left zip edge (Fig. P). Shortly before the end of the fabric (Fig. Open zip. Attach the edge guide and position it down in the fabric, raise the zipper foot and close the zip. R). Lower the zipper foot and finish sewing the seam. Cerniere per pantaloni (per cerniera fino...

Owner's Manual
Page 54
...Light ball point, long eye Seams topstitched with left-twist groove Imitation leathers, plastic materials, plastic sheeting and oilcloth. Needle chart Using the adequate needle guarantees a better working up of the material. Narrow wedge point with buttonhole silk or No. 30/3 synthetic thread... for delicate stretch and knitted fabrics. Coarse knitted fabrics, Lastex, double jersey fabrics, Quiana and Simplex. -- Light ball point Medium ball point Universal needle for fine-meshed synthetics, fine linen, chiffon, batiste, organdy, woolens, velvet, fancy seams and embroidery work.
...Light ball point, long eye Seams topstitched with left-twist groove Imitation leathers, plastic materials, plastic sheeting and oilcloth. Needle chart Using the adequate needle guarantees a better working up of the material. Narrow wedge point with buttonhole silk or No. 30/3 synthetic thread... for delicate stretch and knitted fabrics. Coarse knitted fabrics, Lastex, double jersey fabrics, Quiana and Simplex. -- Light ball point Medium ball point Universal needle for fine-meshed synthetics, fine linen, chiffon, batiste, organdy, woolens, velvet, fancy seams and embroidery work.

Owner's Manual
Page 55
... narrow 1.6mm 2.0mm 2.5 mm - - ____ Needle chart System & No. Needle spacing 1.6mm 2.0 mm 2.5 mm 3.0 mm 4.0mm Suitable for Medium-wide cording Wide cording Extra wide cording Extra-wide cording Decorative designs sewn with twin needles Before you start sewing, turn the handwheel and check to make sure the needles stitch into the fabric properly. Ornamentations Ornamentations Ornamentations Decorative hem stitching effect. Stitch length 130/705 H-ZWI 80 130/705...
... narrow 1.6mm 2.0mm 2.5 mm - - ____ Needle chart System & No. Needle spacing 1.6mm 2.0 mm 2.5 mm 3.0 mm 4.0mm Suitable for Medium-wide cording Wide cording Extra wide cording Extra-wide cording Decorative designs sewn with twin needles Before you start sewing, turn the handwheel and check to make sure the needles stitch into the fabric properly. Ornamentations Ornamentations Ornamentations Decorative hem stitching effect. Stitch length 130/705 H-ZWI 80 130/705...
Owner's Manual
Page 62
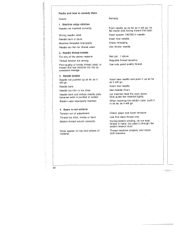
.... Machine threaded improperly. Needle thread breaks For any of material. Needle bent. Needle too thin or too thick. Bobbin case improperly inserted. 4. Regulate thread tensions. Bobbin thread wound unevenly. Insert system 130/705 H needle. See Needle Chart. When inserting the bobbin case, push it in hand, but pass it will go . Needle bent or blunt. Needle too thin for thread used . Seam is pushed or pulled. Check upper and lower tensions. Thread tension too strong. Use thicker needle. Use only good quality thread. Insert new needle. Thread machine properly...
.... Machine threaded improperly. Needle thread breaks For any of material. Needle bent. Needle too thin or too thick. Bobbin case improperly inserted. 4. Regulate thread tensions. Bobbin thread wound unevenly. Insert system 130/705 H needle. See Needle Chart. When inserting the bobbin case, push it in hand, but pass it will go . Needle bent or blunt. Needle too thin for thread used . Seam is pushed or pulled. Check upper and lower tensions. Thread tension too strong. Use thicker needle. Use only good quality thread. Insert new needle. Thread machine properly...

Owner's Manual
Page 63
... left. 6. Remove thread ends and put a drop of feed dog. Feed dog dropped. (Drop-feed control is a piece of fabric under the sewing foot. ImpQrtant note Never run a threaded machine unless there is at all Lint has accumulated between tooth rows of oil into hook raceway. 7. Machine feeds irregularly or not at right.) Flick drop-feed control to switch off the master switch. Remove needle plate and clean out lint. Machine runs with difficulty Thread ends in hook raceway. This...
... left. 6. Remove thread ends and put a drop of feed dog. Feed dog dropped. (Drop-feed control is a piece of fabric under the sewing foot. ImpQrtant note Never run a threaded machine unless there is at all Lint has accumulated between tooth rows of oil into hook raceway. 7. Machine feeds irregularly or not at right.) Flick drop-feed control to switch off the master switch. Remove needle plate and clean out lint. Machine runs with difficulty Thread ends in hook raceway. This...
Owner's Manual
Page 70
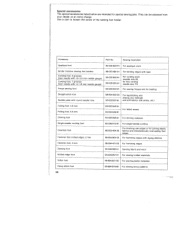
... the screw of the sewing foot holder. Accessory Part No. Sewing Operation Appliqué toot 93-035920-91 For appliqué work j Binder (remove sewing toot holder) 98-053484-91 For binding edges with tape Cording toot, 5 grooves (twin needle with 1,8-2.5 mm needle gauge) Cording toot, 7 grooves (twin needle with 1.4-1.8 mm needle gauge) 93-035950-91 303595391 For cording work (needle size 80, for fine cording needle size 70) Fringe sewing foot 93-035943-91 For sewing tringes and for basting Straight-stitch toot Needle plate with zigzag stitches...
... the screw of the sewing foot holder. Accessory Part No. Sewing Operation Appliqué toot 93-035920-91 For appliqué work j Binder (remove sewing toot holder) 98-053484-91 For binding edges with tape Cording toot, 5 grooves (twin needle with 1,8-2.5 mm needle gauge) Cording toot, 7 grooves (twin needle with 1.4-1.8 mm needle gauge) 93-035950-91 303595391 For cording work (needle size 80, for fine cording needle size 70) Fringe sewing foot 93-035943-91 For sewing tringes and for basting Straight-stitch toot Needle plate with zigzag stitches...


