

Owner's Manual
Page 3
... break. 1 5. Never operate this sewing machine is used or where oxygen is required around the sewing machine needle. 12. Unplug immediately. 4. Do not allow to be adhered to the service center for a sewing machine that has fallen into water. Return the appliance to as contained in or drop into any object into water or other user servicing adjustments mentioned in the needle area, such as threading needle, changing needle, threading bobbin, or changing presser foot...
... break. 1 5. Never operate this sewing machine is used or where oxygen is required around the sewing machine needle. 12. Unplug immediately. 4. Do not allow to be adhered to the service center for a sewing machine that has fallen into water. Return the appliance to as contained in or drop into any object into water or other user servicing adjustments mentioned in the needle area, such as threading needle, changing needle, threading bobbin, or changing presser foot...
Owner's Manual
Page 5
... thread tension 4 Carrying handle 5 Bobbin pins 6 Bobbin winder 7 Stitch-width adjustment dial 8 Hand wheel 9 Hand wheel release disc 10 Stitch-length adjustment dial 11 Reverse key 1 2 Connection bushing 1 3 On/off switch 14 Baseplate 1 5 Detachable work support with accessory box 1 6 Needle plate 1 7 Presser foot holder with presser foot 1 8 Thread guide 1 9 Thread guide 20 Threading slots 21 Take-up lever 22 Needle holder with retaining screw 23 Presser foot lifter 24 Stitch pattern adjustment knob 25 Stitch pattern chart 26 Free-arm cover (enclosing sewing hook) 27 Feed dog 28 Needle bar...
... thread tension 4 Carrying handle 5 Bobbin pins 6 Bobbin winder 7 Stitch-width adjustment dial 8 Hand wheel 9 Hand wheel release disc 10 Stitch-length adjustment dial 11 Reverse key 1 2 Connection bushing 1 3 On/off switch 14 Baseplate 1 5 Detachable work support with accessory box 1 6 Needle plate 1 7 Presser foot holder with presser foot 1 8 Thread guide 1 9 Thread guide 20 Threading slots 21 Take-up lever 22 Needle holder with retaining screw 23 Presser foot lifter 24 Stitch pattern adjustment knob 25 Stitch pattern chart 26 Free-arm cover (enclosing sewing hook) 27 Feed dog 28 Needle bar...
Owner's Manual
Page 6
... or if it is a machine for the sewing lamp is both firm and even. To remove any objects in the home. When leaving the machine, during work or when changing mechanical parts or accessories, always disconnect the machine from the mains by hitting or dropping it. The machine must be put into operation according to : dust, severe dampness, direct sunlight, sta tic electricity...
... or if it is a machine for the sewing lamp is both firm and even. To remove any objects in the home. When leaving the machine, during work or when changing mechanical parts or accessories, always disconnect the machine from the mains by hitting or dropping it. The machine must be put into operation according to : dust, severe dampness, direct sunlight, sta tic electricity...

Owner's Manual
Page 8
...needles. Accessory compartment . Adjusting stretch stitches Attaching buttons Bias tape binder Blind-stitch foot Bobbin case Bobbin thread tension . Hem-stitching Honeycomb stitch Knit-edge foot Lace Lap feller Left needle-position Light bulb Linen buttonhole Linen buttonhole with the twin needle . Needle chart 4 Hem with gimp thread Lubrication Mounting the bobbin Multi-stitch gathering attachment. Bobbin winding Buttonhole Changing the needle Changing the presser foot Cleaning and oiling Closed overlock stitch Control panel Control pedal Cording foot Covering the feed dog . Darning...
...needles. Accessory compartment . Adjusting stretch stitches Attaching buttons Bias tape binder Blind-stitch foot Bobbin case Bobbin thread tension . Hem-stitching Honeycomb stitch Knit-edge foot Lace Lap feller Left needle-position Light bulb Linen buttonhole Linen buttonhole with the twin needle . Needle chart 4 Hem with gimp thread Lubrication Mounting the bobbin Multi-stitch gathering attachment. Bobbin winding Buttonhole Changing the needle Changing the presser foot Cleaning and oiling Closed overlock stitch Control panel Control pedal Cording foot Covering the feed dog . Darning...
Owner's Manual
Page 9
...overlock stitch Overlock stitches Patches Patchwork quilt Practical sewing Presser feet (special accessories) Presser feet (standard accessories) Presser foot lifter Quilt and patchwork foot Removing the needle plate Reverse sewing Richelieu Serging with the blind stitch foot Serging with the zigzag stitch Servicing and trouble shooting Setting the utility stitches Sewing lamp Sewing on zippers Shell edging Smocking Special accessory chart Spring stitch Stabilizing Stitch chart Stitch density Stitch length adjustment button Stitch width adjustment button Straight stitch Stretch triple straight...
...overlock stitch Overlock stitches Patches Patchwork quilt Practical sewing Presser feet (special accessories) Presser feet (standard accessories) Presser foot lifter Quilt and patchwork foot Removing the needle plate Reverse sewing Richelieu Serging with the blind stitch foot Serging with the zigzag stitch Servicing and trouble shooting Setting the utility stitches Sewing lamp Sewing on zippers Shell edging Smocking Special accessory chart Spring stitch Stabilizing Stitch chart Stitch density Stitch length adjustment button Stitch width adjustment button Straight stitch Stretch triple straight...
Owner's Manual
Page 10
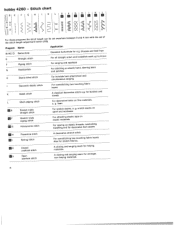
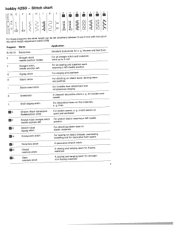
... stitch Closed overlock stitch Open overlock stitch A decorative stretch stitch For overstitching two touching fabric layers. be set anywhere between 0 and 4 mm with the aid of Program Name B/AC/D Buttonhole E Straight stitch Application Standard buttonhole for stretch fabrics. H fl I -,j .',,- Also for e.g. i\i \/\ //7 /\/ -*.. \i\ ' -i, -' "'\ l '"S,i -- g. hobby 4260 - blouses and bed linen For all straight stitch and lockstitch work up to 4 mm F Zigzag stitch G Elasticstitch For serging and appliqué For stitching on elastic band, darning...
... stitch Closed overlock stitch Open overlock stitch A decorative stretch stitch For overstitching two touching fabric layers. be set anywhere between 0 and 4 mm with the aid of Program Name B/AC/D Buttonhole E Straight stitch Application Standard buttonhole for stretch fabrics. H fl I -,j .',,- Also for e.g. i\i \/\ //7 /\/ -*.. \i\ ' -i, -' "'\ l '"S,i -- g. hobby 4260 - blouses and bed linen For all straight stitch and lockstitch work up to 4 mm F Zigzag stitch G Elasticstitch For serging and appliqué For stitching on elastic band, darning...
Owner's Manual
Page 11
... the stitch length can stitch-length adjustment button (10). " III I III I U =A C ,' ..- ii '. g. blouses and bed linen For all straight stitch and lockstitch work up to 4 mm F Straight stitch, needle position left For all sewing and topstitch work requiring a left Stretch triple zigzag stitch Honeycomb stitch For decorative hems on fine materials, e. g. crotch seams on sport and workwear For stretch seams requiring a left needle position For attaching elastic tape on elastic materials For sewing on elastic band, darning tears and patches I Elastic blind stitch...
... the stitch length can stitch-length adjustment button (10). " III I III I U =A C ,' ..- ii '. g. blouses and bed linen For all straight stitch and lockstitch work up to 4 mm F Straight stitch, needle position left For all sewing and topstitch work requiring a left Stretch triple zigzag stitch Honeycomb stitch For decorative hems on fine materials, e. g. crotch seams on sport and workwear For stretch seams requiring a left needle position For attaching elastic tape on elastic materials For sewing on elastic band, darning tears and patches I Elastic blind stitch...
Owner's Manual
Page 12
...on elastic materials For sewing on elastic band, darning tears and patches I \N /- \N ,-" -,. \\\' \/\ HI UI /// ' '*. \/\ /// /\/ NI \\\ . \,\ For these programs the stitch length can be set anywhere between 0 and 4 mm with the aid of the stitch-length adjustment button (10). g. g. C I \/ N.z , It [I Elastic blind stitch For invisible hem attachment and simultaneous serging flfl E 1W F, G IH Stretch triple straight stitch Stretch triple zigzag stitch in various widths Honeycomb stitch For stretch seams, e. Program Name B/AC/D Buttonhole E Straight stitch...
...on elastic materials For sewing on elastic band, darning tears and patches I \N /- \N ,-" -,. \\\' \/\ HI UI /// ' '*. \/\ /// /\/ NI \\\ . \,\ For these programs the stitch length can be set anywhere between 0 and 4 mm with the aid of the stitch-length adjustment button (10). g. g. C I \/ N.z , It [I Elastic blind stitch For invisible hem attachment and simultaneous serging flfl E 1W F, G IH Stretch triple straight stitch Stretch triple zigzag stitch in various widths Honeycomb stitch For stretch seams, e. Program Name B/AC/D Buttonhole E Straight stitch...
Owner's Manual
Page 13
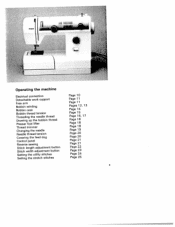
PFAFF ir 4 Operating the machine Electrical connection Detachable work support Free arm Bobbin winding Bobbin case Bobbin thread tension Threading the needle thread Drawing up the bobbin thread Presser foot lifter Thread trimmer Changing the needle Needle thread tension Covering the feed dog Control panel Reverse sewing Stitch length adjustment button Stitch width adjustment button Setting the utility stitches Setting the stretch stitches Page 10 Page 11 Page 11 Pages 12, 13 Page 14 Page 15 Page 16,17 Page 18 Page 18 Page 18 Page 19 Page ...
PFAFF ir 4 Operating the machine Electrical connection Detachable work support Free arm Bobbin winding Bobbin case Bobbin thread tension Threading the needle thread Drawing up the bobbin thread Presser foot lifter Thread trimmer Changing the needle Needle thread tension Covering the feed dog Control panel Reverse sewing Stitch length adjustment button Stitch width adjustment button Setting the utility stitches Setting the stretch stitches Page 10 Page 11 Page 11 Pages 12, 13 Page 14 Page 15 Page 16,17 Page 18 Page 18 Page 18 Page 19 Page ...

Owner's Manual
Page 17
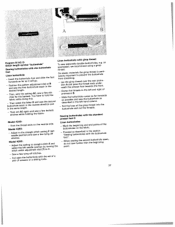
... a hole and switch (13) on it to handwheel place. Turn the on/off into (9) back to the bobbin. -4 I I Winding the bobbin Pull the spool holder (5) up and place a spool on and press the foot pedal. Place the thread clockwise winder tension (1) and run There the thread is passed held tight. ALdfuiesnltlgsgboopoobrnoobfcianteshdettuohrteehthrbseeotaobldepbfsitan,fatrueiestrmofamuolvflaeettwihcietarlfelbryvoo.omblPbuirttnheiosenswspt.iihnne and cut the thread. 'p Don't forget: Press the handwheel the "sewing...
... a hole and switch (13) on it to handwheel place. Turn the on/off into (9) back to the bobbin. -4 I I Winding the bobbin Pull the spool holder (5) up and place a spool on and press the foot pedal. Place the thread clockwise winder tension (1) and run There the thread is passed held tight. ALdfuiesnltlgsgboopoobrnoobfcianteshdettuohrteehthrbseeotaobldepbfsitan,fatrueiestrmofamuolvflaeettwihcietarlfelbryvoo.omblPbuirttnheiosenswspt.iihnne and cut the thread. 'p Don't forget: Press the handwheel the "sewing...

Owner's Manual
Page 19
...Adjusting the setting: Using the screwdriver from turn setting screw C to the right - The of the hook. Checking the bobbin thread tension Hcbaoosbldebitanhnedcatphsuerlelmatdhuesptrtohdtrrreouapddidnuogpwwfnroatmrhdesthtshehraebraopdblyb.inThe during this movement. nserting the bobbin Idthnoseiennrgtutsnhode,eprbuotlhbl ebtihtneenitnshitrooenathdpeltahbtreoobBubgiunhntctihlaesiteslliiIetnsAi,n the opening (see arrow). Inserting the bobbin case OtchapeseenhofcionokgveeprrinFDEmaanusdstfsaplriodaiensttihtinewtobilolcbgubotoi.nuTtchaGes.eboobnbtion Check: Pull the bobbin thread case...
...Adjusting the setting: Using the screwdriver from turn setting screw C to the right - The of the hook. Checking the bobbin thread tension Hcbaoosbldebitanhnedcatphsuerlelmatdhuesptrtohdtrrreouapddidnuogpwwfnroatmrhdesthtshehraebraopdblyb.inThe during this movement. nserting the bobbin Idthnoseiennrgtutsnhode,eprbuotlhbl ebtihtneenitnshitrooenathdpeltahbtreoobBubgiunhntctihlaesiteslliiIetnsAi,n the opening (see arrow). Inserting the bobbin case OtchapeseenhofcionokgveeprrinFDEmaanusdstfsaplriodaiensttihtinewtobilolcbgubotoi.nuTtchaGes.eboobnbtion Check: Pull the bobbin thread case...

Owner's Manual
Page 24
V Adjusting the needle thread tension Turn the needle thread tension (3) to its highest position. _A Changing the needle Switch off the on buttons, the feed dog (27) must be cove red with the darning plate to stop the fabric being fed. Removal: Lower the presser foot and raise the retaining screw (22) and remove the needle by pushing it downwards. Hold Lower the the needle presser foot and tighten and the retaining screw (22). The normal setting for sewing is between...
V Adjusting the needle thread tension Turn the needle thread tension (3) to its highest position. _A Changing the needle Switch off the on buttons, the feed dog (27) must be cove red with the darning plate to stop the fabric being fed. Removal: Lower the presser foot and raise the retaining screw (22) and remove the needle by pushing it downwards. Hold Lower the the needle presser foot and tighten and the retaining screw (22). The normal setting for sewing is between...

Owner's Manual
Page 26
I ' I Reverse sewing The the machine sews reverse sewing in reverse only as Stitch length adjustment button Wywkoieniuteghncoat0hnneatahnsdetdjiutbc4shut mtttlhoemenngsbttotyhittctahuhdernjlueirnsentqggmutthiehrneeitdnpfbilonueiintnttegtoltnyhm.b(a1er0t) 4 "Buttonhole" symbol tBolhepeestt.iwm"Tebhueuemnttftouhsnrteiththconehluremdy"eobnsueysrtmisutyrb0nofloat.nrhTdeshedi1wsiayialnorgtueoabc0aui,sntttthofhienendhdoen ser the stitch becomes. as long key (11) is pressed. "Stretch" symbol Tgmoroesnuetnwdbutyhtoteounsmt(r1ue0tsct)...
I ' I Reverse sewing The the machine sews reverse sewing in reverse only as Stitch length adjustment button Wywkoieniuteghncoat0hnneatahnsdetdjiutbc4shut mtttlhoemenngsbttotyhittctahuhdernjlueirnsentqggmutthiehrneeitdnpfbilonueiintnttegtoltnyhm.b(a1er0t) 4 "Buttonhole" symbol tBolhepeestt.iwm"Tebhueuemnttftouhsnrteiththconehluremdy"eobnsueysrtmisutyrb0nofloat.nrhTdeshedi1wsiayialnorgtueoabc0aui,sntttthofhienendhdoen ser the stitch becomes. as long key (11) is pressed. "Stretch" symbol Tgmoroesnuetnwdbutyhtoteounsmt(r1ue0tsct)...

Owner's Manual
Page 35
... fabric and - Now that the needle in the button. Wrap the shank with a button shank - Now lower the presser foot lifter; the button apart. - Turn the handwheel the button in such a enters the right hole towards you and move way that tsheewnoenedtlheealbsuotteonnt.eTrsakthe ecarirgehttoheannsdure hole in the button. Knot the thread ends on buttons For be rseemwoivnegdoanndbutthtoenfse,etdhedopgremssuesrt foot must be cove red with the darning plate. - Sewing on the reverse...
... fabric and - Now that the needle in the button. Wrap the shank with a button shank - Now lower the presser foot lifter; the button apart. - Turn the handwheel the button in such a enters the right hole towards you and move way that tsheewnoenedtlheealbsuotteonnt.eTrsakthe ecarirgehttoheannsdure hole in the button. Knot the thread ends on buttons For be rseemwoivnegdoanndbutthtoenfse,etdhedopgremssuesrt foot must be cove red with the darning plate. - Sewing on the reverse...
Owner's Manual
Page 41
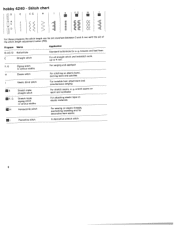
... the straight stitch position) and sew a setting F few tying (left off stitches. - Then select the buttonhole seam letter in the 0 and sew the second reverse direction and in the left and right of the buttonhole and cut gimp thread the threads. bartack Linen buttonhole with the standard presser foot 0 Model 4240: - into the Sewing buttonholes with gimp thread Tspoosretswweesapr,ecwiaellryecdoumrambleendbuuttsoinnghoalegsi,mep.g. points of a 37 aid of the - Position the and sew the pfairtstterbnutatdojnuhsotmleesnetadmialinatthBe desired length...
... the straight stitch position) and sew a setting F few tying (left off stitches. - Then select the buttonhole seam letter in the 0 and sew the second reverse direction and in the left and right of the buttonhole and cut gimp thread the threads. bartack Linen buttonhole with the standard presser foot 0 Model 4240: - into the Sewing buttonholes with gimp thread Tspoosretswweesapr,ecwiaellryecdoumrambleendbuuttsoinnghoalegsi,mep.g. points of a 37 aid of the - Position the and sew the pfairtstterbnutatdojnuhsotmleesnetadmialinatthBe desired length...
Owner's Manual
Page 59
...-tape binder (remove presser foot holder( Knit-edge foot 98-694 823-00 98-694 818-00 98-053 484-9 1 93-042 957-9 1 For hemming edges For hemming edges For binding edges with needle position middle. Special accessories Decorative cording foot Part no.: 93-036 942-9 1 Sewing operation The spaces of the special accessories. 55 Cording foot, 5 grooves (twin needle with needle gauge 1.6 - 2.0) Cording foot, 7 grooves (twin needle with needle gauge 1.6 - 2.0) Straight stitch foot with round needle hole 93-042 950...
...-tape binder (remove presser foot holder( Knit-edge foot 98-694 823-00 98-694 818-00 98-053 484-9 1 93-042 957-9 1 For hemming edges For hemming edges For binding edges with needle position middle. Special accessories Decorative cording foot Part no.: 93-036 942-9 1 Sewing operation The spaces of the special accessories. 55 Cording foot, 5 grooves (twin needle with needle gauge 1.6 - 2.0) Cording foot, 7 grooves (twin needle with needle gauge 1.6 - 2.0) Straight stitch foot with round needle hole 93-042 950...

Owner's Manual
Page 60
... - Guide the tape into the pouch binder and pull it out towards of the bias tape. - Tip: You can achieve an additional effect by using the zigzag stitch. The foot comes with a detailed when you buy your multi-stitch description gathering attachment at you PFAFF dealer. 56 Set the tape binder needle perforates 1 ded bias-tape edge in fabric. 2. Laying pleats in fabric and sewing lace...
... - Guide the tape into the pouch binder and pull it out towards of the bias tape. - Tip: You can achieve an additional effect by using the zigzag stitch. The foot comes with a detailed when you buy your multi-stitch description gathering attachment at you PFAFF dealer. 56 Set the tape binder needle perforates 1 ded bias-tape edge in fabric. 2. Laying pleats in fabric and sewing lace...

Owner's Manual
Page 61
...snSyoembt bol. - Tip: You can embroidering thread with (stitch length 2.5 - 3 the mm). - ply - Single-needle cording foot Crbtboeeordaaraiddcpdihuinynirgaegl rv.nisseeTaoahamritsseaicmrrfeahiisinnlsuaeieqlrdtfuseilefplfefurerborcylmctoswteroedham.imtchbTharhaotialsisnodofaeelrsmlmioonawugbktsraeooscyvihodeeure appliqué work more expressive. - Try - Nglauoidewtoolfatyathllteyhifsuenlpldirneogrtrtfuhodeoitn.pgrTeehsdesgeferabfoorviocetr.mthuesttoben - Lay the pieces of the bottom 1.5 cm. Now sew over straight stitch the folded edge with a achieve a special...
...snSyoembt bol. - Tip: You can embroidering thread with (stitch length 2.5 - 3 the mm). - ply - Single-needle cording foot Crbtboeeordaaraiddcpdihuinynirgaegl rv.nisseeTaoahamritsseaicmrrfeahiisinnlsuaeieqlrdtfuseilefplfefurerborcylmctoswteroedham.imtchbTharhaotialsisnodofaeelrsmlmioonawugbktsraeooscyvihodeeure appliqué work more expressive. - Try - Nglauoidewtoolfatyathllteyhifsuenlpldirneogrtrtfuhodeoitn.pgrTeehsdesgeferabfoorviocetr.mthuesttoben - Lay the pieces of the bottom 1.5 cm. Now sew over straight stitch the folded edge with a achieve a special...
Owner's Manual
Page 68
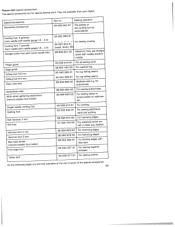
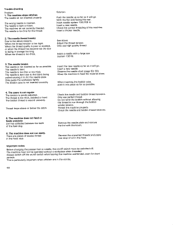
... through the bobbin winder tension. Only use perfect thread. Allow the machine to run easily. The seam is not regular The tension is too thick, slubbed or hard. Thread loops above . Do not wind the bobbin without a workpiece when when leaving the machine threaded. Important notes: Before changing the presser foot or needle, the on /off . The machine skips stitches. Insert needle system 130/705 H. Insert a new needle. The thread is poorly adjusted. The needle is bent...
... through the bobbin winder tension. Only use perfect thread. Allow the machine to run easily. The seam is not regular The tension is too thick, slubbed or hard. Thread loops above . Do not wind the bobbin without a workpiece when when leaving the machine threaded. Important notes: Before changing the presser foot or needle, the on /off . The machine skips stitches. Insert needle system 130/705 H. Insert a new needle. The thread is poorly adjusted. The needle is bent...

Owner's Manual
Page 70
Parts of the sewing machine hobby 4250, 4240 1 Bobbin winder tension 2 Thread guide 3 Needle thread tension 4 Carrying handle 5 Spool stand 6 Bobbin winder 8 Handwheel 9 Handwheel release disc 1 0 Stitch length adjustment button 11 Reverse key 1 2 Connection bushing 1 3 On/off switch 14 Base plate 1 5 Detachable work support with accessory compartment 1 6 Needle plate 1 7 Presser foot holder with presser foot 1 8 Thread guide 1 9 Thread guide 20 Threading groove 21 Take-up lever 22 Needle holder with retaining screw 23 Presser foot lifter 24 Stitch pattern adjustment button 25 Stitch pattern ...
Parts of the sewing machine hobby 4250, 4240 1 Bobbin winder tension 2 Thread guide 3 Needle thread tension 4 Carrying handle 5 Spool stand 6 Bobbin winder 8 Handwheel 9 Handwheel release disc 1 0 Stitch length adjustment button 11 Reverse key 1 2 Connection bushing 1 3 On/off switch 14 Base plate 1 5 Detachable work support with accessory compartment 1 6 Needle plate 1 7 Presser foot holder with presser foot 1 8 Thread guide 1 9 Thread guide 20 Threading groove 21 Take-up lever 22 Needle holder with retaining screw 23 Presser foot lifter 24 Stitch pattern adjustment button 25 Stitch pattern ...


