
Owner's Manual
Page 2
...notes on page 63 Table des matières, page 65 Indice página 67 lndice pagina 69 / binealcoI n The wires according in to the the mains lead are following code: coloured Blue: ...Neutral Brown: Live As the lead of spond minals wcitnohitlihysooutaurhpsrepoplcfiloautlngho,ceuerpwrmcoioracdeyesienndginotaothsfceotfhormerlleoatwiensrs: TckoehdnenwweciitrtheedtwhhteoiclthehtetiesrtecNromlooiurnracelodwlobhuliruceehd must be is mar black. A62 Tfbulheseefprcoloumvgeerm.leuScstprtiacnraeelvfesuurspebpelcioeuvrsseerdosrwatrhiteehoauvtaila PFAFF...
...notes on page 63 Table des matières, page 65 Indice página 67 lndice pagina 69 / binealcoI n The wires according in to the the mains lead are following code: coloured Blue: ...Neutral Brown: Live As the lead of spond minals wcitnohitlihysooutaurhpsrepoplcfiloautlngho,ceuerpwrmcoioracdeyesienndginotaothsfceotfhormerlleoatwiensrs: TckoehdnenwweciitrtheedtwhhteoiclthehtetiesrtecNromlooiurnracelodwlobhuliruceehd must be is mar black. A62 Tfbulheseefprcoloumvgeerm.leuScstprtiacnraeelvfesuurspebpelcioeuvrsseerdosrwatrhiteehoauvtaila PFAFF...

Owner's Manual
Page 6
... cleaning the housing. This sewing machine is solely the responsibility of the needle and constantly observe the sewing area during maintenance work . 2. Do not use only original PFAFF parts. Be sure to : dust, severe dampness, direct sunlight, static elec tricity, heat-producing objects, corro sive chemicals or liquids. To avoid the risk of fluff. it is used on a free surface, which the user can repair...
... cleaning the housing. This sewing machine is solely the responsibility of the needle and constantly observe the sewing area during maintenance work . 2. Do not use only original PFAFF parts. Be sure to : dust, severe dampness, direct sunlight, static elec tricity, heat-producing objects, corro sive chemicals or liquids. To avoid the risk of fluff. it is used on a free surface, which the user can repair...

Owner's Manual
Page 10
... adjustments in the needle area, such as contained in or drop into a tub or sink. To disconnect, turn all moving parts. Never operate on cord. To unplug, grasp the plug, not the cord. 11. Always use only. Use needles recommended by the manufacturer as threading needle, changing needle, threading bobbin, or changing presser foot, etc. 16. Do not pull or push fabric while stitching. It may be blocked. 10. Always unplug sewing machine...
... adjustments in the needle area, such as contained in or drop into a tub or sink. To disconnect, turn all moving parts. Never operate on cord. To unplug, grasp the plug, not the cord. 11. Always use only. Use needles recommended by the manufacturer as threading needle, changing needle, threading bobbin, or changing presser foot, etc. 16. Do not pull or push fabric while stitching. It may be blocked. 10. Always unplug sewing machine...

Owner's Manual
Page 26
... Point fantaisie Elastic seam Point zigzag piqué Honeycomb stitch Point nid dabeille Elastic blind stitch Point invisible elastique Shell-edging stitch -- Point cocotte Point overlock Fancy stitch Fancy stitch Point fantaisie I Overlock stitch nt tricot - position gatiche Zigzag stitch range Pot zigzag Straight triple stretch stitch Zigzag triple stretch stitch Triple couture point droit Triple point zigzag Buttonhole symf Symboles de boutonniere I 'll'' h1 22 Stitch pattern table Stitch Sira ght St teh mrddte position Straight stitch olt needs position Tableau des...
... Point fantaisie Elastic seam Point zigzag piqué Honeycomb stitch Point nid dabeille Elastic blind stitch Point invisible elastique Shell-edging stitch -- Point cocotte Point overlock Fancy stitch Fancy stitch Point fantaisie I Overlock stitch nt tricot - position gatiche Zigzag stitch range Pot zigzag Straight triple stretch stitch Zigzag triple stretch stitch Triple couture point droit Triple point zigzag Buttonhole symf Symboles de boutonniere I 'll'' h1 22 Stitch pattern table Stitch Sira ght St teh mrddte position Straight stitch olt needs position Tableau des...
Owner's Manual
Page 32
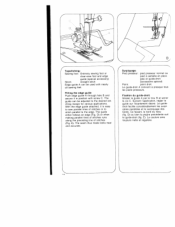
... for various applications. D) ou bien Ia piqure précédente suit le guide-droit (fig. The guide can be adjusted to the edge. Ce faisant, le bord du tissu (fig. E). Suivant 'application, regler le guide sur l'écartement désiré. Topstitching: Sewing foot: Ordinary sewing foot or clear-view foot and edge guide (special accessory): Stitch: straight stitch Edge guide A can be used with screw C.
... for various applications. D) ou bien Ia piqure précédente suit le guide-droit (fig. The guide can be adjusted to the edge. Ce faisant, le bord du tissu (fig. E). Suivant 'application, regler le guide sur l'écartement désiré. Topstitching: Sewing foot: Ordinary sewing foot or clear-view foot and edge guide (special accessory): Stitch: straight stitch Edge guide A can be used with screw C.

Owner's Manual
Page 34
... D). Elastic blind stitch: Sewing foot: blindstitch foot Tension: needle thread tension a little slack. Turn screw A to adjust edge guide B so far to regulate the needle penetration: Place the prepared hem under the blindstitch sewing foot. First make a sewing test using a piece of waste material. \9 4 Point invisible elastique: a Pied presseur: Pied points invisibles Tension: Fil: Fil d'aiguille moms tendu Fil a coudre Point: Point invisible élastique Longueur do tissu. J 30 Thread: ordinary sewing thread Stitch: elastic blind stitch Stitch length: 3-4 Needle: size...
... D). Elastic blind stitch: Sewing foot: blindstitch foot Tension: needle thread tension a little slack. Turn screw A to adjust edge guide B so far to regulate the needle penetration: Place the prepared hem under the blindstitch sewing foot. First make a sewing test using a piece of waste material. \9 4 Point invisible elastique: a Pied presseur: Pied points invisibles Tension: Fil: Fil d'aiguille moms tendu Fil a coudre Point: Point invisible élastique Longueur do tissu. J 30 Thread: ordinary sewing thread Stitch: elastic blind stitch Stitch length: 3-4 Needle: size...

Owner's Manual
Page 36
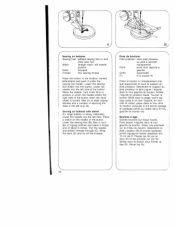
... quelques points de nouage. 6. Set knob 20 at and sew four to 80 1. Set utility-stitch knob 20 at 1and sew the second buttonhole seam as long as the first. Raise the needle. 5. Arrèter laiguille en haut. 3. Sewing buttonholes: Sewing foot: clear-view sewing foot Tension: needle thread tension a little slack Thread: fine machine embroidery thread Stitch length: buttonhole range (red) Needle: sizes 70 to six tacking stitches. Raise the needle. 2. Raise the needle. 3. Ouvrir a boutonniere au Dé...
... quelques points de nouage. 6. Set knob 20 at and sew four to 80 1. Set utility-stitch knob 20 at 1and sew the second buttonhole seam as long as the first. Raise the needle. 5. Arrèter laiguille en haut. 3. Sewing buttonholes: Sewing foot: clear-view sewing foot Tension: needle thread tension a little slack Thread: fine machine embroidery thread Stitch length: buttonhole range (red) Needle: sizes 70 to six tacking stitches. Raise the needle. 2. Raise the needle. 3. Ouvrir a boutonniere au Dé...
Owner's Manual
Page 38
.... 34 4 Sewing on buttons: Sewing foot: wiThout sewing foot or with stems (for large buttons in heavy materials): Lower the needle into the left only (A). Arréter laiguille en position haute. Lower the sewing foot holder into the left needle position Feed: dropped Thread: fine sewing thread Place the button in the location marked beforehand and push it under the sewing foot holder. Lower the needle into the button. Sew six to a position in the left hole. Descendre le support du...
.... 34 4 Sewing on buttons: Sewing foot: wiThout sewing foot or with stems (for large buttons in heavy materials): Lower the needle into the left only (A). Arréter laiguille en position haute. Lower the sewing foot holder into the left needle position Feed: dropped Thread: fine sewing thread Place the button in the location marked beforehand and push it under the sewing foot holder. Lower the needle into the button. Sew six to a position in the left hole. Descendre le support du...

Owner's Manual
Page 40
... zip (Fig. Leave the needle down in the material, raise the zipper toot and open zip under the foot so that its teeth run along the right guiding edge on the sole of the foot (Fig. Lower the zipper foot again and sew to 3 Stitch: Straight stitch, middle needle position Thread: sewing thread This is how the zipper foot is engaged: Insert the foot with the back pin in the back groove E and...
... zip (Fig. Leave the needle down in the material, raise the zipper toot and open zip under the foot so that its teeth run along the right guiding edge on the sole of the foot (Fig. Lower the zipper foot again and sew to 3 Stitch: Straight stitch, middle needle position Thread: sewing thread This is how the zipper foot is engaged: Insert the foot with the back pin in the back groove E and...

Owner's Manual
Page 44
... the end of the foot (Fig. Attach the edge guide and position it for the desired seam margin so that it moves along the edge of the placket on the wrong side so that its teeth are still visible. Lower the zipper foot and finish sewing the seam. Epingler Ia sous-patte...zipper foot to the right edge of the fabric (Fig. Baste the closed zip to the left zip edge (Fig. The zip teeth run along the intended seam line. A). Pin the overlapping edge along the right guiding edge of the seam leave the needle down at the same time as it down in ladies' slacks: For machine setting...
... the end of the foot (Fig. Attach the edge guide and position it for the desired seam margin so that it moves along the edge of the placket on the wrong side so that its teeth are still visible. Lower the zipper foot and finish sewing the seam. Epingler Ia sous-patte...zipper foot to the right edge of the fabric (Fig. Baste the closed zip to the left zip edge (Fig. The zip teeth run along the intended seam line. A). Pin the overlapping edge along the right guiding edge of the seam leave the needle down at the same time as it down in ladies' slacks: For machine setting...

Owner's Manual
Page 46
Darning: Preparing the machine: Sewing foot: Darning foot (special accessory) Stitch type: Straight stitch Needle thread tension: Ease needle thread tension Thread: Fine machine embroidery thread Needle: Size 70 Feld dog: dropped How to sew. When the damaged spot is covered evenly, turn the fabric through 90 and darn over the damaged area in serpentine fashion, as shown in the matenal. Executer d'abord quelques points dans le tissu. Placer les fils étroitement l'un ...
Darning: Preparing the machine: Sewing foot: Darning foot (special accessory) Stitch type: Straight stitch Needle thread tension: Ease needle thread tension Thread: Fine machine embroidery thread Needle: Size 70 Feld dog: dropped How to sew. When the damaged spot is covered evenly, turn the fabric through 90 and darn over the damaged area in serpentine fashion, as shown in the matenal. Executer d'abord quelques points dans le tissu. Placer les fils étroitement l'un ...

Owner's Manual
Page 50
.... 30/3 synthetic thread. Particularly suitable for fine-meshed synthetics, fine linen, chiffon, batiste, organdy, woolens, velvet, fancy seams and embroidery work Light ball point point Specially developed quilting needle Acute round point For working up to the material. Hemstitching point Attractive hemstitching on heavily dressed materials, organdy and glass cambric. Fabric weight: light Needle size: 60, 70, 75 Needle points System & needle size i75H 70...
.... 30/3 synthetic thread. Particularly suitable for fine-meshed synthetics, fine linen, chiffon, batiste, organdy, woolens, velvet, fancy seams and embroidery work Light ball point point Specially developed quilting needle Acute round point For working up to the material. Hemstitching point Attractive hemstitching on heavily dressed materials, organdy and glass cambric. Fabric weight: light Needle size: 60, 70, 75 Needle points System & needle size i75H 70...

Owner's Manual
Page 51
... & needle size Stitch length 130/705 H-ZWI 2.5mm • 80 2.5 mm 130/705 H-ZWI 80 , 2.5 mm 90 2.5mm 100 3.0 mm Stitch width - - very narrow - Needle spacing 1.6mm 2.0 mm 2.5 mm 3.0mm 4.0 mm Suitable for Medium-wide cording Wide cording Extra wide cording Extra-wide cording Decorative designs sewn with twin needles Before you start sewing, turn the handwheel and check to make sure the needles stitch into the fabric properly...
... & needle size Stitch length 130/705 H-ZWI 2.5mm • 80 2.5 mm 130/705 H-ZWI 80 , 2.5 mm 90 2.5mm 100 3.0 mm Stitch width - - very narrow - Needle spacing 1.6mm 2.0 mm 2.5 mm 3.0mm 4.0 mm Suitable for Medium-wide cording Wide cording Extra wide cording Extra-wide cording Decorative designs sewn with twin needles Before you start sewing, turn the handwheel and check to make sure the needles stitch into the fabric properly...

Owner's Manual
Page 58
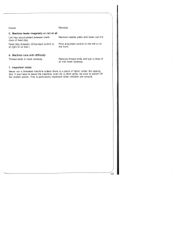
... strikes needle plate because work alone. Check threading. See Needle Chart. Check upper and lower tensions. Poor-quality or knotty thread used . Needle breaks Needle not pushed up as far as it will go . Needle too thin or too thick. Kinks appear on top and bottom of the above . Regulate thread tensions. Insert new needle. Machine skips stitches Needle not inserted correctly. Bobbin case improperly inserted. 4. Remedy: Push needle up as far as it will go . Insert new needle. Seam is...
... strikes needle plate because work alone. Check threading. See Needle Chart. Check upper and lower tensions. Poor-quality or knotty thread used . Needle breaks Needle not pushed up as far as it will go . Needle too thin or too thick. Kinks appear on top and bottom of the above . Regulate thread tensions. Insert new needle. Machine skips stitches Needle not inserted correctly. Bobbin case improperly inserted. 4. Remedy: Push needle up as far as it will go . Insert new needle. Seam is...
Owner's Manual
Page 59
... sewing foot. Machine runs with difficulty Thread ends in hook raceway. Remove needle plate and clean out lint. Important notes: Never run a threaded machine unless there is particularly important when children are around. 55 Machine feeds irregularly or not at rear.) Flick drop-feed control to the left or to switch off the master switch. This is a piece of feed dog. Cause: Remedy: 5. Remove thread ends and put a drop of oil into hook...
... sewing foot. Machine runs with difficulty Thread ends in hook raceway. Remove needle plate and clean out lint. Important notes: Never run a threaded machine unless there is particularly important when children are around. 55 Machine feeds irregularly or not at rear.) Flick drop-feed control to the left or to switch off the master switch. This is a piece of feed dog. Cause: Remedy: 5. Remove thread ends and put a drop of oil into hook...

Owner's Manual
Page 66
... (remove sewing foot holder) Part No. Sewing Operation [ 98-053484-91 For binding edges with tape Cording foot. 5 grooves (twin needle with round needle hole 98-802 422-00 98-694 803-00 For top-stitching (wadding) C1 aution Machine must be obtained from your dealer at straight stitch, centre needle For topstitching and position. for joining elastic overcasting their edges 98-694401-00 For hemming edges 93-106 103-91 Darning fabric...
... (remove sewing foot holder) Part No. Sewing Operation [ 98-053484-91 For binding edges with tape Cording foot. 5 grooves (twin needle with round needle hole 98-802 422-00 98-694 803-00 For top-stitching (wadding) C1 aution Machine must be obtained from your dealer at straight stitch, centre needle For topstitching and position. for joining elastic overcasting their edges 98-694401-00 For hemming edges 93-106 103-91 Darning fabric...

Owner's Manual
Page 67
... Bobbin winding Bobbin winding preparations Changing the bulb Changing the needle Cleaning and oiling Darning Disengaging the sewing mechanism Drawing up the bobbin thread Dropping the feed Edge guide Elastic blind stitch Electrical connection Engaging the sewing mechanism Faults and how to remedy them Inserting the bobbin Inserting the bobbin case Inserting the spool pins Needle chart Needle thread tension Operating the foot control Reverse sewing Sewing buttonholes Sewing on buttons Sewing feet Sewing foot, changing and attaching Special accessories Stitch length, setting the Stitch pattern...
... Bobbin winding Bobbin winding preparations Changing the bulb Changing the needle Cleaning and oiling Darning Disengaging the sewing mechanism Drawing up the bobbin thread Dropping the feed Edge guide Elastic blind stitch Electrical connection Engaging the sewing mechanism Faults and how to remedy them Inserting the bobbin Inserting the bobbin case Inserting the spool pins Needle chart Needle thread tension Operating the foot control Reverse sewing Sewing buttonholes Sewing on buttons Sewing feet Sewing foot, changing and attaching Special accessories Stitch length, setting the Stitch pattern...


