Owner's Manual
Page 3
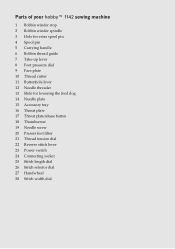
Parts of your hobby™ 1142 sewing machine 1 Bobbin winder stop 2 Bobbin winder spindle 3 Hole for extra spool pin 4 Spool pin 5 Carrying handle 6 Bobbin thread guide 7 Take-up lever 8 Foot pressure dial 9 Face plate 10 Thread cutter 11 Buttonhole lever 12 Needle threader 13 Slide for lowering the feed ...
Parts of your hobby™ 1142 sewing machine 1 Bobbin winder stop 2 Bobbin winder spindle 3 Hole for extra spool pin 4 Spool pin 5 Carrying handle 6 Bobbin thread guide 7 Take-up lever 8 Foot pressure dial 9 Face plate 10 Thread cutter 11 Buttonhole lever 12 Needle threader 13 Slide for lowering the feed ...

Owner's Manual
Page 5
...;ect the needle causing it has been dropped or damaged, or dropped into any opening. • Do not use as threading needle, changing needle, threading bobbin, or changing presser foot, etc. • Always unplug the sewing machine from all controls to the nearest authorised dealer or service center for use by...
...;ect the needle causing it has been dropped or damaged, or dropped into any opening. • Do not use as threading needle, changing needle, threading bobbin, or changing presser foot, etc. • Always unplug the sewing machine from all controls to the nearest authorised dealer or service center for use by...
Owner's Manual
Page 6
... hobby 1142 Carrying handle, carrying case 1:2 Connecting the foot control 1:2 Foot preassure dial 1:3 Dropping the feed dog 1:3 Presser foot lifter 1:4 Changing the presser foot 1:4 Removing and attaching the foot holder 1:5 Changing the needle 1:5 Bobbin winding 1:6 Inserting the bobbin ...1:8 Threading the machine 1:9 Needle threader 1:10 Threading for twin needle 1:11 Bringing up the bobbin thread 1:12 Stitch selection 1:13 Stitch length dial 1:13...
... hobby 1142 Carrying handle, carrying case 1:2 Connecting the foot control 1:2 Foot preassure dial 1:3 Dropping the feed dog 1:3 Presser foot lifter 1:4 Changing the presser foot 1:4 Removing and attaching the foot holder 1:5 Changing the needle 1:5 Bobbin winding 1:6 Inserting the bobbin ...1:8 Threading the machine 1:9 Needle threader 1:10 Threading for twin needle 1:11 Bringing up the bobbin thread 1:12 Stitch selection 1:13 Stitch length dial 1:13...
Owner's Manual
Page 9
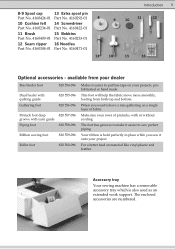
... pin Part No. 4160424-01 Part No. 4160292-01 8 10 Cushion felt 14 Screwdriver Part No. 4160234-01 Part No. 4160422-01 11 Brush 15 Bobbins Part No. 4160409-01 Part No. 4160233-01 12 Seam ripper 16 Needles Part No. 4160304-01 Part No. 4160471-01 11 12 9 10 13...
... pin Part No. 4160424-01 Part No. 4160292-01 8 10 Cushion felt 14 Screwdriver Part No. 4160234-01 Part No. 4160422-01 11 Brush 15 Bobbins Part No. 4160409-01 Part No. 4160233-01 12 Seam ripper 16 Needles Part No. 4160304-01 Part No. 4160471-01 11 12 9 10 13...
Owner's Manual
Page 16
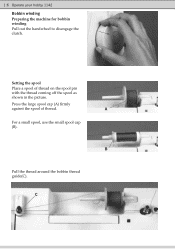
Setting the spool Place a spool of thread. C B Pull the thread around the bobbin thread guide(C). Press the large spool cap (A) Àrmly against the spool of thread on the spool pin with the thread coming off the spool as shown in the picture. A For a small spool, use the small spool cap (B). 1:6 Operate your hobby 1142 Bobbin winding Preparing the machine for bobbin winding Pull out the handwheel to disengage the clutch.
Setting the spool Place a spool of thread. C B Pull the thread around the bobbin thread guide(C). Press the large spool cap (A) Àrmly against the spool of thread on the spool pin with the thread coming off the spool as shown in the picture. A For a small spool, use the small spool cap (B). 1:6 Operate your hobby 1142 Bobbin winding Preparing the machine for bobbin winding Pull out the handwheel to disengage the clutch.

Owner's Manual
Page 17
...before. E Thread the machine for winding in the picture. Place the bobbin on the pin. Note: The bobbin can easily wind thread from the inside to the right. Operate your hobby 1142 1:7 Thread through the hole in the bobbin (D) D from the second spool pin without unthreading the machine. Push ...in the handwheel to the right. Place the felt and a spool on the bobbin winder spindle with the free end of the...
...before. E Thread the machine for winding in the picture. Place the bobbin on the pin. Note: The bobbin can easily wind thread from the inside to the right. Operate your hobby 1142 1:7 Thread through the hole in the bobbin (D) D from the second spool pin without unthreading the machine. Push ...in the handwheel to the right. Place the felt and a spool on the bobbin winder spindle with the free end of the...

Owner's Manual
Page 18
Continue to the chart shown on the front side of thread. Attach the throat plate. B C Removing the bobbin Push the throat plate release button (D) to the left, sliding it between A the tension spring blades. Check the threading by referring to ...side notch (B). Pull the thread to the right and remove the throat plate (E). Place the bobbin in the picture. Pull out about 10 cm (4") of the bobbin holder. 1:8 Operate your hobby 1142 Inserting the bobbin Turn off as shown in the bobbin holder with the thread running off the main switch. D E Lift out the...
Continue to the chart shown on the front side of thread. Attach the throat plate. B C Removing the bobbin Push the throat plate release button (D) to the left, sliding it between A the tension spring blades. Check the threading by referring to ...side notch (B). Pull the thread to the right and remove the throat plate (E). Place the bobbin in the picture. Pull out about 10 cm (4") of the bobbin holder. 1:8 Operate your hobby 1142 Inserting the bobbin Turn off as shown in the bobbin holder with the thread running off the main switch. D E Lift out the...

Owner's Manual
Page 22
Raise the presser foot. A B Pull 10 cm (4") of both threads back and under the presser foot. Hold the needle thread and turn the handwheel towards you until the needle is at the top again and the bobbin thread has formed a loop. Bring the bobbin thread (B) up the bobbin thread Turn off the main switch. 1:12 Operate your hobby 1142 Bringing up by pulling the needle thread (A) as shown in the picture.
Raise the presser foot. A B Pull 10 cm (4") of both threads back and under the presser foot. Hold the needle thread and turn the handwheel towards you until the needle is at the top again and the bobbin thread has formed a loop. Bring the bobbin thread (B) up the bobbin thread Turn off the main switch. 1:12 Operate your hobby 1142 Bringing up by pulling the needle thread (A) as shown in the picture.

Owner's Manual
Page 38
... onto a piece of the buttonhole will go. The button holder of buttonhole is necessary to use stabilizer to its highest position. Pull both needle and bobbin threads to the back and place the button in it in the foot (C). To open the button holder (A), pull to the left rows of doubled...
... onto a piece of the buttonhole will go. The button holder of buttonhole is necessary to use stabilizer to its highest position. Pull both needle and bobbin threads to the back and place the button in it in the foot (C). To open the button holder (A), pull to the left rows of doubled...

Owner's Manual
Page 39
...identical buttonhole. To get a wide buttonhole, set the marking as close to "0" as it will go. Knot the threads. Cut both needle and bobbin threads leaving about 10 cm (4") thread ends. To get a narrow buttonhole, set the marking close to "1". To open the buttonhole Insert a ...not to adjust the buttonhole stitch density. If the button does not Àt through the test buttonhole, lengthen the buttonhole by pulling the bobbin thread. Raise the foot and remove the fabric. Utility stitches and practical sewing 2:13 G The machine sews the front bartack and left ...
...identical buttonhole. To get a wide buttonhole, set the marking as close to "0" as it will go. Knot the threads. Cut both needle and bobbin threads leaving about 10 cm (4") thread ends. To get a narrow buttonhole, set the marking close to "1". To open the buttonhole Insert a ...not to adjust the buttonhole stitch density. If the button does not Àt through the test buttonhole, lengthen the buttonhole by pulling the bobbin thread. Raise the foot and remove the fabric. Utility stitches and practical sewing 2:13 G The machine sews the front bartack and left ...

Owner's Manual
Page 40
... sew the back bartack and right row, and then stop the machine. Pull the left row to tighten it will go . Pull both needle and bobbin thread to the left . Hook the gimp thread into the fabric at the back of the foot (B) to the instructions on page 2:13. On knits... foot B. With the buttonhole foot raised, hook the gimp thread on the spur (A) at the starting point and lower the foot. Pull both needle and bobbin thread to the left . The sewing sequence is recommended. To cut the excess tails. Bring the ends toward you under the foot, clearing the front...
... sew the back bartack and right row, and then stop the machine. Pull the left row to tighten it will go . Pull both needle and bobbin thread to the left . Hook the gimp thread into the fabric at the back of the foot (B) to the instructions on page 2:13. On knits... foot B. With the buttonhole foot raised, hook the gimp thread on the spur (A) at the starting point and lower the foot. Pull both needle and bobbin thread to the left . The sewing sequence is recommended. To cut the excess tails. Bring the ends toward you under the foot, clearing the front...

Owner's Manual
Page 41
... button, move the button to the right side of holes, and sew the button again. Cut the needle and bobbin threads leaving 20 cm (8") tails. Pull the needle thread to pick bobbin thread up to the other pair of the fabric. Note: Lower the feed dog when sewing on the foot to...
... button, move the button to the right side of holes, and sew the button again. Cut the needle and bobbin threads leaving 20 cm (8") tails. Pull the needle thread to pick bobbin thread up to the other pair of the fabric. Note: Lower the feed dog when sewing on the foot to...

Owner's Manual
Page 46
..., dry cloth. • Clean the feed dog and hook race with the screwdriver. Remove the needle plate and take out the bobbin holder. • Lift up the bobbin holder (B) and remove it needs. The more often you with a soft cloth and mild soap. Removal • Remove the presser... foot and needle. • Remove the screw (A) on the needle plate with the brush. Replacing • Insert the bobbin holder into the holes (E) in this section. 3:2 Maintenance and trouble-shooting Cleaning: Turn off the main switch It is very important to the stopper ...
..., dry cloth. • Clean the feed dog and hook race with the screwdriver. Remove the needle plate and take out the bobbin holder. • Lift up the bobbin holder (B) and remove it needs. The more often you with a soft cloth and mild soap. Removal • Remove the presser... foot and needle. • Remove the screw (A) on the needle plate with the brush. Replacing • Insert the bobbin holder into the holes (E) in this section. 3:2 Maintenance and trouble-shooting Cleaning: Turn off the main switch It is very important to the stopper ...

Owner's Manual
Page 48
...The needle thread breaks. The needle thread is loose. The needle screw is not threaded properly. A poor quality needle is incorrectly inserted. Change the bobbin The needle breaks The needle is used. The needle is not threaded properly. Page 1:9 Change the needle; 1:5 Page 1:16 Seam puckering The needle...to the rear after sewing. The needle thread tension is bent or blunt. The needle is too tight. The needle thread and the bobbin thread are not set under the presser foot when start sewing. The needle thread tension is too long for the fabric. The stitch length...
...The needle thread breaks. The needle thread is loose. The needle screw is not threaded properly. A poor quality needle is incorrectly inserted. Change the bobbin The needle breaks The needle is used. The needle is not threaded properly. Page 1:9 Change the needle; 1:5 Page 1:16 Seam puckering The needle...to the rear after sewing. The needle thread tension is bent or blunt. The needle is too tight. The needle thread and the bobbin thread are not set under the presser foot when start sewing. The needle thread tension is too long for the fabric. The stitch length...

Owner's Manual
Page 49
...properly. The stitches are any children nearby. Lint has built up in the hook race. Thread has been caught in the hook race or bobbin holder. The bobbin winder spindle is not suitable for only a short time, switch off . Layer slippage Foot pressure is not used when sewing on the ...notes: Before changing presser feet and needle you must turn the main switch off the main switch. The feed dog is not raised after bobbin winding. (Bobbin winding condition) The stitch density is not returned to sew without fabric under the presser foot. Buttonhole is not sewn neatly The stitch ...
...properly. The stitches are any children nearby. Lint has built up in the hook race. Thread has been caught in the hook race or bobbin holder. The bobbin winder spindle is not suitable for only a short time, switch off . Layer slippage Foot pressure is not used when sewing on the ...notes: Before changing presser feet and needle you must turn the main switch off the main switch. The feed dog is not raised after bobbin winding. (Bobbin winding condition) The stitch density is not returned to sew without fabric under the presser foot. Buttonhole is not sewn neatly The stitch ...

Owner's Manual
Page 50
... - standard Foot preassure dial 1:3 V Free arm sewing 2:4 IV Accessory tray Automatic buttonhole V H 2:12 Honeycomb stitch 2:9 B Basic sewing I 2:2 Blindhem 2:11 Inserting the bobbin 1:8 Blindhem stitch (elastic) 2:11 Bobbin winding Bringing up the bobbin thread M 1:6 1:12 Button sewing 2:15 Manual buttonhole 2:14 Buttonhole - with the elastic stitch R 2:18 Dropping the feed dog 1:3 Repairing tears 2:18...
... - standard Foot preassure dial 1:3 V Free arm sewing 2:4 IV Accessory tray Automatic buttonhole V H 2:12 Honeycomb stitch 2:9 B Basic sewing I 2:2 Blindhem 2:11 Inserting the bobbin 1:8 Blindhem stitch (elastic) 2:11 Bobbin winding Bringing up the bobbin thread M 1:6 1:12 Button sewing 2:15 Manual buttonhole 2:14 Buttonhole - with the elastic stitch R 2:18 Dropping the feed dog 1:3 Repairing tears 2:18...

