

Owner's Manual
Page 2
... making any adjustment in the needle area, such as threading needle, changing needle, threading bobbin, or changing presser foot, etc. • Always unplug the sewing machine from the electrical outlet when removing covers, lubricating, or when making any other user servicing adjustments mentioned in the instruction manual. • Never drop or insert any object into water. The wrong plate can cause the needle to break. • Do not use the proper needle plate. Close attention is necessary when this sewing machine is used...
... making any adjustment in the needle area, such as threading needle, changing needle, threading bobbin, or changing presser foot, etc. • Always unplug the sewing machine from the electrical outlet when removing covers, lubricating, or when making any other user servicing adjustments mentioned in the instruction manual. • Never drop or insert any object into water. The wrong plate can cause the needle to break. • Do not use the proper needle plate. Close attention is necessary when this sewing machine is used...
Owner's Manual
Page 5
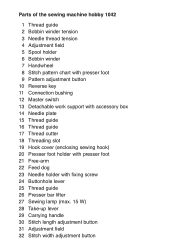
Parts of the sewing machine hobby 1042 1 Thread guide 2 Bobbin winder tension 3 Needle thread tension 4 Adjustment field 5 Spool holder 6 Bobbin winder 7 Handwheel 8 Stitch pattern chart with presser foot 9 Pattern adjustment button 10 Reverse key 11 Connection bushing 12 Master switch 13 Detachable work support with accessory box 14 Needle plate 15 Thread guide 16 Thread guide 17 Thread cutter 18 Threading slot 19 Hook cover (enclosing sewing hook) 20 Presser foot holder with presser foot 21 Free-arm 22 Feed dog 23 Needle holder with fixing screw 24 Buttonhole lever 25 Thread guide 26 Presser...
Parts of the sewing machine hobby 1042 1 Thread guide 2 Bobbin winder tension 3 Needle thread tension 4 Adjustment field 5 Spool holder 6 Bobbin winder 7 Handwheel 8 Stitch pattern chart with presser foot 9 Pattern adjustment button 10 Reverse key 11 Connection bushing 12 Master switch 13 Detachable work support with accessory box 14 Needle plate 15 Thread guide 16 Thread guide 17 Thread cutter 18 Threading slot 19 Hook cover (enclosing sewing hook) 20 Presser foot holder with presser foot 21 Free-arm 22 Feed dog 23 Needle holder with fixing screw 24 Buttonhole lever 25 Thread guide 26 Presser...

Owner's Manual
Page 7
... of the sewing machine hobby 1022 and 1032 1 Thread guide 2 Bobbin winder tension 3 Needle thread tension 4 Adjustment field 5 Spool holder 6 Bobbin winder 7 Handwheel 8 Stitch pattern chart with presser foot 9 Pattern adjustment button 10 Reverse key 11 Connection bushing 12 Master switch 13 Detachable work support with accessory box 14 Needle plate 15 Thread guide 16 Thread guide 17 Thread cutter 18 Threading slot 19 Hook cover (enclosing sewing hook) 20 Presser foot holder with presser foot 21 Free-arm 22 Feed dog 23 Needle holder with fixing screw 25 Thread guide 26 Presser bar lifter 27...
... of the sewing machine hobby 1022 and 1032 1 Thread guide 2 Bobbin winder tension 3 Needle thread tension 4 Adjustment field 5 Spool holder 6 Bobbin winder 7 Handwheel 8 Stitch pattern chart with presser foot 9 Pattern adjustment button 10 Reverse key 11 Connection bushing 12 Master switch 13 Detachable work support with accessory box 14 Needle plate 15 Thread guide 16 Thread guide 17 Thread cutter 18 Threading slot 19 Hook cover (enclosing sewing hook) 20 Presser foot holder with presser foot 21 Free-arm 22 Feed dog 23 Needle holder with fixing screw 25 Thread guide 26 Presser bar lifter 27...
Owner's Manual
Page 8
... Feed dog, lowering 20 Felling foot 57 Foot control 10 56 Free arm 11 28 14-15 G 50 Gathering with the elastic thread 41 33-37 Gathering with the straight stitch 40 29 General sewing aids 25 C Changing the needle 20 Changing the sewing lamp 63 Cleaning and oiling 62 Closed overlock stitch 32 Control panel 21 Cording foot 57 D Darning 42 Detachable work support 11 Drawing up the bobbin thread 18 E Edge guide 26 Elastic blind stitch 28 Elastic stitch 31 Elastic stitches 30-32 Electrical connection 10 Embroidering...
... Feed dog, lowering 20 Felling foot 57 Foot control 10 56 Free arm 11 28 14-15 G 50 Gathering with the elastic thread 41 33-37 Gathering with the straight stitch 40 29 General sewing aids 25 C Changing the needle 20 Changing the sewing lamp 63 Cleaning and oiling 62 Closed overlock stitch 32 Control panel 21 Cording foot 57 D Darning 42 Detachable work support 11 Drawing up the bobbin thread 18 E Edge guide 26 Elastic blind stitch 28 Elastic stitch 31 Elastic stitches 30-32 Electrical connection 10 Embroidering...

Owner's Manual
Page 9
Sewing for fun O Oiling the machine One step buttonhole Open overlock stitch Overlock stitches P Patchwork quilt Practical sewing Presser bar lifter Q Quilt and patchwork foot R Repairing tears Reverse sewing Richelieu Roll hemming RufÁer 62 35-37 32 32 51 25 17 58 43 24 50 46 56 Stitch density 23 Stitch length adjustment button 23 Stitch width adjustment button 24 Straight stitch 27 Stretch stitches, adjusting 23 Stretch triple straight stitch 30 Stretch triple zigzag stitch 30 T Thread cutter 18 Thread tension 14 Threading 16-17 Threading the needle thread 16...
Sewing for fun O Oiling the machine One step buttonhole Open overlock stitch Overlock stitches P Patchwork quilt Practical sewing Presser bar lifter Q Quilt and patchwork foot R Repairing tears Reverse sewing Richelieu Roll hemming RufÁer 62 35-37 32 32 51 25 17 58 43 24 50 46 56 Stitch density 23 Stitch length adjustment button 23 Stitch width adjustment button 24 Straight stitch 27 Stretch stitches, adjusting 23 Stretch triple straight stitch 30 Stretch triple zigzag stitch 30 T Thread cutter 18 Thread tension 14 Threading 16-17 Threading the needle thread 16...
Owner's Manual
Page 10
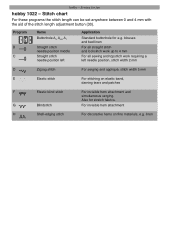
... adjustment button (30). Program B C Name Buttonhole A3, A4/2, A1 Straight stitch needle position middle Straight stitch needle position left needle position, stitch width 2 mm D Zigzag stitch For serging and appliqué, stitch width 5 mm E Elastic stitch For stitching on Àne materials, e.g. linen G Blindstitch For invisible hem attachment H Shell-edging stitch For decorative hems on elastic band, darning tears and patches F Elastic blind stitch For invisible hem attachment and simultaneous serging. Sewing for stretch fabrics. Also for fun hobby 1022...
... adjustment button (30). Program B C Name Buttonhole A3, A4/2, A1 Straight stitch needle position middle Straight stitch needle position left needle position, stitch width 2 mm D Zigzag stitch For serging and appliqué, stitch width 5 mm E Elastic stitch For stitching on Àne materials, e.g. linen G Blindstitch For invisible hem attachment H Shell-edging stitch For decorative hems on elastic band, darning tears and patches F Elastic blind stitch For invisible hem attachment and simultaneous serging. Sewing for stretch fabrics. Also for fun hobby 1022...

Owner's Manual
Page 11
...For these programs the stitch length can be set anywhere between 0 and 4 mm with the aid of the stitch length adjustment button (30). middle and workwear C Stretch triple straight For stretch seams requiring a left needle position stitch, needle position left needle position For serging and appliqué, stitch width 5 mm E Elastic stitch For stitching on Àne materials, e.g. hobby - Program B C D Name Buttonhole A3 A4/2 A1 Straight stitch needle position middle Straight stitch needle position left Zigzag stitch Application Standard buttonhole for fun hobby 1032 - linen...
...For these programs the stitch length can be set anywhere between 0 and 4 mm with the aid of the stitch length adjustment button (30). middle and workwear C Stretch triple straight For stretch seams requiring a left needle position stitch, needle position left needle position For serging and appliqué, stitch width 5 mm E Elastic stitch For stitching on Àne materials, e.g. hobby - Program B C D Name Buttonhole A3 A4/2 A1 Straight stitch needle position middle Straight stitch needle position left Zigzag stitch Application Standard buttonhole for fun hobby 1032 - linen...

Owner's Manual
Page 12
... and appliqué E Elastic stitch F Elastic blind stitch serging. middle e.g. left D Stretch triple zigzag stitch For attaching elastic tape on elastic materials E Honeycomb stitch For sewing on sports- on Àne materials, e.g. blouses and bed linen B Straight stitch, For all straight stitch and lockstitch work up to needle position middle to 5, use the stitch width adjustment button (32). M N OP crotch seams on elastic threads, overlocking towelling and for decorative hem seams F Edge stitch wide For closing and serging one or more fabric layers...
... and appliqué E Elastic stitch F Elastic blind stitch serging. middle e.g. left D Stretch triple zigzag stitch For attaching elastic tape on elastic materials E Honeycomb stitch For sewing on sports- on Àne materials, e.g. blouses and bed linen B Straight stitch, For all straight stitch and lockstitch work up to needle position middle to 5, use the stitch width adjustment button (32). M N OP crotch seams on elastic threads, overlocking towelling and for decorative hem seams F Edge stitch wide For closing and serging one or more fabric layers...
Owner's Manual
Page 24
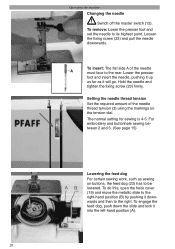
... this, open the hook cover (19) and move the metallic slide to the right-hand position (B) by pushing it up as far as sewing on the tension dial. Loosen the Àxing screw (23) and pull the needle downwards. To engage the feed dog, push down the slide and lock it will go. To remove: Lower the presser foot and set the needle to be lowered. For embroidery and buttonhole sewing between...
... this, open the hook cover (19) and move the metallic slide to the right-hand position (B) by pushing it up as far as sewing on the tension dial. Loosen the Àxing screw (23) and pull the needle downwards. To engage the feed dog, push down the slide and lock it will go. To remove: Lower the presser foot and set the needle to be lowered. For embroidery and buttonhole sewing between...

Owner's Manual
Page 26
...;eld (4). Note: For embroidering use the clear view foot. 22 Operating the machine Setting utility stitches All stitch patterns that you can sew with your machine are illustrated in the adjustment Àeld (4). Using the stitch pattern adjustment button (9) you can set the desired stitch by turning the dial until the required letter appears in the stitch pattern chart (8). Setting fancy stitches (model 1042 only) Using the stitch pattern adjustment button (9) select the fancy stitches M-P. The lower value shows you the optimum stitch length.
...;eld (4). Note: For embroidering use the clear view foot. 22 Operating the machine Setting utility stitches All stitch patterns that you can sew with your machine are illustrated in the adjustment Àeld (4). Using the stitch pattern adjustment button (9) you can set the desired stitch by turning the dial until the required letter appears in the stitch pattern chart (8). Setting fancy stitches (model 1042 only) Using the stitch pattern adjustment button (9) select the fancy stitches M-P. The lower value shows you the optimum stitch length.
Owner's Manual
Page 27
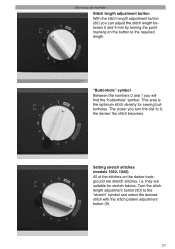
Setting stretch stitches (models 1032, 1042) All of the stitches on the button to the required length. "Buttonhole" symbol Between the numbers 0 and 1 you turn the dial to the "stretch" symbol and select the desired stitch with the stitch pattern adjustment button (9). 23 Turn the stitch length adjustment button (30) to 0, the denser the stitch becomes. Operating the machine Stitch length adjustment button With the stitch length adjustment button (30) you can adjust the stitch length between 0 and 4 mm by turning the point marking on...
Setting stretch stitches (models 1032, 1042) All of the stitches on the button to the required length. "Buttonhole" symbol Between the numbers 0 and 1 you turn the dial to the "stretch" symbol and select the desired stitch with the stitch pattern adjustment button (9). 23 Turn the stitch length adjustment button (30) to 0, the denser the stitch becomes. Operating the machine Stitch length adjustment button With the stitch length adjustment button (30) you can adjust the stitch length between 0 and 4 mm by turning the point marking on...
Owner's Manual
Page 30
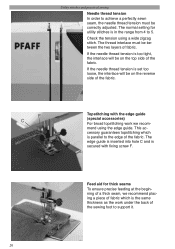
... needle thread tension is set too loose, the interlace will be on the top side of fabric which is secured with Àxing screw F. F C Topstitching with the edge guide (special accessories) For broad topstitching work under the back of a thick seam, we recommend using a wide zigzag stitch. Utility stitches and practical sewing Needle thread tension In order to achieve a perfectly sewn seam, the needle thread tension must be correctly adjusted. The edge guide is inserted into hole...
... needle thread tension is set too loose, the interlace will be on the top side of fabric which is secured with Àxing screw F. F C Topstitching with the edge guide (special accessories) For broad topstitching work under the back of a thick seam, we recommend using a wide zigzag stitch. Utility stitches and practical sewing Needle thread tension In order to achieve a perfectly sewn seam, the needle thread tension must be correctly adjusted. The edge guide is inserted into hole...
Owner's Manual
Page 31
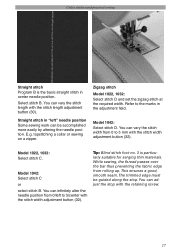
... the fabric edge from 0/left " needle position Some sewing work can be guided along the stop with the stitch width adjustment button (32). E.g. Tip: Blind stitch foot no. 3 is the basic straight stitch in center needle position. Model 1042: Select stitch D. Straight stitch in "left to the marks in Ànitely alter the needle position from rolling up. Model 1042: Select stitch C or select stitch B. You can in the adjustment Àeld. Zigzag stitch Model 1022, 1032: Select stitch D and set the zigzag stitch...
... the fabric edge from 0/left " needle position Some sewing work can be guided along the stop with the stitch width adjustment button (32). E.g. Tip: Blind stitch foot no. 3 is the basic straight stitch in center needle position. Model 1042: Select stitch D. Straight stitch in "left to the marks in Ànitely alter the needle position from rolling up. Model 1042: Select stitch C or select stitch B. You can in the adjustment Àeld. Zigzag stitch Model 1022, 1032: Select stitch D and set the zigzag stitch...

Owner's Manual
Page 33
... sewing Sewing on buttons For sewing on buttons, the presser foot must be removed and the feed dog must be held in the left hole in the button. • Knot the thread ends on the reverse side. 29 Turn the stitch adjustment button (9) to the required width (refer to ensure that the needle also enters the right hand hole in the button. • Lower the presser bar lifter. Take care to the marks). Model...
... sewing Sewing on buttons For sewing on buttons, the presser foot must be removed and the feed dog must be held in the left hole in the button. • Knot the thread ends on the reverse side. 29 Turn the stitch adjustment button (9) to the required width (refer to ensure that the needle also enters the right hand hole in the button. • Lower the presser bar lifter. Take care to the marks). Model...
Owner's Manual
Page 37
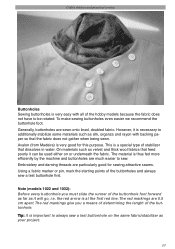
... wool fabrics that feed poorly it can be rotated. Embroidery and darning threads are much easier to additionally stabilize some materials such as silk, organza and rayon with all of the buttonholes and always sew a test buttonhole Àrst. To make sewing buttonholes even easier we recommend the buttonhole foot. Note (models 1022 and 1032): Before every buttonhole you a means of determining the length of the buttonhole. The...
... wool fabrics that feed poorly it can be rotated. Embroidery and darning threads are much easier to additionally stabilize some materials such as silk, organza and rayon with all of the buttonholes and always sew a test buttonhole Àrst. To make sewing buttonholes even easier we recommend the buttonhole foot. Note (models 1022 and 1032): Before every buttonhole you a means of determining the length of the buttonhole. The...
Owner's Manual
Page 38
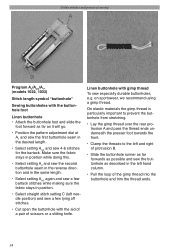
... buttonhole seam in the reverse direction and in the same length. • Select setting A4/2 again and sew a few tying off stitches. • Cut open the buttonhole with the aid of a pair of scissors or a slitting knife. on sportswear, we recommend using a gimp thread. Linen buttonhole with gimp thread To sew especially durable buttonholes, e.g. Utility stitches and practical sewing A B Program A3/A4/2/A1, (models 1022, 1032) Stitch length symbol "buttonhole" Sewing buttonholes with the buttonhole foot Linen buttonhole...
... buttonhole seam in the reverse direction and in the same length. • Select setting A4/2 again and sew a few tying off stitches. • Cut open the buttonhole with the aid of a pair of scissors or a slitting knife. on sportswear, we recommend using a gimp thread. Linen buttonhole with gimp thread To sew especially durable buttonholes, e.g. Utility stitches and practical sewing A B Program A3/A4/2/A1, (models 1022, 1032) Stitch length symbol "buttonhole" Sewing buttonholes with the buttonhole foot Linen buttonhole...

Owner's Manual
Page 41
... buttonholes, push the buttonhole lever (24) upward as far as it will go. • By pulling the bobbin thread, bring the needle thread to prevent damaging the bartack by cutting open the buttonhole, insert a pin into the bartack. 37 Tie off the threads. • Remove the button from the button holder. Utility stitches and practical sewing • In order to sew the next buttonhole turn the stitch pattern adjustment button counter-clockwise until the "reverse...
... buttonholes, push the buttonhole lever (24) upward as far as it will go. • By pulling the bobbin thread, bring the needle thread to prevent damaging the bartack by cutting open the buttonhole, insert a pin into the bartack. 37 Tie off the threads. • Remove the button from the button holder. Utility stitches and practical sewing • In order to sew the next buttonhole turn the stitch pattern adjustment button counter-clockwise until the "reverse...

Owner's Manual
Page 43
... . • Each additional seam can be sewn at a presser foot·s width from the Àrst row. • When sewing several seams next to one another, you must be irregular. • Knot the threads at the beginning and end of the bobbin case must stretch the fabric to its original length when sewing the subsequent seams. Otherwise the gather will be set very loose. For smocking work .
... . • Each additional seam can be sewn at a presser foot·s width from the Àrst row. • When sewing several seams next to one another, you must be irregular. • Knot the threads at the beginning and end of the bobbin case must stretch the fabric to its original length when sewing the subsequent seams. Otherwise the gather will be set very loose. For smocking work .

Owner's Manual
Page 61
... effect by using a sewing thread of a different color. 57 Set stitch length to braiding. Tip: You can make these seams particularly decorative by overstitching a medium pearl thread with the pattern adjustment button (9). Pull the two fabric layers taut during sewing. With this overlapping edge over by the foot and is a technique in two different widths. • Attach the felling foot to the presser foot holder. • Place the fabrics wrong sides...
... effect by using a sewing thread of a different color. 57 Set stitch length to braiding. Tip: You can make these seams particularly decorative by overstitching a medium pearl thread with the pattern adjustment button (9). Pull the two fabric layers taut during sewing. With this overlapping edge over by the foot and is a technique in two different widths. • Attach the felling foot to the presser foot holder. • Place the fabrics wrong sides...

Owner's Manual
Page 68
... of oil to the hook. Only use good quality threads. Re-thread machine. Important notes: Before changing presser feet and needle the master switch must be switched off Needle is not pushed fully in. Do not attempt to make sure bobbin case is not properly inserted. Maintenance and troubleshooting Sewing problems and their solutions Problem/Cause 1. Needle is not properly threaded. The machine is bent or blunt. Use needle system 130/705 H. Insert a new needle. See above . Insert new needle and...
... of oil to the hook. Only use good quality threads. Re-thread machine. Important notes: Before changing presser feet and needle the master switch must be switched off Needle is not pushed fully in. Do not attempt to make sure bobbin case is not properly inserted. Maintenance and troubleshooting Sewing problems and their solutions Problem/Cause 1. Needle is not properly threaded. The machine is bent or blunt. Use needle system 130/705 H. Insert a new needle. See above . Insert new needle and...


