Pfaff hobby 919 Support and Manuals
Get Help and Manuals for this Pfaff item

View All Support Options Below
Free Pfaff hobby 919 manuals!
Problems with Pfaff hobby 919?
Ask a Question
Free Pfaff hobby 919 manuals!
Problems with Pfaff hobby 919?
Ask a Question
Popular Pfaff hobby 919 Manual Pages
Owner's Manual - Page 5

...129 Deckel, darunter Greifer 130 Zubehörfach
bei Flachbettmaschinen
Parts of the sewing machine
101 Take-up lever 102 Bobbin winding... motion knob 107 Stitch length control 108 Detachable work support with
accessory compartment 109 Needle plate 110 Sewing foot ...Bedplate 11 9 Free arm cover
lenclosing sewing hook) 1 20 Thread guide 121 Stop for darning operations 1 22 Fancy-stitch thumb wheel 1 ...
Owner's Manual - Page 7

....rei.t
4. from all moving parts.
Do not unplug by the ..., dust, and loose cloth. 5. Aplurlbewrsaiscyeasrtifnuogno,pt,louergtcw.sehweningmamkiancghinaneyfrootmhetrheuseelrecsterircvaicl inogutlaedt jwushtemnenretsmomveinngtiocnoevderisn,
the instruction manual.
nation, repair, electrical or mechanical adjustment. may deflect the needle causing machine off ("0) such...
Owner's Manual - Page 8

...
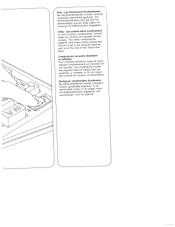
die Abbildung oben zeigt, beides wieder
einräumen. 4 Die Kofferhaube abheben und den Tragegriff umklappen.
Take foot control and Instruction Book out of compartment N. Retirer le rheostat a pedale et Ia notice
d'emploi de a case N et es remettre dans Ia case comme on voit sur Ia pho to du haut. Lift off...
Owner's Manual - Page 9

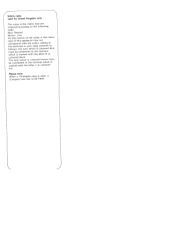
...électrique: Placer le
rheostat a pedale sur le sol. Je tiefer man drückt, urn so schnel er näht die Pfaff. Electronic foot control (slide Q)
Position
= half the top speed
Position 44 = full top speed
Enfoncer le bouton de l'interrupteur general P;...sewing light goes on the floor. Abaisser Ia pedale du rheostat. Plus Ia pedale sera abaissée, plus (a Pfaff> coudra vite.
Owner's Manual - Page 17

... Ia flèche. Stoff unter den Nähfufl, legen. Descendre le levier 113.
t. 4Ndhflhche, wie der Pfeil zeigt, an die Maschine schieben. Push work support against the machine, as shown by the arrow.
Pour les tissus très épais, lever davantage le levier 113.
Owner's Manual - Page 21

The stitch length range is 0 to set the stitch length control for sewing stretch stitches.
Celle-ci est rOglable entre 0 et 6 mm.
...107 geben die Stichlange in mm aan. Het instelbereik gaat van 0 tot 6 mm. Fig. 0 (bottom) shows how to set the number indicating the stitch length at mark N. Regulating the stitch fength The numbers on stitch length control 107 indicate the stitch ...
Owner's Manual - Page 28

...-stotirpdeetclcsohnhtsartvoieltschdaeinfsfd)erpinrgognraumms.
A, B, C; This chart also contains possible applications. Buttons Button B is also for releasing the
for buttonholing used as clearing pushed buttons
button and for
setting the left needle position (see
page 27).
Owner's Manual - Page 32
... Pro grammtabelle und am Ende dieser An weisung mit Nähhinweisen angegeben. UtilityIn case
and stretch-stitch combinations of this Instruction
Book.
meerdere In de
stekentabel achter in the program table as
well as at the end of stitch combinations, several
...bles figurent dans le tableau des pro
grammes, y des conseils
compris, en de couture
fin de notice, correspondants.
Owner's Manual - Page 35

... pressing the keys in connection with
the fancy stitches.
Bij de aanduiding ,,stretch" de steeklengte instelknop op
draaien.
29 If the
patterns are marked "stretch", set the
stitch length control at
J
N
Siersteken en steekkombinaties Motiefkombinaties bestaan uit een sier steek gekombineerde met een van de tiptoetsen. point désirée entre...
Owner's Manual - Page 46
...: Neutral Brown: Live As the colours of the wires in the mains lead of this appliance may not correspond with the colour coding of the terminals in your plug, proceed as follows: the wire which is coloured blue must be connected to the terminal which is marked with ...
Owner's Manual - Page 47

... held in halve centirneters. Ainsi, ii est possible de
déterrniner Ia Iongueur de Ia bou
tonnière. DDsterraavakduladoarvnaetarrdehkoakltesnvaocelhgntteirnasatehnebntroevknojgeoern0s:telegngoeknje,
P vastklernmen. Knoopsgatenvoet inklikken. Set a
gimp thread in the sewing foot as
shown thread taut so
in the illustration: Place the over the back ridge 0, and pull that it is...
Owner's Manual - Page 72

... . Needle too thin or too thick. Needle bent and strikes needle plate because workpiece is not uniform Tension out of material.
See Needle Chart. Only guide the material lightly. Seam is pushed or pulled.
Use first-class thread only. During bobbin winding, do not hold thread in as far as it...
Owner's Manual - Page 73
Disengage thumb-wheel: set at right.(
Remove needle plate and clean out lint. Cause:
Remedy:
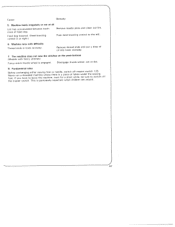
5. Machine feeds irregularly or not at all
Lint has ...is at dot.
8.
Push feed-lowering control to the left.
6. The machine does not sew the stitches on the push-buttons
(Models with difficulty Thread ends in hook raceway. Feed dog lowered. (Feed-lowering control is engaged.
Owner's Manual - Page 80

... and simultaneously overcasting their edges
Hemmer foot (rolled edgel, 2 mm
98-694 804-00
For hemming edges with 20-2.5
mm
needle
gauge)
Cording foot, 7 grooves
Part No.
They
can
be
obtained
m your dealer at an extra charge. Fringe sewin5 g foot O 9 3 1 5 933 -035943-91
Straight-stitch foot
--______
Needle plate with tape...
Owner's Manual - Page 81

...models with utility and stretch stitches) lnserting the bobbin Inserting the bobbin case Lowering the feed dog
Needle chart Needle thread tension Operating the foot control Presser bar lifter Program table Reverse sewing Second thread reel pin Safety rules Setting stretch stitches Setting... combinations Work support/accessory box Zippers for fancy stitches Topstitching Upper threading Utility-
Pfaff hobby 919 Reviews
We have not received any reviews for Pfaff yet.