
Owner's Manual
Page 2
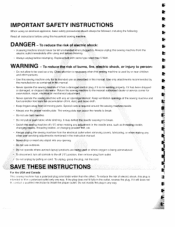
... required around the sewing machine needle. • Always use bent needles F • Do not pull or push fabric whilo stitching. tlien ernove plug from the electric outlet immediately after using and before cleaning. • Always unplug before using an electrical appliance, basic safety precautions should never be used as threading needle, changing needle threading bobbin, or changing presser foot etc. • Always unplug the sewing machine from all moving parts. VVARNING - To reduce...
... required around the sewing machine needle. • Always use bent needles F • Do not pull or push fabric whilo stitching. tlien ernove plug from the electric outlet immediately after using and before cleaning. • Always unplug before using an electrical appliance, basic safety precautions should never be used as threading needle, changing needle threading bobbin, or changing presser foot etc. • Always unplug the sewing machine from all moving parts. VVARNING - To reduce...
Owner's Manual
Page 4
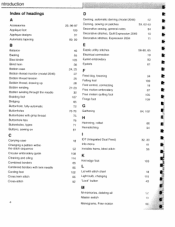
... A Accessories Applique foot Applique designs Automatic tapering B Balance Basting Bias binder Blind hem Bobbin case Bobbin thread monitor (model 2046) Bobbin thread tension Bobbin thread, drawing up Bobbin winding Bobbin winding through the needle Braiding foot Bridging Buttonhole, fully-automatic Buttonholes Buttonholes with gimp thread Buttonhole tips Buttonholes, types Buttons, sewing on C Carrying case Changing a pattern within the stitch sequence Circular embroidery guide Cleaning and oiling Combined borders Combined borders with twin needle Cording foot Cross hem stitch Cross-stitch...
... A Accessories Applique foot Applique designs Automatic tapering B Balance Basting Bias binder Blind hem Bobbin case Bobbin thread monitor (model 2046) Bobbin thread tension Bobbin thread, drawing up Bobbin winding Bobbin winding through the needle Braiding foot Bridging Buttonhole, fully-automatic Buttonholes Buttonholes with gimp thread Buttonhole tips Buttonholes, types Buttons, sewing on C Carrying case Changing a pattern within the stitch sequence Circular embroidery guide Cleaning and oiling Combined borders Combined borders with twin needle Cording foot Cross hem stitch Cross-stitch...
Owner's Manual
Page 5
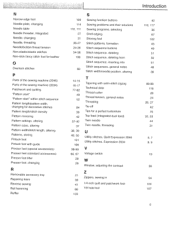
...Needle, changing Needle, threading Needle/bobbin thread tension Non-elastic/elastic stitches Non-stick fancy stitch foot for leather 0 Overlock stitches P Parts of the sewing machine (2046) Parts of the sewing machine (2034) Patchwork and quilting "Pattern start' 'Pattern start" within stitch sequence Pattern length/pattern width, changing for decorative stitches Pattern length/stitch density Pattern mirroring Pattern settings, altering Pattern sizes, altering Pattern width/stitch length, altering Patterns, storing Pintuck foot Pintuck foot with guide Presser feet (special accessories) Presser...
...Needle, changing Needle, threading Needle/bobbin thread tension Non-elastic/elastic stitches Non-stick fancy stitch foot for leather 0 Overlock stitches P Parts of the sewing machine (2046) Parts of the sewing machine (2034) Patchwork and quilting "Pattern start' 'Pattern start" within stitch sequence Pattern length/pattern width, changing for decorative stitches Pattern length/stitch density Pattern mirroring Pattern settings, altering Pattern sizes, altering Pattern width/stitch length, altering Patterns, storing Pintuck foot Pintuck foot with guide Presser feet (special accessories) Presser...
Owner's Manual
Page 6
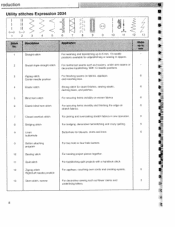
roduction Utility stitches Expression 2034 I Ei
roduction Utility stitches Expression 2034 I Ei
Owner's Manual
Page 7
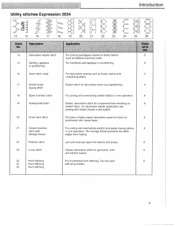
Can be used 6 25 Hem stitching with elastic thread in the bobbin. 20 Cross hem stitch Provides a highly elastic decorative seam for decorative elastic application and sewing with wing needle. 26 Hem stitching 9 The selvage thread prevents the fabric edges from fraying. 22 Pullover stitch Join and overcast open knit fabrics and jersey. 6 23 Cross stitch Classic decorative stitch for decorative hems and topstitching. 6 18 Open overlock stitch For joining and overcasting stretch fabrics in one operation. For joining overlapped...
Can be used 6 25 Hem stitching with elastic thread in the bobbin. 20 Cross hem stitch Provides a highly elastic decorative seam for decorative elastic application and sewing with wing needle. 26 Hem stitching 9 The selvage thread prevents the fabric edges from fraying. 22 Pullover stitch Join and overcast open knit fabrics and jersey. 6 23 Cross stitch Classic decorative stitch for decorative hems and topstitching. 6 18 Open overlock stitch For joining and overcasting stretch fabrics in one operation. For joining overlapped...

Owner's Manual
Page 10
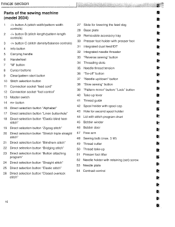
...Bobbin winder stitch" 46 Bobbin door 19 Direct selection button "Zigzag stitch" 47 Free arm 20 Direct selection button "Stretch triple straight stitch" 21 Direct selection button "Blind hem stitch" 22 Direct selection button "Bridging stitch" 23 Direct selection button "Button attaching program" 24 Direct selection button "Straight stitch" 25 Direct selection button "Elastic stitch" 48 Sewing bulb (max. 5 W) 49 Thread cutter 50 Thread take-up 51 Presser foot lifter 52 Needle holder with retaining (set) screw 53 Needle plate 54 Contrast control 26 Direct selection button "Closed overlock...
...Bobbin winder stitch" 46 Bobbin door 19 Direct selection button "Zigzag stitch" 47 Free arm 20 Direct selection button "Stretch triple straight stitch" 21 Direct selection button "Blind hem stitch" 22 Direct selection button "Bridging stitch" 23 Direct selection button "Button attaching program" 24 Direct selection button "Straight stitch" 25 Direct selection button "Elastic stitch" 48 Sewing bulb (max. 5 W) 49 Thread cutter 50 Thread take-up 51 Presser foot lifter 52 Needle holder with retaining (set) screw 53 Needle plate 54 Contrast control 26 Direct selection button "Closed overlock...
Owner's Manual
Page 12
... buttonhole" 18 Direct selection button "Elastic blind hem 42 Spool holder with spool cap 43 Hole for lowering the feed dog 28 Base plate F 2 -1+ button B (stitch length/pattern length 29 Removable accessory tray F controls) 30 Presser foot holder with presser foot F 3 -1+ button C (stitch density/balance controls) 4 Info button 31 Integrated dual feed!IDT F 5 Carrying handle 32 Integrated needle threader F 6 Handwheel 7 M" button 8 Cursor buttons 33 'Reverse sewing" button 34 Threading slots F 35 Needle thread tension F 9 Clear/pattern start button 36 "Tie-off" button...
... buttonhole" 18 Direct selection button "Elastic blind hem 42 Spool holder with spool cap 43 Hole for lowering the feed dog 28 Base plate F 2 -1+ button B (stitch length/pattern length 29 Removable accessory tray F controls) 30 Presser foot holder with presser foot F 3 -1+ button C (stitch density/balance controls) 4 Info button 31 Integrated dual feed!IDT F 5 Carrying handle 32 Integrated needle threader F 6 Handwheel 7 M" button 8 Cursor buttons 33 'Reverse sewing" button 34 Threading slots F 35 Needle thread tension F 9 Clear/pattern start button 36 "Tie-off" button...
Owner's Manual
Page 15
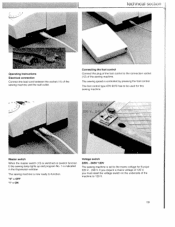
... controlled by pressing the foot control. If you require a mains voltage of the machine to the connection socket (12) of the sewing machine and the wall outlet. Iechnicai seUiün Operating Instructions Electrical connection Connect the lead cord between the socket (11) of the sewing machine. Connecting the foot control Connect the plug of the foot control to 120 V. 19 The sewing speed is indicated in the Expression...
... controlled by pressing the foot control. If you require a mains voltage of the machine to the connection socket (12) of the sewing machine and the wall outlet. Iechnicai seUiün Operating Instructions Electrical connection Connect the lead cord between the socket (11) of the sewing machine. Connecting the foot control Connect the plug of the foot control to 120 V. 19 The sewing speed is indicated in the Expression...

Owner's Manual
Page 27
... highest position. Hold the needle and tighten the needle screw (52) firmly. Technica' secUon Changing the needle Switch off the master switch To remove: Lower the presser foot and set the needle to the rear. To insert: The flat side A of tension disk B. Insert the second spool holder and place one thread each of thread on each to use the integrated needle threader with a twin needle. Continue threading in the left into the thread guide and thread the needles...
... highest position. Hold the needle and tighten the needle screw (52) firmly. Technica' secUon Changing the needle Switch off the master switch To remove: Lower the presser foot and set the needle to the rear. To insert: The flat side A of tension disk B. Insert the second spool holder and place one thread each of thread on each to use the integrated needle threader with a twin needle. Continue threading in the left into the thread guide and thread the needles...

Owner's Manual
Page 33
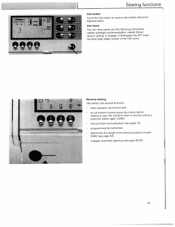
The symbol disappears after a full bobbin is inserted and you start to the right ol the window. Each change is visible in the window. cha Stitch width Pattern width Needle position for straight stitches 9 Sewing functions Bobbin thread monitor (model 2046) If the bobbin is nearing its end [2 ¼ yd (2 m)-3 1/4 yd (3 m)], or there is no thread on the bobbin, the bobbin symbol appears in the window. Altering stitches Adjust the length, width, balance, density or needle position of stitches by touching the appropriate -1+ buttons to sew again.
The symbol disappears after a full bobbin is inserted and you start to the right ol the window. Each change is visible in the window. cha Stitch width Pattern width Needle position for straight stitches 9 Sewing functions Bobbin thread monitor (model 2046) If the bobbin is nearing its end [2 ¼ yd (2 m)-3 1/4 yd (3 m)], or there is no thread on the bobbin, the bobbin symbol appears in the window. Altering stitches Adjust the length, width, balance, density or needle position of stitches by touching the appropriate -1+ buttons to sew again.
Owner's Manual
Page 37
... button before starting to sew, the machine sews in reverse until you the following information: needle size/type recommendation. needle thread tension setting, to receive information about the selected stitch. Info menu The info menu gives you press the button again (2046) manual finish of a buttonhole (see page 89-90) I I 41 "0, Sewing functions Info button Touch the info button to engage or disengage the IDT, lower the feed dogs, page number of the darning program (model...
... button before starting to sew, the machine sews in reverse until you the following information: needle size/type recommendation. needle thread tension setting, to receive information about the selected stitch. Info menu The info menu gives you press the button again (2046) manual finish of a buttonhole (see page 89-90) I I 41 "0, Sewing functions Info button Touch the info button to engage or disengage the IDT, lower the feed dogs, page number of the darning program (model...
Owner's Manual
Page 53
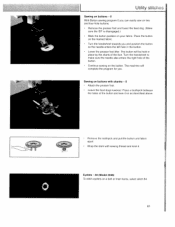
... Sewing on buttons -0 With Button sewing program 0 you . Place the button on buttons with sewing thread and knot it on as described above. • Remove the toothpick and pull the button and fabric apart. • Wrap the stem with shanks - 0 • Attach the presser foot. • Leave the feed dogs lowered. Sewing on the marked fabric. • Turn the handwheel towards you and position the button so the needle enters the left hole in...
... Sewing on buttons -0 With Button sewing program 0 you . Place the button on buttons with sewing thread and knot it on as described above. • Remove the toothpick and pull the button and fabric apart. • Wrap the stem with shanks - 0 • Attach the presser foot. • Leave the feed dogs lowered. Sewing on the marked fabric. • Turn the handwheel towards you and position the button so the needle enters the left hole in...

Owner's Manual
Page 55
... the hole of straight stitch. Tip: Remember; The long, plastic arm must be behind the needle clamplneedle set at its highest position. Tighten the set screw. • Darning position: Lower the presser bar lifter slowly and push it to appear on the reverse side of the darning foot as far as it engages in both directions over the area again. In this position the thread tension is set screw. Insert the pin of your work 63...
... the hole of straight stitch. Tip: Remember; The long, plastic arm must be behind the needle clamplneedle set at its highest position. Tighten the set screw. • Darning position: Lower the presser bar lifter slowly and push it to appear on the reverse side of the darning foot as far as it engages in both directions over the area again. In this position the thread tension is set screw. Insert the pin of your work 63...

Owner's Manual
Page 56
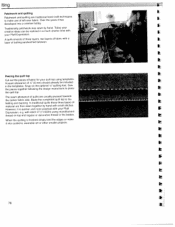
... on the right side of the fabric. Continue attaching elastic threads to help guide the elastic thread. 64 Tip: Use the cording foot (special accessory) to fabric. Set your stitch length to the fabric. Gathering with elastic threads - 17 (19/2034> Gathering with straight stitch - 1 1 A straight stitch can be used to 3. Raise the presser foot and place the elastic thread around the back of the needle. • Lower the presser foot and sew a few stitches until the needle is in the lowest position. Leave about 4 - 5 inches (10-13 cm...
... on the right side of the fabric. Continue attaching elastic threads to help guide the elastic thread. 64 Tip: Use the cording foot (special accessory) to fabric. Set your stitch length to the fabric. Gathering with elastic threads - 17 (19/2034> Gathering with straight stitch - 1 1 A straight stitch can be used to 3. Raise the presser foot and place the elastic thread around the back of the needle. • Lower the presser foot and sew a few stitches until the needle is in the lowest position. Leave about 4 - 5 inches (10-13 cm...

Owner's Manual
Page 67
... the needle. Sew the right-hand seam of the buttonhole foot. Cut off the excess gimp thread. 75 Guide the gimp thread along the foot at the back of the curved end pull the gimp thread down from the fabric surface. Carefully sew the curve. Buttonhole No. 9 can now be raised from the clamp with a straight pin. After the machine sews the first few stitches of the presser foot. Pass the thread...
... the needle. Sew the right-hand seam of the buttonhole foot. Cut off the excess gimp thread. 75 Guide the gimp thread along the foot at the back of the curved end pull the gimp thread down from the fabric surface. Carefully sew the curve. Buttonhole No. 9 can now be raised from the clamp with a straight pin. After the machine sews the first few stitches of the presser foot. Pass the thread...
Owner's Manual
Page 70
... it into a creative hobby. I your quilt top using monofilament thread on the optional ¼" quilting foot. In traditional quilts these three layers of batting sandwiched between. When the quilting is quicker and more practical with stitch 27 (11/2034) using templates. Today your Pfaft Expression, e.g. A quilt consists of three layers, two layers of fabric with small stitches. Sew the pieces together following the design instructions to the batting...
... it into a creative hobby. I your quilt top using monofilament thread on the optional ¼" quilting foot. In traditional quilts these three layers of batting sandwiched between. When the quilting is quicker and more practical with stitch 27 (11/2034) using templates. Today your Pfaft Expression, e.g. A quilt consists of three layers, two layers of fabric with small stitches. Sew the pieces together following the design instructions to the batting...

Owner's Manual
Page 72
I • Set the needle thread tension to produce the desired effect. :4 4 80 Use I easier with the Pfaff Antique quilt stitches. • Use invisible (monofilament) thread in the bobbin. Create the stitch pattern on the three layers of your quilt, you should only see your needle tension as needed to 7-9. • When you sew the stitch on top of the fabric, The intermediate stitch disappears and thus produces a handstitched appearance. This hand stitched look...
I • Set the needle thread tension to produce the desired effect. :4 4 80 Use I easier with the Pfaff Antique quilt stitches. • Use invisible (monofilament) thread in the bobbin. Create the stitch pattern on the three layers of your quilt, you should only see your needle tension as needed to 7-9. • When you sew the stitch on top of the fabric, The intermediate stitch disappears and thus produces a handstitched appearance. This hand stitched look...
Owner's Manual
Page 73
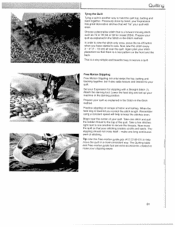
... speed will tie' your Expression for model 2034). I QuiWi Tying the Quilt Tying a quilt is another to secure the threads. Choose a decorative stitch that your quilt as 75 or 78 (56 or 58 for stippling with ease. This is a forward moving stitch. Lower the feed dog and set up your quilt. Set your quilt with a Straight Stitch (1). Take one long continuous swirl of fabric and batting. In order to secure a quilt. Free Motion...
... speed will tie' your Expression for model 2034). I QuiWi Tying the Quilt Tying a quilt is another to secure the threads. Choose a decorative stitch that your quilt as 75 or 78 (56 or 58 for stippling with ease. This is a forward moving stitch. Lower the feed dog and set up your quilt. Set your quilt with a Straight Stitch (1). Take one long continuous swirl of fabric and batting. In order to secure a quilt. Free Motion...
Owner's Manual
Page 96
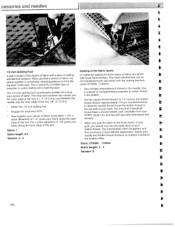
... the dual feed (lOT). Attach the 1,4 inch quilting foot. Use a contrast or complementary polyester or cotton thread in the bobbin. • Set the,needle thread tension to a middle layer of the foot is particularly suitable for working with the sewing machine (stitch 27/2046 11/2034). • Use invisible (monofilament) thread in continually changing patterns to form the top layer of the quilt, This is tacked to 7-9. Many geometric pieces of fabric are...
... the dual feed (lOT). Attach the 1,4 inch quilting foot. Use a contrast or complementary polyester or cotton thread in the bobbin. • Set the,needle thread tension to a middle layer of the foot is particularly suitable for working with the sewing machine (stitch 27/2046 11/2034). • Use invisible (monofilament) thread in continually changing patterns to form the top layer of the quilt, This is tacked to 7-9. Many geometric pieces of fabric are...

Owner's Manual
Page 108
... into bobbin tension spring. Thread is threaded. Thread is not properly inserted. Only use . The bobbin case is too thick. Only guide the fabric lightly. Re-thread machine, making sure presser foot is raised to make sure bobbin case is in . p 116 The machine is too small for thread. Needle is not properly threaded. Insert a new needle. Needle is sewn unevenly The tension needs adjusting. Insert different type of fabric. Thread loops at top or underside of needle. Do not wind thread by hand. Wrong needle is secure. Push needle fully...
... into bobbin tension spring. Thread is threaded. Thread is not properly inserted. Only use . The bobbin case is too thick. Only guide the fabric lightly. Re-thread machine, making sure presser foot is raised to make sure bobbin case is in . p 116 The machine is too small for thread. Needle is not properly threaded. Insert a new needle. Needle is sewn unevenly The tension needs adjusting. Insert different type of fabric. Thread loops at top or underside of needle. Do not wind thread by hand. Wrong needle is secure. Push needle fully...


