
Owner's Manual
Page 9
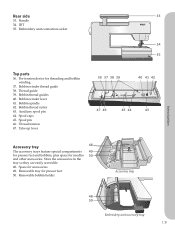
...-up lever 36 37 38 39 40 41 42 47 46 45 44 43 Accessory tray 48 The accessory trays feature special compartments 49 for presser feet and bobbins, plus space for accessories 49. Removable bobbin holder Accessory tray Introduction 48 50 Embroidery unit accessory tray 1:9 Bobbin winder thread guide 38. Bobbin... they are easily accessible. 48. Spool caps 45. IDT 35. Bobbin spindle 42. Removable tray for threading and bobbin winding 37. Pre-tension device for presser feet 50.
...-up lever 36 37 38 39 40 41 42 47 46 45 44 43 Accessory tray 48 The accessory trays feature special compartments 49 for presser feet and bobbins, plus space for accessories 49. Removable bobbin holder Accessory tray Introduction 48 50 Embroidery unit accessory tray 1:9 Bobbin winder thread guide 38. Bobbin... they are easily accessible. 48. Spool caps 45. IDT 35. Bobbin spindle 42. Removable tray for threading and bobbin winding 37. Pre-tension device for presser feet 50.

Owner's Manual
Page 11
...close to ride along the fold of the hem edge. Use the markings on the foot to zipper teeth. Presser foot 5M Presser foot 6A Presser foot 7 Presser foot 8 Manual buttonhole foot This foot is used for blindhem stitches. The groove on the underside of the zipper... been entered into the machine. The groove on the underside of the foot holds cording for darning. Presser feet Presser foot 0A Presser foot 1A Presser foot 2A Presser foot 3 Presser foot 4 Standard presser foot with IDT (attached on the machine upon delivery) This foot is used for decorative stitches. Fancy...
...close to ride along the fold of the hem edge. Use the markings on the foot to zipper teeth. Presser foot 5M Presser foot 6A Presser foot 7 Presser foot 8 Manual buttonhole foot This foot is used for blindhem stitches. The groove on the underside of the zipper... been entered into the machine. The groove on the underside of the foot holds cording for darning. Presser feet Presser foot 0A Presser foot 1A Presser foot 2A Presser foot 3 Presser foot 4 Standard presser foot with IDT (attached on the machine upon delivery) This foot is used for decorative stitches. Fancy...

Owner's Manual
Page 29
...away from the top and bottom at a comfortable height for regulating the presser foot height. The flat the ribbed ankle. IDT (Integrated dual feed) For sewing any fabric precisely PFAFF® creative vision™ sewing and embroidery machine provides the ideal solution: the integrated ...dual feed, IDT system. The IDT keeps all work with the IDT, use presser feet with two fingers at side must face upwards...
...away from the top and bottom at a comfortable height for regulating the presser foot height. The flat the ribbed ankle. IDT (Integrated dual feed) For sewing any fabric precisely PFAFF® creative vision™ sewing and embroidery machine provides the ideal solution: the integrated ...dual feed, IDT system. The IDT keeps all work with the IDT, use presser feet with two fingers at side must face upwards...
Owner's Manual
Page 46
.... Do not use if Sensormatic free-motion is being formed. Pfaff HD screen Sensormatic free-motion Activate to set the machine in Spring foot free-motion mode. Note: Be careful not to adjust the presser foot pressure. The open -toe free-motion feet are stitching. Spring foot free-motion Activate to set the...
.... Do not use if Sensormatic free-motion is being formed. Pfaff HD screen Sensormatic free-motion Activate to set the machine in Spring foot free-motion mode. Note: Be careful not to adjust the presser foot pressure. The open -toe free-motion feet are stitching. Spring foot free-motion Activate to set the...
Owner's Manual
Page 62
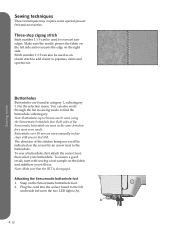
...using the Sensormatic buttonhole foot. Snap on the right side. A 4:12 Sewing mode Sewing techniques These techniques may require some special presser feet and accessories. Attaching the Sensormatic buttonhole foot 1. The direction of the Sensormatic buttonhole are sewn manually in the selection menu. Buttonholes ...To sew a buttonhole, first attach the correct foot, then select your buttonhole. To ensure a good result, start with presser foot 5M. Three-step zigzag stitch Stich number 1.1.9 can also scroll through the list in the same direction for a more even result.
...using the Sensormatic buttonhole foot. Snap on the right side. A 4:12 Sewing mode Sewing techniques These techniques may require some special presser feet and accessories. Attaching the Sensormatic buttonhole foot 1. The direction of the Sensormatic buttonhole are sewn manually in the selection menu. Buttonholes ...To sew a buttonhole, first attach the correct foot, then select your buttonhole. To ensure a good result, start with presser foot 5M. Three-step zigzag stitch Stich number 1.1.9 can also scroll through the list in the same direction for a more even result.

Owner's Manual
Page 67
...the direction, use the four direction sewing icons (C). Use them for sewing on patches without having to find out which special presser foot is indicated by touching one of the four direction icons. A B C D Sewing mode 4:17 Note: Touch Quick help (D) and then...eld (B), and the actual sewing direction is sewn in one direction, select the new direction by the optional presser foot icon (A). These techniques may require some special presser feet and accessories. The selected direction icon is also showing the actual sewing direction. Special sewing techniques The 6th ...
...the direction, use the four direction sewing icons (C). Use them for sewing on patches without having to find out which special presser foot is indicated by touching one of the four direction icons. A B C D Sewing mode 4:17 Note: Touch Quick help (D) and then...eld (B), and the actual sewing direction is sewn in one direction, select the new direction by the optional presser foot icon (A). These techniques may require some special presser feet and accessories. The selected direction icon is also showing the actual sewing direction. Special sewing techniques The 6th ...
Owner's Manual
Page 83
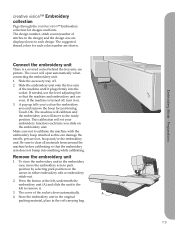
If needed, use the level adjusting feet so that the embroidery arm does not bump into the socket. Make sure not to clear all materials from around the machine before calibrating so ... shown. Be sure to calibrate the machine with the embroidery hoop attached as this can damage the needle, presser foot, hoop and/or the embroidery unit. Preparations creative vision™ Embroidery collection Page through the creative vision™ Embroidery collection for each design. If the machine is a covered socket behind the free-arm, see picture...
If needed, use the level adjusting feet so that the embroidery arm does not bump into the socket. Make sure not to clear all materials from around the machine before calibrating so ... shown. Be sure to calibrate the machine with the embroidery hoop attached as this can damage the needle, presser foot, hoop and/or the embroidery unit. Preparations creative vision™ Embroidery collection Page through the creative vision™ Embroidery collection for each design. If the machine is a covered socket behind the free-arm, see picture...
Owner's Manual
Page 137
...:4 Personal files 10:3 Personal fonts 10:3 Personal info 3:13 Personal menu 3:4 PFAFF® HD screen 3:2 Position of the marked stitch point 6:5 Precise positioning 9:8 Presser feet 1:11 Presser foot down and pivot toggle 2:15 Presser foot height embroidery 3:10 Presser foot pressure 3:10 Presser foot up and extra lift toggle 2:15 Q Quick help 3:13 R Raise and lower...
...:4 Personal files 10:3 Personal fonts 10:3 Personal info 3:13 Personal menu 3:4 PFAFF® HD screen 3:2 Position of the marked stitch point 6:5 Precise positioning 9:8 Presser feet 1:11 Presser foot down and pivot toggle 2:15 Presser foot height embroidery 3:10 Presser foot pressure 3:10 Presser foot up and extra lift toggle 2:15 Q Quick help 3:13 R Raise and lower...


