
Owner's Manual
Page 83
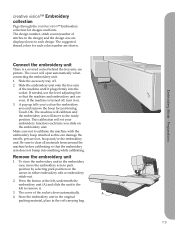
...that the machine and embroidery unit are shown. Preparations creative vision™ Embroidery collection Page through the creative vision™ Embroidery collection for positioning. The cover will move the embroidery arm to clear the embroidery area and remove the hoop for designs and fonts. If the machine is a... place in either embroidery edit or embroidery stitch-out. 2. Touch OK. The cover of stitches in the design) and the design size are displayed next to each time you to park position by selecting park position on . 3. Press the button at the left, ...
...that the machine and embroidery unit are shown. Preparations creative vision™ Embroidery collection Page through the creative vision™ Embroidery collection for positioning. The cover will move the embroidery arm to clear the embroidery area and remove the hoop for designs and fonts. If the machine is a... place in either embroidery edit or embroidery stitch-out. 2. Touch OK. The cover of stitches in the design) and the design size are displayed next to each time you to park position by selecting park position on . 3. Press the button at the left, ...

Owner's Manual
Page 93
... dragging in the embroidery field. Scale (15) When scale is active, you can move the stylus from the center of the selected design(s), the size will decrease. Height and width can pan, move the stylus on which touch function is active, the selected design(s) will rotate the design(s) 90 degrees... 18 17 18 15 17 18 15 17 16 17 8:7 If you move , rotate and scale, depending on the screen towards the center of the hoop. edit Touch functions You can pan the embroidery field in the wheel (17) to fine tune. Rotate (14) When rotate is active. Use...
... dragging in the embroidery field. Scale (15) When scale is active, you can move the stylus from the center of the selected design(s), the size will decrease. Height and width can pan, move the stylus on which touch function is active, the selected design(s) will rotate the design(s) 90 degrees... 18 17 18 15 17 18 15 17 16 17 8:7 If you move , rotate and scale, depending on the screen towards the center of the hoop. edit Touch functions You can pan the embroidery field in the wheel (17) to fine tune. Rotate (14) When rotate is active. Use...

Owner's Manual
Page 96
... authorized PFAFF® dealer. Multi-select (C) and select equal (D) If you can only be used and more than one color block at a time, use the multi-select icon (C). Touch the multi-select icon again to replace in the embroidery field. 8:10 A CD B Note: Hoops that ... color block(s). The window will close automatically. To deselect a color block, touch it and touch OK. Select hoop (21) 21 To select the correct hoop size, touch the hoop selection icon (21). The selected color block(s) will be highlighted in the color list. When the select equal icon...
... authorized PFAFF® dealer. Multi-select (C) and select equal (D) If you can only be used and more than one color block at a time, use the multi-select icon (C). Touch the multi-select icon again to replace in the embroidery field. 8:10 A CD B Note: Hoops that ... color block(s). The window will close automatically. To deselect a color block, touch it and touch OK. Select hoop (21) 21 To select the correct hoop size, touch the hoop selection icon (21). The selected color block(s) will be highlighted in the color list. When the select equal icon...

Owner's Manual
Page 101
.... 6. Select the line shape in the list (A). Touch the wheel center icon once to side. Close Shaping. Select the touch function - Switch to 360x200. 3. Set hoop size to embroidery stitch-out by touching the duplicate last (+) icon (C). 7. C E 8:15 scale. Close sequencing to load to sequencing and then open the selection menu. edit...
.... 6. Select the line shape in the list (A). Touch the wheel center icon once to side. Close Shaping. Select the touch function - Switch to 360x200. 3. Set hoop size to embroidery stitch-out by touching the duplicate last (+) icon (C). 7. C E 8:15 scale. Close sequencing to load to sequencing and then open the selection menu. edit...

Owner's Manual
Page 104
...13 14 18 Retain fill type Do not retain fill type 8:18 The size of the design is working. Adjust the placement of stitches in millimeters above the wheel. There are made in the hoop, using the wheel. When finished the resize window will stop. The resizing process ...will close the window and start resizing When you want to resize. Note: To reduce or increase the size less than the original design. Retain fill...
...13 14 18 Retain fill type Do not retain fill type 8:18 The size of the design is working. Adjust the placement of stitches in millimeters above the wheel. There are made in the hoop, using the wheel. When finished the resize window will stop. The resizing process ...will close the window and start resizing When you want to resize. Note: To reduce or increase the size less than the original design. Retain fill...
Owner's Manual
Page 105
... your machine always resizes first may see stitch irregularities. design is larger than hoop size, the machine • It does not matter in which order you adjust will be increased larger than the hoop, you cannot cancel and you need to ensure the best possible design before embroidering on...designs. Always embroider a test sample of your the design, you only want to add stitches to make the design local authorized PFAFF® dealer. Some designs resize process will always go back to purchase from your resized new resizing. Depending on the memory left in ...
... your machine always resizes first may see stitch irregularities. design is larger than hoop size, the machine • It does not matter in which order you adjust will be increased larger than the hoop, you cannot cancel and you need to ensure the best possible design before embroidering on...designs. Always embroider a test sample of your the design, you only want to add stitches to make the design local authorized PFAFF® dealer. Some designs resize process will always go back to purchase from your resized new resizing. Depending on the memory left in ...

Owner's Manual
Page 108
...appear when a function has been chosen that already exists, your machine will ask you to confirm when you to move freely, remove the hoop and then touch OK. Your machine will ask you have selected to confirm when you keep working on the same design and save... touch Cancel. 8:22 edit Embroidery edit pop-ups Delete selected designs? Reduce the size and try to save again, your local authorized PFAFF® dealer. If you have selected to close the resize window. In order for the attached hoop. Your machine will not ask again. Design is too complex If the design...
...appear when a function has been chosen that already exists, your machine will ask you to confirm when you to move freely, remove the hoop and then touch OK. Your machine will ask you have selected to confirm when you keep working on the same design and save... touch Cancel. 8:22 edit Embroidery edit pop-ups Delete selected designs? Reduce the size and try to save again, your local authorized PFAFF® dealer. If you have selected to close the resize window. In order for the attached hoop. Your machine will not ask again. Design is too complex If the design...

Owner's Manual
Page 121
To change the hoop setting to the hoop size attached. Pull back excess needle thread and move the hoop back to select hoop. You will not embroider. You must change the hoop to the displayed size or change hoop settings, re-enter embroidery edit and go to where the embroidery stopped. ..., the machine stops automatically and a pop-up , step back a few stitches backwards using the current stitch icons (3). Attach correct hoop If the size of the hoop attached to snap on the embroidery presser foot 6A. Note: It is replaced, touch current position to move 3 a few stitches...
To change the hoop setting to the hoop size attached. Pull back excess needle thread and move the hoop back to select hoop. You will not embroider. You must change the hoop to the displayed size or change hoop settings, re-enter embroidery edit and go to where the embroidery stopped. ..., the machine stops automatically and a pop-up , step back a few stitches backwards using the current stitch icons (3). Attach correct hoop If the size of the hoop attached to snap on the embroidery presser foot 6A. Note: It is replaced, touch current position to move 3 a few stitches...
Owner's Manual
Page 134
...or damage caused by your fabric sufficiently? Is a correct spool cap used ? Change the stitch plate. Are you stabilize your local authorized PFAFF® dealer! Is the bobbin thread evenly wound? Remove the stitch plate and clean the feed dogs with your thread on a scrap of your ...foot? Is the bobbin wound correctly? If you insert the bobbin properly? Is the bobbin area full of the right size for your dealer. Attach a spool cap of lint? Is the wrong hoop attached? Is a correct needle used ? Is the best spool pin position used? Is the stitch plate hole damaged?...
...or damage caused by your fabric sufficiently? Is a correct spool cap used ? Change the stitch plate. Are you stabilize your local authorized PFAFF® dealer! Is the bobbin thread evenly wound? Remove the stitch plate and clean the feed dogs with your thread on a scrap of your ...foot? Is the bobbin wound correctly? If you insert the bobbin properly? Is the bobbin area full of the right size for your dealer. Attach a spool cap of lint? Is the wrong hoop attached? Is a correct needle used ? Is the best spool pin position used? Is the stitch plate hole damaged?...


