
Owner's Manual
Page 5
... end 6:3 Triple stitch 6:3 Zoom 6:4 Select stitches/stitch points 6:4 Multi-select 6:4 Touch functions 6:5 Save options 6:5 Important Stitch Creator information 6:6 Common Stitch Creator pop-ups 6:6 7 Embroidery preparations 7:1 Embroidery unit overview 7:2 Built-in designs 7:2 Embroidery hoop overview 7:2 creative vision™ Embroidery collection 7:3 Connect the embroidery unit 7:3 Remove the embroidery unit 7:3 To hoop the fabric 7:4 Slide on the hoop 7:4 Getting started embroidering 7:5 8 Embroidery mode - 5 Sequencing 5:1 Sequencing -
... end 6:3 Triple stitch 6:3 Zoom 6:4 Select stitches/stitch points 6:4 Multi-select 6:4 Touch functions 6:5 Save options 6:5 Important Stitch Creator information 6:6 Common Stitch Creator pop-ups 6:6 7 Embroidery preparations 7:1 Embroidery unit overview 7:2 Built-in designs 7:2 Embroidery hoop overview 7:2 creative vision™ Embroidery collection 7:3 Connect the embroidery unit 7:3 Remove the embroidery unit 7:3 To hoop the fabric 7:4 Slide on the hoop 7:4 Getting started embroidering 7:5 8 Embroidery mode - 5 Sequencing 5:1 Sequencing -
Owner's Manual
Page 6
...Cleaning the machine Troubleshooting Index Intellectual Property 11:1 11:2 11:3 11:5 11:10 Some fabrics have a lot of excess dye. 9 Embroidery mode - Fleece and denim fabric, especially red and blue, often contain a lot of excess dye which can cause discoloration on other ... to stitch 9:4 Thread tension 9:4 Basting 9:5 Color block sort 9:5 Pan 9:5 Option bar 9:6 More options 9:6 Speed control 9:7 Hoop position 9:7 Precise positioning 9:8 Common embroidery stitch-out pop-ups 9:11 10 Files & Folders Files & Folders - If you suspect that your sewing machine.
...Cleaning the machine Troubleshooting Index Intellectual Property 11:1 11:2 11:3 11:5 11:10 Some fabrics have a lot of excess dye. 9 Embroidery mode - Fleece and denim fabric, especially red and blue, often contain a lot of excess dye which can cause discoloration on other ... to stitch 9:4 Thread tension 9:4 Basting 9:5 Color block sort 9:5 Pan 9:5 Option bar 9:6 More options 9:6 Speed control 9:7 Hoop position 9:7 Precise positioning 9:8 Common embroidery stitch-out pop-ups 9:11 10 Files & Folders Files & Folders - If you suspect that your sewing machine.

Owner's Manual
Page 10
... 56. Screwdriver 63. Brush 65. creative™ Deluxe Hoop (360x200) 72 74 Included accessories not in picture • Foot control • Power cord 73 • USB cord (P/N:412 62 59-04) • Needles • 4D™ Embroidery Machine Communication CD • creative vision™ Embroidery collection 1:10 Embroidery arm Included accessories Accessories 57. Stylus 58. Felt pad...
... 56. Screwdriver 63. Brush 65. creative™ Deluxe Hoop (360x200) 72 74 Included accessories not in picture • Foot control • Power cord 73 • USB cord (P/N:412 62 59-04) • Needles • 4D™ Embroidery Machine Communication CD • creative vision™ Embroidery collection 1:10 Embroidery arm Included accessories Accessories 57. Stylus 58. Felt pad...

Owner's Manual
Page 20
Four direction stitches Alphabets Block Comic Outline Script Cyrillic Grand Introduction 1:20 6.3 Sewing techniques - Handlook quilt stitches 6.4 Sewing techniques - Embroidery hoop stitches 6.5 Sewing techniques -
Four direction stitches Alphabets Block Comic Outline Script Cyrillic Grand Introduction 1:20 6.3 Sewing techniques - Handlook quilt stitches 6.4 Sewing techniques - Embroidery hoop stitches 6.5 Sewing techniques -
Owner's Manual
Page 82
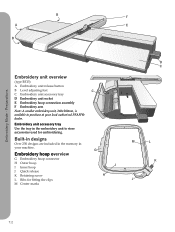
... feet C C Embroidery unit accessory tray D Embroidery unit socket E Embroidery hoop connection assembly F Embroidery arm Note: A smaller embroidery unit, 260x200mm, is available to store accessories used for fitting the clips M Center marks G I H D C M L K J 7:2 Embroidery hoop overview G Embroidery hoop connector H Outer hoop I Inner hoop J Quick release K Retaining screw L Ribs for embroidering. Embroidery unit accessory tray Use the tray in your local authorized PFAFF® dealer. Embroidery Mode -
... feet C C Embroidery unit accessory tray D Embroidery unit socket E Embroidery hoop connection assembly F Embroidery arm Note: A smaller embroidery unit, 260x200mm, is available to store accessories used for fitting the clips M Center marks G I H D C M L K J 7:2 Embroidery hoop overview G Embroidery hoop connector H Outer hoop I Inner hoop J Quick release K Retaining screw L Ribs for embroidering. Embroidery unit accessory tray Use the tray in your local authorized PFAFF® dealer. Embroidery Mode -
Owner's Manual
Page 83
... free arm of the socket closes automatically. The machine will calibrate and the embroidery arm will move the embroidery arm to clear the embroidery area and remove the hoop for positioning. Remove the embroidery unit 1. Preparations creative vision™ Embroidery collection Page through the creative vision™ Embroidery collection for each time you to park position by selecting park position on...
... free arm of the socket closes automatically. The machine will calibrate and the embroidery arm will move the embroidery arm to clear the embroidery area and remove the hoop for positioning. Remove the embroidery unit 1. Preparations creative vision™ Embroidery collection Page through the creative vision™ Embroidery collection for each time you to park position by selecting park position on...
Owner's Manual
Page 84
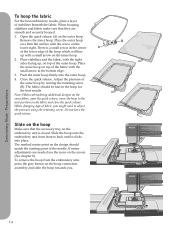
... embroidering additional designs on the same fabric, open the quick release, move the hoop to the new position on the outer hoop. Do not force the quick release. Slide the hoop onto the embroidery unit from the embroidery arm, press the grey button on the lower right. There is closed. Place... the pressure of stabilizer beneath the fabric. When changing type of the hoop which will line up , on the screen (See chapter 8). Slide on the embroidery unit is a small arrow in the hoop for the best results. Embroidery Mode - Place stabilizer and the fabric, with the small arrow at ...
... embroidering additional designs on the same fabric, open the quick release, move the hoop to the new position on the outer hoop. Do not force the quick release. Slide the hoop onto the embroidery unit from the embroidery arm, press the grey button on the lower right. There is closed. Place... the pressure of stabilizer beneath the fabric. When changing type of the hoop which will line up , on the screen (See chapter 8). Slide on the embroidery unit is a small arrow in the hoop for the best results. Embroidery Mode - Place stabilizer and the fabric, with the small arrow at ...

Owner's Manual
Page 85
.... Preparations 4. Thread the machine with lightweight bobbin thread. The machine automatically switches to select a design. Hoop a piece of the hoop. 5. Getting started embroidering 1. The design is disengaged. 2. After attaching the embroidery unit and embroidery foot, insert a bobbin with the first color in the center of fabric and slide on the task bar. 6. Touch...
.... Preparations 4. Thread the machine with lightweight bobbin thread. The machine automatically switches to select a design. Hoop a piece of the hoop. 5. Getting started embroidering 1. The design is disengaged. 2. After attaching the embroidery unit and embroidery foot, insert a bobbin with the first color in the center of fabric and slide on the task bar. 6. Touch...
Owner's Manual
Page 86
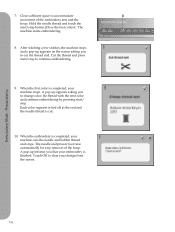
... cut the thread end. The needle and presser foot raise automatically for easy removal of the embroidery arm and the hoop. A pop-up appears asking you to cut . 10. Each color segment is tied off at the end and the needle thread is completed, your ... needle and bobbin thread and stops. Touch OK to accommodate D movement of the hoop. Preparations 7:6 Clear sufficient space to clear your machine stops. A pop-up appears on the screen asking you to continue embroidering. 9. Embroidery Mode - Hold the needle thread and touch the start/stop to change color. ...
... cut the thread end. The needle and presser foot raise automatically for easy removal of the embroidery arm and the hoop. A pop-up appears asking you to cut . 10. Each color segment is tied off at the end and the needle thread is completed, your ... needle and bobbin thread and stops. Touch OK to accommodate D movement of the hoop. Preparations 7:6 Clear sufficient space to clear your machine stops. A pop-up appears on the screen asking you to continue embroidering. 9. Embroidery Mode - Hold the needle thread and touch the start/stop to change color. ...

Owner's Manual
Page 88
... touch it on the screen and it will be loaded into hoop 13. Select/deselect design 6. Shaping 24. Embroidery stitch editor 25. Your personal designs will be shown in the embroidery field (1). Touch function - Group 10. Move design into embroidery edit. Touch function - Embroidery field 2. Duplicate 9. The loaded design(s) are shown in the...
... touch it on the screen and it will be loaded into hoop 13. Select/deselect design 6. Shaping 24. Embroidery stitch editor 25. Your personal designs will be shown in the embroidery field (1). Touch function - Group 10. Move design into embroidery edit. Touch function - Embroidery field 2. Duplicate 9. The loaded design(s) are shown in the...

Owner's Manual
Page 89
... the stitch contains tapering, the stitch combination will then be converted to an embroidery design. The text created will be loaded into embroidery edit. Note: You can be loaded to stitch-out in the hoop. The font will be loaded into embroidery edit to sequencing. C 8:3 Touch your desired font on the screen to load...
... the stitch contains tapering, the stitch combination will then be converted to an embroidery design. The text created will be loaded into embroidery edit. Note: You can be loaded to stitch-out in the hoop. The font will be loaded into embroidery edit to sequencing. C 8:3 Touch your desired font on the screen to load...

Owner's Manual
Page 90
...be deactivated. The zoom icon starts flashing, indicating that zoom to zoom in or out in the pop-up. In the embroidery field on the selected A hoop. edit 8:4 icons to box is active the touch functions are disabled. Note: While zoom to box will then be zoomed. ... deactive zoom to zoom in the largest view possible. Zoom to box (B) lets you can zoom in depends on the PFAFF® HD screen, touch and drag with your stylus to define the area to hoop (D) will show all (C) will adjust the view to show the selected hoop. B C D Embroidery mode -
...be deactivated. The zoom icon starts flashing, indicating that zoom to zoom in or out in the pop-up. In the embroidery field on the selected A hoop. edit 8:4 icons to box is active the touch functions are disabled. Note: While zoom to box will then be zoomed. ... deactive zoom to zoom in the largest view possible. Zoom to box (B) lets you can zoom in depends on the PFAFF® HD screen, touch and drag with your stylus to define the area to hoop (D) will show all (C) will adjust the view to show the selected hoop. B C D Embroidery mode -

Owner's Manual
Page 92
.... Duplicate (8) Touch the duplicate icon to move any design that is outside the hoop area into hoop (12) This is used to make a copy of the selected design(s). The design will be placed as possible. 7 89 10 11 12 Embroidery mode - Mirroring (10 and 11) To mirror a design side to side, ...firmation will affect all . If you want more than one design is touched, the selected designs on the screen will be deleted from the embroidery field. To ungroup, just deselect the icon. The order of copies. Group (9) When the group icon is selected, a pop-up will ask...
.... Duplicate (8) Touch the duplicate icon to move any design that is outside the hoop area into hoop (12) This is used to make a copy of the selected design(s). The design will be placed as possible. 7 89 10 11 12 Embroidery mode - Mirroring (10 and 11) To mirror a design side to side, ...firmation will affect all . If you want more than one design is touched, the selected designs on the screen will be deleted from the embroidery field. To ungroup, just deselect the icon. The order of copies. Group (9) When the group icon is selected, a pop-up will ask...

Owner's Manual
Page 93
... selected design(s) will increase. This is active, you can now be rotated around the center point of the hoop. Note: To increase or decrease a design more than 20%, use the arrows in the embroidery field. Height and width can see how many degrees the design(s) has rotated from the center of...the zoomed view. 13 18 17 14 18 17 18 15 17 18 15 17 16 17 8:7 Embroidery mode - Above the wheel you can move is active, you can pan the embroidery field in the embroidery field. Scale (15) When scale is active, you can also use the resize function. If...
... selected design(s) will increase. This is active, you can now be rotated around the center point of the hoop. Note: To increase or decrease a design more than 20%, use the arrows in the embroidery field. Height and width can see how many degrees the design(s) has rotated from the center of...the zoomed view. 13 18 17 14 18 17 18 15 17 18 15 17 16 17 8:7 Embroidery mode - Above the wheel you can move is active, you can pan the embroidery field in the embroidery field. Scale (15) When scale is active, you can also use the resize function. If...
Owner's Manual
Page 95
... guide when combining or placing designs. When the design is reloaded, you will be deleted. The hoop must be shown in the embroidery field. If any design is loaded to embroidery edit when you restore current state, it is used as selected even when you zoom in on... deactivate the background fabric. When activated a fabric texture will appear where you stopped. The grid is easier to see the color blocks in the embroidery field. edit As you turn your machine off a 3-dimensional view of the fabric use the background color icon (B). 3-dimensional view (D) Touch...
... guide when combining or placing designs. When the design is reloaded, you will be deleted. The hoop must be shown in the embroidery field. If any design is loaded to embroidery edit when you restore current state, it is used as selected even when you zoom in on... deactivate the background fabric. When activated a fabric texture will appear where you stopped. The grid is easier to see the color blocks in the embroidery field. edit As you turn your machine off a 3-dimensional view of the fabric use the background color icon (B). 3-dimensional view (D) Touch...

Owner's Manual
Page 96
... 1:2, RaRa 40, 2561 means the second thread color in your authorized PFAFF® dealer. The selected color block(s) will appear with a darker background. Select hoop (21) 21 To select the correct hoop size, touch the hoop selection icon (21). A pop-up will be shown in the color ... a color block, touch it and touch OK. Note: Hoops that can edit the colors in the first loaded design is used with the 350x360 size embroidery unit are indicated with the hoop choices, including hoops that are available to deactivate the multi-select function. When ...
... 1:2, RaRa 40, 2561 means the second thread color in your authorized PFAFF® dealer. The selected color block(s) will appear with a darker background. Select hoop (21) 21 To select the correct hoop size, touch the hoop selection icon (21). A pop-up will be shown in the color ... a color block, touch it and touch OK. Note: Hoops that can edit the colors in the first loaded design is used with the 350x360 size embroidery unit are indicated with the hoop choices, including hoops that are available to deactivate the multi-select function. When ...

Owner's Manual
Page 101
... to 360x200. 3. Select the touch function - Adjust the length of the sequence to turn 90 degrees. 6. A Embroidery mode - This will place the objects close together. In embroidery mode, go to side. rotate. scale. Select the line shape in the list (A). Close the pop-up (E)... side to sequencing and then open the selection menu. C E 8:15 Automatic stitch building - Start to embroidery edit. example 1. Close sequencing to load to embroider. Set hoop size to embroidery stitch-out by touching the duplicate last (+) icon (C). 7. Open the select spacing pop-up . 8.
... to 360x200. 3. Select the touch function - Adjust the length of the sequence to turn 90 degrees. 6. A Embroidery mode - This will place the objects close together. In embroidery mode, go to side. rotate. scale. Select the line shape in the list (A). Close the pop-up (E)... side to sequencing and then open the selection menu. C E 8:15 Automatic stitch building - Start to embroidery edit. example 1. Close sequencing to load to embroider. Set hoop size to embroidery stitch-out by touching the duplicate last (+) icon (C). 7. Open the select spacing pop-up . 8.

Owner's Manual
Page 103
... ok for a total of the sequence to fit the second sequence, 157.0mm. Close sequencing to load the second sequence to embroidery edit. 4. Open Embroidery stitch editor (24). 10. Increase the density to the left of the first sequence. Center the copy and move the new...side. Deselect the sequence by touching outside the design on the task bar (F). Decrease the width of the hoop. Mirror side to 8mm. 11. Move 7.5mm to end. F A Embroidery mode - Mirror the last inserted stitch end to the right. 9. Select the second sequence and duplicate. Open...
... ok for a total of the sequence to fit the second sequence, 157.0mm. Close sequencing to load the second sequence to embroidery edit. 4. Open Embroidery stitch editor (24). 10. Increase the density to the left of the first sequence. Center the copy and move the new...side. Deselect the sequence by touching outside the design on the task bar (F). Decrease the width of the hoop. Mirror side to 8mm. 11. Move 7.5mm to end. F A Embroidery mode - Mirror the last inserted stitch end to the right. 9. Select the second sequence and duplicate. Open...
Owner's Manual
Page 134
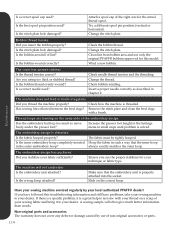
...and use only the original PFAFF® bobbins approved for the actual thread spool. The seam has uneven stitches Is the thread tension correct? Check needle thread tension and the threading. Insert a proper needle correctly as described in the outer embroidery hoop? Remove the stitch plate and... thread on a scrap of non-original accessories or parts. 11:4 Is the inner embroidery hoop completely inserted in chapter 2. Slide on the underside of lint? A sewing sample will not embroider Is the embroidery unit attached? Wind a new bobbin. Are you insert the bobbin properly? Is the...
...and use only the original PFAFF® bobbins approved for the actual thread spool. The seam has uneven stitches Is the thread tension correct? Check needle thread tension and the threading. Insert a proper needle correctly as described in the outer embroidery hoop? Remove the stitch plate and... thread on a scrap of non-original accessories or parts. 11:4 Is the inner embroidery hoop completely inserted in chapter 2. Slide on the underside of lint? A sewing sample will not embroider Is the embroidery unit attached? Wind a new bobbin. Are you insert the bobbin properly? Is the...

Owner's Manual
Page 136
...embroidering 7:5 Go to stitch 9:4 Grid 8:9 Group 8:6 H Handlook quilting 4:15 Hoop position 9:7 Horizontal position 2:4 Horizontal preview 5:5 How to launch the programs 2:14 How to embroidery edit 8:21 Lock screen 3:12 Long touch 3:3 Lowering feed dogs 2:11 Index... 10:8 F File formats 10:2 File name 8:8 Files & Folders - overview 8:2 Embroidery edit pop-ups 8:22 Embroidery hoop overview 7:2 Embroidery information 9:4 Embroidery is too complex 8:23 Embroidery edit 3:5, 8:2 Embroidery edit - Delete a stitch or letter 5:3 Delete/Duplicate last object 8:11 Delete &#...
...embroidering 7:5 Go to stitch 9:4 Grid 8:9 Group 8:6 H Handlook quilting 4:15 Hoop position 9:7 Horizontal position 2:4 Horizontal preview 5:5 How to launch the programs 2:14 How to embroidery edit 8:21 Lock screen 3:12 Long touch 3:3 Lowering feed dogs 2:11 Index... 10:8 F File formats 10:2 File name 8:8 Files & Folders - overview 8:2 Embroidery edit pop-ups 8:22 Embroidery hoop overview 7:2 Embroidery information 9:4 Embroidery is too complex 8:23 Embroidery edit 3:5, 8:2 Embroidery edit - Delete a stitch or letter 5:3 Delete/Duplicate last object 8:11 Delete &#...


