
Owner's Manual
Page 4
...18 Table of contents 1 Introduction 1:7 Machine overview 1:8 Front side 1:8 Rear side 1:9 Top parts 1:9 Accessory tray 1:9 Parts of the embroidery unit 1:10 Included accessories 1:10 Stitch overview 1:12 Utility stitches 1:12 Decorative stitches 1:16 Alphabets 1:20 2 Preparations 2:1 Unpacking...2:12 Connect machine to computer 2:12 4D™ Embroidery Software 2:13 Installing your machine 2:14 Buttons and icons 2:15 3 PFAFF® HD screen 3:1 Task bar 3:2 Use the task bar 3:3 Common icons 3:3 Selection menu 3:4 Embroidery edit 3:5 Embroidery ...
...18 Table of contents 1 Introduction 1:7 Machine overview 1:8 Front side 1:8 Rear side 1:9 Top parts 1:9 Accessory tray 1:9 Parts of the embroidery unit 1:10 Included accessories 1:10 Stitch overview 1:12 Utility stitches 1:12 Decorative stitches 1:16 Alphabets 1:20 2 Preparations 2:1 Unpacking...2:12 Connect machine to computer 2:12 4D™ Embroidery Software 2:13 Installing your machine 2:14 Buttons and icons 2:15 3 PFAFF® HD screen 3:1 Task bar 3:2 Use the task bar 3:3 Common icons 3:3 Selection menu 3:4 Embroidery edit 3:5 Embroidery ...
Owner's Manual
Page 9
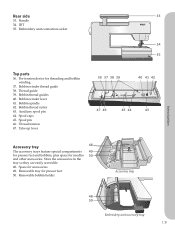
.... Bobbin winder lever 41. Take-up lever 36 37 38 39 40 41 42 47 46 45 44 43 Accessory tray 48 The accessory trays feature special compartments 49 for presser feet and bobbins, plus space for threading and bobbin winding 37. Thread tension 47.... Auxiliary spool pin 44. Space for presser feet 50. Removable bobbin holder Accessory tray Introduction 48 50 Embroidery unit accessory tray 1:9 Bobbin spindle 42. Spool caps 45. Handle 34. Bobbin thread guides 40. IDT 35. Embroidery unit connection socket...
.... Bobbin winder lever 41. Take-up lever 36 37 38 39 40 41 42 47 46 45 44 43 Accessory tray 48 The accessory trays feature special compartments 49 for presser feet and bobbins, plus space for threading and bobbin winding 37. Thread tension 47.... Auxiliary spool pin 44. Space for presser feet 50. Removable bobbin holder Accessory tray Introduction 48 50 Embroidery unit accessory tray 1:9 Bobbin spindle 42. Spool caps 45. Handle 34. Bobbin thread guides 40. IDT 35. Embroidery unit connection socket...

Owner's Manual
Page 10
...53. Embroidery accesssory tray 54. Embroidery arm Included accessories Accessories 57. USB Embroidery stick 62. Spool cap, medium 67. Hoop clips 71. Introduction Parts of the embroidery unit (type BE15) 51. Embroidery unit socket 55. Thread net 59. Felt pad 61. creative™ 120 Square... hoops 72. creative™ Deluxe Hoop (360x200) 72 74 Included accessories not in picture • Foot control • Power cord 73 • USB cord (P/N:412 62 59-04) • Needles • 4D™ Embroidery Machine Communication CD • creative vision™ Embroidery ...
...53. Embroidery accesssory tray 54. Embroidery arm Included accessories Accessories 57. USB Embroidery stick 62. Spool cap, medium 67. Hoop clips 71. Introduction Parts of the embroidery unit (type BE15) 51. Embroidery unit socket 55. Thread net 59. Felt pad 61. creative™ 120 Square... hoops 72. creative™ Deluxe Hoop (360x200) 72 74 Included accessories not in picture • Foot control • Power cord 73 • USB cord (P/N:412 62 59-04) • Needles • 4D™ Embroidery Machine Communication CD • creative vision™ Embroidery ...
Owner's Manual
Page 22
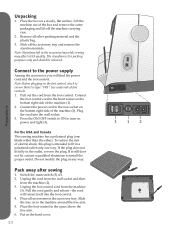
.... Press the ON/OFF switch to ON to the front socket on power and light (3). If the plug does not fit fully in the accessory tray while sewing may affect stitch quality. Lift the machine out of the machine (1). 2. Do not modify the plug in the space above the free ... Place the foot control in any way. Connect to install the proper outlet. Note: Before plugging in the foot control, check to fit in the accessory tray. Place all other ). Slide off the machine carrying case. 2. the cord will find the power cord and the foot control. Plug the cord ...
.... Press the ON/OFF switch to ON to the front socket on power and light (3). If the plug does not fit fully in the accessory tray while sewing may affect stitch quality. Lift the machine out of the machine (1). 2. Do not modify the plug in the space above the free ... Place the foot control in any way. Connect to install the proper outlet. Note: Before plugging in the foot control, check to fit in the accessory tray. Place all other ). Slide off the machine carrying case. 2. the cord will find the power cord and the foot control. Plug the cord ...

Owner's Manual
Page 23
When attached, a hook keeps the accessory tray locked to front as shown. Stylus holder To keep the stylus in the Settings menu, see chapter 3. Remove the tray by sliding it , the stylus holder is provided with a locking feature. Preparations Custom LED lights Your machine has LED lights which distribute the light ... and color temperature of the light in place when not using it to the left. Thread cutter To use the free arm, slide off the accessory tray. To release the stylus, just bend it slightly towards you. 2:3 Free arm To use the thread cutter, pull the thread from back to the ...
When attached, a hook keeps the accessory tray locked to front as shown. Stylus holder To keep the stylus in the Settings menu, see chapter 3. Remove the tray by sliding it , the stylus holder is provided with a locking feature. Preparations Custom LED lights Your machine has LED lights which distribute the light ... and color temperature of the light in place when not using it to the left. Thread cutter To use the free arm, slide off the accessory tray. To release the stylus, just bend it slightly towards you. 2:3 Free arm To use the thread cutter, pull the thread from back to the ...
Owner's Manual
Page 82
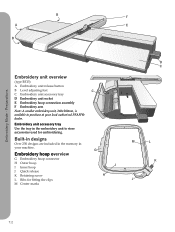
...A Embroidery unit release button B Level adjusting feet C C Embroidery unit accessory tray D Embroidery unit socket E Embroidery hoop connection assembly F Embroidery arm Note: A smaller embroidery unit, 260x200mm, is available to store accessories used for fitting the clips M Center marks G I Inner hoop...Embroidery hoop connector H Outer hoop I H D C M L K J 7:2 Embroidery Mode - Embroidery unit accessory tray Use the tray in your local authorized PFAFF® dealer. Built-in designs Over 250 designs are included in the memory in the embroidery unit to purchase...
...A Embroidery unit release button B Level adjusting feet C C Embroidery unit accessory tray D Embroidery unit socket E Embroidery hoop connection assembly F Embroidery arm Note: A smaller embroidery unit, 260x200mm, is available to store accessories used for fitting the clips M Center marks G I Inner hoop...Embroidery hoop connector H Outer hoop I H D C M L K J 7:2 Embroidery Mode - Embroidery unit accessory tray Use the tray in your local authorized PFAFF® dealer. Built-in designs Over 250 designs are included in the memory in the embroidery unit to purchase...
Owner's Manual
Page 83
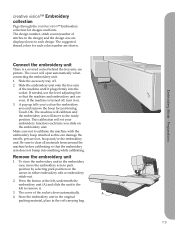
... clear all materials from around the machine before calibrating so that the machine and embroidery unit are even. Preparations creative vision™ Embroidery collection Page through the creative vision™ Embroidery collection for positioning. Slide the accessory tray off , turn it . 3. Touch OK. Embroidery Mode - Be sure to remove it on the embroidery unit. Make sure...
... clear all materials from around the machine before calibrating so that the machine and embroidery unit are even. Preparations creative vision™ Embroidery collection Page through the creative vision™ Embroidery collection for positioning. Slide the accessory tray off , turn it . 3. Touch OK. Embroidery Mode - Be sure to remove it on the embroidery unit. Make sure...
Owner's Manual
Page 84
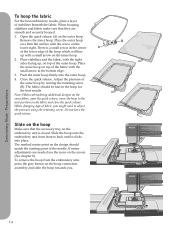
... back until it clicks into the outer hoop. 4. The marked center point on the inner hoop. 2. When hooping stabilizer and fabric make sure that the accessory tray on a firm flat the bottom edge. 3. Remove the inner hoop. Place the outer hoop B on the embroidery unit is a small arrow in the...
... back until it clicks into the outer hoop. 4. The marked center point on the inner hoop. 2. When hooping stabilizer and fabric make sure that the accessory tray on a firm flat the bottom edge. 3. Remove the inner hoop. Place the outer hoop B on the embroidery unit is a small arrow in the...
Owner's Manual
Page 135
... file or folder 10:6 Could not delete file or folder 10:7 Create a new folder 10:6 Create a sequence 5:3 creative vision™ Embroidery collection 7:3 Crosshair 9:3 Current position 9:7 Current stitch 9:4 Custom LED lights 2:3 Cut jump stitches 3:9 Cut position 9:7 Cut ... Index Index 3-dimensional view 8:9, 9:6 4D™ Embroidery Software 2:13 4D™ Organizer 2:13 4D™ QuickFont 2:13 A Accessories 1:10 Accessory tray 1:9 Action indicator 2:15 Add a letter into a text 8:20 Adjust Custom LED lights 3:12 Adjustments 8:6 Adjust stitches 8:16 Adjust ...
... file or folder 10:6 Could not delete file or folder 10:7 Create a new folder 10:6 Create a sequence 5:3 creative vision™ Embroidery collection 7:3 Crosshair 9:3 Current position 9:7 Current stitch 9:4 Custom LED lights 2:3 Cut jump stitches 3:9 Cut position 9:7 Cut ... Index Index 3-dimensional view 8:9, 9:6 4D™ Embroidery Software 2:13 4D™ Organizer 2:13 4D™ QuickFont 2:13 A Accessories 1:10 Accessory tray 1:9 Action indicator 2:15 Add a letter into a text 8:20 Adjust Custom LED lights 3:12 Adjustments 8:6 Adjust stitches 8:16 Adjust ...

Owner's Manual
Page 136
...;nished - example 8:17 Embroidery stitch-out 3:6 Embroidery stitch-out - overview 9:2 Embroidery text editor 3:6, 8:20 Embroidery unit accessory tray 7:2 Embroidery unit calibration 9:11 Embroidery unit overview 7:2 Engaging the IDT 2:9 Exceeded maximum number of stitches 8:23 External Device ...2:9 Immediate tie-off 2:15 Important resize information 8:19 Important sequencing information 5:6 Important Stitch Creator information 6:6 Included accessories 1:10 Included accessories not in picture 1:10 Included hoops 1:10 Index 3:13 Info menu 3:13 Insert a new stitch point 6:3...
...;nished - example 8:17 Embroidery stitch-out 3:6 Embroidery stitch-out - overview 9:2 Embroidery text editor 3:6, 8:20 Embroidery unit accessory tray 7:2 Embroidery unit calibration 9:11 Embroidery unit overview 7:2 Engaging the IDT 2:9 Exceeded maximum number of stitches 8:23 External Device ...2:9 Immediate tie-off 2:15 Important resize information 8:19 Important sequencing information 5:6 Important Stitch Creator information 6:6 Included accessories 1:10 Included accessories not in picture 1:10 Included hoops 1:10 Index 3:13 Info menu 3:13 Insert a new stitch point 6:3...


