
Owner's Manual
Page 4
... 4:5 Speed control 4:6 Sewing programs 4:6 Balance 4:8 Mirroring 4:8 Zoom to update your machine 2:14 Buttons and icons 2:15 3 PFAFF® HD screen 3:1 Task bar 3:2 Use the task bar 3:3 Common icons 3:3 Selection menu 3:4 Embroidery edit 3:5 Embroidery text...Table of contents 1 Introduction 1:7 Machine overview 1:8 Front side 1:8 Rear side 1:9 Top parts 1:9 Accessory tray 1:9 Parts of the embroidery unit 1:10 Included accessories 1:10 Stitch overview 1:12 Utility stitches 1:12 Decorative stitches 1:16 Alphabets 1:20 2 Preparations 2:1...
... 4:5 Speed control 4:6 Sewing programs 4:6 Balance 4:8 Mirroring 4:8 Zoom to update your machine 2:14 Buttons and icons 2:15 3 PFAFF® HD screen 3:1 Task bar 3:2 Use the task bar 3:3 Common icons 3:3 Selection menu 3:4 Embroidery edit 3:5 Embroidery text...Table of contents 1 Introduction 1:7 Machine overview 1:8 Front side 1:8 Rear side 1:9 Top parts 1:9 Accessory tray 1:9 Parts of the embroidery unit 1:10 Included accessories 1:10 Stitch overview 1:12 Utility stitches 1:12 Decorative stitches 1:16 Alphabets 1:20 2 Preparations 2:1...
Owner's Manual
Page 9
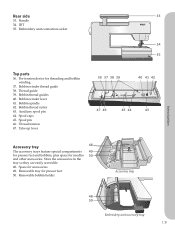
Embroidery unit connection socket 34 35 Top parts 36. Spool caps 45. Store the accessories in the tray so they are easily accessible. 48. Removable bobbin holder Accessory tray Introduction 48 50 Embroidery unit accessory tray 1:9 Bobbin thread guides 40. Bobbin thread cutter 43. Take-up lever 36 37 ...38 39 40 41 42 47 46 45 44 43 Accessory tray 48 The accessory trays feature special compartments 49 for presser feet and bobbins, plus space for presser feet 50. IDT 35. Bobbin winder thread guide...
Embroidery unit connection socket 34 35 Top parts 36. Spool caps 45. Store the accessories in the tray so they are easily accessible. 48. Removable bobbin holder Accessory tray Introduction 48 50 Embroidery unit accessory tray 1:9 Bobbin thread guides 40. Bobbin thread cutter 43. Take-up lever 36 37 ...38 39 40 41 42 47 46 45 44 43 Accessory tray 48 The accessory trays feature special compartments 49 for presser feet and bobbins, plus space for presser feet 50. IDT 35. Bobbin winder thread guide...

Owner's Manual
Page 10
... 71 Included hoops 72. Spool cap, medium 67. creative™ Deluxe Hoop (360x200) 72 74 Included accessories not in picture • Foot control • Power cord 73 • USB cord (P/N:412 62 59-04) • Needles • 4D™ Embroidery Machine Communication CD • creative vision™ Embroidery collection 1:10 Level adjusting feet 53...
... 71 Included hoops 72. Spool cap, medium 67. creative™ Deluxe Hoop (360x200) 72 74 Included accessories not in picture • Foot control • Power cord 73 • USB cord (P/N:412 62 59-04) • Needles • 4D™ Embroidery Machine Communication CD • creative vision™ Embroidery collection 1:10 Level adjusting feet 53...
Owner's Manual
Page 22
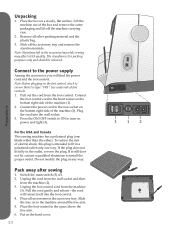
...should be removed. Pull the cord gently and release - Place all other ). Put on the bottom right side of foot control). 1. Remove all accessories in a polarized outlet only one blade wider than the other packing material and the plastic bag. 3. Connect to the front socket on the hard cover.... 2:2 3 1 2 Connect the foot control cord to the power supply Among the accessories you will retract itself into the wall socket. 3. Press the ON/OFF switch to ON to the machine around the free arm. 5. Place the box...
...should be removed. Pull the cord gently and release - Place all other ). Put on the bottom right side of foot control). 1. Remove all accessories in a polarized outlet only one blade wider than the other packing material and the plastic bag. 3. Connect to the front socket on the hard cover.... 2:2 3 1 2 Connect the foot control cord to the power supply Among the accessories you will retract itself into the wall socket. 3. Press the ON/OFF switch to ON to the machine around the free arm. 5. Place the box...

Owner's Manual
Page 23
... place when not using it slightly towards you. 2:3 Stylus holder To keep the stylus in the Settings menu, see chapter 3. When attached, a hook keeps the accessory tray locked to the left. Preparations Custom LED lights Your machine has LED lights which distribute the light evenly over the sewing area and eliminates... arm To use the thread cutter, pull the thread from back to front as shown. Thread cutter To use the free arm, slide off the accessory tray.
... place when not using it slightly towards you. 2:3 Stylus holder To keep the stylus in the Settings menu, see chapter 3. When attached, a hook keeps the accessory tray locked to the left. Preparations Custom LED lights Your machine has LED lights which distribute the light evenly over the sewing area and eliminates... arm To use the thread cutter, pull the thread from back to front as shown. Thread cutter To use the free arm, slide off the accessory tray.
Owner's Manual
Page 25
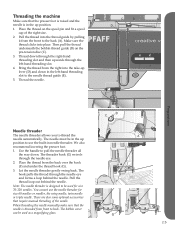
... threader allows you to be used as a magnifying glass. Note: The needle threader is designed to thread the needle automatically. There are also some optional accessories that the needle is threaded from the back over the hook (F) and under the thread hook (G). 3. The bobbin cover can be in the up position...
... threader allows you to be used as a magnifying glass. Note: The needle threader is designed to thread the needle automatically. There are also some optional accessories that the needle is threaded from the back over the hook (F) and under the thread hook (G). 3. The bobbin cover can be in the up position...
Owner's Manual
Page 62
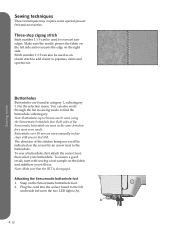
... found in category 1, subcategory 1.3 in the same direction for a more even result. Sewing mode Sewing techniques These techniques may require some special presser feet and accessories. Make sure the needle pierces the fabric on the right side. To sew a buttonhole, first attach the correct foot, then select your buttonhole. Both...
... found in category 1, subcategory 1.3 in the same direction for a more even result. Sewing mode Sewing techniques These techniques may require some special presser feet and accessories. Make sure the needle pierces the fabric on the right side. To sew a buttonhole, first attach the correct foot, then select your buttonhole. Both...

Owner's Manual
Page 64
... thread. After completing the buttonhole, pull the ends of the gimp thread until the loop of thread is appropriate for your local authorized PFAFF® dealer. 4:14 Corded buttonhole Corded buttonholes that will automatically be lowered. Before starting to the wrong side of the presser foot.... are more stable, durable and have a professional appearance. The feed dogs will fasten the button on button foot, available as an optional accessory at your button. You can also use a sew on the fabric, using the button stitch repetition icons (24). The machine will sew...
... thread. After completing the buttonhole, pull the ends of the gimp thread until the loop of thread is appropriate for your local authorized PFAFF® dealer. 4:14 Corded buttonhole Corded buttonholes that will automatically be lowered. Before starting to the wrong side of the presser foot.... are more stable, durable and have a professional appearance. The feed dogs will fasten the button on button foot, available as an optional accessory at your button. You can also use a sew on the fabric, using the button stitch repetition icons (24). The machine will sew...

Owner's Manual
Page 67
... direction by the optional presser foot icon (A). The selected direction icon is sewn in four directions. These techniques may require some special presser feet and accessories.
... direction by the optional presser foot icon (A). The selected direction icon is sewn in four directions. These techniques may require some special presser feet and accessories.
Owner's Manual
Page 82
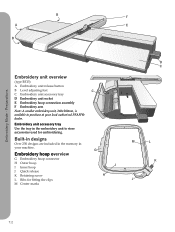
... D Embroidery unit socket E Embroidery hoop connection assembly F Embroidery arm Note: A smaller embroidery unit, 260x200mm, is available to store accessories used for fitting the clips M Center marks G I Inner hoop J Quick release K Retaining screw L Ribs for embroidering. Embroidery hoop overview G Embroidery hoop connector H Outer hoop I H D C... M L K J 7:2 Built-in designs Over 250 designs are included in the memory in the embroidery unit to purchase at your machine. Embroidery unit accessory tray Use the tray in your local authorized PFAFF® dealer.
... D Embroidery unit socket E Embroidery hoop connection assembly F Embroidery arm Note: A smaller embroidery unit, 260x200mm, is available to store accessories used for fitting the clips M Center marks G I Inner hoop J Quick release K Retaining screw L Ribs for embroidering. Embroidery hoop overview G Embroidery hoop connector H Outer hoop I H D C... M L K J 7:2 Built-in designs Over 250 designs are included in the memory in the embroidery unit to purchase at your machine. Embroidery unit accessory tray Use the tray in your local authorized PFAFF® dealer.
Owner's Manual
Page 83
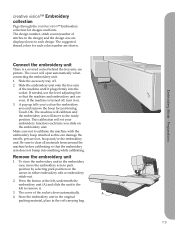
... before calibrating so that the machine and embroidery unit are even. Embroidery Mode - This calibration will set your embroidery functions each design. Slide the accessory tray off , turn it . 3. Remove the embroidery unit 1. Make sure not to park position by selecting park position on the embroidery unit... until it plugs firmly into anything while calibrating. To store the embroidery unit in the soft carrying bag. 7:3 Preparations creative vision™ Embroidery collection Page through the creative vision™ Embroidery collection for positioning.
... before calibrating so that the machine and embroidery unit are even. Embroidery Mode - This calibration will set your embroidery functions each design. Slide the accessory tray off , turn it . 3. Remove the embroidery unit 1. Make sure not to park position by selecting park position on the embroidery unit... until it plugs firmly into anything while calibrating. To store the embroidery unit in the soft carrying bag. 7:3 Preparations creative vision™ Embroidery collection Page through the creative vision™ Embroidery collection for positioning.
Owner's Manual
Page 84
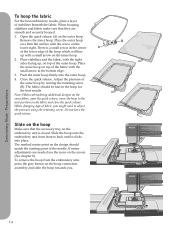
... which will line up , on the inner hoop. 2. If minor adjustments are smooth and securely hooped. 1. When hooping stabilizer and fabric make sure that the accessory tray on the embroidery unit is a small arrow in the hoop for the best results. Place stabilizer and the fabric, with the right sides facing...
... which will line up , on the inner hoop. 2. If minor adjustments are smooth and securely hooped. 1. When hooping stabilizer and fabric make sure that the accessory tray on the embroidery unit is a small arrow in the hoop for the best results. Place stabilizer and the fabric, with the right sides facing...

Owner's Manual
Page 132
...of your machine. The dust and lint will be blown into your machine with a clean, soft and damp cloth. Note: When using the optional accessory PFAFF® Embroidery Cutwork Needles, it is needed. Clean only with the brush. B Cleaning under the bobbin area Clean the area under the stitch ... bobbin case holder A back in the bobbin case area. C Replacing the stitch plate With feed dogs lowered, place the stitch plate with the accessories. Clean the feed dogs with the brush found with the knob fitting into the bobbin case area. Note: Do not blow air into...
...of your machine. The dust and lint will be blown into your machine with a clean, soft and damp cloth. Note: When using the optional accessory PFAFF® Embroidery Cutwork Needles, it is needed. Clean only with the brush. B Cleaning under the bobbin area Clean the area under the stitch ... bobbin case holder A back in the bobbin case area. C Replacing the stitch plate With feed dogs lowered, place the stitch plate with the accessories. Clean the feed dogs with the brush found with the knob fitting into the bobbin case area. Note: Do not blow air into...
Owner's Manual
Page 134
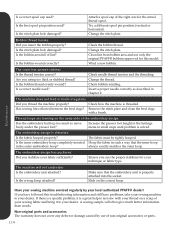
... does not feed or feeds irregularly Did you stabilize your dealer. The fabric must be tightly hooped. Maintenance Have your local authorized PFAFF® dealer! Bobbin thread breaks Did you using too thick or slubbed thread? Check the bobbin thread. The embroidery design is properly...If you use of the embroidery design Has the embroidery built up too much better information than words. Non-original parts and accessories The warranty does not cover any defect or damage caused by your sewing machine serviced regularly by use the proper stabilizer for this...
... does not feed or feeds irregularly Did you stabilize your dealer. The fabric must be tightly hooped. Maintenance Have your local authorized PFAFF® dealer! Bobbin thread breaks Did you using too thick or slubbed thread? Check the bobbin thread. The embroidery design is properly...If you use of the embroidery design Has the embroidery built up too much better information than words. Non-original parts and accessories The warranty does not cover any defect or damage caused by your sewing machine serviced regularly by use the proper stabilizer for this...
Owner's Manual
Page 135
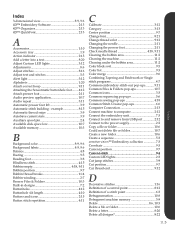
...a file or folder 10:6 Could not delete file or folder 10:7 Create a new folder 10:6 Create a sequence 5:3 creative vision™ Embroidery collection 7:3 Crosshair 9:3 Current position 9:7 Current stitch 9:4 Custom LED lights 2:3 Cut jump stitches 3:9 Cut position 9:7 Cut thread...:5 Index Index 3-dimensional view 8:9, 9:6 4D™ Embroidery Software 2:13 4D™ Organizer 2:13 4D™ QuickFont 2:13 A Accessories 1:10 Accessory tray 1:9 Action indicator 2:15 Add a letter into a text 8:20 Adjust Custom LED lights 3:12 Adjustments 8:6 Adjust stitches 8:16 ...
...a file or folder 10:6 Could not delete file or folder 10:7 Create a new folder 10:6 Create a sequence 5:3 creative vision™ Embroidery collection 7:3 Crosshair 9:3 Current position 9:7 Current stitch 9:4 Custom LED lights 2:3 Cut jump stitches 3:9 Cut position 9:7 Cut thread...:5 Index Index 3-dimensional view 8:9, 9:6 4D™ Embroidery Software 2:13 4D™ Organizer 2:13 4D™ QuickFont 2:13 A Accessories 1:10 Accessory tray 1:9 Action indicator 2:15 Add a letter into a text 8:20 Adjust Custom LED lights 3:12 Adjustments 8:6 Adjust stitches 8:16 ...

Owner's Manual
Page 136
... 2:9 Immediate tie-off 2:15 Important resize information 8:19 Important sequencing information 5:6 Important Stitch Creator information 6:6 Included accessories 1:10 Included accessories not in picture 1:10 Included hoops 1:10 Index 3:13 Info menu 3:13 Insert a new stitch point 6:3 ...& Folders - example 8:17 Embroidery stitch-out 3:6 Embroidery stitch-out - overview 9:2 Embroidery text editor 3:6, 8:20 Embroidery unit accessory tray 7:2 Embroidery unit calibration 9:11 Embroidery unit overview 7:2 Engaging the IDT 2:9 Exceeded maximum number of stitches 8:23 External Device ...
... 2:9 Immediate tie-off 2:15 Important resize information 8:19 Important sequencing information 5:6 Important Stitch Creator information 6:6 Included accessories 1:10 Included accessories not in picture 1:10 Included hoops 1:10 Index 3:13 Info menu 3:13 Insert a new stitch point 6:3 ...& Folders - example 8:17 Embroidery stitch-out 3:6 Embroidery stitch-out - overview 9:2 Embroidery text editor 3:6, 8:20 Embroidery unit accessory tray 7:2 Embroidery unit calibration 9:11 Embroidery unit overview 7:2 Engaging the IDT 2:9 Exceeded maximum number of stitches 8:23 External Device ...
Owner's Manual
Page 137
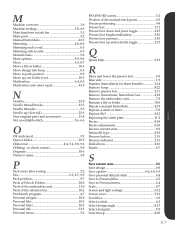
... bar 10:2 Patchwork program 4:7 Personal designs 10:4 Personal files 10:3 Personal fonts 10:3 Personal info 3:13 Personal menu 3:4 PFAFF® HD screen 3:2 Position of the marked stitch point 6:5 Precise positioning 9:8 Presser feet 1:11 Presser foot down and pivot toggle ...2:15 Presser foot height embroidery 3:10 Presser foot pressure 3:10 Presser foot up /down (J 2:16 Non-original parts and accessories 11:4 Not an editable stitch 5:6, 6:6 O OK and cancel 3:3 Open a folder 10:5 Option bar 4:4, 5:4, 8:8, 9:6 Orbiting - to Personal menu...
... bar 10:2 Patchwork program 4:7 Personal designs 10:4 Personal files 10:3 Personal fonts 10:3 Personal info 3:13 Personal menu 3:4 PFAFF® HD screen 3:2 Position of the marked stitch point 6:5 Precise positioning 9:8 Presser feet 1:11 Presser foot down and pivot toggle ...2:15 Presser foot height embroidery 3:10 Presser foot pressure 3:10 Presser foot up /down (J 2:16 Non-original parts and accessories 11:4 Not an editable stitch 5:6, 6:6 O OK and cancel 3:3 Open a folder 10:5 Option bar 4:4, 5:4, 8:8, 9:6 Orbiting - to Personal menu...

Owner's Manual
Page 140
... safely recycled in doubt please contact your retailer for guidance. PFAFF, CREATIVE VISION, CV, IDT (image) and 4D are listed on disposal, this product are trademarks of KSIN Luxembourg II, S.ar.l. Intellectual Property Patents protecting this product must be to the benefit of accessories without prior notice, or make modifications to...
... safely recycled in doubt please contact your retailer for guidance. PFAFF, CREATIVE VISION, CV, IDT (image) and 4D are listed on disposal, this product are trademarks of KSIN Luxembourg II, S.ar.l. Intellectual Property Patents protecting this product must be to the benefit of accessories without prior notice, or make modifications to...


