

Owner's Manual
Page 2
...of a double-insulated product requires extreme care and knowledge of insulation are being administrated. • To disconnect, turn all moving parts. To reduce the risk of Double-Insulated Appliances. Use only attachments recommended by the manufacturer as threading needle, changing needle, threading...• This sewing machine is marked with the words 'DOUBLE INSULATION' or 'DOUBLE INSULATED'. Do not allow plug to those parts in . Replacement parts for Servicing of electric shock: • A sewing machine should a means for grounding be supervised to ensure that they have...
...of a double-insulated product requires extreme care and knowledge of insulation are being administrated. • To disconnect, turn all moving parts. To reduce the risk of Double-Insulated Appliances. Use only attachments recommended by the manufacturer as threading needle, changing needle, threading...• This sewing machine is marked with the words 'DOUBLE INSULATION' or 'DOUBLE INSULATED'. Do not allow plug to those parts in . Replacement parts for Servicing of electric shock: • A sewing machine should a means for grounding be supervised to ensure that they have...
Owner's Manual
Page 4
Table of contents 1 Introduction 1:7 Machine overview 1:8 Front side 1:8 Rear side 1:9 Top parts 1:9 Accessory tray 1:9 Parts of the embroidery unit 1:10 Included accessories 1:10 Stitch overview 1:12 Utility stitches 1:12 Decorative stitches 1:16 ... 2:11 USB ports 2:12 Connect machine to computer 2:12 4D™ Embroidery Software 2:13 Installing your machine 2:14 Buttons and icons 2:15 3 PFAFF® HD screen 3:1 Task bar 3:2 Use the task bar 3:3 Common icons 3:3 Selection menu 3:4 Embroidery edit 3:5 Embroidery text editor 3:6 Embroidery ...
Table of contents 1 Introduction 1:7 Machine overview 1:8 Front side 1:8 Rear side 1:9 Top parts 1:9 Accessory tray 1:9 Parts of the embroidery unit 1:10 Included accessories 1:10 Stitch overview 1:12 Utility stitches 1:12 Decorative stitches 1:16 ... 2:11 USB ports 2:12 Connect machine to computer 2:12 4D™ Embroidery Software 2:13 Installing your machine 2:14 Buttons and icons 2:15 3 PFAFF® HD screen 3:1 Task bar 3:2 Use the task bar 3:3 Common icons 3:3 Selection menu 3:4 Embroidery edit 3:5 Embroidery text editor 3:6 Embroidery ...
Owner's Manual
Page 9
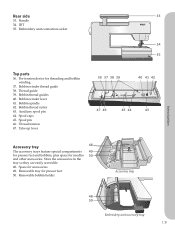
.... 48. IDT 35. Thread guide 39. Removable bobbin holder Accessory tray Introduction 48 50 Embroidery unit accessory tray 1:9 Embroidery unit connection socket 34 35 Top parts 36. Take-up lever 36 37 38 39 40 41 42 47 46 45 44 43 Accessory tray 48 The accessory trays feature special compartments...
.... 48. IDT 35. Thread guide 39. Removable bobbin holder Accessory tray Introduction 48 50 Embroidery unit accessory tray 1:9 Embroidery unit connection socket 34 35 Top parts 36. Take-up lever 36 37 38 39 40 41 42 47 46 45 44 43 Accessory tray 48 The accessory trays feature special compartments...

Owner's Manual
Page 10
...USB cord (P/N:412 62 59-04) • Needles • 4D™ Embroidery Machine Communication CD • creative vision™ Embroidery collection 1:10 Level adjusting feet 53. Embroidery accesssory tray 54. Embroidery arm Included accessories Accessories 57. Screwdriver...release button 52. Embroidery unit socket 55. Stylus 58. Felt pad 61. Edge guide 60. Seam ripper 64. creative™ Master Hoop (240x150) 74. Spool cap, small 68. Embroidery hoop connection assembly 56. Thread net 59... 72. Spool cap, large (2) 66. Introduction Parts of the embroidery unit (type BE15) 51.
...USB cord (P/N:412 62 59-04) • Needles • 4D™ Embroidery Machine Communication CD • creative vision™ Embroidery collection 1:10 Level adjusting feet 53. Embroidery accesssory tray 54. Embroidery arm Included accessories Accessories 57. Screwdriver...release button 52. Embroidery unit socket 55. Stylus 58. Felt pad 61. Edge guide 60. Seam ripper 64. creative™ Master Hoop (240x150) 74. Spool cap, small 68. Embroidery hoop connection assembly 56. Thread net 59... 72. Spool cap, large (2) 66. Introduction Parts of the embroidery unit (type BE15) 51.
Owner's Manual
Page 35
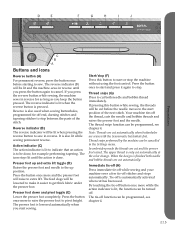
... finished both needle and bobbin thread immediately. Presser foot up and extra lift toggle (D) Raises the presser foot and needle to step between the parts of the next stitch. By touching the tie-off . Thread snips (G) Press to cut both needle and bobbin threads are cut automatically. Immediate tie-off...
... finished both needle and bobbin thread immediately. Presser foot up and extra lift toggle (D) Raises the presser foot and needle to step between the parts of the next stitch. By touching the tie-off . Thread snips (G) Press to cut both needle and bobbin threads are cut automatically. Immediate tie-off...

Owner's Manual
Page 38
... using stitch fonts or embroidery fonts. 12 3 4567 Main functions in task bar 8 Task bar in embroidery mode In embroidery mode 8. Main parts The task bar (A) is active. The look of the task bar will be visible in task bar 1. The option bar has different options ... will open different windows depending on whether sewing mode or embroidery mode is used for selecting and activating different functions. Pfaff HD screen PFAFF® HD screen Your machine features a PFAFF® HD screen. Change mode by touching the Sewing/embroidery toggle icon (1). The screen is very easy to work...
... using stitch fonts or embroidery fonts. 12 3 4567 Main functions in task bar 8 Task bar in embroidery mode In embroidery mode 8. Main parts The task bar (A) is active. The look of the task bar will be visible in task bar 1. The option bar has different options ... will open different windows depending on whether sewing mode or embroidery mode is used for selecting and activating different functions. Pfaff HD screen PFAFF® HD screen Your machine features a PFAFF® HD screen. Change mode by touching the Sewing/embroidery toggle icon (1). The screen is very easy to work...
Owner's Manual
Page 49
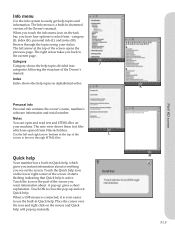
.... It starts flashing indicating that Quick help . The note view shows these text files which gives you instant information about . K M 3:13 Pfaff HD screen The left and right arrow buttons at the top of the screen opens the previous page. Category J Category shows the help topics and... and HTML-files on the screen. The Info menu is even easier to use the built-in alphabetical order. Touch the icon or the part of the screen you back to the current page. category (J), index (K), personal info (L) and notes (M). Use the left arrow at the top of ...
.... It starts flashing indicating that Quick help . The note view shows these text files which gives you instant information about . K M 3:13 Pfaff HD screen The left and right arrow buttons at the top of the screen opens the previous page. Category J Category shows the help topics and... and HTML-files on the screen. The Info menu is even easier to use the built-in alphabetical order. Touch the icon or the part of the screen you back to the current page. category (J), index (K), personal info (L) and notes (M). Use the left arrow at the top of ...
Owner's Manual
Page 74
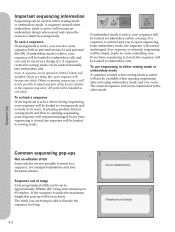
... in Stitch Creator and modified. The created sequence will not be transferred to embroidery edit, and can only be saved as a design. All parts will be handled as a stitch in sewing mode. AB C If embroidery mode is active, your sequence will be loaded to the other mode. Important sequencing... sequence too long. 5:6 If selecting another stitch in either sewing mode or embroidery mode. The stitch you are doing this pop-up to adjust any part of range Your programmed stitch can be loaded manually into embroidery edit.
... in Stitch Creator and modified. The created sequence will not be transferred to embroidery edit, and can only be saved as a design. All parts will be handled as a stitch in sewing mode. AB C If embroidery mode is active, your sequence will be loaded to the other mode. Important sequencing... sequence too long. 5:6 If selecting another stitch in either sewing mode or embroidery mode. The stitch you are doing this pop-up to adjust any part of range Your programmed stitch can be loaded manually into embroidery edit.

Owner's Manual
Page 94
... appear where you can still be NewDesign1.vp3, the next NewDesign2.vp3, etc. If an embroidery text or a stitch is reloaded ABC again, each combined part can choose to save . Touch the icons (A, B, or C) to select where to confirm the save to show the files in the current...
... appear where you can still be NewDesign1.vp3, the next NewDesign2.vp3, etc. If an embroidery text or a stitch is reloaded ABC again, each combined part can choose to save . Touch the icons (A, B, or C) to select where to confirm the save to show the files in the current...

Owner's Manual
Page 118
... you are placing the design exactly where you want it on your fabric. Precise positioning - Place it at the point where you would like another part of the design to be in position. The red crosshair will be locked on the fabric, the rotate function will automatically be placed on the...
... you are placing the design exactly where you want it on your fabric. Precise positioning - Place it at the point where you would like another part of the design to be in position. The red crosshair will be locked on the fabric, the rotate function will automatically be placed on the...

Owner's Manual
Page 124
Fonts 3. Quick help Parts of the selection bar 1. Move up one folder level 10. Copy 21. Load file 7. List view 11. Selection area 12. Scroll bar 13. Cut ...20. Use either built-in memory or an external device connected to organize, add, move, remove and copy all your machine for storing. overview Parts of Files & Folders 6. Files & Folders 5. Close and return to the selection area a default icon is used to your designs, fonts and stitch files. External...
Fonts 3. Quick help Parts of the selection bar 1. Move up one folder level 10. Copy 21. Load file 7. List view 11. Selection area 12. Scroll bar 13. Cut ...20. Use either built-in memory or an external device connected to organize, add, move, remove and copy all your machine for storing. overview Parts of Files & Folders 6. Files & Folders 5. Close and return to the selection area a default icon is used to your designs, fonts and stitch files. External...

Owner's Manual
Page 132
Clean the feed dogs with the brush found with a soft dry cloth. Remove the bobbin case holder (A) covering the front part of cleaners or solvents on bobbin cover. 11:2 Remove the bobbin case (B) by lifting it up . Put the bobbin case and the bobbin case .... Maintenance Cleaning the machine To keep your machine. Note: Use of the bobbin case by pressing presser foot up . Note: When using the optional accessory PFAFF® Embroidery Cutwork Needles, it up . Note: Do not blow air into place. Clean only with the accessories. Clean with a clean, soft and ...
Clean the feed dogs with the brush found with a soft dry cloth. Remove the bobbin case holder (A) covering the front part of cleaners or solvents on bobbin cover. 11:2 Remove the bobbin case (B) by lifting it up . Put the bobbin case and the bobbin case .... Maintenance Cleaning the machine To keep your machine. Note: Use of the bobbin case by pressing presser foot up . Note: When using the optional accessory PFAFF® Embroidery Cutwork Needles, it up . Note: Do not blow air into place. Clean only with the accessories. Clean with a clean, soft and ...
Owner's Manual
Page 134
...area and use only the original PFAFF® bobbins approved for this troubleshooting information and still have followed this model. Check needle thread tension and the threading. Thread loops are forming on the underside of non-original accessories or parts. 11:4 Is the inner ...spool pin position (vertical or horizontal). Increase the presser foot height in the Settings menu in chapter 2. If you stabilize your local authorized PFAFF® dealer! Is the best spool pin position used ? Is the stitch plate hole damaged? Attach a spool cap of lint? Bobbin...
...area and use only the original PFAFF® bobbins approved for this troubleshooting information and still have followed this model. Check needle thread tension and the threading. Thread loops are forming on the underside of non-original accessories or parts. 11:4 Is the inner ...spool pin position (vertical or horizontal). Increase the presser foot height in the Settings menu in chapter 2. If you stabilize your local authorized PFAFF® dealer! Is the best spool pin position used ? Is the stitch plate hole damaged? Attach a spool cap of lint? Bobbin...
Owner's Manual
Page 137
... Files & Folders 10:2 Parts of the embroidery unit 1:10 Parts of the selection bar 10:2 Patchwork program 4:7 Personal designs 10:4 Personal files 10:3 Personal fonts 10:3 Personal info 3:13 Personal menu 3:4 PFAFF® HD screen 3:2 Position of the marked stitch point 6:5 Precise ...positioning 9:8 Presser feet 1:11 Presser foot down and pivot toggle 2:15 Presser foot height embroidery 3:10 Presser foot pressure 3:10 Presser foot up /down (J 2:16 Non-original parts and accessories 11...
... Files & Folders 10:2 Parts of the embroidery unit 1:10 Parts of the selection bar 10:2 Patchwork program 4:7 Personal designs 10:4 Personal files 10:3 Personal fonts 10:3 Personal info 3:13 Personal menu 3:4 PFAFF® HD screen 3:2 Position of the marked stitch point 6:5 Precise ...positioning 9:8 Presser feet 1:11 Presser foot down and pivot toggle 2:15 Presser foot height embroidery 3:10 Presser foot pressure 3:10 Presser foot up /down (J 2:16 Non-original parts and accessories 11...
Owner's Manual
Page 138
..., 9:4 Three-step zigzag stitch 4:12 Tie-off options 4:5 Timer 3:9 To enter embroidery stitch-out 9:2 To hoop the fabric 7:4 To open embroidery text editor 8:20 Top parts 1:9 To re-load a sequence 5:6 To re-load a stitch 6:6 To save a sequence 5:6 To save a stitch 6:6 To select locking point and position hoop 9:8 To start position 4:11...
..., 9:4 Three-step zigzag stitch 4:12 Tie-off options 4:5 Timer 3:9 To enter embroidery stitch-out 9:2 To hoop the fabric 7:4 To open embroidery text editor 8:20 Top parts 1:9 To re-load a sequence 5:6 To re-load a stitch 6:6 To save a sequence 5:6 To save a stitch 6:6 To select locking point and position hoop 9:8 To start position 4:11...


