

Owner's Manual
Page 2
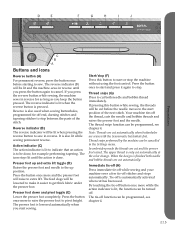
... where oxygen is being administrated. • To disconnect, turn all moving parts. Use only attachments recommended by the manufacturer as threading needle, changing needle, threading bobbin, or changing presser foot, etc. • Always unplug sewing machine from all controls to person: • This sewing machine is required around the sewing machine...
... where oxygen is being administrated. • To disconnect, turn all moving parts. Use only attachments recommended by the manufacturer as threading needle, changing needle, threading bobbin, or changing presser foot, etc. • Always unplug sewing machine from all controls to person: • This sewing machine is required around the sewing machine...
Owner's Manual
Page 4
...off options 4:5 Speed control 4:6 Sewing programs 4:6 Balance 4:8 Mirroring 4:8 Zoom to update your machine 2:14 Buttons and icons 2:15 3 PFAFF® HD screen 3:1 Task bar 3:2 Use the task bar 3:3 Common icons 3:3 Selection menu 3:4 Embroidery edit 3:5 Embroidery text editor... 2:3 Free arm 2:3 Thread cutter 2:3 Stylus holder 2:3 Spool pins 2:4 Threading the machine 2:5 Needle threader 2:5 Bobbin winding 2:7 Inserting the bobbin 2:8 IDT (Integrated dual feed) 2:9 Electronic knee-lift 2:9 Needles 2:10 Changing the needle 2:11 Lowering feed ...
...off options 4:5 Speed control 4:6 Sewing programs 4:6 Balance 4:8 Mirroring 4:8 Zoom to update your machine 2:14 Buttons and icons 2:15 3 PFAFF® HD screen 3:1 Task bar 3:2 Use the task bar 3:3 Common icons 3:3 Selection menu 3:4 Embroidery edit 3:5 Embroidery text editor... 2:3 Free arm 2:3 Thread cutter 2:3 Stylus holder 2:3 Spool pins 2:4 Threading the machine 2:5 Needle threader 2:5 Bobbin winding 2:7 Inserting the bobbin 2:8 IDT (Integrated dual feed) 2:9 Electronic knee-lift 2:9 Needles 2:10 Changing the needle 2:11 Lowering feed ...
Owner's Manual
Page 8
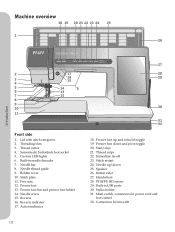
...connectors for knee-lift 1:8 Sensormatic buttonhole foot socket 5. Free arm 12. Presser foot 13. Start/stop 21. Button ruler 27. Stylus holder 31. Bobbin cover 10. Presser foot up /down and pivot toggle 20. Thread snips 22. Handwheel 28. Machine overview 18 19 20 21 22 23 24 25...cord and foot control 32. Needle thread guide 9. Presser foot down 25. Speaker 26. Threading slots 3. Presser foot bar and presser foot holder 14. PFAFF® HD screen 29. Immediate tie-off 23. Built-in USB ports 30. Built-in needle threader 7. Lid with stitch categories 2. Needle bar ...
...connectors for knee-lift 1:8 Sensormatic buttonhole foot socket 5. Free arm 12. Presser foot 13. Start/stop 21. Button ruler 27. Stylus holder 31. Bobbin cover 10. Presser foot up /down and pivot toggle 20. Thread snips 22. Handwheel 28. Machine overview 18 19 20 21 22 23 24 25...cord and foot control 32. Needle thread guide 9. Presser foot down 25. Speaker 26. Threading slots 3. Presser foot bar and presser foot holder 14. PFAFF® HD screen 29. Immediate tie-off 23. Built-in USB ports 30. Built-in needle threader 7. Lid with stitch categories 2. Needle bar ...
Owner's Manual
Page 9
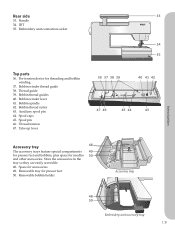
...42 47 46 45 44 43 Accessory tray 48 The accessory trays feature special compartments 49 for presser feet and bobbins, plus space for threading and bobbin winding 37. Spool pin 46. Bobbin thread guides 40. Auxiliary spool pin 44. Pre-tension device for needles 50 and other accessories. Removable... bobbin holder Accessory tray Introduction 48 50 Embroidery unit accessory tray 1:9 Space for presser feet 50. Store the accessories in the tray so...
...42 47 46 45 44 43 Accessory tray 48 The accessory trays feature special compartments 49 for presser feet and bobbins, plus space for threading and bobbin winding 37. Spool pin 46. Bobbin thread guides 40. Auxiliary spool pin 44. Pre-tension device for needles 50 and other accessories. Removable... bobbin holder Accessory tray Introduction 48 50 Embroidery unit accessory tray 1:9 Space for presser feet 50. Store the accessories in the tray so...

Owner's Manual
Page 10
...Screwdriver 63. Spool cap, small 68. Introduction Parts of the embroidery unit (type BE15) 51. Embroidery unit socket 55. Stylus 58. creative™ 120 Square Hoop (120x120) 73. Thread net 59. Knee-lift 51 52 52 56 55 54 53 57 58 59 60... (P/N:412 62 59-04) • Needles • 4D™ Embroidery Machine Communication CD • creative vision™ Embroidery collection 1:10 Brush 65. Multi-purpose tool 69. USB Embroidery stick 62. Embroidery unit release button 52. Bobbins 70. Level adjusting feet 53. creative™ Master Hoop (240x150) 74.
...Screwdriver 63. Spool cap, small 68. Introduction Parts of the embroidery unit (type BE15) 51. Embroidery unit socket 55. Stylus 58. creative™ 120 Square Hoop (120x120) 73. Thread net 59. Knee-lift 51 52 52 56 55 54 53 57 58 59 60... (P/N:412 62 59-04) • Needles • 4D™ Embroidery Machine Communication CD • creative vision™ Embroidery collection 1:10 Brush 65. Multi-purpose tool 69. USB Embroidery stick 62. Embroidery unit release button 52. Bobbins 70. Level adjusting feet 53. creative™ Master Hoop (240x150) 74.
Owner's Manual
Page 12
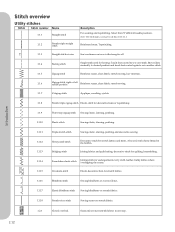
... blindhem stitch Sewing blindhems on stretch fabrics. 1.1.18 Stretch tricot stitch Sewing seams on stretch fabrics. 1.2.1 Closed overlock Seam and overcast stretch fabrics in the bobbin. Honeycomb stitch Decorative stitch for stretch fabrics. Reinforced seam. Elastic stitch Sewing elastic, darning, patching. Topstitching. 1.1.3 Straight stitch reverse Sew continuous reverse with elastic thread...
... blindhem stitch Sewing blindhems on stretch fabrics. 1.1.18 Stretch tricot stitch Sewing seams on stretch fabrics. 1.2.1 Closed overlock Seam and overcast stretch fabrics in the bobbin. Honeycomb stitch Decorative stitch for stretch fabrics. Reinforced seam. Elastic stitch Sewing elastic, darning, patching. Topstitching. 1.1.3 Straight stitch reverse Sew continuous reverse with elastic thread...

Owner's Manual
Page 24
... reels off too fast. This is to the vertical position. Auxiliary spool pin The auxiliary spool pin is adjustable and can be used when winding a bobbin thread from a second spool of the spool cap should be pressed firmly against the spool. Do not place a spool cap on top of the...
... reels off too fast. This is to the vertical position. Auxiliary spool pin The auxiliary spool pin is adjustable and can be used when winding a bobbin thread from a second spool of the spool cap should be pressed firmly against the spool. Do not place a spool cap on top of the...
Owner's Manual
Page 25
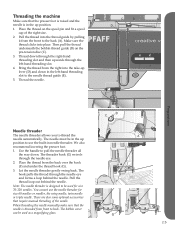
Make sure the thread clicks into the thread guide by pulling it from front to back. Then pull the thread underneath the bobbin thread guide (B) on the spool pin and fit a spool cap of the needle. Let the needle threader gently swing back. Pull the thread loop out .... The needle must be in the up lever (D) and down in the left -hand threading slot. 4. Note: The needle threader is in needle threader. The bobbin cover can be used for size 60 needles or smaller, the wing needle, twin needle or triple needle. C B A D E B C A F G 2:5 Preparations Place the thread on the pre...
Make sure the thread clicks into the thread guide by pulling it from front to back. Then pull the thread underneath the bobbin thread guide (B) on the spool pin and fit a spool cap of the needle. Let the needle threader gently swing back. Pull the thread loop out .... The needle must be in the up lever (D) and down in the left -hand threading slot. 4. Note: The needle threader is in needle threader. The bobbin cover can be used for size 60 needles or smaller, the wing needle, twin needle or triple needle. C B A D E B C A F G 2:5 Preparations Place the thread on the pre...
Owner's Manual
Page 26
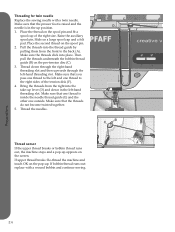
Slide on the pre-tension disc (C). 3. Then pull the threads underneath the bobbin thread guide (B) on a large spool cap and a felt pad. Make sure that...one thread to the left and one outside. C B A D F E B C Thread sensor A If the upper thread breaks or bobbin thread runs out, the machine stops and a pop-up . Thread down in the up lever (D) and down through the right-hand threading...-up position. 1. Threading for twin needle Replace the sewing needle with a wound bobbin and continue sewing. Make sure that one thread is in the left -hand threading slot. If...
Slide on the pre-tension disc (C). 3. Then pull the threads underneath the bobbin thread guide (B) on a large spool cap and a felt pad. Make sure that...one thread to the left and one outside. C B A D F E B C Thread sensor A If the upper thread breaks or bobbin thread runs out, the machine stops and a pop-up . Thread down in the up lever (D) and down through the right-hand threading...-up position. 1. Threading for twin needle Replace the sewing needle with a wound bobbin and continue sewing. Make sure that one thread is in the left -hand threading slot. If...
Owner's Manual
Page 27
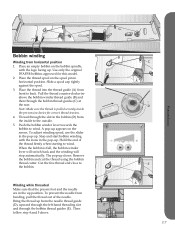
Use only the original PFAFF® bobbins approved for correct thread tension. 4. A pop-up appears on the spool pin in horizontal position. Cut the free thread end close to back. Place the thread spool on the screen. Remove the bobbin and cut the thread using the bobbin thread cutter. B C A D E A D .... The pop-up position. Winding while threaded Make sure that the presser foot and the needle are in the pop-up . Bobbin winding Winding from the inside the pre-tension device for this model. 2. Pull the thread counter-clockwise above . Then follow step 4...
Use only the original PFAFF® bobbins approved for correct thread tension. 4. A pop-up appears on the spool pin in horizontal position. Cut the free thread end close to back. Place the thread spool on the screen. Remove the bobbin and cut the thread using the bobbin thread cutter. B C A D E A D .... The pop-up position. Winding while threaded Make sure that the presser foot and the needle are in the pop-up . Bobbin winding Winding from the inside the pre-tension device for this model. 2. Pull the thread counter-clockwise above . Then follow step 4...
Owner's Manual
Page 28
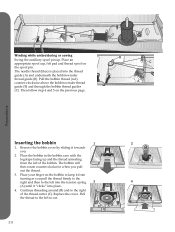
... then rotate counter-clockwise when you . 2. Pull the thread to the left to the right B of the bobbin. A C 2:8 Place the bobbin in the bobbin case with the logotype facing up . Place an appropriate spool cap, felt pad and thread spool on the previous page. Then follow step 4 and 5 on...unreeling from turning as you pull the thread firmly to the right and then to the left into the thread guide (A) and underneath the bobbin winder thread guide (B). The needle thread (blue) is placed into the tension spring 3 4 (A) until it towards you pull out the thread...
... then rotate counter-clockwise when you . 2. Pull the thread to the left to the right B of the bobbin. A C 2:8 Place the bobbin in the bobbin case with the logotype facing up . Place an appropriate spool cap, felt pad and thread spool on the previous page. Then follow step 4 and 5 on...unreeling from turning as you pull the thread firmly to the right and then to the left into the thread guide (A) and underneath the bobbin winder thread guide (B). The needle thread (blue) is placed into the tension spring 3 4 (A) until it towards you pull out the thread...
Owner's Manual
Page 35
...Thread snips (G) Press to cut has been used when sewing buttonholes, programmed tie-off . Tie-off is finished both needle and bobbin thread immediately. Reverse indicator (B) The reverse indicator will be lit and the machine sews in reverse. Note: Threads are sewn with the Sensormatic... are cut automatically when buttonholes are cut and the presser foot raised. When the design is automatically activated when cut both needle and bobbin threads are cut before starting to sew. The reverse indicator (B) will raise to the up and extra lift toggle (D) Raises the...
...Thread snips (G) Press to cut has been used when sewing buttonholes, programmed tie-off . Tie-off is finished both needle and bobbin thread immediately. Reverse indicator (B) The reverse indicator will be lit and the machine sews in reverse. Note: Threads are sewn with the Sensormatic... are cut automatically when buttonholes are cut and the presser foot raised. When the design is automatically activated when cut both needle and bobbin threads are cut before starting to sew. The reverse indicator (B) will raise to the up and extra lift toggle (D) Raises the...

Owner's Manual
Page 53
... presser foot, press the presser foot up and extra lift button and the presser foot down position, the presser foot raises to cut needle and bobbin thread and raise the foot. When the needle stops in the stitch selection area (3). To lower the presser foot, place the fabric under the presser...
... presser foot, press the presser foot up and extra lift button and the presser foot down position, the presser foot raises to cut needle and bobbin thread and raise the foot. When the needle stops in the stitch selection area (3). To lower the presser foot, place the fabric under the presser...
Owner's Manual
Page 60
..., i.e. Increase the needle thread tension. Sewing mode 23 4:10 Touch - Thread tension (15) Touch + to decrease the needle thread tension. to increase, and - If the bobbin thread is visible on the underside of the entire stitch. Reduce the needle thread tension. For decorative stitches and buttonholes the top thread should be...
..., i.e. Increase the needle thread tension. Sewing mode 23 4:10 Touch - Thread tension (15) Touch + to decrease the needle thread tension. to increase, and - If the bobbin thread is visible on the underside of the entire stitch. Reduce the needle thread tension. For decorative stitches and buttonholes the top thread should be...
Owner's Manual
Page 65
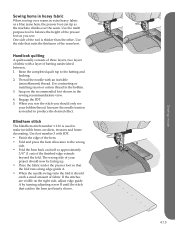
... shows. Baste the completed quilt top to balance the height of batting sandwiched between. 1. Use foot number 3 with IDT. • Finish the edge of your bobbin thread. Handlook quilting A quilt usually consists of three layers, two layers of fabric with an invisible (monofilament) thread. B A Sewing mode 4:15 The wrong... to produce the desired effect. Use the multi purpose tool to the batting and backing. 2. Use contrasting or matching rayon or cotton thread in the bobbin. 3.
... shows. Baste the completed quilt top to balance the height of batting sandwiched between. 1. Use foot number 3 with IDT. • Finish the edge of your bobbin thread. Handlook quilting A quilt usually consists of three layers, two layers of fabric with an invisible (monofilament) thread. B A Sewing mode 4:15 The wrong... to produce the desired effect. Use the multi purpose tool to the batting and backing. 2. Use contrasting or matching rayon or cotton thread in the bobbin. 3.

Owner's Manual
Page 68
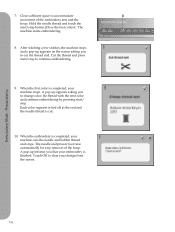
Just continue sewing without the Sensormatic buttonhole foot in your Personal menu. 4:18 Replace the empty bobbin with the Sensormatic buttonhole foot. • Sewing an adjusted buttonhole saved without closing the pop-up and start sewing again. Re-thread the needle thread, ... needs to sew until the thread has run out. Check needle thread The machine stops automatically if the needle thread runs out or breaks. Bobbin empty When the bobbin is shown. Sewing mode Common sewing pop-ups System busy When the machine is loading, saving, moving files or anything that takes...
Just continue sewing without the Sensormatic buttonhole foot in your Personal menu. 4:18 Replace the empty bobbin with the Sensormatic buttonhole foot. • Sewing an adjusted buttonhole saved without closing the pop-up and start sewing again. Re-thread the needle thread, ... needs to sew until the thread has run out. Check needle thread The machine stops automatically if the needle thread runs out or breaks. Bobbin empty When the bobbin is shown. Sewing mode Common sewing pop-ups System busy When the machine is loading, saving, moving files or anything that takes...

Owner's Manual
Page 85
... machine automatically switches to embroidery stitch-out by touching the embroidery toggle icon (B) on the hoop. 3. B A C B 7:5 After attaching the embroidery unit and embroidery foot, insert a bobbin with the first color in the center of fabric and slide on the task bar. 6. Note: Make sure that the IDT is placed in...
... machine automatically switches to embroidery stitch-out by touching the embroidery toggle icon (B) on the hoop. 3. B A C B 7:5 After attaching the embroidery unit and embroidery foot, insert a bobbin with the first color in the center of fabric and slide on the task bar. 6. Note: Make sure that the IDT is placed in...
Owner's Manual
Page 86
... arm and the hoop. After stitching a few stitches, the machine stops and a pop-up appears asking you to clear your machine cuts the needle and bobbin thread and stops. 7. Each color segment is tied off at the end and the needle thread is completed, your design from the screen. Embroidery Mode...
... arm and the hoop. After stitching a few stitches, the machine stops and a pop-up appears asking you to clear your machine cuts the needle and bobbin thread and stops. 7. Each color segment is tied off at the end and the needle thread is completed, your design from the screen. Embroidery Mode...

Owner's Manual
Page 117
...Cut position Cut position will move the hoop towards you making it easier to change the set to get a pop-up . You can change the bobbin, touch bobbin position. Long touch the speed control icon to default. Note: If selecting the highest speed in the slider, it is removed, otherwise it may... by sliding the button right or left and then close the pop-up. Use the park position when you need to open the bobbin cover and replace the bobbin. Just touch the speed control icon to easily reduce the maximum embroidery speed. Park position When you have chosen. Speed control (11)...
...Cut position Cut position will move the hoop towards you making it easier to change the set to get a pop-up . You can change the bobbin, touch bobbin position. Long touch the speed control icon to default. Note: If selecting the highest speed in the slider, it is removed, otherwise it may... by sliding the button right or left and then close the pop-up. Use the park position when you need to open the bobbin cover and replace the bobbin. Just touch the speed control icon to easily reduce the maximum embroidery speed. Park position When you have chosen. Speed control (11)...

Owner's Manual
Page 121
... and start /stop button or the foot control. To change the hoop setting to embroider until the thread has completely run out. When the bobbin is possible to the hoop size attached. Close the pop-up appears on screen, the machine will also be damaged while calibrating. Note: It... the size displayed on the screen. Attach correct hoop If the size of the hoop attached to snap on the embroidery presser foot 6A. Bobbin empty When the bobbin is attached, a popup asks you to select hoop. Re-thread the needle thread, close the pop-up, step back a few stitches...
... and start /stop button or the foot control. To change the hoop setting to embroider until the thread has completely run out. When the bobbin is possible to the hoop size attached. Close the pop-up appears on screen, the machine will also be damaged while calibrating. Note: It... the size displayed on the screen. Attach correct hoop If the size of the hoop attached to snap on the embroidery presser foot 6A. Bobbin empty When the bobbin is attached, a popup asks you to select hoop. Re-thread the needle thread, close the pop-up, step back a few stitches...


