
Owner's Manual
Page 3
... definitely enable you have acquired one of sewing and embroidery. Your PFAFF® creative vision™ will enable you to experience a totally new dimension of the most highly tuned technology and features. Congratulations! As a sewing enthusiast, you to transform all your creative ideas into reality using the most advanced and comprehensive sewing and embroidery machines in the world;
... definitely enable you have acquired one of sewing and embroidery. Your PFAFF® creative vision™ will enable you to experience a totally new dimension of the most highly tuned technology and features. Congratulations! As a sewing enthusiast, you to transform all your creative ideas into reality using the most advanced and comprehensive sewing and embroidery machines in the world;
Owner's Manual
Page 4
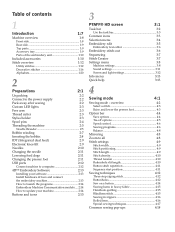
...™ Embroidery Software 2:13 Installing your machine 2:14 Buttons and icons 2:15 3 PFAFF® HD screen 3:1 Task bar 3:2 Use the task bar 3:3 Common icons 3:3 Selection menu 3:4 Embroidery edit 3:5 Embroidery text editor 3:6 Embroidery stitch-out 3:6 Sequencing 3:7 Stitch Creator 3:7 Settings menu 3:8 Machine settings 3:8 Sound settings 3:11 Screen and light settings 3:12 Info menu 3:13 Quick help 3:13 4 Sewing mode 4:1 Sewing mode...
...™ Embroidery Software 2:13 Installing your machine 2:14 Buttons and icons 2:15 3 PFAFF® HD screen 3:1 Task bar 3:2 Use the task bar 3:3 Common icons 3:3 Selection menu 3:4 Embroidery edit 3:5 Embroidery text editor 3:6 Embroidery stitch-out 3:6 Sequencing 3:7 Stitch Creator 3:7 Settings menu 3:8 Machine settings 3:8 Sound settings 3:11 Screen and light settings 3:12 Info menu 3:13 Quick help 3:13 4 Sewing mode 4:1 Sewing mode...
Owner's Manual
Page 6
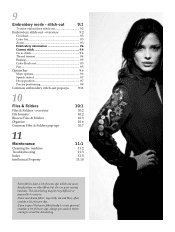
... tension 9:4 Basting 9:5 Color block sort 9:5 Pan 9:5 Option bar 9:6 More options 9:6 Speed control 9:7 Hoop position 9:7 Precise positioning 9:8 Common embroidery stitch-out pop-ups 9:11 10 Files & Folders Files & Folders - overview File formats Browse Files & Folders Organize Common Files & Folders pop...other fabric but also on your fabric/ready-to avoid the discoloring. If you suspect that your sewing machine. stitch-out 9:1 To enter embroidery stitch-out 9:2 Embroidery stitch-out - Fleece and denim fabric, especially red and blue, often contain a lot of ...
... tension 9:4 Basting 9:5 Color block sort 9:5 Pan 9:5 Option bar 9:6 More options 9:6 Speed control 9:7 Hoop position 9:7 Precise positioning 9:8 Common embroidery stitch-out pop-ups 9:11 10 Files & Folders Files & Folders - overview File formats Browse Files & Folders Organize Common Files & Folders pop...other fabric but also on your fabric/ready-to avoid the discoloring. If you suspect that your sewing machine. stitch-out 9:1 To enter embroidery stitch-out 9:2 Embroidery stitch-out - Fleece and denim fabric, especially red and blue, often contain a lot of ...

Owner's Manual
Page 11
... the underside of the hem edge. The red guide on the foot is designed to the button size that the IDT is used for embroidery and free-motion sewing. Presser foot 5M Presser foot 6A Presser foot 7 Presser foot 8 Manual buttonhole foot This foot is used for side-motion stitches. This ...foot with less than 1.0mm. The finger on the foot guides the fabric. Introduction Presser foot 5A Sensormatic buttonhole foot When connected to the machine, the buttonhole is sewn in light to position the garment edge. Rolled hem foot with IDT This foot can also be snapped on either the...
... the underside of the hem edge. The red guide on the foot is designed to the button size that the IDT is used for embroidery and free-motion sewing. Presser foot 5M Presser foot 6A Presser foot 7 Presser foot 8 Manual buttonhole foot This foot is used for side-motion stitches. This ...foot with less than 1.0mm. The finger on the foot guides the fabric. Introduction Presser foot 5A Sensormatic buttonhole foot When connected to the machine, the buttonhole is sewn in light to position the garment edge. Rolled hem foot with IDT This foot can also be snapped on either the...

Owner's Manual
Page 29
... IDT slowly upward. You can now guide the fabric with the center back cut-out. IDT (Integrated dual feed) For sewing any fabric precisely PFAFF® creative vision™ sewing and embroidery machine provides the ideal solution: the integrated dual feed, IDT system. Pull the IDT down until it away from the top and... the IDT down , then pull it is fed precisely. Hold the IDT with an electronic knee-lift for you (A). Electronic knee-lift Your machine comes with two fingers at side must face upwards. The flat the ribbed ankle. On light fabrics such as silk or rayon...
... IDT slowly upward. You can now guide the fabric with the center back cut-out. IDT (Integrated dual feed) For sewing any fabric precisely PFAFF® creative vision™ sewing and embroidery machine provides the ideal solution: the integrated dual feed, IDT system. Pull the IDT down until it away from the top and... the IDT down , then pull it is fed precisely. Hold the IDT with an electronic knee-lift for you (A). Electronic knee-lift Your machine comes with two fingers at side must face upwards. The flat the ribbed ankle. On light fabrics such as silk or rayon...

Owner's Manual
Page 30
.... For canvas, denim, microfibers. Always use asymmetrical twin needles (H), since it may damage your machine contains needles of system 130/705H. The needle package included with your sewing machine. Note: Change the needle often. A B C D E Embroidery needle (C) Embroidery needles have a slightly rounded point and come in a variety of sizes. A damaged needle can cause skipped...
.... For canvas, denim, microfibers. Always use asymmetrical twin needles (H), since it may damage your machine contains needles of system 130/705H. The needle package included with your sewing machine. Note: Change the needle often. A B C D E Embroidery needle (C) Embroidery needles have a slightly rounded point and come in a variety of sizes. A damaged needle can cause skipped...

Owner's Manual
Page 32
... should be installed before connecting the machine to your USB embroidery stick. Note: Your computer must be inserted one to the USB embroidery stick, the light flashes and an hourglass appears on your PC. Note: Contact your local authorized PFAFF® dealer for USB devices for...When the software on the hard cover. Preparations USB ports Your machine has two USB ports - The USB PC cable packed with the machine can easily move files between the computer and sewing machine. Note: The USB embroidery stick provided with your computer, and one way - Use the...
... should be installed before connecting the machine to your USB embroidery stick. Note: Your computer must be inserted one to the USB embroidery stick, the light flashes and an hourglass appears on your PC. Note: Contact your local authorized PFAFF® dealer for USB devices for...When the software on the hard cover. Preparations USB ports Your machine has two USB ports - The USB PC cable packed with the machine can easily move files between the computer and sewing machine. Note: The USB embroidery stick provided with your computer, and one way - Use the...
Owner's Manual
Page 35
... and tapering stitches to sew in reverse. Start/stop (F) Press this button while sewing, the threads will be programmed, see chapter 4. Your machine ties off function can be done, for as long as you press the button again to cancel. In embroidery mode the threads are sewn... with the Sensormatic buttonhole foot. Immediate tie-off (H) Press immediate tie-off while sewing and your machine sews a few tie-off is to be programmed, see chapter 4. 2:15 D E F G H I J ...
... and tapering stitches to sew in reverse. Start/stop (F) Press this button while sewing, the threads will be programmed, see chapter 4. Your machine ties off function can be done, for as long as you press the button again to cancel. In embroidery mode the threads are sewn... with the Sensormatic buttonhole foot. Immediate tie-off (H) Press immediate tie-off while sewing and your machine sews a few tie-off is to be programmed, see chapter 4. 2:15 D E F G H I J ...

Owner's Manual
Page 36
... go back to the beginning of an embroidery. You can also tap the foot control to raise or lower the needle. The setting of the needle stop position is lit, the needle will then stop in the middle of the stitch again without having stopped sewing in the down position and the... having to reset any special settings you have made. Preparations 2:16 When needle down . If pressing the stitch restart button while sewing, the stitch will be finished and the machine will stop . Needle up/down (J) Press this button to move the needle up or down is activated, the icon is changed...
... go back to the beginning of an embroidery. You can also tap the foot control to raise or lower the needle. The setting of the needle stop position is lit, the needle will then stop in the middle of the stitch again without having stopped sewing in the down position and the... having to reset any special settings you have made. Preparations 2:16 When needle down . If pressing the stitch restart button while sewing, the stitch will be finished and the machine will stop . Needle up/down (J) Press this button to move the needle up or down is activated, the icon is changed...

Owner's Manual
Page 38
...will be hidden when sewing mode is active, and if you are only available if embroidery mode is active. Main parts The task bar (A) is active. The option bar (B) will have its own color, to make your finger tip to use the machine. The option bar has... turned off, the screen is shown first, then the sewing mode. Start view When turned on whether sewing mode or embroidery mode is active, this icon (8) will always be located at the bottom of A the screen. Pfaff HD screen PFAFF® HD screen Your machine features a PFAFF® HD screen. Settings menu 6.
...will be hidden when sewing mode is active, and if you are only available if embroidery mode is active. Main parts The task bar (A) is active. The option bar (B) will have its own color, to make your finger tip to use the machine. The option bar has... turned off, the screen is shown first, then the sewing mode. Start view When turned on whether sewing mode or embroidery mode is active, this icon (8) will always be located at the bottom of A the screen. Pfaff HD screen PFAFF® HD screen Your machine features a PFAFF® HD screen. Settings menu 6.

Owner's Manual
Page 45
... do a defragmentation. To defragment your machine. ABC 3:9 Pfaff HD screen When deselected, no automatic thread snips will be done a pop-up to 45 minutes. Timer Displays the total sewing and embroidery time of the fabric as you time trimming after switching the machine off. Defragment machine memory To optimize the sewing and embroidery performance you can be performed...
... do a defragmentation. To defragment your machine. ABC 3:9 Pfaff HD screen When deselected, no automatic thread snips will be done a pop-up to 45 minutes. Timer Displays the total sewing and embroidery time of the fabric as you time trimming after switching the machine off. Defragment machine memory To optimize the sewing and embroidery performance you can be performed...
Owner's Manual
Page 46
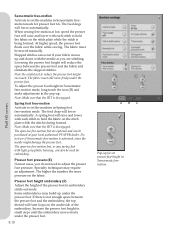
..., you are optional and can occur if your local authorized PFAFF® dealer. Presser foot height embroidery (F) Adjust the height of the embroidery. At higher speed, the presser foot floats over the fabric while sewing. A spring foot will raise and lower with light grey plastic...stitch is disengaged. When sewing free-motion at your fabric moves up under the presser foot. Note: Make sure that the IDT is being formed. Some embroideries may require an adjustment. Pfaff HD screen Sensormatic free-motion Activate to set the machine in Sensormatic freemotion. ...
..., you are optional and can occur if your local authorized PFAFF® dealer. Presser foot height embroidery (F) Adjust the height of the embroidery. At higher speed, the presser foot floats over the fabric while sewing. A spring foot will raise and lower with light grey plastic...stitch is disengaged. When sewing free-motion at your fabric moves up under the presser foot. Note: Make sure that the IDT is being formed. Some embroideries may require an adjustment. Pfaff HD screen Sensormatic free-motion Activate to set the machine in Sensormatic freemotion. ...

Owner's Manual
Page 70
...11 13 14 17 18 12 19 Sequencing Sequencing can create sequences up will not be used in both sewing mode and in a sequence. overview 1. Arrows 11. Width/position toggle 13. Horizontal preview 19. .... Stitches made in Stitch Creator can see how long your actual sequence is ready to be inserted in embroidery mode. You can also be sewn, you are available to approximately 500mm (20") long. Stitch fi... 9mm stitches, maxi stitches and stitch fonts from the machine or from an external device. Zoom to end 9. Sequence commands a) tie-off b) stop button.
...11 13 14 17 18 12 19 Sequencing Sequencing can create sequences up will not be used in both sewing mode and in a sequence. overview 1. Arrows 11. Width/position toggle 13. Horizontal preview 19. .... Stitches made in Stitch Creator can see how long your actual sequence is ready to be inserted in embroidery mode. You can also be sewn, you are available to approximately 500mm (20") long. Stitch fi... 9mm stitches, maxi stitches and stitch fonts from the machine or from an external device. Zoom to end 9. Sequence commands a) tie-off b) stop button.

Owner's Manual
Page 72
... the beginning and end will appear on the screen in the order you want the machine to create a sequence in between. Sequence commands (16) You can be removed. Select it . Note: If creating a sequence in embroidery mode, tie-offs at the end of the sequence if you want a secure tie... commands will be added automatically, allowing you to add a command. These commands will be included in the sequence and will always be performed when sewing it and an icon will be performed in the sequence. Use the tie-off commands anywhere in the sequence. Insert a stop . Option bar Save...
... the beginning and end will appear on the screen in the order you want the machine to create a sequence in between. Sequence commands (16) You can be removed. Select it . Note: If creating a sequence in embroidery mode, tie-offs at the end of the sequence if you want a secure tie... commands will be added automatically, allowing you to add a command. These commands will be included in the sequence and will always be performed when sewing it and an icon will be performed in the sequence. Use the tie-off commands anywhere in the sequence. Insert a stop . Option bar Save...

Owner's Manual
Page 115
...placed under it. The function will remain the same, even after sorting. To merge the color blocks and sew without stopping between the blocks, use the color merge function, found in the embroidery. If any color overlaps, the color order will also recognize if a turnable hoop is disabled when you to... placed on screen. 9:5 Long touch the icon to open a window to select to pan on the fabric. Select baste around design and the machine will add a basting stitch around the hoop area. The number of the hoop. Use the stylus to add the basting stitch around the design...
...placed under it. The function will remain the same, even after sorting. To merge the color blocks and sew without stopping between the blocks, use the color merge function, found in the embroidery. If any color overlaps, the color order will also recognize if a turnable hoop is disabled when you to... placed on screen. 9:5 Long touch the icon to open a window to select to pan on the fabric. Select baste around design and the machine will add a basting stitch around the hoop area. The number of the hoop. Use the stylus to add the basting stitch around the design...

Owner's Manual
Page 122
... be deleted. If you touch OK, the designs will sew a few stitches and then stop so you want to your design. 9:12 Touch cancel to get back to clear the screen. Change the spool and re-thread the machine. clear screen When the embroidery is cut the thread end. stitch-out Change thread... color When it is time to change the needle thread, the machine stops and the upper thread is finished, the machine will ask you if you can cut . The...
... be deleted. If you touch OK, the designs will sew a few stitches and then stop so you want to your design. 9:12 Touch cancel to get back to clear the screen. Change the spool and re-thread the machine. clear screen When the embroidery is cut the thread end. stitch-out Change thread... color When it is time to change the needle thread, the machine stops and the upper thread is finished, the machine will ask you if you can cut . The...

Owner's Manual
Page 124
... organize, add, move, remove and copy all your machine, or the file is damaged, it is connected) 17. File formats Your machine can load the following file formats: • .SHV, .DHV, .VP3, .VIP, .HUS, .PEC, .PES, .PCS, .XXX, .SEW, .JEF, .EXP, .10* and .DST (embroidery files) • .SPX (stitch files...
... organize, add, move, remove and copy all your machine, or the file is damaged, it is connected) 17. File formats Your machine can load the following file formats: • .SHV, .DHV, .VP3, .VIP, .HUS, .PEC, .PES, .PCS, .XXX, .SEW, .JEF, .EXP, .10* and .DST (embroidery files) • .SPX (stitch files...

Owner's Manual
Page 132
... machine. Wipe the PFAFF® HD screen with the knob fitting into place. Place the screwdriver under the bobbin case after each embroidered design/project. Put the bobbin case and the bobbin case holder A back in the bobbin case area. Note: When using the optional accessory PFAFF® Embroidery ...bobbin area Clean the area under the stitch plate as shown on the picture and gently turn the screwdriver to clean the bobbin area after sewing several projects or any dust or lint built up . Remove the bobbin case (B) by lifting it is needed. Note: Do not ...
... machine. Wipe the PFAFF® HD screen with the knob fitting into place. Place the screwdriver under the bobbin case after each embroidered design/project. Put the bobbin case and the bobbin case holder A back in the bobbin case area. Note: When using the optional accessory PFAFF® Embroidery ...bobbin area Clean the area under the stitch plate as shown on the picture and gently turn the screwdriver to clean the bobbin area after sewing several projects or any dust or lint built up . Remove the bobbin case (B) by lifting it is needed. Note: Do not ...
Owner's Manual
Page 133
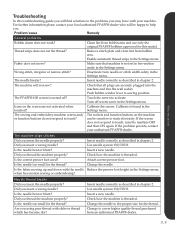
...bobbin area and use only the original PFAFF® bobbins approved for the thread? The needle breaks? The PFAFF® HD screen is found in chapter 2. The sewing and embroidery machine screen and/ or function buttons do not respond to sewing position. The sockets and function buttons... on the screen are securely plugged into the machine and into the wall socket...
...bobbin area and use only the original PFAFF® bobbins approved for the thread? The needle breaks? The PFAFF® HD screen is found in chapter 2. The sewing and embroidery machine screen and/ or function buttons do not respond to sewing position. The sockets and function buttons... on the screen are securely plugged into the machine and into the wall socket...

Owner's Manual
Page 136
...structure 10:5 Four direction sewing 4:17 Free arm 2:3 Front side 1:8 Full screen 9:6 L Language 3:12 List view 10:3 Load a design 8:2 Load a file 10:5 Load a font 8:3 Load a font from another location 8:21 Load a stitch 8:3 Load text to update your machine 2:14 I IDT (Integrated... menu 3:13 Insert a new stitch point 6:3 Insert a stitch or letter 5:3 Inserting the bobbin 2:8 Install hardware drivers and connect the embroidery machine 2:13 Installing your software 2:13 Intellectual Property 11:10 Invalid file type for this folder 10:8 F File formats 10:2 File ...
...structure 10:5 Four direction sewing 4:17 Free arm 2:3 Front side 1:8 Full screen 9:6 L Language 3:12 List view 10:3 Load a design 8:2 Load a file 10:5 Load a font 8:3 Load a font from another location 8:21 Load a stitch 8:3 Load text to update your machine 2:14 I IDT (Integrated... menu 3:13 Insert a new stitch point 6:3 Insert a stitch or letter 5:3 Inserting the bobbin 2:8 Install hardware drivers and connect the embroidery machine 2:13 Installing your software 2:13 Intellectual Property 11:10 Invalid file type for this folder 10:8 F File formats 10:2 File ...


