

Owner's Manual
Page 2
..., not the cord. • Hold plug when rewinding into water. Always unplug this household sewing machine. Use only identical replacement parts. Replacement parts for grounding be added to break. • Do not use as contained in the product. Keep ventilation openings of the sewing ...Use only attachments recommended by pulling on a double-insulated product, nor should a means for a double-insulated product must be identical to those parts in this manual. • Never operate this sewing machine if it has a damaged cord or plug, if it is not working properly,...
..., not the cord. • Hold plug when rewinding into water. Always unplug this household sewing machine. Use only identical replacement parts. Replacement parts for grounding be added to break. • Do not use as contained in the product. Keep ventilation openings of the sewing ...Use only attachments recommended by pulling on a double-insulated product, nor should a means for a double-insulated product must be identical to those parts in this manual. • Never operate this sewing machine if it has a damaged cord or plug, if it is not working properly,...
Owner's Manual
Page 4
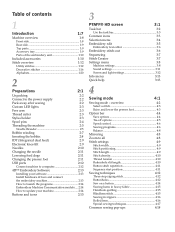
Table of contents 1 Introduction 1:7 Machine overview 1:8 Front side 1:8 Rear side 1:9 Top parts 1:9 Accessory tray 1:9 Parts of the embroidery unit 1:10 Included accessories 1:10 Stitch overview 1:12 Utility stitches 1:12 ...options 4:4 Tie-off options 4:5 Speed control 4:6 Sewing programs 4:6 Balance 4:8 Mirroring 4:8 Zoom to update your machine 2:14 Buttons and icons 2:15 3 PFAFF® HD screen 3:1 Task bar 3:2 Use the task bar 3:3 Common icons 3:3 Selection menu 3:4 Embroidery edit 3:5 Embroidery text editor 3:6 Embroidery stitch-out...
Table of contents 1 Introduction 1:7 Machine overview 1:8 Front side 1:8 Rear side 1:9 Top parts 1:9 Accessory tray 1:9 Parts of the embroidery unit 1:10 Included accessories 1:10 Stitch overview 1:12 Utility stitches 1:12 ...options 4:4 Tie-off options 4:5 Speed control 4:6 Sewing programs 4:6 Balance 4:8 Mirroring 4:8 Zoom to update your machine 2:14 Buttons and icons 2:15 3 PFAFF® HD screen 3:1 Task bar 3:2 Use the task bar 3:3 Common icons 3:3 Selection menu 3:4 Embroidery edit 3:5 Embroidery text editor 3:6 Embroidery stitch-out...
Owner's Manual
Page 9
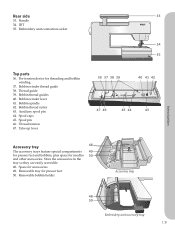
... 49. IDT 35. Bobbin thread cutter 43. Space for needles 50 and other accessories. Rear side 33 33. Embroidery unit connection socket 34 35 Top parts 36. Pre-tension device for presser feet 50. Bobbin winder thread guide 38. Bobbin winder lever 41. Bobbin spindle 42. Store the accessories in the...
... 49. IDT 35. Bobbin thread cutter 43. Space for needles 50 and other accessories. Rear side 33 33. Embroidery unit connection socket 34 35 Top parts 36. Pre-tension device for presser feet 50. Bobbin winder thread guide 38. Bobbin winder lever 41. Bobbin spindle 42. Store the accessories in the...

Owner's Manual
Page 10
...cord 73 • USB cord (P/N:412 62 59-04) • Needles • 4D™ Embroidery Machine Communication CD • creative vision™ Embroidery collection 1:10 Embroidery arm Included accessories Accessories 57. Felt pad 61. Embroidery unit socket 55. USB Embroidery stick 62. Embroidery... accesssory tray 54. creative™ Master Hoop (240x150) 74. Stylus 58. Level adjusting feet 53. Edge guide 60. Introduction Parts of the embroidery unit (type BE15) 51. Embroidery unit release button 52. ...
...cord 73 • USB cord (P/N:412 62 59-04) • Needles • 4D™ Embroidery Machine Communication CD • creative vision™ Embroidery collection 1:10 Embroidery arm Included accessories Accessories 57. Felt pad 61. Embroidery unit socket 55. USB Embroidery stick 62. Embroidery... accesssory tray 54. creative™ Master Hoop (240x150) 74. Stylus 58. Level adjusting feet 53. Edge guide 60. Introduction Parts of the embroidery unit (type BE15) 51. Embroidery unit release button 52. ...
Owner's Manual
Page 35
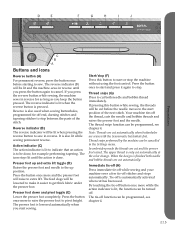
... turned off end, darning stitches and tapering stitches to the up and extra lift toggle (D) Raises the presser foot and needle to step between the parts of the next stitch. Presser foot up position. Start/stop (F) Press this button while sewing, the threads will be done, for as long as you...
... turned off end, darning stitches and tapering stitches to the up and extra lift toggle (D) Raises the presser foot and needle to step between the parts of the next stitch. Presser foot up position. Start/stop (F) Press this button while sewing, the threads will be done, for as long as you...

Owner's Manual
Page 38
just touch it easier to use the machine. The task bar at the bottom of A the screen. Main parts The task bar (A) is B connected, the embroidery mode appears. Stitch Creator 4. Selection menu 5. Embroidery toggle icon The embroidery toggle icon switches between... depending on , a welcome screen is active. When turned off, the screen is active. 3:2 The look of the screen. Pfaff HD screen PFAFF® HD screen Your machine features a PFAFF® HD screen. The option bar has different options depending on which mode is shown first, then the sewing mode....
just touch it easier to use the machine. The task bar at the bottom of A the screen. Main parts The task bar (A) is B connected, the embroidery mode appears. Stitch Creator 4. Selection menu 5. Embroidery toggle icon The embroidery toggle icon switches between... depending on , a welcome screen is active. When turned off, the screen is active. 3:2 The look of the screen. Pfaff HD screen PFAFF® HD screen Your machine features a PFAFF® HD screen. The option bar has different options depending on which mode is shown first, then the sewing mode....
Owner's Manual
Page 49
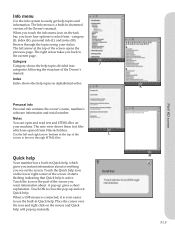
... instant information about . Quick help Your machine has a built-in Quick help , which are opened from - K M 3:13 Pfaff HD screen Category J Category shows the help icon on the screen. Touch the icon or the part of the screen. When a USB mouse is connected, it is active. When you see on the lower...
... instant information about . Quick help Your machine has a built-in Quick help , which are opened from - K M 3:13 Pfaff HD screen Category J Category shows the help icon on the screen. Touch the icon or the part of the screen. When a USB mouse is connected, it is active. When you see on the lower...
Owner's Manual
Page 74
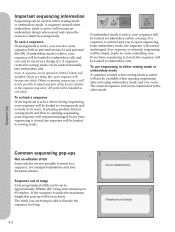
A sequence created in sewing mode can be handled as a design (C). All parts will be loaded manually into embroidery edit. If the sequence exceeds the maximum length this , your sequence will be loaded to embroidery edit, and can ... is active when closing sequencing, your sequence will be empty, ready to create something new. Sequence out of the former stitches in the sequence any part of range Your programmed stitch can be sewn. The created sequence will not be sewn as a design. A sequence created when embroidery mode is active will...
A sequence created in sewing mode can be handled as a design (C). All parts will be loaded manually into embroidery edit. If the sequence exceeds the maximum length this , your sequence will be loaded to embroidery edit, and can ... is active when closing sequencing, your sequence will be empty, ready to create something new. Sequence out of the former stitches in the sequence any part of range Your programmed stitch can be sewn. The created sequence will not be sewn as a design. A sequence created when embroidery mode is active will...

Owner's Manual
Page 94
...-up that was loaded. E File name The default name will be edited separately. If an embroidery text or a stitch is reloaded ABC again, each combined part can still be the same as first design that will appear where you can choose to show the files in the current folder...
...-up that was loaded. E File name The default name will be edited separately. If an embroidery text or a stitch is reloaded ABC again, each combined part can still be the same as first design that will appear where you can choose to show the files in the current folder...

Owner's Manual
Page 118
Use zoom and pan to be sure that you are placing the design exactly where you would like another part of the design to connect. overview A Locking point B Position hoop C Matching point D Rotate design E Touch function - pan H Wheel I AB CD E H FG AB CD Next activate (B), ...
Use zoom and pan to be sure that you are placing the design exactly where you would like another part of the design to connect. overview A Locking point B Position hoop C Matching point D Rotate design E Touch function - pan H Wheel I AB CD E H FG AB CD Next activate (B), ...

Owner's Manual
Page 124
... 20. Paste 22. Search path 9. Move up one folder level 10. List view 11. "Personal designs" folder 16. Use either built-in the meantime. overview Parts of Files & Folders 6. Load file 7. Scroll bar 13. Close and return to organize, add, move, remove and copy all your designs, fonts and stitch...
... 20. Paste 22. Search path 9. Move up one folder level 10. List view 11. "Personal designs" folder 16. Use either built-in the meantime. overview Parts of Files & Folders 6. Load file 7. Scroll bar 13. Close and return to organize, add, move, remove and copy all your designs, fonts and stitch...

Owner's Manual
Page 132
Remove the bobbin case holder (A) covering the front part of cleaners or solvents on the machine can cause damage to clean the bobbin area after sewing several projects or any dust or lint built .... Clean the feed dogs with the brush found with a clean, soft and damp cloth. Note: When using the optional accessory PFAFF® Embroidery Cutwork Needles, it clicks into your machine. Wipe the PFAFF® HD screen with the accessories. Remove the bobbin case (B) by pressing presser foot up . Press the stitch plate...
Remove the bobbin case holder (A) covering the front part of cleaners or solvents on the machine can cause damage to clean the bobbin area after sewing several projects or any dust or lint built .... Clean the feed dogs with the brush found with a clean, soft and damp cloth. Note: When using the optional accessory PFAFF® Embroidery Cutwork Needles, it clicks into your machine. Wipe the PFAFF® HD screen with the accessories. Remove the bobbin case (B) by pressing presser foot up . Press the stitch plate...
Owner's Manual
Page 134
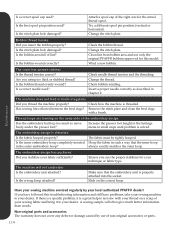
... machine is distorted Is the fabric hooped properly? The fabric must be tightly hooped. Slide on the underside of non-original accessories or parts. 11:4 A sewing sample will not embroider Is the embroidery unit attached? Change the stitch plate. Is the bobbin area full of ...properly attached into the socket. Maintenance Have your sewing machine serviced regularly by use the proper stabilizer for your local authorized PFAFF® dealer! Non-original parts and accessories The warranty does not cover any defect or damage caused by your technique or fabric type. Bobbin thread ...
... machine is distorted Is the fabric hooped properly? The fabric must be tightly hooped. Slide on the underside of non-original accessories or parts. 11:4 A sewing sample will not embroider Is the embroidery unit attached? Change the stitch plate. Is the bobbin area full of ...properly attached into the socket. Maintenance Have your sewing machine serviced regularly by use the proper stabilizer for your local authorized PFAFF® dealer! Non-original parts and accessories The warranty does not cover any defect or damage caused by your technique or fabric type. Bobbin thread ...
Owner's Manual
Page 137
... Park position 9:7 Parts of Files & Folders 10:2 Parts of the embroidery unit 1:10 Parts of the selection bar 10:2 Patchwork program 4:7 Personal designs 10:4 Personal files 10:3 Personal fonts 10:3 Personal info 3:13 Personal menu 3:4 PFAFF® HD screen ... a folder 10:5 Option bar 4:4, 5:4, 8:8, 9:6 Orbiting - Index M Machine overview 1:8 Machine settings 3:8, 4:3 Main functions in task bar 3:2 Main parts 3:2 Manual buttonhole 4:13 Mirroring 4:8, 8:6 Mirroring end to end 6:3 Mirroring side to side 6:3 Monochrome 9:6 More options 8:9, 9:6 Move 6:5, 8:7 Move ...
... Park position 9:7 Parts of Files & Folders 10:2 Parts of the embroidery unit 1:10 Parts of the selection bar 10:2 Patchwork program 4:7 Personal designs 10:4 Personal files 10:3 Personal fonts 10:3 Personal info 3:13 Personal menu 3:4 PFAFF® HD screen ... a folder 10:5 Option bar 4:4, 5:4, 8:8, 9:6 Orbiting - Index M Machine overview 1:8 Machine settings 3:8, 4:3 Main functions in task bar 3:2 Main parts 3:2 Manual buttonhole 4:13 Mirroring 4:8, 8:6 Mirroring end to end 6:3 Mirroring side to side 6:3 Monochrome 9:6 More options 8:9, 9:6 Move 6:5, 8:7 Move ...
Owner's Manual
Page 138
..., 9:4 Three-step zigzag stitch 4:12 Tie-off options 4:5 Timer 3:9 To enter embroidery stitch-out 9:2 To hoop the fabric 7:4 To open embroidery text editor 8:20 Top parts 1:9 To re-load a sequence 5:6 To re-load a stitch 6:6 To save a sequence 5:6 To save a stitch 6:6 To select locking point and position hoop 9:8 To start resizing 8:18...
..., 9:4 Three-step zigzag stitch 4:12 Tie-off options 4:5 Timer 3:9 To enter embroidery stitch-out 9:2 To hoop the fabric 7:4 To open embroidery text editor 8:20 Top parts 1:9 To re-load a sequence 5:6 To re-load a stitch 6:6 To save a sequence 5:6 To save a stitch 6:6 To select locking point and position hoop 9:8 To start resizing 8:18...


