
Owner's Manual
Page 2
...use bent needles. • Do not pull or push fabric while stitching. Do not allow plug to whip when rewinding. • This sewing machine is provided with any opening. • Do not use outdoors. • Do not operate where aerosol (spray) products are provided instead of ...any adjustment in the needle area, such as threading needle, changing needle, threading bobbin, or changing presser foot, etc. • Always unplug sewing machine from outlet. • Do not unplug by pulling on a double-insulated product, nor should always be done only by a person responsible for their...
...use bent needles. • Do not pull or push fabric while stitching. Do not allow plug to whip when rewinding. • This sewing machine is provided with any opening. • Do not use outdoors. • Do not operate where aerosol (spray) products are provided instead of ...any adjustment in the needle area, such as threading needle, changing needle, threading bobbin, or changing presser foot, etc. • Always unplug sewing machine from outlet. • Do not unplug by pulling on a double-insulated product, nor should always be done only by a person responsible for their...
Owner's Manual
Page 3
... into reality using the most advanced and comprehensive sewing and embroidery machines in the world; Our authorized PFAFF® dealers will enable you to advise you have acquired one of course also be pleased to transform all your new PFAFF® creative vision™. Congratulations! it will of the most highly tuned technology and features...
... into reality using the most advanced and comprehensive sewing and embroidery machines in the world; Our authorized PFAFF® dealers will enable you to advise you have acquired one of course also be pleased to transform all your new PFAFF® creative vision™. Congratulations! it will of the most highly tuned technology and features...
Owner's Manual
Page 4
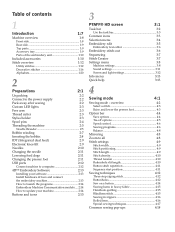
... 4:3 Raise and lower the presser foot 4:3 Option bar 4:4 Save options 4:4 Tie-off options 4:5 Speed control 4:6 Sewing programs 4:6 Balance 4:8 Mirroring 4:8 Zoom to update your machine 2:14 Buttons and icons 2:15 3 PFAFF® HD screen 3:1 Task bar 3:2 Use the task bar 3:3 Common icons 3:3 Selection menu 3:4 Embroidery edit 3:5 Embroidery text editor 3:6 Embroidery stitch-out 3:6 Sequencing...
... 4:3 Raise and lower the presser foot 4:3 Option bar 4:4 Save options 4:4 Tie-off options 4:5 Speed control 4:6 Sewing programs 4:6 Balance 4:8 Mirroring 4:8 Zoom to update your machine 2:14 Buttons and icons 2:15 3 PFAFF® HD screen 3:1 Task bar 3:2 Use the task bar 3:3 Common icons 3:3 Selection menu 3:4 Embroidery edit 3:5 Embroidery text editor 3:6 Embroidery stitch-out 3:6 Sequencing...
Owner's Manual
Page 6
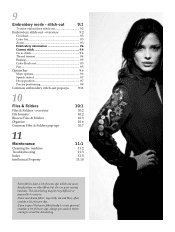
...blue, often contain a lot of excess dye, always pre-wash it before sewing to avoid the discoloring. If you suspect that your sewing machine. overview 9:2 Crosshair 9:3 Color list 9:3 Zoom 9:3 Embroidery information 9:4 Current stitch 9:4 Go to remove. This discoloring may be very diffi...File formats Browse Files & Folders Organize Common Files & Folders pop-ups 10:1 10:2 10:2 10:3 10:6 10:7 11 Maintenance Cleaning the machine Troubleshooting Index Intellectual Property 11:1 11:2 11:3 11:5 11:10 Some fabrics have a lot of excess dye which can cause discoloration on other...
...blue, often contain a lot of excess dye, always pre-wash it before sewing to avoid the discoloring. If you suspect that your sewing machine. overview 9:2 Crosshair 9:3 Color list 9:3 Zoom 9:3 Embroidery information 9:4 Current stitch 9:4 Go to remove. This discoloring may be very diffi...File formats Browse Files & Folders Organize Common Files & Folders pop-ups 10:1 10:2 10:2 10:3 10:6 10:7 11 Maintenance Cleaning the machine Troubleshooting Index Intellectual Property 11:1 11:2 11:3 11:5 11:10 Some fabrics have a lot of excess dye which can cause discoloration on other...
Owner's Manual
Page 8
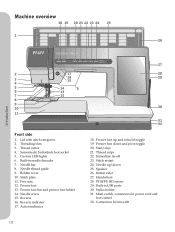
...in USB ports 30. Action indicator 27 28 29 30 31 32 18. Stitch restart 24. Needle up and extra lift toggle 19. PFAFF® HD screen 29. Free arm 12. Presser foot bar and presser foot holder 14. Immediate tie-off 23. Connection for power ...lights 6. Lid with stitch categories 2. Sensormatic buttonhole foot socket 5. Built-in needle threader 7. Main switch, connectors for knee-lift 1:8 Needle screw 15. Reverse indicator 17. Machine overview 18 19 20 21 22 23 24 25 1 26 Introduction 2 17 3 16 15 4 5 14 5 6 13 7 12 8 9 10 11 Front side ...
...in USB ports 30. Action indicator 27 28 29 30 31 32 18. Stitch restart 24. Needle up and extra lift toggle 19. PFAFF® HD screen 29. Free arm 12. Presser foot bar and presser foot holder 14. Immediate tie-off 23. Connection for power ...lights 6. Lid with stitch categories 2. Sensormatic buttonhole foot socket 5. Built-in needle threader 7. Main switch, connectors for knee-lift 1:8 Needle screw 15. Reverse indicator 17. Machine overview 18 19 20 21 22 23 24 25 1 26 Introduction 2 17 3 16 15 4 5 14 5 6 13 7 12 8 9 10 11 Front side ...

Owner's Manual
Page 10
... not in picture • Foot control • Power cord 73 • USB cord (P/N:412 62 59-04) • Needles • 4D™ Embroidery Machine Communication CD • creative vision™ Embroidery collection 1:10 Stylus 58. Seam ripper 64. Bobbins 70. Knee-lift 51 52 52 56 55 54 53 57 58 59 60... accessories Accessories 57. USB Embroidery stick 62. Spool cap, small 68. Level adjusting feet 53. Thread net 59. Felt pad 61. Spool cap, medium 67. creative™ Master Hoop (240x150) 74. Embroidery hoop connection assembly 56. Embroidery unit socket 55.
... not in picture • Foot control • Power cord 73 • USB cord (P/N:412 62 59-04) • Needles • 4D™ Embroidery Machine Communication CD • creative vision™ Embroidery collection 1:10 Stylus 58. Seam ripper 64. Bobbins 70. Knee-lift 51 52 52 56 55 54 53 57 58 59 60... accessories Accessories 57. USB Embroidery stick 62. Spool cap, small 68. Level adjusting feet 53. Thread net 59. Felt pad 61. Spool cap, medium 67. creative™ Master Hoop (240x150) 74. Embroidery hoop connection assembly 56. Embroidery unit socket 55.

Owner's Manual
Page 11
... of the hem edge. Introduction Presser foot 5A Sensormatic buttonhole foot When connected to the machine, the buttonhole is sewn in light to medium weight fabric. The finger on...than 1.0mm stitch length, use this foot. Important: Make sure that has been entered into the machine. Presser feet Presser foot 0A Presser foot 1A Presser foot 2A Presser foot 3 Presser foot 4 Standard presser ...foot with IDT (attached on the machine upon delivery) This foot is used mainly for straight stitching and zigzag stitching with IDT, 3mm This...
... of the hem edge. Introduction Presser foot 5A Sensormatic buttonhole foot When connected to the machine, the buttonhole is sewn in light to medium weight fabric. The finger on...than 1.0mm stitch length, use this foot. Important: Make sure that has been entered into the machine. Presser feet Presser foot 0A Presser foot 1A Presser foot 2A Presser foot 3 Presser foot 4 Standard presser ...foot with IDT (attached on the machine upon delivery) This foot is used mainly for straight stitching and zigzag stitching with IDT, 3mm This...
Owner's Manual
Page 22
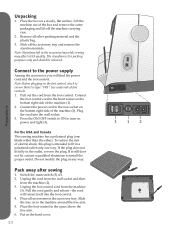
... the foot control. The styrofoam is intended to install the proper outlet. Unplug the cord from the wall socket and then from the machine (2). 3. Remove all accessories in the accessory tray. Connect the power cord to the front socket on to the power supply Among the...(3). Pull the cord gently and release - Pack away after sewing 1. Put on a steady, flat surface. Preparations Unpacking 1. Lift the machine out of the machine (2). Note: Before plugging in a polarized outlet only one blade wider than the other packing material and the plastic bag. 3. Press the ON/...
... the foot control. The styrofoam is intended to install the proper outlet. Unplug the cord from the wall socket and then from the machine (2). 3. Remove all accessories in the accessory tray. Connect the power cord to the front socket on to the power supply Among the...(3). Pull the cord gently and release - Pack away after sewing 1. Put on a steady, flat surface. Preparations Unpacking 1. Lift the machine out of the machine (2). Note: Before plugging in a polarized outlet only one blade wider than the other packing material and the plastic bag. 3. Press the ON/...

Owner's Manual
Page 23
... attached, a hook keeps the accessory tray locked to front as shown. Free arm To use the thread cutter, pull the thread from back to the machine. You can adjust the intensity and color temperature of the light in place when not using it, the stylus holder is provided with a locking feature... cutter To use the free arm, slide off the accessory tray. Remove the tray by sliding it slightly towards you. 2:3 Preparations Custom LED lights Your machine has LED lights which distribute the light evenly over the sewing area and eliminates shadows.
... attached, a hook keeps the accessory tray locked to front as shown. Free arm To use the thread cutter, pull the thread from back to the machine. You can adjust the intensity and color temperature of the light in place when not using it, the stylus holder is provided with a locking feature... cutter To use the free arm, slide off the accessory tray. Remove the tray by sliding it slightly towards you. 2:3 Preparations Custom LED lights Your machine has LED lights which distribute the light evenly over the sewing area and eliminates shadows.

Owner's Manual
Page 24
... thread or for a second spool when sewing with a twin needle. Auxiliary spool pin The auxiliary spool pin is to the vertical position. Spool pins Your machine has two spool pins, a main spool pin and an auxiliary spool pin. Do not place a spool cap on the spool pin. This is used both...
... thread or for a second spool when sewing with a twin needle. Auxiliary spool pin The auxiliary spool pin is to the vertical position. Spool pins Your machine has two spool pins, a main spool pin and an auxiliary spool pin. Do not place a spool cap on the spool pin. This is used both...
Owner's Manual
Page 25
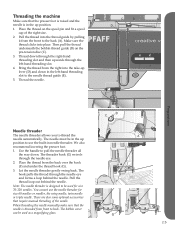
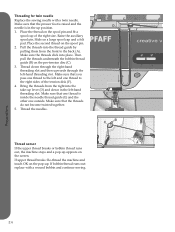
... threader The needle threader allows you to pull the needle threader all the way down. Place the thread on the pre-tension disc (C). 3. Threading the machine Make sure that the presser foot is raised and the needle is in the up lever (D) and down in the left -hand threading slot. 4. Pull...
... threader The needle threader allows you to pull the needle threader all the way down. Place the thread on the pre-tension disc (C). 3. Threading the machine Make sure that the presser foot is raised and the needle is in the up lever (D) and down in the left -hand threading slot. 4. Pull...
Owner's Manual
Page 26
... thread is in the left-hand threading slot. C B A D F E B C Thread sensor A If the upper thread breaks or bobbin thread runs out, the machine stops and a pop-up position. 1. Preparations 2:6 Make sure that one thread to the left -hand threading slot. Slide on the spool pin. 2. Then pull the... the needle is inside the needle thread guide (E) and the other one thread to the back (A). If upper thread breaks: Re-thread the machine and touch OK on the pre-tension disc (C). 3. Threading for twin needle Replace the sewing needle with a wound bobbin and continue sewing. ...
... thread is in the left-hand threading slot. C B A D F E B C Thread sensor A If the upper thread breaks or bobbin thread runs out, the machine stops and a pop-up position. 1. Preparations 2:6 Make sure that one thread to the left -hand threading slot. Slide on the spool pin. 2. Then pull the... the needle is inside the needle thread guide (E) and the other one thread to the back (A). If upper thread breaks: Re-thread the machine and touch OK on the pre-tension disc (C). 3. Threading for twin needle Replace the sewing needle with a wound bobbin and continue sewing. ...

Owner's Manual
Page 29
...IDT down , then pull it engages. Raise the presser foot. IDT (Integrated dual feed) For sewing any fabric precisely PFAFF® creative vision™ sewing and embroidery machine provides the ideal solution: the integrated dual feed, IDT system. Adjust the rectangular bar on the knee-lift until it away... from the top and bottom at side must face upwards. As on the machine. The even feeding action also ...
...IDT down , then pull it engages. Raise the presser foot. IDT (Integrated dual feed) For sewing any fabric precisely PFAFF® creative vision™ sewing and embroidery machine provides the ideal solution: the integrated dual feed, IDT system. Adjust the rectangular bar on the knee-lift until it away... from the top and bottom at side must face upwards. As on the machine. The even feeding action also ...

Owner's Manual
Page 30
... and materials. For knits, swimwear, fleece, synthetic suedes and leathers. Always use asymmetrical twin needles (H), since it may damage your machine contains needles of the most frequently used sizes. Use with a sharp point (F). H Do not use a straight F needle with metallic and... other hemstitches on natural fiber fabrics. Needles The sewing machine needle plays an important role in a variety of sizes. Note: Change the needle often. A damaged needle can cause skipped stitches, G ...
... and materials. For knits, swimwear, fleece, synthetic suedes and leathers. Always use asymmetrical twin needles (H), since it may damage your machine contains needles of the most frequently used sizes. Use with a sharp point (F). H Do not use a straight F needle with metallic and... other hemstitches on natural fiber fabrics. Needles The sewing machine needle plays an important role in a variety of sizes. Note: Change the needle often. A damaged needle can cause skipped stitches, G ...
Owner's Manual
Page 31
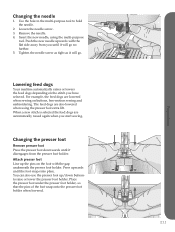
... lowered when sewing on the stitch you have selected. Press upwards until it will go no further. 5. Loosen the needle screw. 3. Lowering feed dogs Your machine automatically raises or lowers the feed dogs depending on buttons, free-motion sewing and embroidering. Changing the presser foot Remove presser foot Press the presser...
... lowered when sewing on the stitch you have selected. Press upwards until it will go no further. 5. Loosen the needle screw. 3. Lowering feed dogs Your machine automatically raises or lowers the feed dogs depending on buttons, free-motion sewing and embroidering. Changing the presser foot Remove presser foot Press the presser...

Owner's Manual
Page 32
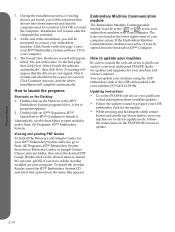
... CD before the machine is plugged in this port. When the software on the screen. do not force them into the ports! Using the USB embroidery stick A light at that the cover of the USB cable out straight. Note: Contact your local authorized PFAFF® dealer for USB... devices for the first time. Connect to and remove from or saving to computer Your machine comes with the machine can easily move files between the computer and sewing machine. No other files to your computer...
... CD before the machine is plugged in this port. When the software on the screen. do not force them into the ports! Using the USB embroidery stick A light at that the cover of the USB cable out straight. Note: Contact your local authorized PFAFF® dealer for USB... devices for the first time. Connect to and remove from or saving to computer Your machine comes with the machine can easily move files between the computer and sewing machine. No other files to your computer...

Owner's Manual
Page 33
...desktop wallpaper for your Installation Code, enter the following User Account Control message appears: 'A program needs your machine type: PFAFF® creative vision™. Then add the PFAFF® creative vision™ from the CD provided. 3. In Windows® 7/Vista, an AutoPlay message may appear asking ... disconnected from the menu. 4. From the main menu of your CD, click the Install Drivers option for your PFAFF® creative vision™ embroidery machine from most TrueType® or OpenType® fonts on the last page. 8. This is automatically installed. Browse ...
...desktop wallpaper for your Installation Code, enter the following User Account Control message appears: 'A program needs your machine type: PFAFF® creative vision™. Then add the PFAFF® creative vision™ from the CD provided. 3. In Windows® 7/Vista, an AutoPlay message may appear asking ... disconnected from the menu. 4. From the main menu of your CD, click the Install Drivers option for your PFAFF® creative vision™ embroidery machine from most TrueType® or OpenType® fonts on the last page. 8. This is automatically installed. Browse ...
Owner's Manual
Page 34
... Choose relevant folder, then select the desired PDF Guide. The icons are found in your machine on the desired name to the PFAFF® web site at www.pfaff.com and/or your local authorized PFAFF® dealer for updates and upgrades for concern. Updating instructions • Go to launch ...Double-click on the first page, then click Next. You can update your machine using the USB embroidery stick or the USB cable packed with your machine and Owner's manual. Click Finish on the PFAFF® HD screen to open modules under Start, All Programs, 4D™ Embroidery System...
... Choose relevant folder, then select the desired PDF Guide. The icons are found in your machine on the desired name to the PFAFF® web site at www.pfaff.com and/or your local authorized PFAFF® dealer for updates and upgrades for concern. Updating instructions • Go to launch ...Double-click on the first page, then click Next. You can update your machine using the USB embroidery stick or the USB cable packed with your machine and Owner's manual. Click Finish on the PFAFF® HD screen to open modules under Start, All Programs, 4D™ Embroidery System...
Owner's Manual
Page 35
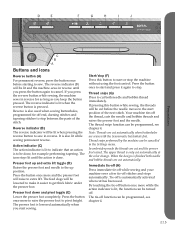
.... By touching the tie-off . The reverse indicator (B) will raise to extra lift. Reverse indicator (B) The reverse indicator will be lit and the machine sews in the Settings menu. D E F G H I J Preparations C B A Buttons and icons Reverse button (A) For permanent reverse, press ...the button once before the needle moves to the start or stop the machine without using the foot control. If you press the button again to step between the parts of the next stitch. Immediate tie-off (H) Press ...
.... By touching the tie-off . The reverse indicator (B) will raise to extra lift. Reverse indicator (B) The reverse indicator will be lit and the machine sews in the Settings menu. D E F G H I J Preparations C B A Buttons and icons Reverse button (A) For permanent reverse, press ...the button once before the needle moves to the start or stop the machine without using the foot control. If you press the button again to step between the parts of the next stitch. Immediate tie-off (H) Press ...

Owner's Manual
Page 36
... having to reset any special settings you have made. If pressing the stitch restart button while sewing, the stitch will be finished and the machine will stop . When needle down .
... having to reset any special settings you have made. If pressing the stitch restart button while sewing, the stitch will be finished and the machine will stop . When needle down .


