Owner's Manual
Page 6
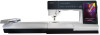
... 9:4 Current stitch 9:4 Go to stitch 9:4 Basting 9:4 Color block sort 9:5 Thread metering/Thread tension 9:5 Option bar 9:6 More options 9:6 Hoop position 9:7 Speed control 9:7 Precise positioning 9:8 Common Embroidery stitch-out pop-ups 9:12 10 Files & Folders Files & Folders - overview 8:2... edit 8:1 Embroidery edit - 7 Embroidery preparations 7:1 Embroidery unit overview 7:2 Embroidery hoop overview 7:2 Built-in designs 7:3 creative sensation™ Embroidery collection 7:3 Connect the embroidery unit 7:3 Remove the embroidery unit 7:4 Attaching the...
... 9:4 Current stitch 9:4 Go to stitch 9:4 Basting 9:4 Color block sort 9:5 Thread metering/Thread tension 9:5 Option bar 9:6 More options 9:6 Hoop position 9:7 Speed control 9:7 Precise positioning 9:8 Common Embroidery stitch-out pop-ups 9:12 10 Files & Folders Files & Folders - overview 8:2... edit 8:1 Embroidery edit - 7 Embroidery preparations 7:1 Embroidery unit overview 7:2 Embroidery hoop overview 7:2 Built-in designs 7:3 creative sensation™ Embroidery collection 7:3 Connect the embroidery unit 7:3 Remove the embroidery unit 7:4 Attaching the...
Owner's Manual
Page 9
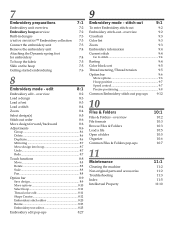
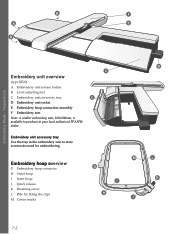
... 39 40 41 45 44 43 42 46 47 48 Accessory tray 46 48 Introduction Embroidery unit overview (type BE20) 49. Bobbin spindle 41. Embroidery hoop connection assembly 54. Handle 33.
... 39 40 41 45 44 43 42 46 47 48 Accessory tray 46 48 Introduction Embroidery unit overview (type BE20) 49. Bobbin spindle 41. Embroidery hoop connection assembly 54. Handle 33.
Owner's Manual
Page 10
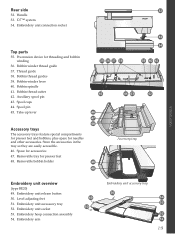
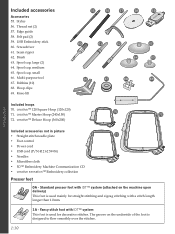
... stitch foot with IDT™ system This foot is designed to Áow smoothly over the stitches. Screwdriver 61. creative™ 120 Square Hoop (120x120) 71. The groove on the machine upon delivery) This foot is used for straight stitching and zigzag stitching ...creative™ Deluxe Hoop (360x200) 70 72 Included accessories not in picture • Straight stitch needle plate 71 • Foot control • Power cord • USB cord (P/N:412 62 59-04) • Needles • MicroÀber cloth • 5D™ Embroidery Machine Communication CD • creative sensation...
... stitch foot with IDT™ system This foot is designed to Áow smoothly over the stitches. Screwdriver 61. creative™ 120 Square Hoop (120x120) 71. The groove on the machine upon delivery) This foot is used for straight stitching and zigzag stitching ...creative™ Deluxe Hoop (360x200) 70 72 Included accessories not in picture • Straight stitch needle plate 71 • Foot control • Power cord • USB cord (P/N:412 62 59-04) • Needles • MicroÀber cloth • 5D™ Embroidery Machine Communication CD • creative sensation...
Owner's Manual
Page 96
... F Embroidery arm Note: A smaller embroidery unit, 260x200mm, is available to store accessories used for Àtting the clips M Center marks M G I Inner hoop J Quick release K Retaining screw L Ribs for embroidering. Embroidery hoop overview G Embroidery hoop connector H Outer hoop I H J D L K 7:2 Embroidery unit accessory tray Use the tray in the embroidery unit to purchase at your local authorized...
... F Embroidery arm Note: A smaller embroidery unit, 260x200mm, is available to store accessories used for Àtting the clips M Center marks M G I Inner hoop J Quick release K Retaining screw L Ribs for embroidering. Embroidery hoop overview G Embroidery hoop connector H Outer hoop I H J D L K 7:2 Embroidery unit accessory tray Use the tray in the embroidery unit to purchase at your local authorized...
Owner's Manual
Page 97
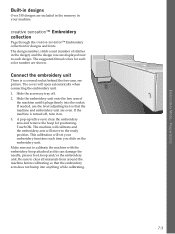
...the free arm of stitches in your embroidery functions each time you to clear the embroidery area and remove the hoop for positioning. creative sensation™ Embroidery collection Page through the creative sensation™ Embroidery collection for each design. The cover will move to clear all materials from around the machine ...unit There is turned off . 2. Make sure not to each color number are displayed next to calibrate the machine with the embroidery hoop attached as this can damage the needle, presser foot, hoop and/or the embroidery unit. Touch OK. Embroidery Mode -
...the free arm of stitches in your embroidery functions each time you to clear the embroidery area and remove the hoop for positioning. creative sensation™ Embroidery collection Page through the creative sensation™ Embroidery collection for each design. The cover will move to clear all materials from around the machine ...unit There is turned off . 2. Make sure not to each color number are displayed next to calibrate the machine with the embroidery hoop attached as this can damage the needle, presser foot, hoop and/or the embroidery unit. Touch OK. Embroidery Mode -
Owner's Manual
Page 99
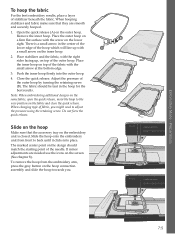
...and the fabric, with the right sides facing up with the screw on the hoop connection assembly and slide the hoop towards you might need to adjust the pressure using the retaining screw. Place the inner hoop on the fabric and close the quick release. Adjust the pressure of stabilizer ...of the fabric with the small arrow at surface with A a small arrow on the same fabric, open the quick release, move the hoop to back until it clicks into the outer hoop. 4. When hooping stabilizer and fabric make sure that the accessory tray on the screen (See chapter 8). Slide on the...
...and the fabric, with the right sides facing up with the screw on the hoop connection assembly and slide the hoop towards you might need to adjust the pressure using the retaining screw. Place the inner hoop on the fabric and close the quick release. Adjust the pressure of stabilizer ...of the fabric with the small arrow at surface with A a small arrow on the same fabric, open the quick release, move the hoop to back until it clicks into the outer hoop. 4. When hooping stabilizer and fabric make sure that the accessory tray on the screen (See chapter 8). Slide on the...
Owner's Manual
Page 100
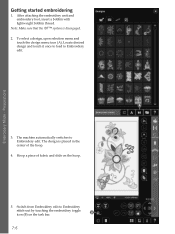
... foot, insert a bobbin with lightweight bobbin thread. The machine automatically switches to Embroidery stitch-out by touching the embroidery toggle icon (B) on the hoop. 5. B 7:6 Preparations A 3. Switch from Embroidery edit to Embroidery edit. To select a design, open selection menu and touch the design menu...(A). Embroidery Mode - The design is disengaged. 2. Locate desired design and touch it once to load to Embroidery edit. Hoop a piece of the hoop. 4. Note: Make sure that the IDT™ system is placed in the center of fabric and slide on the task...
... foot, insert a bobbin with lightweight bobbin thread. The machine automatically switches to Embroidery stitch-out by touching the embroidery toggle icon (B) on the hoop. 5. B 7:6 Preparations A 3. Switch from Embroidery edit to Embroidery edit. To select a design, open selection menu and touch the design menu...(A). Embroidery Mode - The design is disengaged. 2. Locate desired design and touch it once to load to Embroidery edit. Hoop a piece of the hoop. 4. Note: Make sure that the IDT™ system is placed in the center of fabric and slide on the task...
Owner's Manual
Page 101
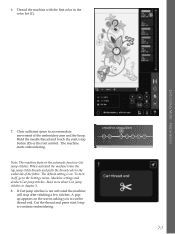
... chapter 3. 8. When activated the machine trims the top jump stitch threads and pulls the thread ends to the underside of the embroidery arm and the hoop. C Embroidery Mode - Hold the needle thread and touch the start /stop button (D) or the foot control. To turn it off, go to continue embroidering. 7:7 A popup...
... chapter 3. 8. When activated the machine trims the top jump stitch threads and pulls the thread ends to the underside of the embroidery arm and the hoop. C Embroidery Mode - Hold the needle thread and touch the start /stop button (D) or the foot control. To turn it off, go to continue embroidering. 7:7 A popup...

Owner's Manual
Page 102
.... Re-thread with the next color and continue embroidering by pressing start/stop. The needle and presser foot raise automatically for easy removal of the hoop. Each color segment is tied off at the end and the needle thread is Ànished. When the embroidery is completed, your machine cuts the...
.... Re-thread with the next color and continue embroidering by pressing start/stop. The needle and presser foot raise automatically for easy removal of the hoop. Each color segment is tied off at the end and the needle thread is Ànished. When the embroidery is completed, your machine cuts the...
Owner's Manual
Page 104
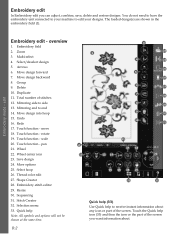
... end to side 13. Redo 17. rotate 19. scale 20. Thread color edit 27. Selection menu 33. Multi-select 4. Move design into hoop 15. Touch function - Touch function - Wheel 22. Shape Creator 28. Embroidery stitch editor 29. Resize 30. Stitch Creator 32. Mirroring side to...icon or part of the screen. edit Embroidery edit - Zoom 3. Touch function - move 18. Wheel center icon 23. Save design 24. Select hoop 26. Move design backward 8. Total number of stitches 12. pan 21. Sequencing 31. Select/deselect design 5. Move design forward 7. Duplicate 11....
... end to side 13. Redo 17. rotate 19. scale 20. Thread color edit 27. Selection menu 33. Multi-select 4. Move design into hoop 15. Touch function - Touch function - Wheel 22. Shape Creator 28. Embroidery stitch editor 29. Resize 30. Stitch Creator 32. Mirroring side to...icon or part of the screen. edit Embroidery edit - Zoom 3. Touch function - move 18. Wheel center icon 23. Save design 24. Select hoop 26. Move design backward 8. Total number of stitches 12. pan 21. Sequencing 31. Select/deselect design 5. Move design forward 7. Duplicate 11....

Owner's Manual
Page 106
...stitch To load a stitch, select stitches (A) from the selection bar. Zoom to box will be converted to zoom in or out in the hoop. If the stitch contains tapering, the stitch combination will then be zoomed. icons to an embroidery design. Zoom to open a list of the... touch function icons. Embroidery mode - Touch the zoom icon (2) to hoop (D) will show the selected hoop. 2 B CD 8:4 Select a category and then a subcategory. Touch your desired stitch on the PFAFF® creative™ Color Touch Screen, touch and drag with your stylus to deÀne the...
...stitch To load a stitch, select stitches (A) from the selection bar. Zoom to box will be converted to zoom in or out in the hoop. If the stitch contains tapering, the stitch combination will then be zoomed. icons to an embroidery design. Zoom to open a list of the... touch function icons. Embroidery mode - Touch the zoom icon (2) to hoop (D) will show the selected hoop. 2 B CD 8:4 Select a category and then a subcategory. Touch your desired stitch on the PFAFF® creative™ Color Touch Screen, touch and drag with your stylus to deÀne the...
Owner's Manual
Page 109
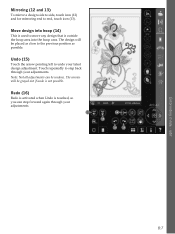
Move design into the hoop area. Redo (16) Redo is activated when Undo is touched, so you can be greyed out if undo is used to end, touch icon (13). ... (12 and 13) To mirror a design side to side, touch icon (12) and for mirroring end to move any design that is outside the hoop area into hoop (14) This is not possible. Touch repeatedly to step back through your adjustments. Note: Not all adjustments can step forward again through your adjustments...
Move design into the hoop area. Redo (16) Redo is activated when Undo is touched, so you can be greyed out if undo is used to end, touch icon (13). ... (12 and 13) To mirror a design side to side, touch icon (12) and for mirroring end to move any design that is outside the hoop area into hoop (14) This is not possible. Touch repeatedly to step back through your adjustments. Note: Not all adjustments can step forward again through your adjustments...
Owner's Manual
Page 110
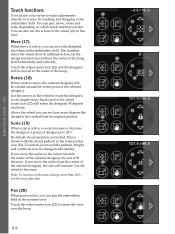
...and scale, depending on screen, by touching and dragging in millimeters how far the design has been moved from the center of the hoop. Use the arrows in the wheel to 20%. Scale (19) When scale is active, you can see how many degrees the ...(18) When rotate is shown with the closed padlock in one degree steps. Use the wheel to center the view over the hoop. 8:8 17 21 22 18 21 22 21 19 22 21 19 22 21 20 22 Above the wheel you move the stylus... in the wheel center icon (22). If you can increase or decrease the design or a group of the hoop, both horizontally and vertically.
...and scale, depending on screen, by touching and dragging in millimeters how far the design has been moved from the center of the hoop. Use the arrows in the wheel to 20%. Scale (19) When scale is active, you can see how many degrees the ...(18) When rotate is shown with the closed padlock in one degree steps. Use the wheel to center the view over the hoop. 8:8 17 21 22 18 21 22 21 19 22 21 19 22 21 20 22 Above the wheel you move the stylus... in the wheel center icon (22). If you can increase or decrease the design or a group of the hoop, both horizontally and vertically.
Owner's Manual
Page 111
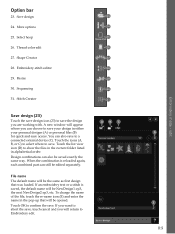
... combined part can also be NewDesign1.vp3, the next NewDesign2.vp3, etc. Touch OK to save the design you are working with. Resize 30. Select hoop 26.
... combined part can also be NewDesign1.vp3, the next NewDesign2.vp3, etc. Touch OK to save the design you are working with. Resize 30. Select hoop 26.
Owner's Manual
Page 112
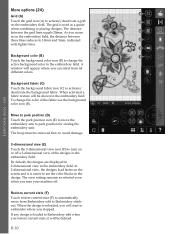
... mode - In 2-dimensional view, the designs load faster on or off . Background fabric (C) Touch the background fabric icon (C) to activate/ deactivate the background fabric. The hoop must be shown in the embroidery Àeld. When the design is easier to see the color blocks in the embroidery Àeld. E Background color...
... mode - In 2-dimensional view, the designs load faster on or off . Background fabric (C) Touch the background fabric icon (C) to activate/ deactivate the background fabric. The hoop must be shown in the embroidery Àeld. When the design is easier to see the color blocks in the embroidery Àeld. E Background color...
Owner's Manual
Page 113
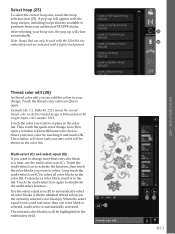
...will be shown in the color list. After selecting your authorized PFAFF® dealer. A pop-up will appear with 64 different color choices. Touch the thread color edit icon (26) to open a window with the hoop choices, including hoops that can edit the colors in the list. Example (A): 1:2,...automatically select all color blocks in the color list. Touch the multi-select icon again to replace in the color list. Note: Hoops that are indicated with the identical thread color(s) to select all color blocks with a lighter background. Touch the multi-select icon ...
...will be shown in the color list. After selecting your authorized PFAFF® dealer. A pop-up will appear with 64 different color choices. Touch the thread color edit icon (26) to open a window with the hoop choices, including hoops that can edit the colors in the list. Example (A): 1:2,...automatically select all color blocks in the color list. Touch the multi-select icon again to replace in the color list. Note: Hoops that are indicated with the identical thread color(s) to select all color blocks with a lighter background. Touch the multi-select icon ...
Owner's Manual
Page 120
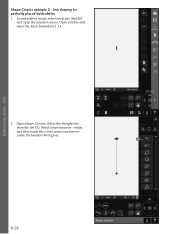
Select touch function - Open Shape Creator. Open stitches and select the linen buttonhole 1.3.1. 2. rotate, and then touch the wheel center one time to rotate the baseline 90 degrees. In embroidery mode, select hoop size 360x200 and open the selection menu. A 8:18 Embroidery mode - Select the straight line from the list (A). line shaping for perfectly placed buttonholes 1. edit Shape Creator example 2 -
Select touch function - Open Shape Creator. Open stitches and select the linen buttonhole 1.3.1. 2. rotate, and then touch the wheel center one time to rotate the baseline 90 degrees. In embroidery mode, select hoop size 360x200 and open the selection menu. A 8:18 Embroidery mode - Select the straight line from the list (A). line shaping for perfectly placed buttonholes 1. edit Shape Creator example 2 -
Owner's Manual
Page 124
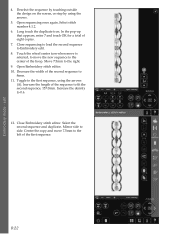
... duplicate. In the pop-up that appears, enter 7 and touch OK for a total of the Àrst sequence. Mirror side to the center of the hoop. Touch the wheel center icon when move is selected, to move 7.5mm to Embroidery edit. 8. Close Embroidery stitch editor. Embroidery mode - Deselect the sequence by...
... duplicate. In the pop-up that appears, enter 7 and touch OK for a total of the Àrst sequence. Mirror side to the center of the hoop. Touch the wheel center icon when move is selected, to move 7.5mm to Embroidery edit. 8. Close Embroidery stitch editor. Embroidery mode - Deselect the sequence by...
Owner's Manual
Page 125
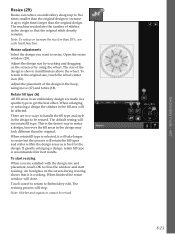
... Adjust the placement of the design in a speciÀc type to get the best effect. Resize adjustments Select the design you are made in the hoop, using the wheel. The default setting will close the window and start resizing When you want to eight times larger than the original. This is...
... Adjust the placement of the design in a speciÀc type to get the best effect. Resize adjustments Select the design you are made in the hoop, using the wheel. The default setting will close the window and start resizing When you want to eight times larger than the original. This is...

Owner's Manual
Page 126
...rotation, mirroring etc. Start over and resize to a smaller percentage for changing a design less than the hoop, process to be increased larger than 20% and also for designs digitized with a • Resize is... some designs too complex to resize in both length and width. If you reduce design in the hoop. so ensure that you scale instead of your machine always resizes Àrst and then •...design Àts in original size. Some designs should not be reduced more than hoop size, the machine will be lost or distorted, and/ or it is always proportional. It is...
...rotation, mirroring etc. Start over and resize to a smaller percentage for changing a design less than the hoop, process to be increased larger than 20% and also for designs digitized with a • Resize is... some designs too complex to resize in both length and width. If you reduce design in the hoop. so ensure that you scale instead of your machine always resizes Àrst and then •...design Àts in original size. Some designs should not be reduced more than hoop size, the machine will be lost or distorted, and/ or it is always proportional. It is...


