
Owner's Manual
Page 2
... provided with double insulation. Keep ventilation openings of the sewing machine and foot controller free from the accumulation of insulation are being used or where oxygen is being administrated. • To disconnect, turn all controls to the off ("0") when making any other user... before cleaning. No ground means is provided on cord. A double-insulated product is required around the sewing machine needle. • Always use outdoors. • Do not operate where aerosol (spray) products are provided instead of the system, and should be followed, including the ...
... provided with double insulation. Keep ventilation openings of the sewing machine and foot controller free from the accumulation of insulation are being used or where oxygen is being administrated. • To disconnect, turn all controls to the off ("0") when making any other user... before cleaning. No ground means is provided on cord. A double-insulated product is required around the sewing machine needle. • Always use outdoors. • Do not operate where aerosol (spray) products are provided instead of the system, and should be followed, including the ...
Owner's Manual
Page 3
... of sewing and embroidery. Our authorized PFAFF® dealers will deÀnitely enable you to transform all your new PFAFF® creative sensation™ sewing and embroidery machine. Your PFAFF® creative sensation™ sewing and embroidery machine will ...of your machine. As a sewing enthusiast, you start, please spend some time reading this owner's manual. Congratulations! it will soon discover how to maximize the use...
... of sewing and embroidery. Our authorized PFAFF® dealers will deÀnitely enable you to transform all your new PFAFF® creative sensation™ sewing and embroidery machine. Your PFAFF® creative sensation™ sewing and embroidery machine will ...of your machine. As a sewing enthusiast, you start, please spend some time reading this owner's manual. Congratulations! it will soon discover how to maximize the use...
Owner's Manual
Page 10
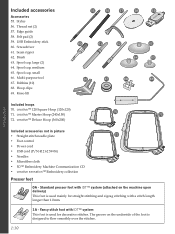
... 68 69 Introduction Included hoops 70. Standard presser foot with IDT™ system (attached on the underside of the foot is used for straight stitching and zigzag stitching with IDT™ system This foot is designed to Áow smoothly over the stitches. Felt...cord • USB cord (P/N:412 62 59-04) • Needles • MicroÀber cloth • 5D™ Embroidery Machine Communication CD • creative sensation™ Embroidery collection Presser feet 0A - Stylus 56. Edge guide 58. Spool cap, large (2) 64. Fancy stitch foot with a stitch length longer than ...
... 68 69 Introduction Included hoops 70. Standard presser foot with IDT™ system (attached on the underside of the foot is used for straight stitching and zigzag stitching with IDT™ system This foot is designed to Áow smoothly over the stitches. Felt...cord • USB cord (P/N:412 62 59-04) • Needles • MicroÀber cloth • 5D™ Embroidery Machine Communication CD • creative sensation™ Embroidery collection Presser feet 0A - Stylus 56. Edge guide 58. Spool cap, large (2) 64. Fancy stitch foot with a stitch length longer than ...
Owner's Manual
Page 11
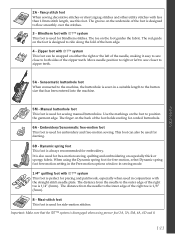
... embroidering on the foot guides the fabric. The distance from the needle to position the garment edge. Maxi-stitch foot This foot is also used for sewing manual buttonholes. The toe on especially thick or spongy fabric. Manual buttonhole foot This foot is 1/8" (3mm). 8 - Important:...a suitable length to the machine, the buttonhole is sewn in sewing mode. 1/4" quilting foot with less than 1.0mm stitch length, use this foot. Use the markings on the foot to the outer edge of the foot holds cording for side-motion stitches. Introduction 2A - Sensormatic buttonhole ...
... embroidering on the foot guides the fabric. The distance from the needle to position the garment edge. Maxi-stitch foot This foot is also used for sewing manual buttonholes. The toe on especially thick or spongy fabric. Manual buttonhole foot This foot is 1/8" (3mm). 8 - Important:...a suitable length to the machine, the buttonhole is sewn in sewing mode. 1/4" quilting foot with less than 1.0mm stitch length, use this foot. Use the markings on the foot to the outer edge of the foot holds cording for side-motion stitches. Introduction 2A - Sensormatic buttonhole ...

Owner's Manual
Page 12
...Foundation elastic stitch Crosshem stitch Sewing elastic, darning, patching and decorative sewing. Decorative stitch for stretch fabrics and hems. Also used for stretch fabrics. 1.1.16 Blindhem stitch Sewing blindhems on woven fabrics. 1.1.17 Elastic blindhem stitch Sewing blindhems on stretch fabrics..., bulky fabrics where overlapping the seams. Elastic decorative hem for basting. Reinforced seam. Basting stitch Zigzag stitch Single stitch used with strong tie-off than stitch 2.1.1. Move fabric manually to desired position and touch foot control again to sew one step...
...Foundation elastic stitch Crosshem stitch Sewing elastic, darning, patching and decorative sewing. Decorative stitch for stretch fabrics and hems. Also used for stretch fabrics. 1.1.16 Blindhem stitch Sewing blindhems on woven fabrics. 1.1.17 Elastic blindhem stitch Sewing blindhems on stretch fabrics..., bulky fabrics where overlapping the seams. Elastic decorative hem for basting. Reinforced seam. Basting stitch Zigzag stitch Single stitch used with strong tie-off than stitch 2.1.1. Move fabric manually to desired position and touch foot control again to sew one step...
Owner's Manual
Page 25
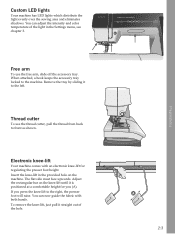
... as shown. Adjust the rectangular bar on the machine. Remove the tray by sliding it is positioned at side must face upwards. Thread cutter To use the free arm, slide off the accessory tray. The Áat a comfortable height for regulating the presser foot height. You can adjust the intensity and... of the light in the provided hole on the knee-lift until it to the right, the presser foot will raise. A 2:3 Preparations Free arm To use the thread cutter, pull the thread from back to the machine.
... as shown. Adjust the rectangular bar on the machine. Remove the tray by sliding it is positioned at side must face upwards. Thread cutter To use the free arm, slide off the accessory tray. The Áat a comfortable height for regulating the presser foot height. You can adjust the intensity and... of the light in the provided hole on the knee-lift until it to the right, the presser foot will raise. A 2:3 Preparations Free arm To use the thread cutter, pull the thread from back to the machine.
Owner's Manual
Page 26
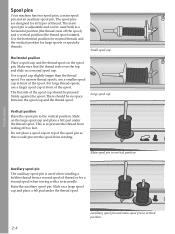
... thread from a second spool of the spool. There should be pressed Àrmly against the spool. Do not place a spool cap on top of thread. Use the horizontal position for normal threads and the vertical position for all types of the spool pin as that the thread reels over the top... a large spool cap and place a felt pad under the thread spool. Slide on a second spool cap. The main spool pin is to the vertical position. Use a spool cap slightly larger than the thread spool. Make sure that would prevent the spool from reeling off the spool) and a vertical position (the thread...
... thread from a second spool of the spool. There should be pressed Àrmly against the spool. Do not place a spool cap on top of thread. Use the horizontal position for normal threads and the vertical position for all types of the spool pin as that the thread reels over the top... a large spool cap and place a felt pad under the thread spool. Slide on a second spool cap. The main spool pin is to the vertical position. Use a spool cap slightly larger than the thread spool. Make sure that would prevent the spool from reeling off the spool) and a vertical position (the thread...
Owner's Manual
Page 27
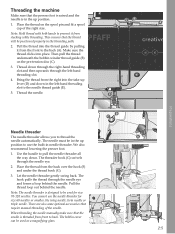
...presser foot is raised and the needle is threaded from front to back. Thread the needle. Note: The needle threader is designed to be used for size 60 needles or smaller, the wing needle, twin needle or triple needle. Pull the thread loop out behind the needle. When threading... from the front to pull the needle threader all the way down through the right-hand threading slot and then upwards through the needle eye. 2. Use the handle to the back (A). CB A D E B C A F G 2:5 Preparations Place the thread on the pre-tension disc (C). 3. Note: Hold thread with both hands to ...
...presser foot is raised and the needle is threaded from front to back. Thread the needle. Note: The needle threader is designed to be used for size 60 needles or smaller, the wing needle, twin needle or triple needle. Pull the thread loop out behind the needle. When threading... from the front to pull the needle threader all the way down through the right-hand threading slot and then upwards through the needle eye. 2. Use the handle to the back (A). CB A D E B C A F G 2:5 Preparations Place the thread on the pre-tension disc (C). 3. Note: Hold thread with both hands to ...
Owner's Manual
Page 29
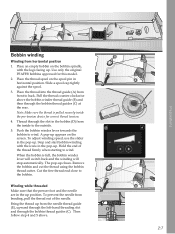
... to the bobbin. B C A D C A E 2:7 Preparations Remove the bobbin and cut the thread using the bobbin thread cutter. Pull the thread counter-clockwise above . To adjust winding speed, use the slider in horizontal position. Stop and start bobbin winding with the logo facing up . Cut the free... thread end close to wind. Use only the original PFAFF® bobbins approved for correct thread tension. 4. Thread through the bobbin thread guides (C) at the rear. Place the thread...
... to the bobbin. B C A D C A E 2:7 Preparations Remove the bobbin and cut the thread using the bobbin thread cutter. Pull the thread counter-clockwise above . To adjust winding speed, use the slider in horizontal position. Stop and start bobbin winding with the logo facing up . Cut the free... thread end close to wind. Use only the original PFAFF® bobbins approved for correct thread tension. 4. Thread through the bobbin thread guides (C) at the rear. Place the thread...
Owner's Manual
Page 31
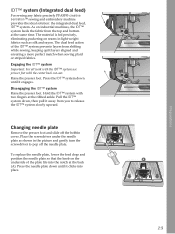
...; system (Integrated dual feed) For sewing any fabric precisely PFAFF® creative sensation™ sewing and embroidery machine provides the ideal solution: the integrated dual feed, IDT™ system. Engaging the IDT™ system Important: For all work with the IDT™ system use presser feet with two Àngers at the same time...
...; system (Integrated dual feed) For sewing any fabric precisely PFAFF® creative sensation™ sewing and embroidery machine provides the ideal solution: the integrated dual feed, IDT™ system. Engaging the IDT™ system Important: For all work with the IDT™ system use presser feet with two Àngers at the same time...
Owner's Manual
Page 32
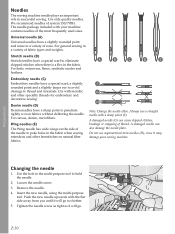
...other specailty threads for embroidery and decorative sewing Denim needle (D) Denim needles have a special scarf to thread and materials. Always use asymmetrical twin needles (H), since it will go no further. 5. Preparations Changing the needle 1. Tighten the needle screw as tight... often. A damaged needle can cause skipped stitches, breakage or snapping of system 130/705H. Do not use a straight needle with your sewing machine. Loosen the needle screw. 3. Use only quality needles. For canvas, denim, microÀbers. For knits, swimwear, Áeece, synthetic...
...other specailty threads for embroidery and decorative sewing Denim needle (D) Denim needles have a special scarf to thread and materials. Always use asymmetrical twin needles (H), since it will go no further. 5. Preparations Changing the needle 1. Tighten the needle screw as tight... often. A damaged needle can cause skipped stitches, breakage or snapping of system 130/705H. Do not use a straight needle with your sewing machine. Loosen the needle screw. 3. Use only quality needles. For canvas, denim, microÀbers. For knits, swimwear, Áeece, synthetic...

Owner's Manual
Page 33
... presser foot downwards until it disengages from the presser foot holder. Preparations Attach presser foot Line up /down buttons to the right. You can also use the presser foot up the pins on the foot should be placed behind E the needle screw. 3.
... presser foot downwards until it disengages from the presser foot holder. Preparations Attach presser foot Line up /down buttons to the right. You can also use the presser foot up the pins on the foot should be placed behind E the needle screw. 3.

Owner's Manual
Page 34
Use the stick to store designs and other end of the cable to move designs or other Àles to the USB embroidery stick an hourglass ... Àles, or to your machine. Removing the stick at that the cover of the USB cable out straight. This CD should be used in the upper port. Using the USB embroidery stick When loading from USB port Insert the USB embroidery stick or other cable should be inserted one to the...
Use the stick to store designs and other end of the cable to move designs or other Àles to the USB embroidery stick an hourglass ... Àles, or to your machine. Removing the stick at that the cover of the USB cable out straight. This CD should be used in the upper port. Using the USB embroidery stick When loading from USB port Insert the USB embroidery stick or other cable should be inserted one to the...
Owner's Manual
Page 35
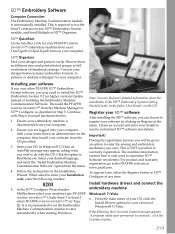
... choose to install hardware drivers. 1. For product and warranty registration, go to use the Send To features in 5D™ Organizer. 5D™ QuickFont Create font Àles (.vf3) for your PFAFF® creative sensation™ embroidery machine from most TrueType® or OpenType® fonts on the... is required to the PFAFF® web site at any 5D™ Embroidery System module, and Send Multiple in any time. Then add the PFAFF® creative sensation™ from the menu. 4. From the main menu of thumbnail catalogs. This is only used to Run Menu.exe....
... choose to install hardware drivers. 1. For product and warranty registration, go to use the Send To features in 5D™ Organizer. 5D™ QuickFont Create font Àles (.vf3) for your PFAFF® creative sensation™ embroidery machine from most TrueType® or OpenType® fonts on the... is required to the PFAFF® web site at any 5D™ Embroidery System module, and Send Multiple in any time. Then add the PFAFF® creative sensation™ from the menu. 4. From the main menu of thumbnail catalogs. This is only used to Run Menu.exe....
Owner's Manual
Page 36
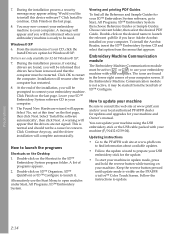
Click Install to restart the computer. Click Finish on the PFAFF® creative™ Color Touch Screen. From the main menu of programs ... 8. How to update your machine Be sure to connect your computer. Select 'No, not at www.pfaff.com to Ànd information about available updates. • Follow the update wizard to launch the programs... your machine (P/N:412 62 59-04). Updating instructions • Go to the PFAFF® web site at this device software?' Alternatively use your embroidery machine with your computer. Drivers are not signed. How to prepare...
Click Install to restart the computer. Click Finish on the PFAFF® creative™ Color Touch Screen. From the main menu of programs ... 8. How to update your machine Be sure to connect your computer. Select 'No, not at www.pfaff.com to Ànd information about available updates. • Follow the update wizard to launch the programs... your machine (P/N:412 62 59-04). Updating instructions • Go to the PFAFF® web site at this device software?' Alternatively use your embroidery machine with your computer. Drivers are not signed. How to prepare...
Owner's Manual
Page 37
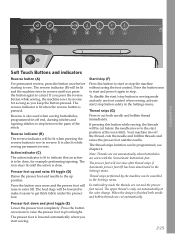
...function can be cancelled in reverse. Thread snips performed by the machine can be cut before starting to sew. When the design is also used when sewing buttonholes, programmed tie-off the thread, cuts the needle and bobbin threads and raises the presser foot and the needle. Presser...will not raise after thread snips if Automatic presser foot lift has been deactivated in sewing mode and only use foot control when sewing, activate start/stop the machine without using the foot control. Your machine ties off end, darning stitches and tapering stitches to stop. In embroidery ...
...function can be cancelled in reverse. Thread snips performed by the machine can be cut before starting to sew. When the design is also used when sewing buttonholes, programmed tie-off the thread, cuts the needle and bobbin threads and raises the presser foot and the needle. Presser...will not raise after thread snips if Automatic presser foot lift has been deactivated in sewing mode and only use foot control when sewing, activate start/stop the machine without using the foot control. Your machine ties off end, darning stitches and tapering stitches to stop. In embroidery ...
Owner's Manual
Page 38
... the tie-off . You can also tap the foot control to the beginning of an embroidery. The setting of the needle stop . You can also use stitch restart to go back to raise or lower the needle. 2:16 When needle down position and the presser foot will then stop position is...
... the tie-off . You can also tap the foot control to the beginning of an embroidery. The setting of the needle stop . You can also use stitch restart to go back to raise or lower the needle. 2:16 When needle down position and the presser foot will then stop position is...
Owner's Manual
Page 40
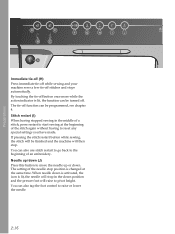
.... This is attached the machine automatically opens embroidery mode. Touch it to toggle to navigate and use the machine. just touch it easier to Embroidery stitch-out mode. Main parts The task bar (A) is used for the active mode is highlighted. The colored vertical bar on , a welcome screen is called...out 3:2 Change mode by touching the embroidery mode icon (1). Return to make your Ànger tip to make it with - The screen is active. PFAFF® creative™ Color Touch Screen PFAFF® creative™ Color Touch Screen Your machine features the...
.... This is attached the machine automatically opens embroidery mode. Touch it to toggle to navigate and use the machine. just touch it easier to Embroidery stitch-out mode. Main parts The task bar (A) is used for the active mode is highlighted. The colored vertical bar on , a welcome screen is called...out 3:2 Change mode by touching the embroidery mode icon (1). Return to make your Ànger tip to make it with - The screen is active. PFAFF® creative™ Color Touch Screen PFAFF® creative™ Color Touch Screen Your machine features the...
Owner's Manual
Page 41
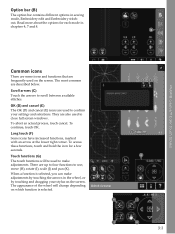
.... Touch functions (G) The touch functions will change depending on which function is selected, you can make adjustments. They are up to four functions to use; move (H), rotate (I J K 3:3 B PFAFF® creative™ Color Touch Screen Common icons There are some icons and functions that are described below. When a function is selected. Scroll arrows (C) Touch...
.... Touch functions (G) The touch functions will change depending on which function is selected, you can make adjustments. They are up to four functions to use; move (H), rotate (I J K 3:3 B PFAFF® creative™ Color Touch Screen Common icons There are some icons and functions that are described below. When a function is selected. Scroll arrows (C) Touch...
Owner's Manual
Page 42
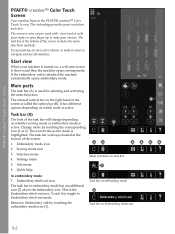
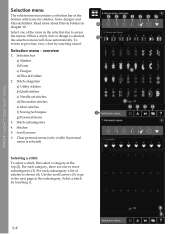
...6 3:4 Selection bar a) Stitches b) Fonts c) Designs d) Files & Folders 2. Clear personal menu (only visible if personal menu is shown (4). Use the scroll arrows (5) to go to access the menus. Select a stitch by touching cancel. To return to previous view, close automatically. Selection menu..., Àrst select a category at the bottom with icons for stitches, fonts, designs and Files & Folders. Stitch subcategories 4. PFAFF® creative™ Color Touch Screen Selection menu The selection menu contains a selection bar at the top (2). Select one or more about Files ...
...6 3:4 Selection bar a) Stitches b) Fonts c) Designs d) Files & Folders 2. Clear personal menu (only visible if personal menu is shown (4). Use the scroll arrows (5) to go to access the menus. Select a stitch by touching cancel. To return to previous view, close automatically. Selection menu..., Àrst select a category at the bottom with icons for stitches, fonts, designs and Files & Folders. Stitch subcategories 4. PFAFF® creative™ Color Touch Screen Selection menu The selection menu contains a selection bar at the top (2). Select one or more about Files ...


