

Owner's Manual
Page 3
...other liquid. Do not place in this sewing machine only for examination, repair, electrical or mechanical adjustment. 4. Use this manual. Never drop or insert any object into any adjustments in the instruction manual. To unplug, grasp the plug, not the cord. 11. Switch the sewing machine off ("0") position, then remove plug...or where oxygen is required around the sewing machine needle. 1 2. VVAR N IN G: To reduce the risk of -doors. 7. Close attention is necessary when this manual. 3. Special care is being used by the manufacturer as follows: Read all moving parts.
...other liquid. Do not place in this sewing machine only for examination, repair, electrical or mechanical adjustment. 4. Use this manual. Never drop or insert any object into any adjustments in the instruction manual. To unplug, grasp the plug, not the cord. 11. Switch the sewing machine off ("0") position, then remove plug...or where oxygen is required around the sewing machine needle. 1 2. VVAR N IN G: To reduce the risk of -doors. 7. Close attention is necessary when this manual. 3. Special care is being used by the manufacturer as follows: Read all moving parts.
Owner's Manual
Page 75
I I creatiVe 7560 I r. I PFAFF I I I Embroidery unit I 7560 I -- - I EOOO 11 I PFAFF I I I I I Instruction manual I I I I
I I creatiVe 7560 I r. I PFAFF I I I Embroidery unit I 7560 I -- - I EOOO 11 I PFAFF I I I I I Instruction manual I I I I

Owner's Manual
Page 83
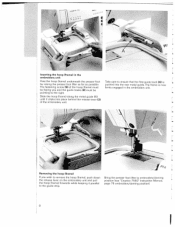
... the J base-plate. Remove the attachment tray, followed by the ' bobbin door and then lower the feed dog (see - "creative 7560" Instruction Manual, page 27). As a result the release button will go. a) x a) 7 0 I- Insert a Creative Fantasy card into the slot in the - The card is to be pushed into the slot in release button next... of the arrow as far as it will spring out approx. 1/4 inch (1/2 cm). Switch the machine on at the on/off switch. Inserting/removing the Creative Fantasy card 7 Connect the power cord and the foot control.
... the J base-plate. Remove the attachment tray, followed by the ' bobbin door and then lower the feed dog (see - "creative 7560" Instruction Manual, page 27). As a result the release button will go. a) x a) 7 0 I- Insert a Creative Fantasy card into the slot in the - The card is to be pushed into the slot in release button next... of the arrow as far as it will spring out approx. 1/4 inch (1/2 cm). Switch the machine on at the on/off switch. Inserting/removing the Creative Fantasy card 7 Connect the power cord and the foot control.
Owner's Manual
Page 84
... the embroidery unit and pull the hoop (frame) forwards while keeping it clicks into the rear metal guide. Take care to embroidery/darning position (see "Creative 7560" Instruction Manual, page 76 embroidery/darning position). 8 The frame is pushed into place behind the release lever (2) of the hoop (frame) must be facing you and...
... the embroidery unit and pull the hoop (frame) forwards while keeping it clicks into the rear metal guide. Take care to embroidery/darning position (see "Creative 7560" Instruction Manual, page 76 embroidery/darning position). 8 The frame is pushed into place behind the release lever (2) of the hoop (frame) must be facing you and...


