

Owner's Manual
Page 3
... can cause the needle to the nearest authorized dealer or service center for its intended use out-of-doors. 7. Always unplug sewing machine from the electric outlet when removing covers, lubricating, or when making any other liquid. SAVE THESE INSTRUCTIONS 1 IMPORTANT SAFETY INSTRUCTIONS For the... recommended by or near children. 2. It may be adhered to be used by the manufacturer only. 14. Switch the sewing machine off ("0") position, then remove plug from all instructions before using and before replacing bulb. Please also observe the general safety notes on page...
... can cause the needle to the nearest authorized dealer or service center for its intended use out-of-doors. 7. Always unplug sewing machine from the electric outlet when removing covers, lubricating, or when making any other liquid. SAVE THESE INSTRUCTIONS 1 IMPORTANT SAFETY INSTRUCTIONS For the... recommended by or near children. 2. It may be adhered to be used by the manufacturer only. 14. Switch the sewing machine off ("0") position, then remove plug from all instructions before using and before replacing bulb. Please also observe the general safety notes on page...

Owner's Manual
Page 4
... technology and you will sew through thick and thin for you. If you can go wrong. Your PFAFF dealer is no problem! So now you have bought a high-quality product that your PFAFF sewing machine is just as simple to operate as this instruction book is to make full use of its stride... and will find that offers unique advantages. Your new sewing machine can take a little time to read . We wish you may...
... technology and you will sew through thick and thin for you. If you can go wrong. Your PFAFF dealer is no problem! So now you have bought a high-quality product that your PFAFF sewing machine is just as simple to operate as this instruction book is to make full use of its stride... and will find that offers unique advantages. Your new sewing machine can take a little time to read . We wish you may...

Owner's Manual
Page 10
Push the bobbin to the right. 17 Place the empty bobbin so that the black pin of the bobbin winder (39) snaps into the slot of the arrow, The needle will then not move during the bobbin-winding procedure. 91 92 93 94 99 I: I 91 92 93 Placing the bobbin Switch off the master switch. Note The bobbin can only be wound if it is moved fully to the right. -7 Preparing the machine for bobbin winding Hold the handwheel (40) firmly and turn the release disk (41) fully in the direction of the bobbin.
Push the bobbin to the right. 17 Place the empty bobbin so that the black pin of the bobbin winder (39) snaps into the slot of the arrow, The needle will then not move during the bobbin-winding procedure. 91 92 93 94 99 I: I 91 92 93 Placing the bobbin Switch off the master switch. Note The bobbin can only be wound if it is moved fully to the right. -7 Preparing the machine for bobbin winding Hold the handwheel (40) firmly and turn the release disk (41) fully in the direction of the bobbin.

Owner's Manual
Page 12
Master switch When the master switch (43) is now ready to use. 15 Press the "ok." key, the sewing machine is switched on, the sewing lamp lights up. ? ; )$a•••P 43 Connecting the foot control Connect the plug of the foot control with the connection socket of the machine (45).
Master switch When the master switch (43) is now ready to use. 15 Press the "ok." key, the sewing machine is switched on, the sewing lamp lights up. ? ; )$a•••P 43 Connecting the foot control Connect the plug of the foot control with the connection socket of the machine (45).
Owner's Manual
Page 18
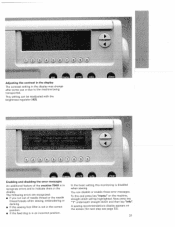
The following errors are recognized: • If you run out of the creative 7560 is disabled when sewing. In the basic setting this end press key "menu" on the screen (for next step see page 32>. 31 Now press ... the feed dog is in the display. You can be highlighted. To this monitoring is to recognize errors and to the machine being transported. A sewing recommendations display appears on the machine, straight stitch will be readjusted with the brightness regulator (42). - This setting can disable or enable these error messages. r Adjusting the...
The following errors are recognized: • If you run out of the creative 7560 is disabled when sewing. In the basic setting this end press key "menu" on the screen (for next step see page 32>. 31 Now press ... the feed dog is in the display. You can be highlighted. To this monitoring is to recognize errors and to the machine being transported. A sewing recommendations display appears on the machine, straight stitch will be readjusted with the brightness regulator (42). - This setting can disable or enable these error messages. r Adjusting the...

Owner's Manual
Page 19
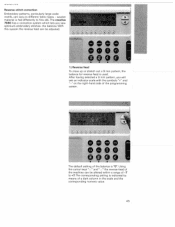
... must press cursor key "-" twice and then key "4" underneath pattern No. 23. 33 It will browse automatically to sew pattern No. 23 you switch the machine on, the first page with the key underneath. Explanation of the basic menu The basic menu contains a selection of ten, which are most often needed...
... must press cursor key "-" twice and then key "4" underneath pattern No. 23. 33 It will browse automatically to sew pattern No. 23 you switch the machine on, the first page with the key underneath. Explanation of the basic menu The basic menu contains a selection of ten, which are most often needed...

Owner's Manual
Page 20
...display indicating that you wish to return to interrupt this , press the foot control, the machine will then continue sewing. longer seams can continue to sew with the programmed straight stitch. The machine will sew a tack at the seam start and will sew a few stitches for straight ... key The "auto" message disappears; When changing the program or switching off the machine the programmed length is now programmed and can be repeated as often as you can be sewn. I - ,- The machine will appear. If you can enter the seam length with the same length as ...
...display indicating that you wish to return to interrupt this , press the foot control, the machine will then continue sewing. longer seams can continue to sew with the programmed straight stitch. The machine will sew a tack at the seam start and will sew a few stitches for straight ... key The "auto" message disappears; When changing the program or switching off the machine the programmed length is now programmed and can be repeated as often as you can be sewn. I - ,- The machine will appear. If you can enter the seam length with the same length as ...

Owner's Manual
Page 22
The next 10 patterns can be sewn immediately. The first pattern of the basic menu, the straight stitch, is highlighted and can be selected by pressing the corresponding number key underneath the screen.The selected pattern is always highlighted. a) As soon as you switch the machine on, the first 10 patterns of the options for pattern selection You have various options to select a pattern from the creative 7560. Each pattern can be called up with the cursor keys and 39 Summary of the basic menu appear.
The next 10 patterns can be sewn immediately. The first pattern of the basic menu, the straight stitch, is highlighted and can be selected by pressing the corresponding number key underneath the screen.The selected pattern is always highlighted. a) As soon as you switch the machine on, the first 10 patterns of the options for pattern selection You have various options to select a pattern from the creative 7560. Each pattern can be called up with the cursor keys and 39 Summary of the basic menu appear.
Owner's Manual
Page 25
... the scale and the corresponding numeric value. 45 y-----,- -- The corresponding setting is used. Using the cursor keys "-" and "-" the reverse feed of the machine can be adjusted. The creative 7560 has a correction system which lets you will see an indicator scale with the symbols "+" and on different fabric types - After having selected a 9 mm...
... the scale and the corresponding numeric value. 45 y-----,- -- The corresponding setting is used. Using the cursor keys "-" and "-" the reverse feed of the machine can be adjusted. The creative 7560 has a correction system which lets you will see an indicator scale with the symbols "+" and on different fabric types - After having selected a 9 mm...

Owner's Manual
Page 27
As soon as you wish to sew again. The machine switches to the basic menu and is ready to change the code, press the "info" key. The message Please enter your code number: **** appears in the display. key, the sewing machine switches to the basic menu and is ready to the basic menu. 49 If you press the "ok." To delete the code, press the "esc" key. The machine switches back to sew. The next time the machine is switched on, no code query is displayed. Having entered the new code, press "o.k". •øê• o..
As soon as you wish to sew again. The machine switches to the basic menu and is ready to change the code, press the "info" key. The message Please enter your code number: **** appears in the display. key, the sewing machine switches to the basic menu and is ready to the basic menu. 49 If you press the "ok." To delete the code, press the "esc" key. The machine switches back to sew. The next time the machine is switched on, no code query is displayed. Having entered the new code, press "o.k". •øê• o..

Owner's Manual
Page 31
... a free M-memory (see pages 62-64). 4j_ f'T7!fl 171 Pattern sequence If you wish to create a pattern sequence from the different patterns of the machine, you are in front of the letter to be carried out with the function "rn-".
... a free M-memory (see pages 62-64). 4j_ f'T7!fl 171 Pattern sequence If you wish to create a pattern sequence from the different patterns of the machine, you are in front of the letter to be carried out with the function "rn-".

Owner's Manual
Page 37
... control the machine will be done more easily by changing the needle position, e.g. Place the fabrics right sides together. Now the seam has been programmed and can be sewn with this length as often as you require (also see page 35), Basting stitch With program 07 you can select the creative 7560's 19...
... control the machine will be done more easily by changing the needle position, e.g. Place the fabrics right sides together. Now the seam has been programmed and can be sewn with this length as often as you require (also see page 35), Basting stitch With program 07 you can select the creative 7560's 19...

Owner's Manual
Page 38
...; For instructions see the description on Page 70. \ Stretch triple straight stitch Program 01 This program is used for elastic fabrics. It is needed, e.g. The machine thus stops after the stitch, and the needle stays in the material. Elastic Blindstitch Program 05 This special blindstitch is particularly suitable for sewing all...
...; For instructions see the description on Page 70. \ Stretch triple straight stitch Program 01 This program is used for elastic fabrics. It is needed, e.g. The machine thus stops after the stitch, and the needle stays in the material. Elastic Blindstitch Program 05 This special blindstitch is particularly suitable for sewing all...

Owner's Manual
Page 40
...the pattern shifts this way you : • Enter a new length by pressing the reverse key. • Select a new program • Switch off the machine • Press the key ,, " (pattern start) qiiij 1111111111111 iiIII ULjj 1 2 Depending on the type of fabric. • Stitch over the damaged area ...at the required length. • Press the reverse key; the machine finishes sewing the darning program and the darning length is used mainly for strengthening damaged areas of material, the darning pattern may shift to ...
...the pattern shifts this way you : • Enter a new length by pressing the reverse key. • Select a new program • Switch off the machine • Press the key ,, " (pattern start) qiiij 1111111111111 iiIII ULjj 1 2 Depending on the type of fabric. • Stitch over the damaged area ...at the required length. • Press the reverse key; the machine finishes sewing the darning program and the darning length is used mainly for strengthening damaged areas of material, the darning pattern may shift to ...

Owner's Manual
Page 56
... even more vividly. • Sew one pintuck. Sewing with a gimp thread you work support, so that the spaces between the needle plate and the sewing machine provides space for a twin needle (e.g. 130/705 H-ZWI; Program: 00 Stitch length: 25 Tension: 5 Tip: If you can fit a "cording tongue" (special accessories) on many...
... even more vividly. • Sew one pintuck. Sewing with a gimp thread you work support, so that the spaces between the needle plate and the sewing machine provides space for a twin needle (e.g. 130/705 H-ZWI; Program: 00 Stitch length: 25 Tension: 5 Tip: If you can fit a "cording tongue" (special accessories) on many...
Owner's Manual
Page 59
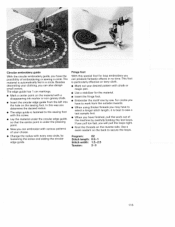
For circles you have to work out of the machine by carefully holding the last loops. Besides decorating your clothing, you may have to select a longer stitch length; In this special foot for loop embroidery ...
For circles you have to work out of the machine by carefully holding the last loops. Besides decorating your clothing, you may have to select a longer stitch length; In this special foot for loop embroidery ...
Owner's Manual
Page 64
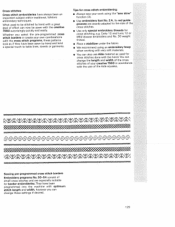
... folkioric embroidery techniques. You can change these patterns look as used to be sewn with the creative 7560 surprisingly quickly and easily. They have been programmed into the machine with optimum stitch length and width, however you select the preprogrammed cross stitch borders or create ... the size of the cross stitches. • Use only special embroidery threads for cross stitch embroidering: • Always sew your creative 7560 in accordance with the hand. Cross stitches Cross stitch embroideries have been sewn by hand with the cross stitch programs, these settings ...
... folkioric embroidery techniques. You can change these patterns look as used to be sewn with the creative 7560 surprisingly quickly and easily. They have been programmed into the machine with optimum stitch length and width, however you select the preprogrammed cross stitch borders or create ... the size of the cross stitches. • Use only special embroidery threads for cross stitch embroidering: • Always sew your creative 7560 in accordance with the hand. Cross stitches Cross stitch embroideries have been sewn by hand with the cross stitch programs, these settings ...
Owner's Manual
Page 70
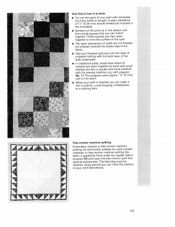
... finished but this is how it into a cushion, a wall hanging, a bedspread, or a clothing item. 11 F' Free-motion machine quilting Embroidery stitches or free-motion machine quilting are particularly suitable for solid-colored materials. p 1 37 These squares are then sewn together to the seam. • When ...your quilt is finished, you have made or bought. In free-motion machine quilting the fabric is guided by hand with small stitches but pressed towards the darker side of your quilt with templates you can match together...
... finished but this is how it into a cushion, a wall hanging, a bedspread, or a clothing item. 11 F' Free-motion machine quilting Embroidery stitches or free-motion machine quilting are particularly suitable for solid-colored materials. p 1 37 These squares are then sewn together to the seam. • When ...your quilt is finished, you have made or bought. In free-motion machine quilting the fabric is guided by hand with small stitches but pressed towards the darker side of your quilt with templates you can match together...

Owner's Manual
Page 73
... push it down at the front until you start sewing, check that the needle plate is otherwise maintenance free and must not be removed. The machine is lying flat. The needle plate can now be oiled in other places. • Clean and oil the sewing...
... push it down at the front until you start sewing, check that the needle plate is otherwise maintenance free and must not be removed. The machine is lying flat. The needle plate can now be oiled in other places. • Clean and oil the sewing...

Owner's Manual
Page 74
...-hand. Run the thread through the thread guide. Slide C (see Page 27) Push slide C (see Page 27) to the back). Machine does not sew the entered program Switch off Needle not pushed in storage. This is unevenly wound. Push needle fully upwards (flat side to ...t wrong needle has been inserted. Thread tension is lowered. Push the bobbin case in it . 4. Check needle-thread and spool-thread tensions. The machine does not feed or Sewing lint has collected between feeds the irregularly Remove needle plate, remove lint with a larger eye (system 1 30 N). 3. ...
...-hand. Run the thread through the thread guide. Slide C (see Page 27) Push slide C (see Page 27) to the back). Machine does not sew the entered program Switch off Needle not pushed in storage. This is unevenly wound. Push needle fully upwards (flat side to ...t wrong needle has been inserted. Thread tension is lowered. Push the bobbin case in it . 4. Check needle-thread and spool-thread tensions. The machine does not feed or Sewing lint has collected between feeds the irregularly Remove needle plate, remove lint with a larger eye (system 1 30 N). 3. ...


