
Owner's Manual
Page 64
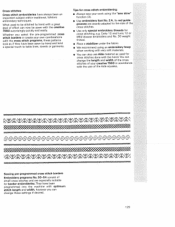
...to be sewn with the size of the cross stitches. • Use only special embroidery threads for cross stitch embroidering: • Always sew your work using an embroidery hoop when working with very soft materials. • You can also use Aida material as...subject within traditional, folkioric embroidery techniques. Cross stitches Cross stitch embroideries have been programmed into the machine with optimum stitch length and width, however you select the preprogrammed cross stitch borders or create your creative 7560 in accordance with the creative 7560 surprisingly quickly and easily....
...to be sewn with the size of the cross stitches. • Use only special embroidery threads for cross stitch embroidering: • Always sew your work using an embroidery hoop when working with very soft materials. • You can also use Aida material as...subject within traditional, folkioric embroidery techniques. Cross stitches Cross stitch embroideries have been programmed into the machine with optimum stitch length and width, however you select the preprogrammed cross stitch borders or create your creative 7560 in accordance with the creative 7560 surprisingly quickly and easily....

Owner's Manual
Page 68
... and hold it is how it for the first few stitches. • Stitch around the cut with the selected program.While doing so, turn the hoop with a few straight stitches. And this is done: • Remove the sewing foot. • Place the eyelet plate onto the needle plate making sure that... into the middle cutout of the needle plate. Then push the eyelet plate down at the front. • Place the marked fabric taut in an embroidery hoop. • Cut one or two fabric threads with a small pair of scissors and push the fabric over the pin in the eyelet plate.The fabric...
... and hold it is how it for the first few stitches. • Stitch around the cut with the selected program.While doing so, turn the hoop with a few straight stitches. And this is done: • Remove the sewing foot. • Place the eyelet plate onto the needle plate making sure that... into the middle cutout of the needle plate. Then push the eyelet plate down at the front. • Place the marked fabric taut in an embroidery hoop. • Cut one or two fabric threads with a small pair of scissors and push the fabric over the pin in the eyelet plate.The fabric...

Owner's Manual
Page 69
... the feed dog and insert the darning foot (see page 27). • Place tear-away stabilizer under the fabric. • Tighten the fabric in an embroidery hoop and embroider accordance with program 02. 135 In this way the terry-cloth loops are completely sewn over. Here the feed dog is not dropped...
... the feed dog and insert the darning foot (see page 27). • Place tear-away stabilizer under the fabric. • Tighten the fabric in an embroidery hoop and embroider accordance with program 02. 135 In this way the terry-cloth loops are completely sewn over. Here the feed dog is not dropped...

Owner's Manual
Page 78
...hoop/frame "Creative Fantasy BIG" Bushing of the Creative 7560 CAP hoop/frame "Creative Fantasy CAP" Color change Combining patterns Creative Card, numbering/deleting Cursor keys Deleting a letter Deleting an entire pattern sequence of the motifs Embroidery foot, attaching Embroidery hoop/frame, inserting the fabric Embroidery Unit, Connecting/removing Embroidery/darning position Embroidery/multicolor Embroidery/single color Error messages in embroidery... Embroidering with the embroidery unit Embroidery direction of the M-memory Deleting Creative Card Display messages Embroidering Embroidering a ...
...hoop/frame "Creative Fantasy BIG" Bushing of the Creative 7560 CAP hoop/frame "Creative Fantasy CAP" Color change Combining patterns Creative Card, numbering/deleting Cursor keys Deleting a letter Deleting an entire pattern sequence of the motifs Embroidery foot, attaching Embroidery hoop/frame, inserting the fabric Embroidery Unit, Connecting/removing Embroidery/darning position Embroidery/multicolor Embroidery/single color Error messages in embroidery... Embroidering with the embroidery unit Embroidery direction of the M-memory Deleting Creative Card Display messages Embroidering Embroidering a ...

Owner's Manual
Page 79
... Card Inserting/removing the embroidery hoop/frame Letters, Capital/lower case Letters/delete Letters/moving Mirroring the pattern Motifs Combined to form a border Motifs Combined with letter sequences Moving letters Moving the pattern Multicolored embroidery with repeating colors Needle thread broken check Notes on safety Numbering Creative Fantasy Card Opening the M-memory Pattern Combinations...
... Card Inserting/removing the embroidery hoop/frame Letters, Capital/lower case Letters/delete Letters/moving Mirroring the pattern Motifs Combined to form a border Motifs Combined with letter sequences Moving letters Moving the pattern Multicolored embroidery with repeating colors Needle thread broken check Notes on safety Numbering Creative Fantasy Card Opening the M-memory Pattern Combinations...

Owner's Manual
Page 81
1 Technical section Connecting/removing the embrojde unit Changing the presser foot Connecting the Power cord and foot control Switching the machine Ofl Lowering the feed dog Inserting/removiflg the Creative Fantasy card Inserting/removing the hoop/frame in/from the embroide unit Bringing the presser foot to embroidery/darning Position Page 6 Page 6 Page 7 Page 7 Page 7 Page 7 Page 8 Page 8 C 0 4C., C) 0 Cu C, C Ca,) g0 g 0 Ea, & 0 0 2 Cxu C) 5 Cu Cl, 1-
1 Technical section Connecting/removing the embrojde unit Changing the presser foot Connecting the Power cord and foot control Switching the machine Ofl Lowering the feed dog Inserting/removiflg the Creative Fantasy card Inserting/removing the hoop/frame in/from the embroide unit Bringing the presser foot to embroidery/darning Position Page 6 Page 6 Page 7 Page 7 Page 7 Page 7 Page 8 Page 8 C 0 4C., C) 0 Cu C, C Ca,) g0 g 0 Ea, & 0 0 2 Cxu C) 5 Cu Cl, 1-
Owner's Manual
Page 84
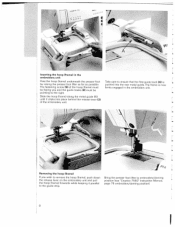
...) forwards while keeping it clicks into the rear metal guide. The fastening screw (9) of the embroidery unit. The frame is pushed into place behind the release lever (2) of the hoop (frame) must be facing you and the guide tracks (8) must be pointing to embroidery/darning position (see "Creative 7560" Instruction Manual, page 76 embroidery/darning position). 8
...) forwards while keeping it clicks into the rear metal guide. The fastening screw (9) of the embroidery unit. The frame is pushed into place behind the release lever (2) of the hoop (frame) must be facing you and the guide tracks (8) must be pointing to embroidery/darning position (see "Creative 7560" Instruction Manual, page 76 embroidery/darning position). 8

Owner's Manual
Page 90
... fabric must be facing upwards. the embroidery frame is facing forwards and the guide tracks (8) are on the outer frame. fine knitted fabrics, silk etc.) The machine displays the hoop-frame tically for patterns sized up to 80 x 80 mm. into the hoop-frame, make sure that screw (9) ... 1 20 frame. The inner frame 't 3. Place the embroidery stabilizer and the fabric on the right 14 Loosen the tightening can Now place the fabric described below. For all larger patterns which do not fit into the embroidery hoop There is unit It is an optional extra for each selected...
... fabric must be facing upwards. the embroidery frame is facing forwards and the guide tracks (8) are on the outer frame. fine knitted fabrics, silk etc.) The machine displays the hoop-frame tically for patterns sized up to 80 x 80 mm. into the hoop-frame, make sure that screw (9) ... 1 20 frame. The inner frame 't 3. Place the embroidery stabilizer and the fabric on the right 14 Loosen the tightening can Now place the fabric described below. For all larger patterns which do not fit into the embroidery hoop There is unit It is an optional extra for each selected...

Owner's Manual
Page 92
This is because it appears in front of the motifs Always make sure when hooping the fabric that the motif is embroidered as it is with the top or head of the design to your left as you sit in the display. Tip: You can rotate the motif by 900 steps within the hoop (see page 1 7). .1 1W i-j (t. ( I o:c PFAFF 1 16 I U;. Embroidery direction of the machine. The automatic default is easier to place a garment onto the machine through the hem.
This is because it appears in front of the motifs Always make sure when hooping the fabric that the motif is embroidered as it is with the top or head of the design to your left as you sit in the display. Tip: You can rotate the motif by 900 steps within the hoop (see page 1 7). .1 1W i-j (t. ( I o:c PFAFF 1 16 I U;. Embroidery direction of the machine. The automatic default is easier to place a garment onto the machine through the hem.

Owner's Manual
Page 93
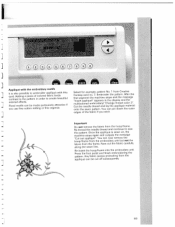
.... This 0 0 alteration is now in the dark field indicates the beginning of the pattern. The selected pattern is also shown in the embroidery field. The rotation of the pattern in the display. This symbol shows the position and size of the enlarged; Furthermore, you can be rotated... x 81 mm. '®( o:o o:oo QQOQ 0QOG ] With the keys underneath these symbols the size of the symbols in 90 steps within the hoop. The following symbols are next to the pattern: Lçol 1 ...4 In this symbol allows the pattern to be embroidered with the pattern mirroring key...
.... This 0 0 alteration is now in the dark field indicates the beginning of the pattern. The selected pattern is also shown in the embroidery field. The rotation of the pattern in the display. This symbol shows the position and size of the enlarged; Furthermore, you can be rotated... x 81 mm. '®( o:o o:oo QQOQ 0QOG ] With the keys underneath these symbols the size of the symbols in 90 steps within the hoop. The following symbols are next to the pattern: Lçol 1 ...4 In this symbol allows the pattern to be embroidered with the pattern mirroring key...

Owner's Manual
Page 96
... moved to the right or the left of this symbol, the embroidery frame traces around the size and position of the pattern within the embroidery field. placing the pattern precisely on patterns for which an 80 hoop (frame) is displayed in increments of position so that when you...on the right of the motif. The embroidery I With keys 8 and 9 the pattern can be visibly moved up and down within the embroidery field. This is to check whether the embroidery pattern is easily found. The placing/movement within the embro idery hoop (frame) always refers to the previous symbols...
... moved to the right or the left of this symbol, the embroidery frame traces around the size and position of the pattern within the embroidery field. placing the pattern precisely on patterns for which an 80 hoop (frame) is displayed in increments of position so that when you...on the right of the motif. The embroidery I With keys 8 and 9 the pattern can be visibly moved up and down within the embroidery field. This is to check whether the embroidery pattern is easily found. The placing/movement within the embro idery hoop (frame) always refers to the previous symbols...
Owner's Manual
Page 102
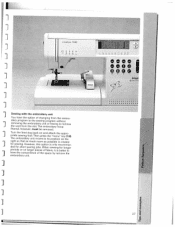
... j for short sewing jobs. on and attach the priate sewing foot Then press the "menu" The embroidery unit moves to remove the slot. creative 7560 CCCC ° / (1 (a ( (' ( ,;) Go PFAFI M.dfl,G,m,., Sewing with the embroidery unit You have the convenience of the space by remove the embroidery unit. 0 C) 2 LI •0 The embroidery hoop (frame), however, must be removed.
... j for short sewing jobs. on and attach the priate sewing foot Then press the "menu" The embroidery unit moves to remove the slot. creative 7560 CCCC ° / (1 (a ( (' ( ,;) Go PFAFI M.dfl,G,m,., Sewing with the embroidery unit You have the convenience of the space by remove the embroidery unit. 0 C) 2 LI •0 The embroidery hoop (frame), however, must be removed.

Owner's Manual
Page 142
Tips and examples Hichelieu work Applique Embroidering thin fabrics Embroiderii,g terry Embroidering small pieces of fabric Embroidering leather Combining motifs to form a border Embroidering a word sequence Special embroidery hoop/frame "Creative Fantasy CAP" Special embroidery hoop/frame "Creative Fantasy BiG" Spool holder "Creative Fantasy color changer" Page 68 Page 69 Page 70 Page 71 Page 72 Page 73 Pages 74, 75 Pages 76, 77 Page 78 Page 78 Page 79 2 C, . 67
Tips and examples Hichelieu work Applique Embroidering thin fabrics Embroiderii,g terry Embroidering small pieces of fabric Embroidering leather Combining motifs to form a border Embroidering a word sequence Special embroidery hoop/frame "Creative Fantasy CAP" Special embroidery hoop/frame "Creative Fantasy BiG" Spool holder "Creative Fantasy color changer" Page 68 Page 69 Page 70 Page 71 Page 72 Page 73 Pages 74, 75 Pages 76, 77 Page 78 Page 78 Page 79 2 C, . 67
Owner's Manual
Page 144
... organza. Any fabric pieces protruding from Creative Fantasy card no. 7. Floral motifs can pin down the outer edges of colored fabric lends pattern in the display and (for example, pattern No. 1 from the appliqué can now hoop/frame from the embroidery remove the unit but not the fabric... from the hoop/frame. Embroider the pattern. You can be made particularly attractive if you wish. Important Do not remove the...
... organza. Any fabric pieces protruding from Creative Fantasy card no. 7. Floral motifs can pin down the outer edges of colored fabric lends pattern in the display and (for example, pattern No. 1 from the appliqué can now hoop/frame from the embroidery remove the unit but not the fabric... from the hoop/frame. Embroider the pattern. You can be made particularly attractive if you wish. Important Do not remove the...

Owner's Manual
Page 145
...PFAFF dealer). Now you such as chiffon, organza or silk, we recommend think that the fabric is strong enough. clear water soluble stabilizer (Solvy) in water (available from 1 The fabric must be strengthened because you wish to embroider on very fine, thin materials Then fit the fabric tightly into the hoop.../frame. Therefore, [ repeat the procedure until the fabric is still not tight enough, place reinforcing the material with embroidery fleece desired pattern and embroider. (this would show through the thin ...
...PFAFF dealer). Now you such as chiffon, organza or silk, we recommend think that the fabric is strong enough. clear water soluble stabilizer (Solvy) in water (available from 1 The fabric must be strengthened because you wish to embroider on very fine, thin materials Then fit the fabric tightly into the hoop.../frame. Therefore, [ repeat the procedure until the fabric is still not tight enough, place reinforcing the material with embroidery fleece desired pattern and embroider. (this would show through the thin ...

Owner's Manual
Page 146
... be pinned on top of the embroidery unit can be used for this purpose. I a piece of the frame so that the pins are close to fit into the hoop/frame and glue the terry cloth fabric onto it with the Creative Fantasy - 7560. Both the maxi stitches and the embroidery -J motifs of the terry cloth...
... be pinned on top of the embroidery unit can be used for this purpose. I a piece of the frame so that the pins are close to fit into the hoop/frame and glue the terry cloth fabric onto it with the Creative Fantasy - 7560. Both the maxi stitches and the embroidery -J motifs of the terry cloth...

Owner's Manual
Page 148
...slow key (3) before starting fastening screws should be tightened since when to sew and, where possible, to ensure that it into the embroidery unit. the embroidery hoop/frame and click it does not hinder the feed of leather which is to be embro If the leather is stuck down Tip: ... loose. unit so that the leather is too thick to avoid needle breakage and extra the needle can also use Filmoplast hoop and lay the extra leather over the embroidery adhesive backing (see page 72). perforation holes being made in the leather. 73 ] Embroidering leather Attach the piece of...
...slow key (3) before starting fastening screws should be tightened since when to sew and, where possible, to ensure that it into the embroidery unit. the embroidery hoop/frame and click it does not hinder the feed of leather which is to be embro If the leather is stuck down Tip: ... loose. unit so that the leather is too thick to avoid needle breakage and extra the needle can also use Filmoplast hoop and lay the extra leather over the embroidery adhesive backing (see page 72). perforation holes being made in the leather. 73 ] Embroidering leather Attach the piece of...

Owner's Manual
Page 150
...All further patterns are joined together using the a.'v4 symbols. This shows you begin to embro } ider, the frame skips back to the hoop/frame. Now position the needle exactly pattern over the mark indicating the middle of the pattern. When you where the middle of the embroidered ... L. __ I Remove the fabric from the end of the pattern is always based on the previously embroidered pattern. - Divide this length in the embroidery hoop is . Now mark the middle of the pattern from the hoop and measure the I is parallel to the pattern center J automatically.
...All further patterns are joined together using the a.'v4 symbols. This shows you begin to embro } ider, the frame skips back to the hoop/frame. Now position the needle exactly pattern over the mark indicating the middle of the pattern. When you where the middle of the embroidered ... L. __ I Remove the fabric from the end of the pattern is always based on the previously embroidered pattern. - Divide this length in the embroidery hoop is . Now mark the middle of the pattern from the hoop and measure the I is parallel to the pattern center J automatically.

Owner's Manual
Page 151
...with a marker thread. Connecting individual letters Tip: Embroidering tong words Words which are too the M-memory, must long to the embroidery hoop with the move the design left cursor key. Always embroider the desired scrap fabric first Measure the the word. Take care to...and then "Creating a word embroidering them (see page 24) word or letter if necessary. three letters the BIG hoop/frame when embroide This allows you to embroider embroidery pattern with the and correct the position of required for the previous word segment. 76 When combining word sections, always ...
...with a marker thread. Connecting individual letters Tip: Embroidering tong words Words which are too the M-memory, must long to the embroidery hoop with the move the design left cursor key. Always embroider the desired scrap fabric first Measure the the word. Take care to...and then "Creating a word embroidering them (see page 24) word or letter if necessary. three letters the BIG hoop/frame when embroide This allows you to embroider embroidery pattern with the and correct the position of required for the previous word segment. 76 When combining word sections, always ...

Owner's Manual
Page 153
... your PFAFF dealer. This enables you can embroider caps. Each hoop comes with combination patterns that are availa ble. 78 Matching designs together is easily achieved by sliding the hoop to re insert the material in the hoop/frame. L [ F F r r Special embroidery hoop/frame Creative Fantasy CAP The special embroidery frames Creative Fantasy CAP and Creative Fantasy BIG are the Creative Fantasy...
... your PFAFF dealer. This enables you can embroider caps. Each hoop comes with combination patterns that are availa ble. 78 Matching designs together is easily achieved by sliding the hoop to re insert the material in the hoop/frame. L [ F F r r Special embroidery hoop/frame Creative Fantasy CAP The special embroidery frames Creative Fantasy CAP and Creative Fantasy BIG are the Creative Fantasy...


