
Owner's Manual
Page 2
... remove any objects in openings on purposes, which the user can repair. Dproodnuoct tussseuacnhyaisnspeectrtoiclid(geass)ororchtheimn icchalemicals for domestic sewing machines according to the indications on safety for cleaning the housing. 1 0. Be sure to 80% Tfetooolhp:eriecsdsrtuuarsopetsenwet,driicvsn-... area during maintenance work . 2. Housing: To clean the housing, use only original PFAFF parts. Do not place any with condensation. The machine for another purpose than that intended or if it is free of the socket by pulling...
... remove any objects in openings on purposes, which the user can repair. Dproodnuoct tussseuacnhyaisnspeectrtoiclid(geass)ororchtheimn icchalemicals for domestic sewing machines according to the indications on safety for cleaning the housing. 1 0. Be sure to 80% Tfetooolhp:eriecsdsrtuuarsopetsenwet,driicvsn-... area during maintenance work . 2. Housing: To clean the housing, use only original PFAFF parts. Do not place any with condensation. The machine for another purpose than that intended or if it is free of the socket by pulling...
Owner's Manual
Page 6
...11 E2 iK j I 2. It features the very latest in its stride and will be at your PFAFF sewing machine. If you many enjoyable hours of them. Your PFAFF dealer will sew through thick and thin for you have bought a high-quality product that is no problem! Ej Congratulations!..., that offers unique 8. Sewing by touch-key 7. II K So now you need. advantages. Modern, uncomplicated 6. - I 3. 4. ii El -I 2 a 9 Nol K Note maci Secti I 1. 1 II I I El 1I K After all, this instruction book is the only way to learn all the things the machine can do, and to...
...11 E2 iK j I 2. It features the very latest in its stride and will be at your PFAFF sewing machine. If you many enjoyable hours of them. Your PFAFF dealer will sew through thick and thin for you have bought a high-quality product that is no problem! Ej Congratulations!..., that offers unique 8. Sewing by touch-key 7. II K So now you need. advantages. Modern, uncomplicated 6. - I 3. 4. ii El -I 2 a 9 Nol K Note maci Secti I 1. 1 II I I El 1I K After all, this instruction book is the only way to learn all the things the machine can do, and to...
Owner's Manual
Page 9
Light-knit mending stitch Machine binds Machine does not feed or feeds irregularly Machine does not sew the entered program Machine skips stitches 48 to 0 33 ' 33 30 I C 79-84 1 11 7 1 8-1 9 11-13 31 47 1 79 1 79 104 11 9 1 52 1 53 103 o 1 j It { a) f Cl... connection Embroidery stitch programs/Summary Engaging the Dual Feed Entering the pattern number Eyelet embroidery Eyelet embroidery, pattern examples Fading in the Creative Designer j Inserting zippers Inserting zippers concealed on both sides "K"key Keyhole buttonholes Keyhole buttonholes with gimp thread Knit-edge foot Lace ...
Light-knit mending stitch Machine binds Machine does not feed or feeds irregularly Machine does not sew the entered program Machine skips stitches 48 to 0 33 ' 33 30 I C 79-84 1 11 7 1 8-1 9 11-13 31 47 1 79 1 79 104 11 9 1 52 1 53 103 o 1 j It { a) f Cl... connection Embroidery stitch programs/Summary Engaging the Dual Feed Entering the pattern number Eyelet embroidery Eyelet embroidery, pattern examples Fading in the Creative Designer j Inserting zippers Inserting zippers concealed on both sides "K"key Keyhole buttonholes Keyhole buttonholes with gimp thread Knit-edge foot Lace ...
Owner's Manual
Page 10
groups of the Creative Designer 2 F Pattern Pattern combinations selection (pattern sequence) I - 95... 43 92 104 163 151 I Setting Setting the the stitch stitch length points and width Sewing a P-Design Sewing faults and their removal Sewing feet and special accessories! the P-Memory (rom) Ac Maxi Stitches / Summary Ac Mirror... - - I Placing the bobbin Placing the needle plate 3 P-Memory selection Preparing the machine Presser foot lifter for bobbin winding Programming a motif Programming sheet Pulling up /down Numbered keys (needle stop) B N( B "o.k."
groups of the Creative Designer 2 F Pattern Pattern combinations selection (pattern sequence) I - 95... 43 92 104 163 151 I Setting Setting the the stitch stitch length points and width Sewing a P-Design Sewing faults and their removal Sewing feet and special accessories! the P-Memory (rom) Ac Maxi Stitches / Summary Ac Mirror... - - I Placing the bobbin Placing the needle plate 3 P-Memory selection Preparing the machine Presser foot lifter for bobbin winding Programming a motif Programming sheet Pulling up /down Numbered keys (needle stop) B N( B "o.k."
Owner's Manual
Page 22
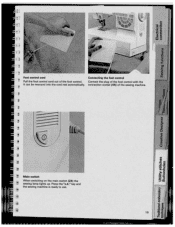
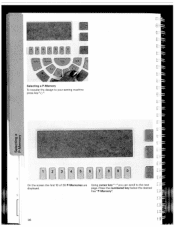
Press the 'ok key and the sewing machine is Main switch When switching on the main switch (24) the sewing lamp lights up. I I 19 Connect the plug of the foot control with the It can be rewound into the cord reel automatically, connection socket (44) of the foot control. I 1* 1$ is ready to use. Foot control cord Connecting the foot control Pull the foot control cord out of the sewing machine.
Press the 'ok key and the sewing machine is Main switch When switching on the main switch (24) the sewing lamp lights up. I I 19 Connect the plug of the foot control with the It can be rewound into the cord reel automatically, connection socket (44) of the foot control. I 1* 1$ is ready to use. Foot control cord Connecting the foot control Pull the foot control cord out of the sewing machine.
Owner's Manual
Page 41
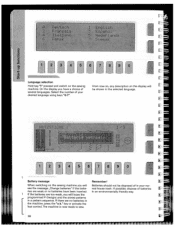
... should not be shown in an environmentally friendly way. 38 On the display you have been inserted. When switching on the sewing machine you will be disposed of several languages. If there are too weak, you will see the message ,,Change batteries" if the batte ries are weak ... mal house trash. If the batteries are no batteries have a choice of in your desired language using keys "O-7' From now on, any description on the sewing machine. Select the number of batteries in the selected language. [ [ r Ffl[ff1 [ 1 Battery message Remember!
... should not be shown in an environmentally friendly way. 38 On the display you have been inserted. When switching on the sewing machine you will be disposed of several languages. If there are too weak, you will see the message ,,Change batteries" if the batte ries are weak ... mal house trash. If the batteries are no batteries have a choice of in your desired language using keys "O-7' From now on, any description on the sewing machine. Select the number of batteries in the selected language. [ [ r Ffl[ff1 [ 1 Battery message Remember!
Owner's Manual
Page 44
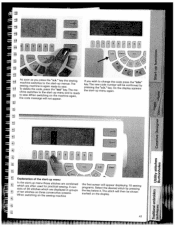
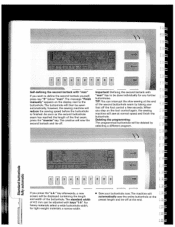
o\Jk. : / j As soon machine as you wish to the the "o.k." On will not appear. 0 L ThH11 1T L:4 I menu\ r o,k. 1 11 ) 0-9 clear Explanation of the start-up menu L WowsInifshhtttieehscnnehofsssawttr3iaeti0rcttcoh-...switches to change the code press the "info" key. The pressing new code number the "o.k." to sew. key the sewing start -up menue. key. 4 WL -4 )[. The sewing machine is again ready to sew. LI a, 2 -Q E a, - When switching on the machine again, " the code message will the be confirmed by display appears the start -up menu again...
o\Jk. : / j As soon machine as you wish to the the "o.k." On will not appear. 0 L ThH11 1T L:4 I menu\ r o,k. 1 11 ) 0-9 clear Explanation of the start-up menu L WowsInifshhtttieehscnnehofsssawttr3iaeti0rcttcoh-...switches to change the code press the "info" key. The pressing new code number the "o.k." to sew. key the sewing start -up menue. key. 4 WL -4 )[. The sewing machine is again ready to sew. LI a, 2 -Q E a, - When switching on the machine again, " the code message will the be confirmed by display appears the start -up menu again...
Owner's Manual
Page 47
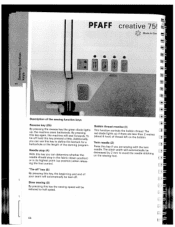
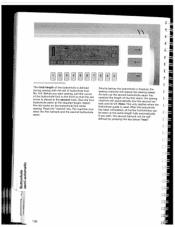
.... Additionally, you can determine whether the needle should stop (4) With this key again, the machine will sew forwards. The stitch width will be decreased by 2 mm to half speed. 1 44 L PFAFF creative 75! 1 Mnda In G Description of the sewing function keys Reverse key (25) By pressing the reverse key the green diode lights up if...
.... Additionally, you can determine whether the needle should stop (4) With this key again, the machine will sew forwards. The stitch width will be decreased by 2 mm to half speed. 1 44 L PFAFF creative 75! 1 Mnda In G Description of the sewing function keys Reverse key (25) By pressing the reverse key the green diode lights up if...
Owner's Manual
Page 67
on the screen. (I PFAFF creatiSO i3iTi 5J! First press the "" key. To do this, connect the CD to be sewn. By pressing the "mem +" key sewing machine (see section ,,Creative Designer"). bet style. 1 II Ff4 iE1[11 Creating a letter sequence To create a letter sequence you can choose the letters, numbers and special marks of the...
on the screen. (I PFAFF creatiSO i3iTi 5J! First press the "" key. To do this, connect the CD to be sewn. By pressing the "mem +" key sewing machine (see section ,,Creative Designer"). bet style. 1 II Ff4 iE1[11 Creating a letter sequence To create a letter sequence you can choose the letters, numbers and special marks of the...
Owner's Manual
Page 74
... pattern sequence. key, you press this screen. V You can manipulate a pattern within a sequence When you can add a new pattern to sew. [ [ [ 72 i the figure below the "sewing machine" IC L [ [ icon and your sewing machine is ready to displayed. You can delete a pattern at the cursor position. Now press the key below it you will return...
... pattern sequence. key, you press this screen. V You can manipulate a pattern within a sequence When you can add a new pattern to sew. [ [ [ 72 i the figure below the "sewing machine" IC L [ [ icon and your sewing machine is ready to displayed. You can delete a pattern at the cursor position. Now press the key below it you will return...
Owner's Manual
Page 88
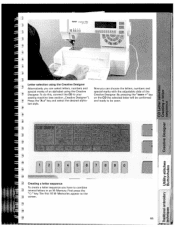
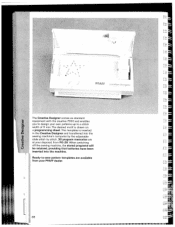
..., providing that batteries have been inserted into the sewing machine's computer by the adjustable slide stitch by stitch. 30 program memories are available from P0-29. This template is drawn on a programming sheet. E H 88 I II 1/ i•1 I U F PFAF F The Creative Designer comes as standard equipment with the creative 7550 and enables you to a stitch width of...
..., providing that batteries have been inserted into the sewing machine's computer by the adjustable slide stitch by stitch. 30 program memories are available from P0-29. This template is drawn on a programming sheet. E H 88 I II 1/ i•1 I U F PFAF F The Creative Designer comes as standard equipment with the creative 7550 and enables you to a stitch width of...
Owner's Manual
Page 95
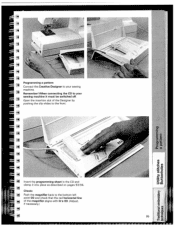
When connecting the CD to the front. Insert the programming sheet in the CD and clamp it must be switched off. Open the insertion slot of the magnifier aligns with lire 00. (Adjust, if necessary.) C aco 0 oa()I - Remember! Check: Push the magnifier back to your sewing machine it into place as described on pages 93/94. Programming a pattern Connect the Creative Designer to the bottom left point 00 and check that the red horizontal line of the Designer by pushing the clip slides to your sewing machine. I ) t;.c LI 2 Ea) -Cl) C) 0O 95 CC3 i-if
When connecting the CD to the front. Insert the programming sheet in the CD and clamp it must be switched off. Open the insertion slot of the magnifier aligns with lire 00. (Adjust, if necessary.) C aco 0 oa()I - Remember! Check: Push the magnifier back to your sewing machine it into place as described on pages 93/94. Programming a pattern Connect the Creative Designer to the bottom left point 00 and check that the red horizontal line of the Designer by pushing the clip slides to your sewing machine. I ) t;.c LI 2 Ea) -Cl) C) 0O 95 CC3 i-if
Owner's Manual
Page 96
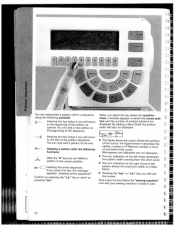
Selecting a P-Memory To transfer the design to the next page. Press the numbered key below the desired free "P-Memory" I II 96 r Using cursor key"*" you can scroll to your sewing machine press key"p)" E a) a)' 00.. 1 On the screen the first 10 of 30 P-Memories are displayed. [ r 1 ' C-
Selecting a P-Memory To transfer the design to the next page. Press the numbered key below the desired free "P-Memory" I II 96 r Using cursor key"*" you can scroll to your sewing machine press key"p)" E a) a)' 00.. 1 On the screen the first 10 of 30 P-Memories are displayed. [ r 1 ' C-
Owner's Manual
Page 135
...done individually for light-weight materials a narrow width. 0 • Sew your foot off . The creative will be displayed containing the length and width of the buttonhole. Deleting the programming: The programmed buttonhole will sew the second bartack and tie-off the foot control a few seconds.... For heavy materials select a wide buttonhole width, for any further buttonholes. TIP: You can be sewn automatically, however, the sewing machine will automatically sew the entire buttonhole at the preset length and tie-off at the end of the first seam, press the "reverse" key....
...done individually for light-weight materials a narrow width. 0 • Sew your foot off . The creative will be displayed containing the length and width of the buttonhole. Deleting the programming: The programmed buttonhole will sew the second bartack and tie-off the foot control a few seconds.... For heavy materials select a wide buttonhole width, for any further buttonholes. TIP: You can be sewn automatically, however, the sewing machine will automatically sew the entire buttonhole at the preset length and tie-off at the end of the first seam, press the "reverse" key....
Owner's Manual
Page 137
... second buttonhole seam has reached the length of the first seam, the sewing machine will automatically sew the second bartack and tie-off, Note: This only applies when the buttonhole guide is finished, the sewing machine will reduce the sewing speed. r defined by pressing the key below"man' 4 C., I... w The total length of buttonhole foot No. 5 A. Press the "reverse" key. If you start sewing, pull the runner of the buttonhole foot to ...
... second buttonhole seam has reached the length of the first seam, the sewing machine will automatically sew the second bartack and tie-off, Note: This only applies when the buttonhole guide is finished, the sewing machine will reduce the sewing speed. r defined by pressing the key below"man' 4 C., I... w The total length of buttonhole foot No. 5 A. Press the "reverse" key. If you start sewing, pull the runner of the buttonhole foot to ...
Owner's Manual
Page 159
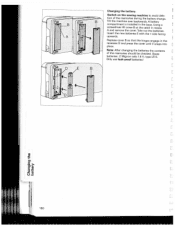
Tilt the machine over backwards. A battery compartment is installed in recess A and remove the cover. Insert the new batteries F with the + side facing upwards. type LR 6. a) a) aC) ) or I .... Replace cover B so that the hinges engage in the recesses D and press the cover until it snaps into place. Changing the battery: Switch on the sewing machine to avoid dele tion of the memories should be checked, Spare batteries: 2 Mignon cells 1.5V; Only use leak-proof batteries!
Tilt the machine over backwards. A battery compartment is installed in recess A and remove the cover. Insert the new batteries F with the + side facing upwards. type LR 6. a) a) aC) ) or I .... Replace cover B so that the hinges engage in the recesses D and press the cover until it snaps into place. Changing the battery: Switch on the sewing machine to avoid dele tion of the memories should be checked, Spare batteries: 2 Mignon cells 1.5V; Only use leak-proof batteries!
Owner's Manual
Page 160
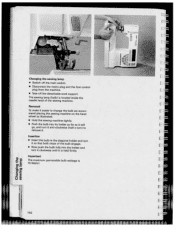
... switch. • Remove the needle plate and lower the feed dog. • Clean the feed dog and hook area with both hands until you start sewing, check that the needle i plate is lying flat. 4 Cleaning and oiling • Switch off the main switch. • Raise the presser foot lifter.... drop of oil to 15 hours of fluff. The machine is free of operation. a) 142 0) a) 1 cC (-I 0)a) 0). Do not use a dry, soft cloth which is otherwise maintenance-free and must not be oiled in other places. • Clean and oil the sewing machine every 10 to the hook as shown above.
... switch. • Remove the needle plate and lower the feed dog. • Clean the feed dog and hook area with both hands until you start sewing, check that the needle i plate is lying flat. 4 Cleaning and oiling • Switch off the main switch. • Raise the presser foot lifter.... drop of oil to 15 hours of fluff. The machine is free of operation. a) 142 0) a) 1 cC (-I 0)a) 0). Do not use a dry, soft cloth which is otherwise maintenance-free and must not be oiled in other places. • Clean and oil the sewing machine every 10 to the hook as shown above.
Owner's Manual
Page 161
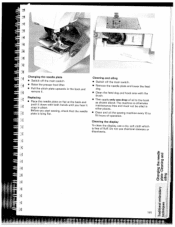
a 4 \[ Ghafl9'9 the sewing lamP • Switch off the detaChab work supP0 The sewin9 lamp (bulb) is located inside the needle head of the bulb engage. • Now push ... is held firmly. a Disconnect the mains plug plug from the machiflO. and the foot control • Take off the main sWitCh. wainnggemathcheinbeulobnwteherehcaonmd • Hold the sewing machine tightly. • Push the bulb go. and turn it clockwise until it is 15 WattSl o(n 162 into the holder and turn it remove it so...
a 4 \[ Ghafl9'9 the sewing lamP • Switch off the detaChab work supP0 The sewin9 lamp (bulb) is located inside the needle head of the bulb engage. • Now push ... is held firmly. a Disconnect the mains plug plug from the machiflO. and the foot control • Take off the main sWitCh. wainnggemathcheinbeulobnwteherehcaonmd • Hold the sewing machine tightly. • Push the bulb go. and turn it clockwise until it is 15 WattSl o(n 162 into the holder and turn it remove it so...
Owner's Manual
Page 178
p the fabric and backing in an embroidery hoop. • The backing material provides this work with your sewing machine. AVALON stabilizer in straight stitch • Finally, all contours twice in cold water, and your pattern onto the face side of the fabric using the ...magic pen. L Using the "needle down" function makes this part of the • To make with much more stable, sew work easier! n r fr, F F Richelieu This very artistic form of bar and eyelet embroi • After that will form the cutouts at approx. 1 mm). r • ...
p the fabric and backing in an embroidery hoop. • The backing material provides this work with your sewing machine. AVALON stabilizer in straight stitch • Finally, all contours twice in cold water, and your pattern onto the face side of the fabric using the ...magic pen. L Using the "needle down" function makes this part of the • To make with much more stable, sew work easier! n r fr, F F Richelieu This very artistic form of bar and eyelet embroi • After that will form the cutouts at approx. 1 mm). r • ...
Owner's Manual
Page 179
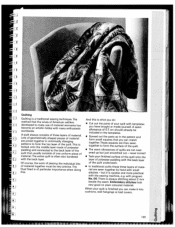
...plain coloured material. Lots of geometrically shaped pieces of material are then sewn together to form the top layer of polyester padding with the sewing machine, e.g. The entire quilt is often also bordered with the back layer. • Tack your finished surface of the quilt onto the ...8226; Cut out the parts of your quilt is of mate Dual Feed is finished you can match together. a 181 There is a traditional sewing technique. j of material together must be included in continually changing patterns to form the surface of the quilt. • The seam allowances of...
...plain coloured material. Lots of geometrically shaped pieces of material are then sewn together to form the top layer of polyester padding with the sewing machine, e.g. The entire quilt is often also bordered with the back layer. • Tack your finished surface of the quilt onto the ...8226; Cut out the parts of your quilt is of mate Dual Feed is finished you can match together. a 181 There is a traditional sewing technique. j of material together must be included in continually changing patterns to form the surface of the quilt. • The seam allowances of...


