
Owner's Manual
Page 2
...:eriecsdsrtuuarsopetsenwet,driicvsn-iiengmsveseedmucrcaheuhcasdhneaiaincimwnealaptihysanepetahpshhalsoiti,amgnidhteci-i.reqse;unIcatiottlsitihstsyusouanubllmidjgeachbcttehe, dine static electricity, heat-producing objects, corrosive chemicals or liquids. Fpoleraesaesifeorldutnhdiesrpstaagnedionpgenofwthhiesninresatrduicntgioint. Do not use only original PFAFF parts. To stubborn dirt, use a dry, clean and soft cloth which the user can repair. Twnheiteehdurlseeegraanrmddutcsoot tnehsxetearnuctpils-yeaoanbddseeqdrvuoeawttenhecmasuoetvwioiinnngg area during maintenance work . 2. To...
...:eriecsdsrtuuarsopetsenwet,driicvsn-iiengmsveseedmucrcaheuhcasdhneaiaincimwnealaptihysanepetahpshhalsoiti,amgnidhteci-i.reqse;unIcatiottlsitihstsyusouanubllmidjgeachbcttehe, dine static electricity, heat-producing objects, corrosive chemicals or liquids. Fpoleraesaesifeorldutnhdiesrpstaagnedionpgenofwthhiesninresatrduicntgioint. Do not use only original PFAFF parts. To stubborn dirt, use a dry, clean and soft cloth which the user can repair. Twnheiteehdurlseeegraanrmddutcsoot tnehsxetearnuctpils-yeaoanbddseeqdrvuoeawttenhecmasuoetvwioiinnngg area during maintenance work . 2. To...

Owner's Manual
Page 4
Parts of the creative 7550 (1) Bobbin thread monitor and sewing function light for "reverse sewing" (2> Key for "twin needle" (3) Key for "slow sewing" (4) Key for "needle up/down position" (5) Key ...
Parts of the creative 7550 (1) Bobbin thread monitor and sewing function light for "reverse sewing" (2> Key for "twin needle" (3) Key for "slow sewing" (4) Key for "needle up/down position" (5) Key ...
Owner's Manual
Page 10
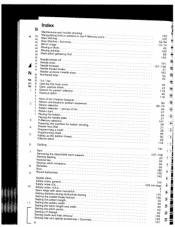
... correction 8. Index Ir Maintenance and trouble shooting Ac Ac Manipulating built-in Maxi Stitches patterns in . groups of the Creative Designer 2 F Pattern Pattern combinations selection (pattern sequence) I Pattern selection - Safety notes U.K Safety notes, U.S.A SSSSeeeetttatttiiminnngggetdtbhhgaeeertpnawaceitketthdselrdesneutwrlheinrnneggahtdbheumttetsnotsintichohonle... selection E Overlock stitch 1 55 161 157-158 27 1 63 44 45 45 24 11 8 46 E Parts of ten I Pattern start I Placing the bobbin Placing the needle plate 3 P-Memory selection Preparing the machine Presser...
... correction 8. Index Ir Maintenance and trouble shooting Ac Ac Manipulating built-in Maxi Stitches patterns in . groups of the Creative Designer 2 F Pattern Pattern combinations selection (pattern sequence) I Pattern selection - Safety notes U.K Safety notes, U.S.A SSSSeeeetttatttiiminnngggetdtbhhgaeeertpnawaceitketthdselrdesneutwrlheinrnneggahtdbheumttetsnotsintichohonle... selection E Overlock stitch 1 55 161 157-158 27 1 63 44 45 45 24 11 8 46 E Parts of ten I Pattern start I Placing the bobbin Placing the needle plate 3 P-Memory selection Preparing the machine Presser...
Owner's Manual
Page 13
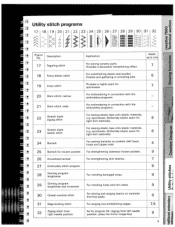
... connection with the embroidery programs. - 22 Stretch triple zigzag stitch For sewing elastic tape onto elastic materials, e.g. Description rn - 1 7 Fagoting stitch Application For joining corsetry parts. Provides a decorative hemstitching effect. C Utility stitch programs 0 18 19 20 21 22 23 24 25 26 27 28 29 30 31 IDa) 'I a)C.) Program No.
... connection with the embroidery programs. - 22 Stretch triple zigzag stitch For sewing elastic tape onto elastic materials, e.g. Description rn - 1 7 Fagoting stitch Application For joining corsetry parts. Provides a decorative hemstitching effect. C Utility stitch programs 0 18 19 20 21 22 23 24 25 26 27 28 29 30 31 IDa) 'I a)C.) Program No.
Owner's Manual
Page 89
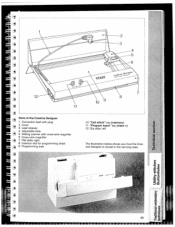
I j I j I- 11 I Parts of the Creative Designer 1 Connection lead with plug 2 Cover I 3 Lead retainer 4 Adjustable slide i 5 Sliding scanner with cross-wire magnifier 6 Cross-wire magnifier i I 7 Clip slide, right 8 Insertion slot for programming sheet 9 Programming area I i 1 1' 10 "Call stitch" key (memory) 11 "Program input" key (mem +) 1 2 Clip slide, left The illustration below shows you how the Crea tive Designer is stored in the carrying case. Ea) [ _cQa)) PFAFF 89 C 0 U) U) .C Cl) 2;
I j I j I- 11 I Parts of the Creative Designer 1 Connection lead with plug 2 Cover I 3 Lead retainer 4 Adjustable slide i 5 Sliding scanner with cross-wire magnifier 6 Cross-wire magnifier i I 7 Clip slide, right 8 Insertion slot for programming sheet 9 Programming area I i 1 1' 10 "Call stitch" key (memory) 11 "Program input" key (mem +) 1 2 Clip slide, left The illustration below shows you how the Crea tive Designer is stored in the carrying case. Ea) [ _cQa)) PFAFF 89 C 0 U) U) .C Cl) 2;
Owner's Manual
Page 116
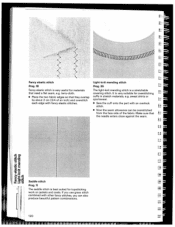
on with 6 mm long straight stitches. • Push the part prepared in place. While serging an sure the needle goes into the edge, always make material and over them with the elastic stitch. a Sew it ...
on with 6 mm long straight stitches. • Push the part prepared in place. While serging an sure the needle goes into the edge, always make material and over them with the elastic stitch. a Sew it ...
Owner's Manual
Page 119
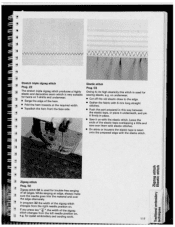
... best suited for materials that '1 the needle enters close against the seam. fri each edge with fancy elastic stitches. • Sew the cuff onto the part with other fancy stitches, you use grass stitch La combined with an overlock stitch. • Now the seam allowance can also produce beautiful pattern combinations...
... best suited for materials that '1 the needle enters close against the seam. fri each edge with fancy elastic stitches. • Sew the cuff onto the part with other fancy stitches, you use grass stitch La combined with an overlock stitch. • Now the seam allowance can also produce beautiful pattern combinations...
Owner's Manual
Page 123
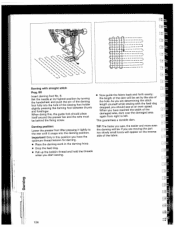
... darning position. TIP: The faster you start sewing. • Now guide the fabric back and forth evenly; When doing this position you are moving the part too slowly small knots will be . When you have the optimum thread tension for darning. • Place the darning work in this , the guide fork...
... darning position. TIP: The faster you start sewing. • Now guide the fabric back and forth evenly; When doing this position you are moving the part too slowly small knots will be . When you have the optimum thread tension for darning. • Place the darning work in this , the guide fork...
Owner's Manual
Page 132
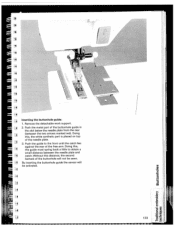
... work support. 2. By inserting the buttonhole guide the sensor will not be activated. 1 I / Cl) 0 0 133 a) . 2 .0 E a) -ø o - 44 cuc Push the metal part of the free-arm. Without this , the white synthetic part is placed on top of the buttonhole will be sewn. Doing this distance, the second bartack of the needle plate. 3.
... work support. 2. By inserting the buttonhole guide the sensor will not be activated. 1 I / Cl) 0 0 133 a) . 2 .0 E a) -ø o - 44 cuc Push the metal part of the free-arm. Without this , the white synthetic part is placed on top of the buttonhole will be sewn. Doing this distance, the second bartack of the needle plate. 3.
Owner's Manual
Page 147
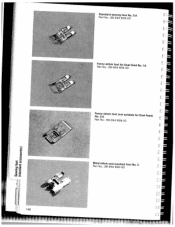
Standard sewing Part No.: 98-694 foot No. 828-00 0 A Fancy-stitch foot Part No.: 98-694 for Dual Feed) 1' Part No.: 98-694 838-00 aU)) 0 U, a(I), C., 4-IC.) (0 H 148 : ' / Blind stitch and Part No.: 98-694 overlock 890-00 foot No. 3 r Fancy-stitch No. 2A foot (not suitable for Dual 836-00 Feed No. 1 A E 1 : .
Standard sewing Part No.: 98-694 foot No. 828-00 0 A Fancy-stitch foot Part No.: 98-694 for Dual Feed) 1' Part No.: 98-694 838-00 aU)) 0 U, a(I), C., 4-IC.) (0 H 148 : ' / Blind stitch and Part No.: 98-694 overlock 890-00 foot No. 3 r Fancy-stitch No. 2A foot (not suitable for Dual 836-00 Feed No. 1 A E 1 : .
Owner's Manual
Page 150
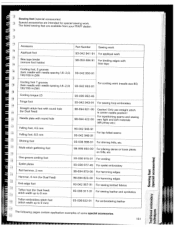
... Caution! Only use straight stitch in center needle position! I Sewing feet (special accessories) Special accessories are available from your PFAFF dealer: 1 Accessory 1 Appliqué foot 1 Bias tape binder (remove foot holder) -I Part Number Sewing work 93-042 941 -91 For appliqué work 98-053 484-9 1 For binding edges with bias tape...
... Caution! Only use straight stitch in center needle position! I Sewing feet (special accessories) Special accessories are available from your PFAFF dealer: 1 Accessory 1 Appliqué foot 1 Bias tape binder (remove foot holder) -I Part Number Sewing work 93-042 941 -91 For appliqué work 98-053 484-9 1 For binding edges with bias tape...
Owner's Manual
Page 151
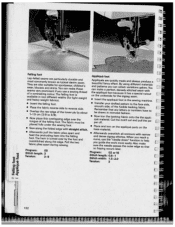
... Cut the mfaobtrificoount taontdheputlhlethaeppplai • Place and iron base material. Overlap the raw edge of i-1.5 cm (3/8 to reverse side. per off. on the appliqué parts on the • nyscaAuoounfrurdtefvergeradtw,uhyeieiuandnsrsegndeeestothezhocdieegcvluzewe"arrnopssgetraielkstsadctstmilehetercso.ahdrlteelohswcee.oanWons"iutlhofyteeuu.nrnrAsceyltdswoiooguintemhrtesaonaokachetrhherolaapwt Program 02 or 16 Stitch length 0.5-1 Stitch width: 1 5-2.0 L O) TensiOfl 3 I L V \'I II Fellin9 foot aaToswmLnvefhaedaaoeapaimsyl_rvtca,fsaboecbyrllnovellew...
... Cut the mfaobtrificoount taontdheputlhlethaeppplai • Place and iron base material. Overlap the raw edge of i-1.5 cm (3/8 to reverse side. per off. on the appliqué parts on the • nyscaAuoounfrurdtefvergeradtw,uhyeieiuandnsrsegndeeestothezhocdieegcvluzewe"arrnopssgetraielkstsadctstmilehetercso.ahdrlteelohswcee.oanWons"iutlhofyteeuu.nrnrAsceyltdswoiooguintemhrtesaonaokachetrhherolaapwt Program 02 or 16 Stitch length 0.5-1 Stitch width: 1 5-2.0 L O) TensiOfl 3 I L V \'I II Fellin9 foot aaToswmLnvefhaedaaoeapaimsyl_rvtca,fsaboecbyrllnovellew...
Owner's Manual
Page 154
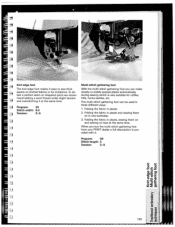
... 33 Stitch width: 6.0 Tension: 3-5 Multi-stitch gathering foot With the multi-stitch gathering foot you buy the multi-stitch gathering foot from your PFAFF dealer a full description is very suitable for ruffles, frills, home textiles, etc. To ob tain a perfect seam on knitted fabrics or fur ...imitations. Knit-edge foot The knit-edge foot makes it easy to sew thick seams on shapecut parts we recom mend adding a wool thread under slight tension and overstitching it , Program: 00 Stitch length: 3 Tension: 3-5 a)i-' ) C a) (U a) 2 E a)...
... 33 Stitch width: 6.0 Tension: 3-5 Multi-stitch gathering foot With the multi-stitch gathering foot you buy the multi-stitch gathering foot from your PFAFF dealer a full description is very suitable for ruffles, frills, home textiles, etc. To ob tain a perfect seam on knitted fabrics or fur ...imitations. Knit-edge foot The knit-edge foot makes it easy to sew thick seams on shapecut parts we recom mend adding a wool thread under slight tension and overstitching it , Program: 00 Stitch length: 3 Tension: 3-5 a)i-' ) C a) (U a) 2 E a)...
Owner's Manual
Page 178
... stitch • Finally, all you have to do not cut out the fabric from the dery is ready. L Using the "needle down" function makes this part of the • To make with your sewing machine. I- 180 n r fr, F F Richelieu This very artistic form of bar and eyelet embroi • After that will...
... stitch • Finally, all you have to do not cut out the fabric from the dery is ready. L Using the "needle down" function makes this part of the • To make with your sewing machine. I- 180 n r fr, F F Richelieu This very artistic form of bar and eyelet embroi • After that will...
Owner's Manual
Page 179
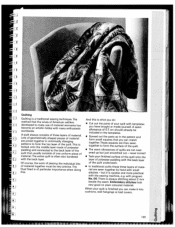
...made of polyester padding and connected to the back layer of the quilt that usually consists of one uniform piece of • Spread out the parts as in the pattern and form small squares that you do: method that the wives of American settlers developed to make it into cushions, wall...machine, e.g. stitches - There is what you can make use of material remnants has become an artistic hobby with many enthusiasts worldwide. • Cut out the parts of 0.7 cm should already be very precise. The And this . but just smoothed out - Ii When your quilt with program II No. 00.
...made of polyester padding and connected to the back layer of the quilt that usually consists of one uniform piece of • Spread out the parts as in the pattern and form small squares that you do: method that the wives of American settlers developed to make it into cushions, wall...machine, e.g. stitches - There is what you can make use of material remnants has become an artistic hobby with many enthusiasts worldwide. • Cut out the parts of 0.7 cm should already be very precise. The And this . but just smoothed out - Ii When your quilt with program II No. 00.


