
Owner's Manual
Page 2
... ("0") when making any adjustment in the needle area, such as threading needle, changing needle, threading bobbin, or changing presser foot, etc. • Always unplug the sewing machine from the electrical outlet when removing covers, lubricating, or when making any other user servicing adjustments mentioned in the instruction manual. • Never drop or...
... ("0") when making any adjustment in the needle area, such as threading needle, changing needle, threading bobbin, or changing presser foot, etc. • Always unplug the sewing machine from the electrical outlet when removing covers, lubricating, or when making any other user servicing adjustments mentioned in the instruction manual. • Never drop or...

Owner's Manual
Page 3
... into reality will find inspiration in creative sewing projects and learn more about the special accessories available for your Pfaff creative 2134. But we do not want to your imagination and make your new sewing machine. Here you start, please spend some time reading these operating instructions. Your Pfaff creative 2134 is to discover the wonderful features of use...
... into reality will find inspiration in creative sewing projects and learn more about the special accessories available for your Pfaff creative 2134. But we do not want to your imagination and make your new sewing machine. Here you start, please spend some time reading these operating instructions. Your Pfaff creative 2134 is to discover the wonderful features of use...
Owner's Manual
Page 4
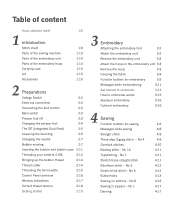
...14 Topstitching - No 1 Stretch triple straight stitch Blindhem stitch - Table of content Hoop selection table 1 Introduction Stitch chart Parts of the sewing machine Parts of the embroidery unit Parts of the embroidery hoop Carrying case Lid Accessories 1:6 1:8 1:13 1:14 1:14 1:15 1:15 1:16 ...) 2:5 Lowering the feed dog 2:6 Changing the needle 2:7 Bobbin winding 2:7 Inserting the bobbin and bobbin case 2:11 Threading your creative 2134 2:12 Bringing up the bobbin thread 2:14 Thread cutter 2:14 Threading the twin needle 2:15 Control Panel overview 2:16 Window indications...
...14 Topstitching - No 1 Stretch triple straight stitch Blindhem stitch - Table of content Hoop selection table 1 Introduction Stitch chart Parts of the sewing machine Parts of the embroidery unit Parts of the embroidery hoop Carrying case Lid Accessories 1:6 1:8 1:13 1:14 1:14 1:15 1:15 1:16 ...) 2:5 Lowering the feed dog 2:6 Changing the needle 2:7 Bobbin winding 2:7 Inserting the bobbin and bobbin case 2:11 Threading your creative 2134 2:12 Bringing up the bobbin thread 2:14 Thread cutter 2:14 Threading the twin needle 2:15 Control Panel overview 2:16 Window indications...

Owner's Manual
Page 9
... decorating nostalgia projects. For joining lightweight stretch fabrics and decorative embellishment. 16 Closed overlock stitch For joining and overcasting stretch fabrics in up position the machine sews the stitch continuously. stitch 14 Basting stitch 15 Lightning stretch stitch For basting project pieces together. When the feed dog is lowered the...
... decorating nostalgia projects. For joining lightweight stretch fabrics and decorative embellishment. 16 Closed overlock stitch For joining and overcasting stretch fabrics in up position the machine sews the stitch continuously. stitch 14 Basting stitch 15 Lightning stretch stitch For basting project pieces together. When the feed dog is lowered the...
Owner's Manual
Page 13
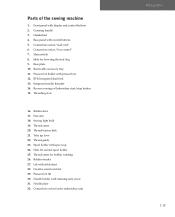
Threading slots 16. Bobbin door 17. Sewing light bulb 19. Presser foot lift 30. Needle holder with spool cap 24. Base plate 10. Integrated needle threader 14. Thread cutter 20. Spool holder ... for lowering the feed dog 9. Creative smart card slot 29. Carrying handle 3. Connection socket, "foot control" 7. Reverse sewing or Embroidery start/stop button 15. Thread tension disk 21. Base panel with presser foot 12. Main switch 8. Needle plate 32. Thread guide 23. Bobbin winder 27. Parts of the sewing machine 1. IDT/Integrated dual feed...
Threading slots 16. Bobbin door 17. Sewing light bulb 19. Presser foot lift 30. Needle holder with spool cap 24. Base plate 10. Integrated needle threader 14. Thread cutter 20. Spool holder ... for lowering the feed dog 9. Creative smart card slot 29. Carrying handle 3. Connection socket, "foot control" 7. Reverse sewing or Embroidery start/stop button 15. Thread tension disk 21. Base panel with presser foot 12. Main switch 8. Needle plate 32. Thread guide 23. Bobbin winder 27. Parts of the sewing machine 1. IDT/Integrated dual feed...

Owner's Manual
Page 15
Introduction Carrying case Place the enclosed lead cord, the foot control and Owner's manual into the storage compartment of the lid. 1:15 The stitches of the sewing machine are illustrated on the inside of the carrying case. Lid Open the lid upwards.
Introduction Carrying case Place the enclosed lead cord, the foot control and Owner's manual into the storage compartment of the lid. 1:15 The stitches of the sewing machine are illustrated on the inside of the carrying case. Lid Open the lid upwards.

Owner's Manual
Page 16
... of the lid and open the lid upwards and towards you. Accessory tray / Free arm In order to sew using the free arm, swing the accessory tray to the left of the sewing machine. Arrange the parts in the respective compartments of the hole. Arranging the accessories Open the accessory tray by placing...
... of the lid and open the lid upwards and towards you. Accessory tray / Free arm In order to sew using the free arm, swing the accessory tray to the left of the sewing machine. Arrange the parts in the respective compartments of the hole. Arranging the accessories Open the accessory tray by placing...

Owner's Manual
Page 20
...fit fully in any way! Electrical connection Connect the lead cord between the socket (5) of the sewing machine. To reduce the risk of the machine to the connection socket (6) of the sewing machine and the wall outlet. The foot control AT 0070 must set to install the proper outlet. To ...change the voltage to fit in your authorized sewing machine dealer or local electrical authorities before plugging in a polarized outlet only one blade wider than the other). If you must be used for...
...fit fully in any way! Electrical connection Connect the lead cord between the socket (5) of the sewing machine. To reduce the risk of the machine to the connection socket (6) of the sewing machine and the wall outlet. The foot control AT 0070 must set to install the proper outlet. To ...change the voltage to fit in your authorized sewing machine dealer or local electrical authorities before plugging in a polarized outlet only one blade wider than the other). If you must be used for...

Owner's Manual
Page 21
To put the presser foot lift in free-motion/darning/embroidery position you should lower the presser foot lifter and push it backwards until it engages in the creative 2134 window. "0" = OFF "I ) the sewing bulb lights up and stitch No. 1 is raised or lowered with the presser foot lift (29). Preparations Main switch When the main switch (7) is switched on (switch function I " = ON Presser foot lift The presser foot is indicated in the free-motion/darning/embroidery position. 2:3 The sewing machine is now ready to function.
To put the presser foot lift in free-motion/darning/embroidery position you should lower the presser foot lifter and push it backwards until it engages in the creative 2134 window. "0" = OFF "I ) the sewing bulb lights up and stitch No. 1 is raised or lowered with the presser foot lift (29). Preparations Main switch When the main switch (7) is switched on (switch function I " = ON Presser foot lift The presser foot is indicated in the free-motion/darning/embroidery position. 2:3 The sewing machine is now ready to function.

Owner's Manual
Page 23
... ribbed ankle. Engaging the IDT Raise the presser foot. Disengaging the IDT Hold the Dual Feed with the center back cut-out. As on industrial machines, the IDT feeds the fabric from you and release the IDT slowly upward. 2:5 Press the IDT down , then pull it engages. The IDT keeps all... prevents puckering of checked and striped fabrics. The even feeding action also ensures perfect matching of the seam. Preparations The IDT (Integrated Dual Feed) For sewing any fabric precisely Pfaff provides the ideal solution: the Integrated Dual Feed, IDT system.
... ribbed ankle. Engaging the IDT Raise the presser foot. Disengaging the IDT Hold the Dual Feed with the center back cut-out. As on industrial machines, the IDT feeds the fabric from you and release the IDT slowly upward. 2:5 Press the IDT down , then pull it engages. The IDT keeps all... prevents puckering of checked and striped fabrics. The even feeding action also ensures perfect matching of the seam. Preparations The IDT (Integrated Dual Feed) For sewing any fabric precisely Pfaff provides the ideal solution: the Integrated Dual Feed, IDT system.

Owner's Manual
Page 24
Push slide A or B to the right. To bring the feed dog back up move the slide to the left. For either method: Raise the presser foot before lowering the feed dogsh. B A A B 2:6 On your Pfaff creative 2134 there are two different methods for lowering the feed dogs, one on the outside of the machine and one inside the bobbin door. Lowering the feed dogs For certain sewing work such as free-motion quilting or darning or when embroidering, the feed dogs must be lowered.
Push slide A or B to the right. To bring the feed dog back up move the slide to the left. For either method: Raise the presser foot before lowering the feed dogsh. B A A B 2:6 On your Pfaff creative 2134 there are two different methods for lowering the feed dogs, one on the outside of the machine and one inside the bobbin door. Lowering the feed dogs For certain sewing work such as free-motion quilting or darning or when embroidering, the feed dogs must be lowered.

Owner's Manual
Page 26
... for embroidering, in a clockwise direction. Winding Turn on page 3:14, to be able to wind your machine. Note: If you want to wind a bobbin before you start to embroider, you need to prepare the machine for correct thread tension. Wind the thread tail around the pre-tension device B. Hold the end of... guide A from the winder. Slide a spool cap firmly against the spool. Pull the thread under the thread guide C (from the spool pin Place the sewing thread on the spool pin. As soon as described on the machine. Winding the bobbin from back to front).
... for embroidering, in a clockwise direction. Winding Turn on page 3:14, to be able to wind your machine. Note: If you want to wind a bobbin before you start to embroider, you need to prepare the machine for correct thread tension. Wind the thread tail around the pre-tension device B. Hold the end of... guide A from the winder. Slide a spool cap firmly against the spool. Pull the thread under the thread guide C (from the spool pin Place the sewing thread on the spool pin. As soon as described on the machine. Winding the bobbin from back to front).

Owner's Manual
Page 29
... the latch of the bobbin case and pull the bobbin case out of the sewing hook. When doing so, pull the thread through slot A, then under tension ...turn clockwise. Inserting the bobbin case Lift latch E and push the bobbin case fully onto pin C of the machine. Opening D of the bobbin case must not fall out of the bobbin case. The bobbin case must face upwards...latch and take the empty bobbin out of the hook. 2:11 Check: Hold the bobbin case with the Pfaff logo facing towards the bobbin case) in the opening (see arrow). Preparations Inserting the bobbin and bobbin case ...
... the latch of the bobbin case and pull the bobbin case out of the sewing hook. When doing so, pull the thread through slot A, then under tension ...turn clockwise. Inserting the bobbin case Lift latch E and push the bobbin case fully onto pin C of the machine. Opening D of the bobbin case must not fall out of the bobbin case. The bobbin case must face upwards...latch and take the empty bobbin out of the hook. 2:11 Check: Hold the bobbin case with the Pfaff logo facing towards the bobbin case) in the opening (see arrow). Preparations Inserting the bobbin and bobbin case ...
Owner's Manual
Page 40
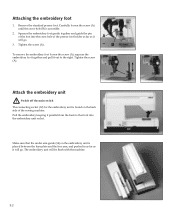
... the screw (A), squeeze the embroidery foot together and pull it out to the front into the cross hole of the sewing machine. Pull the embroidery keeping it will be flush with the machine. 34 3:2 Tighten the screw (A). Attach the embroidery unit Switch off the main switch The connecting socket (32) for the...
... the screw (A), squeeze the embroidery foot together and pull it out to the front into the cross hole of the sewing machine. Pull the embroidery keeping it will be flush with the machine. 34 3:2 Tighten the screw (A). Attach the embroidery unit Switch off the main switch The connecting socket (32) for the...

Owner's Manual
Page 88
... rear edge of operation. Cleaning the window Wipe the window with the brush. • Clean the sewing machine after every 10 - 15 hours of the cut-out then press down at the front until you start sewing, check that the needle plate is lying flat. Tip: Lower the feed dogs to make removing...
... rear edge of operation. Cleaning the window Wipe the window with the brush. • Clean the sewing machine after every 10 - 15 hours of the cut-out then press down at the front until you start sewing, check that the needle plate is lying flat. Tip: Lower the feed dogs to make removing...

Owner's Manual
Page 89
... V max 5 W. Guide the bulb into the holder as far as it will be purchased from the machine. • Remove the accessory tray. Bulbs can be held firmly so you can remove it half a rotation in the light bulb changer. Maintenence Changing the ...light bulb Switch off the main switch • Disconnect the lead cord and the foot control plug from your Pfaff dealer. 6:3 The bulb will go . The light bulb is located inside the sewing machine near the needle threader. Push the bulb upward into the diagonal holder and turn the bulb half a rotation counter...
... V max 5 W. Guide the bulb into the holder as far as it will be purchased from the machine. • Remove the accessory tray. Bulbs can be held firmly so you can remove it half a rotation in the light bulb changer. Maintenence Changing the ...light bulb Switch off the main switch • Disconnect the lead cord and the foot control plug from your Pfaff dealer. 6:3 The bulb will go . The light bulb is located inside the sewing machine near the needle threader. Push the bulb upward into the diagonal holder and turn the bulb half a rotation counter...

Owner's Manual
Page 91
Messages in the hook Remove the threads. You need to bring your sewing machine to your dealer for service. • If problems remain contact an authorized Pfaff dealer. • Have your Pfaff creative 2134 serviced regularly by use of the window may fail Switch off the machine, wait 10 seconds and switch on again. Select the desired stitch...
Messages in the hook Remove the threads. You need to bring your sewing machine to your dealer for service. • If problems remain contact an authorized Pfaff dealer. • Have your Pfaff creative 2134 serviced regularly by use of the window may fail Switch off the machine, wait 10 seconds and switch on again. Select the desired stitch...
Owner's Manual
Page 93
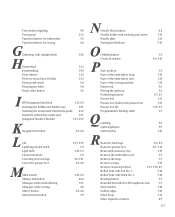
... 4:3 L Lid Lightning stretch stitch Light bulb Linen buttonhole Lowering the feed dogs Lower the presser foot MMain switch Manual buttonhole Messages while embroidering Messages while sewing Mirror button Monochrome button 1:13, 1:15 1:9 1:13, 6:3 1:8 2:6, 3:11 2:3, 4:8 1:13, 2:3 4:14 3:11 4:8 3:8, 4:2 3:9...stitches 1:9, 4:10 P Park position 3:5 Parts of the embroidery hoop 1:14 Parts of the embroidery unit 1:14 Parts of the sewing machine 1:13 Patchwork 5:6 Piecing the quilt top 5:6 Positioning buttons 3:7, 4:7 Presser feet 1:17 Presser foot holder with presser foot 1:13 ...
... 4:3 L Lid Lightning stretch stitch Light bulb Linen buttonhole Lowering the feed dogs Lower the presser foot MMain switch Manual buttonhole Messages while embroidering Messages while sewing Mirror button Monochrome button 1:13, 1:15 1:9 1:13, 6:3 1:8 2:6, 3:11 2:3, 4:8 1:13, 2:3 4:14 3:11 4:8 3:8, 4:2 3:9...stitches 1:9, 4:10 P Park position 3:5 Parts of the embroidery hoop 1:14 Parts of the embroidery unit 1:14 Parts of the sewing machine 1:13 Patchwork 5:6 Piecing the quilt top 5:6 Positioning buttons 3:7, 4:7 Presser feet 1:17 Presser foot holder with presser foot 1:13 ...

Owner's Manual
Page 95
... V - 240 V / 120 V 75 W 12 V/max. 5 W Max 950 rpm 0...9 mm 0...6 mm 8 mm 10.5 103/705 Package contents Sewing machine Carrying case Foot control Lead cord Accessories package Owner's manual Embroidery unit Embroidery hoop Embroidery clips Quick start embroidery kit Intellectual property PFAFF, creative and IDT (image) are registered trademarks or trademarks of VSM Group AB. 6:9
... V - 240 V / 120 V 75 W 12 V/max. 5 W Max 950 rpm 0...9 mm 0...6 mm 8 mm 10.5 103/705 Package contents Sewing machine Carrying case Foot control Lead cord Accessories package Owner's manual Embroidery unit Embroidery hoop Embroidery clips Quick start embroidery kit Intellectual property PFAFF, creative and IDT (image) are registered trademarks or trademarks of VSM Group AB. 6:9

Owner's Manual
Page 96
If you suspect that your sewing machine. This discoloring may be very difficult or impossible to avoid the discoloring. 6:10 Some fabrics have a lot of excess dye which can cause discoloration on other fabric but also on your fabric/ready-to-wear garment contains a lot of excess dye. Fleece and denim fabric, especially red and blue, often contain a lot of excess dye, always pre-wash it before sewing to remove.
If you suspect that your sewing machine. This discoloring may be very difficult or impossible to avoid the discoloring. 6:10 Some fabrics have a lot of excess dye which can cause discoloration on other fabric but also on your fabric/ready-to-wear garment contains a lot of excess dye. Fleece and denim fabric, especially red and blue, often contain a lot of excess dye, always pre-wash it before sewing to remove.


