
Owner's Manual
Page 4
...Introduction 1:5 Machine overview 1:5 Front side 1:5 Top parts 1:5 Rear side 1:6 Accessory tray 1:6 Parts of the embroidery unit 1:6 Included accessories 1:7 Presser feet 1:8 Stitch overview 1:9 Alphabets 1:11 2 Preparations 2:1 Unpacking 2:1 Connect to check position 6:3 Hoop options 6:4 Basting 6:5 Speed control 6:5 Thread ... 2:6 IDT (Integrated dual feed 2:6 Needles 2:7 Changing the needle 2:7 Lowering feed dogs 2:8 Changing the presser foot 2.8 USB port 2:9 5D™ Embroidery Software 2:10 Buttons 2:12 Settings menu 2:14 3 Sewing 3:1 Sewing mode -
...Introduction 1:5 Machine overview 1:5 Front side 1:5 Top parts 1:5 Rear side 1:6 Accessory tray 1:6 Parts of the embroidery unit 1:6 Included accessories 1:7 Presser feet 1:8 Stitch overview 1:9 Alphabets 1:11 2 Preparations 2:1 Unpacking 2:1 Connect to check position 6:3 Hoop options 6:4 Basting 6:5 Speed control 6:5 Thread ... 2:6 IDT (Integrated dual feed 2:6 Needles 2:7 Changing the needle 2:7 Lowering feed dogs 2:8 Changing the presser foot 2.8 USB port 2:9 5D™ Embroidery Software 2:10 Buttons 2:12 Settings menu 2:14 3 Sewing 3:1 Sewing mode -
Owner's Manual
Page 6
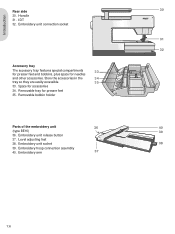
... arm 37 1:6 IDT 32. Embroidery unit release button 37. Embroidery unit connection socket 31 32 Accessory tray The accessory tray features special compartments 33 for presser feet and bobbins, plus space for needles and other accessories. Store the accessories in the 34 tray so they are easily accessible. 35 33. Removable bobbin...
... arm 37 1:6 IDT 32. Embroidery unit release button 37. Embroidery unit connection socket 31 32 Accessory tray The accessory tray features special compartments 33 for presser feet and bobbins, plus space for needles and other accessories. Store the accessories in the 34 tray so they are easily accessible. 35 33. Removable bobbin...
Owner's Manual
Page 8
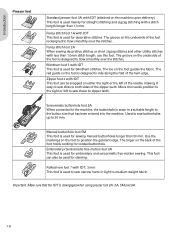
... buttonhole foot 5M This foot is sewn in light to medium weight fabric. Fancy stitch foot 1A with IDT This foot is disengaged when using presser foot 2A, 5A, 5M and 6A. 1:8 This foot can be used for corded buttonhole. Move the needle position to the right or left of ... the right or the left to sew closer to 50 mm. Embroidery/Sensormatic free-motion foot 6A This foot is used for blindhem stitches. Introduction Presser feet Standard presser foot 0A with IDT (attached on the underside of the foot is designed to Áow smoothly over the stitches. The groove on the...
... buttonhole foot 5M This foot is sewn in light to medium weight fabric. Fancy stitch foot 1A with IDT This foot is disengaged when using presser foot 2A, 5A, 5M and 6A. 1:8 This foot can be used for corded buttonhole. Move the needle position to the right or left of ... the right or the left to sew closer to 50 mm. Embroidery/Sensormatic free-motion foot 6A This foot is used for blindhem stitches. Introduction Presser feet Standard presser foot 0A with IDT (attached on the underside of the foot is designed to Áow smoothly over the stitches. The groove on the...
Owner's Manual
Page 18
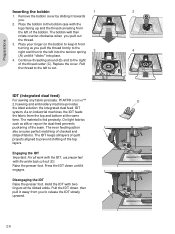
... right of the thread cutter (C). Hold the IDT with the center back cut . 1 3 B A C IDT (integrated dual feed) For sewing any fabric precisely, PFAFF® creative™ 2.0 sewing and embroidery machine provides the ideal solution: the integrated dual feed, IDT system. Place the bobbin in the bobbin case with the logo...checked and striped fabrics. The even feeding action also ensures perfect matching of the seam. The IDT keeps all work with the IDT, use presser feet with two Àngers at the same time. Continue threading around (B) and to prevent shifting of the bobbin. Raise the...
... right of the thread cutter (C). Hold the IDT with the center back cut . 1 3 B A C IDT (integrated dual feed) For sewing any fabric precisely, PFAFF® creative™ 2.0 sewing and embroidery machine provides the ideal solution: the integrated dual feed, IDT system. Place the bobbin in the bobbin case with the logo...checked and striped fabrics. The even feeding action also ensures perfect matching of the seam. The IDT keeps all work with the IDT, use presser feet with two Àngers at the same time. Continue threading around (B) and to prevent shifting of the bobbin. Raise the...
Owner's Manual
Page 26
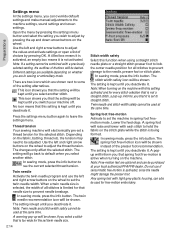
...tension for the selected stitch. Note: When turning on the machine with a previously selected setting, the outlines of the presser foot recommendation. A popup will be purchased at your machine off. Do not use the left and right arrow buttons to...same time. The changes only affect the selected stitch. In sewing mode, press the info button. Note: Free-motion feet are shown next to some of all stitches to prevent damage to prevent needle breakage. Note: If a setting cannot...the settings menu, you can also be kept until you switch your local authorized PFAFF® dealer.
...tension for the selected stitch. Note: When turning on the machine with a previously selected setting, the outlines of the presser foot recommendation. A popup will be purchased at your machine off. Do not use the left and right arrow buttons to...same time. The changes only affect the selected stitch. In sewing mode, press the info button. Note: Free-motion feet are shown next to some of all stitches to prevent damage to prevent needle breakage. Note: If a setting cannot...the settings menu, you can also be kept until you switch your local authorized PFAFF® dealer.
Owner's Manual
Page 46
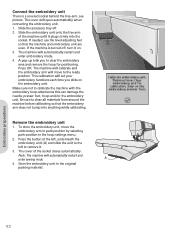
Slide the accessory tray off , turn it on the embroidery unit. If needed, use the level adjusting feet so that the embroidery arm does not bump into the socket. A pop-up tells you slide on . 3. The machine will calibrate and the embroidery arm ... the embroidery unit (A) and slide the unit to the left to calibrate the machine with the embroidery hoop attached as this can damage the needle, presser foot, hoop and/or the embroidery unit. Slide the embroidery unit onto the free arm of the socket closes automatically. This calibration will automatically restart...
Slide the accessory tray off , turn it on the embroidery unit. If needed, use the level adjusting feet so that the embroidery arm does not bump into the socket. A pop-up tells you slide on . 3. The machine will calibrate and the embroidery arm ... the embroidery unit (A) and slide the unit to the left to calibrate the machine with the embroidery hoop attached as this can damage the needle, presser foot, hoop and/or the embroidery unit. Slide the embroidery unit onto the free arm of the socket closes automatically. This calibration will automatically restart...
Owner's Manual
Page 61
... Manual buttonhole 3:7 Sensormatic buttonhole 3:6 Buttons 2:12 C Calibrate 5:2, 6:8 Changing the light bulbs 7:1 Changing the needle 2:7 Changing the presser foot 2:8 Cleaning 7:1 Clear button 2:13 Color list 6:1 Connect the embroidery unit 5:2 Connect the foot control 2:1 Connect to the power... edit 6:2 Embroidery Àeld 6:1 Embroidery preparations 5:1 Embroidery stitch-out 6:7 Embroidery text editor 6:2-6:3 Embroidery unit Connect 5:2 Level adjusting feet 5:1 Overview 5:1 Remove 5:2 Engage IDT 2:6 F F1 2:13 F2 2:13 Feed dogs, lower 2:8 Font, load 6:2 Foot control...
... Manual buttonhole 3:7 Sensormatic buttonhole 3:6 Buttons 2:12 C Calibrate 5:2, 6:8 Changing the light bulbs 7:1 Changing the needle 2:7 Changing the presser foot 2:8 Cleaning 7:1 Clear button 2:13 Color list 6:1 Connect the embroidery unit 5:2 Connect the foot control 2:1 Connect to the power... edit 6:2 Embroidery Àeld 6:1 Embroidery preparations 5:1 Embroidery stitch-out 6:7 Embroidery text editor 6:2-6:3 Embroidery unit Connect 5:2 Level adjusting feet 5:1 Overview 5:1 Remove 5:2 Engage IDT 2:6 F F1 2:13 F2 2:13 Feed dogs, lower 2:8 Font, load 6:2 Foot control...
Owner's Manual
Page 62
... Sequencing 4:3 Sewing mode 3:5 Lowering feed dogs 2:8 M Machine overview 1:5 Accessory tray 1:6 Front side 1:5 Included accessories 1:7 Presser feet 1:8 Rear side 1:6 Top parts 1:5 Maintenance 7:1 Manage your sequences 4.3 Manual buttonhole 3:7 Mirroring 2:13, 3:3, 4:2, 6:7 ...6:4 Personal stitches 3:5 Pivot height embroidery 2:15 Pop-ups Embroidering 6:8 Sewing 3:11 Power supply 2:1 Presser feet 1:8 Presser foot, change 2:8 Presser foot, lower 2:13 Presser foot pressure 2:15 Presser foot, raise 2:12, 2:15 Program a sequence 4:1 Programmed tie-off indicator 2:12, 3:3 ...
... Sequencing 4:3 Sewing mode 3:5 Lowering feed dogs 2:8 M Machine overview 1:5 Accessory tray 1:6 Front side 1:5 Included accessories 1:7 Presser feet 1:8 Rear side 1:6 Top parts 1:5 Maintenance 7:1 Manage your sequences 4.3 Manual buttonhole 3:7 Mirroring 2:13, 3:3, 4:2, 6:7 ...6:4 Personal stitches 3:5 Pivot height embroidery 2:15 Pop-ups Embroidering 6:8 Sewing 3:11 Power supply 2:1 Presser feet 1:8 Presser foot, change 2:8 Presser foot, lower 2:13 Presser foot pressure 2:15 Presser foot, raise 2:12, 2:15 Program a sequence 4:1 Programmed tie-off indicator 2:12, 3:3 ...


