
Owner's Manual
Page 2
... must be adjusted by the needle during sewing. Fold out this appliance may not correspond with the colour coding of the terminals in your fingers by anyone but an authori zed Pfaff agent. b) Make sure you unplug the power cord whenever you have to leave the machine or want to use only a 15...
... must be adjusted by the needle during sewing. Fold out this appliance may not correspond with the colour coding of the terminals in your fingers by anyone but an authori zed Pfaff agent. b) Make sure you unplug the power cord whenever you have to leave the machine or want to use only a 15...
Owner's Manual
Page 3
... have compiled a number of embroidery and hand-sewn stitches, and alphabet pro grams. As a creative fashion designer you wish. Embroidery stitch program. 3. More than just a sew ing machine: Your new PFAFF Creative 1473 The right machine for you have further questions regarding sewing problems now and then. This means you and divided them into three groups: 1. To make...
... have compiled a number of embroidery and hand-sewn stitches, and alphabet pro grams. As a creative fashion designer you wish. Embroidery stitch program. 3. More than just a sew ing machine: Your new PFAFF Creative 1473 The right machine for you have further questions regarding sewing problems now and then. This means you and divided them into three groups: 1. To make...
Owner's Manual
Page 5
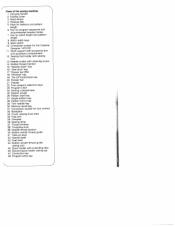
... the sewing machine 1 Carrying handle 2 Folding cover 3 Hand wheel 4 Release disc 5 Keys for balance and pattern length 6 Key for program sequence and recommended sewing modes 7 Key for stitch length and pattern length 8 Stitch width keys 9 Main switch 10 Connection socket for the Creative Designer 1473 CD ...11 Work support with accessory box and accessory compartment 12 Sewing foot holder with sewing foot 13 Needle holder with retaining screw 14 Bobbin thread monitor 15 "Needle down" key 16 "Sew-slow" key 17 Presser bar lifter ...
... the sewing machine 1 Carrying handle 2 Folding cover 3 Hand wheel 4 Release disc 5 Keys for balance and pattern length 6 Key for program sequence and recommended sewing modes 7 Key for stitch length and pattern length 8 Stitch width keys 9 Main switch 10 Connection socket for the Creative Designer 1473 CD ...11 Work support with accessory box and accessory compartment 12 Sewing foot holder with sewing foot 13 Needle holder with retaining screw 14 Bobbin thread monitor 15 "Needle down" key 16 "Sew-slow" key 17 Presser bar lifter ...
Owner's Manual
Page 26
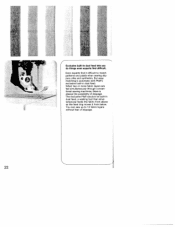
... you do things even experts find it from below. You can sew up to match patterns and plaids when sewing slip pery silks and synthetics. I 22 When two or more fabric layers are fed simultaneously through conven tional sewing machines, there is automatic with Pfaff's exclusive built-in dual feed. But easy matching is always...
... you do things even experts find it from below. You can sew up to match patterns and plaids when sewing slip pery silks and synthetics. I 22 When two or more fabric layers are fed simultaneously through conven tional sewing machines, there is automatic with Pfaff's exclusive built-in dual feed. But easy matching is always...
Owner's Manual
Page 27
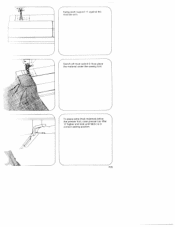
£ 4 Swing work support 11 against the machine arm. Now place the material under the sewing foot. -T' -. Switch off main switch 9. F ) To place extra thick materials below the presser foot, raise presser bar lifter 17 higher and hold until fabric is in correct sewing position. ()1)
£ 4 Swing work support 11 against the machine arm. Now place the material under the sewing foot. -T' -. Switch off main switch 9. F ) To place extra thick materials below the presser foot, raise presser bar lifter 17 higher and hold until fabric is in correct sewing position. ()1)
Owner's Manual
Page 30
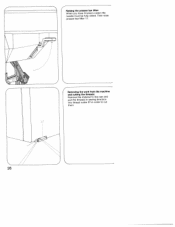
Removing the work from the machine and cutting the threads: Remove the material to the rear and pull the threads in sewing direction into thread cutter 37 in order to cut them. 26 Then raise presser bar lifter 17. Raising the presser bar lifter: When you have finished a seam the needle must be fully raised.
Removing the work from the machine and cutting the threads: Remove the material to the rear and pull the threads in sewing direction into thread cutter 37 in order to cut them. 26 Then raise presser bar lifter 17. Raising the presser bar lifter: When you have finished a seam the needle must be fully raised.
Owner's Manual
Page 31
... compo nduenritnsgthoipsemraaticohni.nTe hbisecisomqueistewnaorrmmal and of no consequence. Owing to switch the machine on again, program 0m0id(dslteraipgohstitsiotintc)hapwpiteharnse. After bobbin winding engage the sewing action again. The stitch width and stitch length can be changed during sewing, it will not machine become effective until the is stopped and the foot con trol is...
... compo nduenritnsgthoipsemraaticohni.nTe hbisecisomqueistewnaorrmmal and of no consequence. Owing to switch the machine on again, program 0m0id(dslteraipgohstitsiotintc)hapwpiteharnse. After bobbin winding engage the sewing action again. The stitch width and stitch length can be changed during sewing, it will not machine become effective until the is stopped and the foot con trol is...

Owner's Manual
Page 32
...16 again. For more details please see pages 78-97. The display goes out and the machine sews again at the top posi tion. If you press the key during sewing, the light goes on and the machine will not go on and a seam is tied off immediately, whereas a pattern is tied ... and stays at full speed. If you push the key during sewing, the light will sew back wards as long as the key is stopped. Display B lights up . To sew: Press key 19: Indicator C lights up and the machine sews back wards permanently. The machine sews at half speed. Indicator light D lights up , the pro ...
...16 again. For more details please see pages 78-97. The display goes out and the machine sews again at the top posi tion. If you press the key during sewing, the light goes on and the machine will not go on and a seam is tied off immediately, whereas a pattern is tied ... and stays at full speed. If you push the key during sewing, the light will sew back wards as long as the key is stopped. Display B lights up . To sew: Press key 19: Indicator C lights up and the machine sews back wards permanently. The machine sews at half speed. Indicator light D lights up , the pro ...
Owner's Manual
Page 37
... not take further inputs, this means the memory capa city is selected, all programs will go into memory MO. By pressing the foot control the machine sews the combination from M 1 to M 15 is exhausted, and a memory you no longer need must be emptied. 4 Checking a program combination by running it...M memory from the beginning as well. Afterwards press key 48 for input. To stop the display press key 6 again. Storing program combinations: The creative computer contains 16 M memories, MO to left key 22 M Oand right key 22. The memories are stored, the program can be changed in the...
... not take further inputs, this means the memory capa city is selected, all programs will go into memory MO. By pressing the foot control the machine sews the combination from M 1 to M 15 is exhausted, and a memory you no longer need must be emptied. 4 Checking a program combination by running it...M memory from the beginning as well. Afterwards press key 48 for input. To stop the display press key 6 again. Storing program combinations: The creative computer contains 16 M memories, MO to left key 22 M Oand right key 22. The memories are stored, the program can be changed in the...
Owner's Manual
Page 38
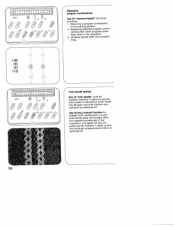
...by 2 mm. If the machine is in the meantime. 3. Returning a program combination to the starting position. 2. i I I I I 11 i ! Press key 29 again and both function and indicator are switched oft. Initiating sewing after other programs have been ...4-Q & 10 f 136 00 00 118 f Repeating program combinations: Key 30 "memory/repeat" has three functions: 1. Key 29 has a second function for straight stitch sewing with a roundhole needle plate and straight stitch foot (special accessories). Repeating selected program combi nations after free program ming. [ ri i i i i i i i riii prog...
...by 2 mm. If the machine is in the meantime. 3. Returning a program combination to the starting position. 2. i I I I I 11 i ! Press key 29 again and both function and indicator are switched oft. Initiating sewing after other programs have been ...4-Q & 10 f 136 00 00 118 f Repeating program combinations: Key 30 "memory/repeat" has three functions: 1. Key 29 has a second function for straight stitch sewing with a roundhole needle plate and straight stitch foot (special accessories). Repeating selected program combi nations after free program ming. [ ri i i i i i i i riii prog...

Owner's Manual
Page 39
... or a program combination and ties off the seam. 99 93 35 If the key 27 is pressed while sewing is sewn in progress, the machine completes the program and ties off beginning and end of the seam. Programs can also be mirror-imaged into a combina tion, as well as whole ...
... or a program combination and ties off the seam. 99 93 35 If the key 27 is pressed while sewing is sewn in progress, the machine completes the program and ties off beginning and end of the seam. Programs can also be mirror-imaged into a combina tion, as well as whole ...
Owner's Manual
Page 40
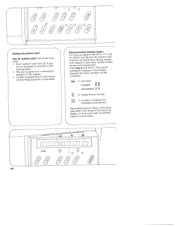
...it. A: dual feed engaged disengaged E B: needle thread tension C: number of sewing foot (standard accessories) Recommendations made in the machine display. In that case both recommen dations can be used. Recommended sewing modes: For every program from those in this book may differ from 00 to ... in buttonholeand darning programs is returned to 1 77. and for letters and figures the machine will indicate recommended sewing modes with regard to dual feed, needle thread tension and sewing feet. The last program in a combination appears in the display beneath the three symbols ...
...it. A: dual feed engaged disengaged E B: needle thread tension C: number of sewing foot (standard accessories) Recommendations made in the machine display. In that case both recommen dations can be used. Recommended sewing modes: For every program from those in this book may differ from 00 to ... in buttonholeand darning programs is returned to 1 77. and for letters and figures the machine will indicate recommended sewing modes with regard to dual feed, needle thread tension and sewing feet. The last program in a combination appears in the display beneath the three symbols ...

Owner's Manual
Page 46
... out the edge guide. Clean the feed dog and the parts in the illustration, every 15 to use only a 15-watt light bulb in the sewing lamp. 42 Push it up and turn it towards A and take it there, Turn the light bulb towards B. Other than that its pins enter slots... oil in the hook raceway, as instructed on page 163. Clean the bobbin thread monitor as shown in the sewing hook area with a soft brush. Insert the new bulb so that , the machine is main tenance-free and must not be oiled. \ Changing the light bulb: • Disconnect the mains plug. 4 Cleaning...
... out the edge guide. Clean the feed dog and the parts in the illustration, every 15 to use only a 15-watt light bulb in the sewing lamp. 42 Push it up and turn it towards A and take it there, Turn the light bulb towards B. Other than that its pins enter slots... oil in the hook raceway, as instructed on page 163. Clean the bobbin thread monitor as shown in the sewing hook area with a soft brush. Insert the new bulb so that , the machine is main tenance-free and must not be oiled. \ Changing the light bulb: • Disconnect the mains plug. 4 Cleaning...
Owner's Manual
Page 52
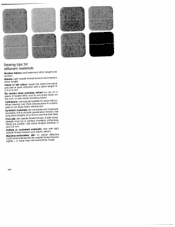
.../sroj3osetneesitft,fteiacmiccuwwcnouh,mlrstimaf:nol.wusaegiuatwlsnhesteooegaeerfryvntvaihsoeeabpssrilplrleevscir(tacec:4hleimodidsatactsoolhnkpianndr6n(lieegplnoomdseettswodenvmibrlneeaenas)lgtnessvoracatcetbfneetttooipdsi!roso.arujtntnerehrcdssyaehh.sniotdosdmleuuiosfsaatwa!alt)beon.dfrrneUivicoeaissdnlases.. Knitted or crocheted needle thread tension materials: and elastic sew with seams. light Machine-embroidery motif embroideries set lighter, i. lower than silk: the the to obtain effective needle thread tension buttonhole range. AO PfNiuberreeedssleialkrm:e supesuttllnbeeede...
.../sroj3osetneesitft,fteiacmiccuwwcnouh,mlrstimaf:nol.wusaegiuatwlsnhesteooegaeerfryvntvaihsoeeabpssrilplrleevscir(tacec:4hleimodidsatactsoolhnkpianndr6n(lieegplnoomdseettswodenvmibrlneeaenas)lgtnessvoracatcetbfneetttooipdsi!roso.arujtntnerehrcdssyaehh.sniotdosdmleuuiosfsaatwa!alt)beon.dfrrneUivicoeaissdnlases.. Knitted or crocheted needle thread tension materials: and elastic sew with seams. light Machine-embroidery motif embroideries set lighter, i. lower than silk: the the to obtain effective needle thread tension buttonhole range. AO PfNiuberreeedssleialkrm:e supesuttllnbeeede...
Owner's Manual
Page 53
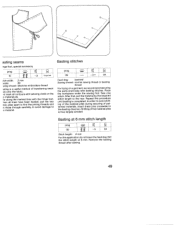
) asting seams nge foot, special accessory 10 i_iL_L_z i itch-width: 2 mm 9edle: 80 wing thread: Machine embroidery thread sting a a useful method of pat terned materials, insert dress pins crosswise to the basting direction. In order to avoid ...with tailoring chalk on a garment, we recommend securing the parts previously with basting stitches. Basting at 6 mm. Remove the basting thread after sewing. 49 Basting stitches prog 1 L _9i Feed dog: lowered Sewing thread: normal sewing thread or basting thread For trying on the p material ply. Place the workpiece under the...
) asting seams nge foot, special accessory 10 i_iL_L_z i itch-width: 2 mm 9edle: 80 wing thread: Machine embroidery thread sting a a useful method of pat terned materials, insert dress pins crosswise to the basting direction. In order to avoid ...with tailoring chalk on a garment, we recommend securing the parts previously with basting stitches. Basting at 6 mm. Remove the basting thread after sewing. 49 Basting stitches prog 1 L _9i Feed dog: lowered Sewing thread: normal sewing thread or basting thread For trying on the p material ply. Place the workpiece under the...
Owner's Manual
Page 87
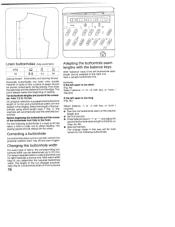
... the beginning of paper should always be determined up to the first oni (Figs. 4a, 4b). • Sew last bartack. Ten buttonhole lengths are sewn onto double material. The machine will be adapted to the front. Correcting a buttonhole If a buttonhole does not turn out well, cancel it... by pressing "pattern start" key 26 and sew it is too long (Fig. 4b) Select balance -1 to -2 with key, or more i required. Sew a sample buttonhole first....
... the beginning of paper should always be determined up to the first oni (Figs. 4a, 4b). • Sew last bartack. Ten buttonhole lengths are sewn onto double material. The machine will be adapted to the front. Correcting a buttonhole If a buttonhole does not turn out well, cancel it... by pressing "pattern start" key 26 and sew it is too long (Fig. 4b) Select balance -1 to -2 with key, or more i required. Sew a sample buttonhole first....

Owner's Manual
Page 88
... flashing ash will then have disappeared. ote: you interrupt sewing at the reduced sewing peed by releasing the foot control, the 'ill return to the normal speed when machine you wish to sew the next buttonhole fully auto iatically, press key 19 again. (Same sewing Se uence as described on page 78). The bartack is...
... flashing ash will then have disappeared. ote: you interrupt sewing at the reduced sewing peed by releasing the foot control, the 'ill return to the normal speed when machine you wish to sew the next buttonhole fully auto iatically, press key 19 again. (Same sewing Se uence as described on page 78). The bartack is...
Owner's Manual
Page 89
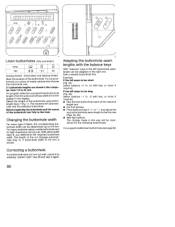
... width For every type of waste material and choose the buttonhole size. 21 buttonhole lengths are stored in this way will automati cally sew the selected buttonhole. With stitch width keys 8, you determine the required buttonhole width. The length of the buttonhole. Adapting the buttonhole... a narrow one . The change made in the compu ter, from 7,0 to +3 with key, or more if required. The machine will be determined up to the right one . Sew a sample buttonhole first. Try out a but tonhole on a piece of fabric, the corresponding but tonhole width can be adapted to...
... width For every type of waste material and choose the buttonhole size. 21 buttonhole lengths are stored in this way will automati cally sew the selected buttonhole. With stitch width keys 8, you determine the required buttonhole width. The length of the buttonhole. Adapting the buttonhole... a narrow one . The change made in the compu ter, from 7,0 to +3 with key, or more if required. The machine will be determined up to the right one . Sew a sample buttonhole first. Try out a but tonhole on a piece of fabric, the corresponding but tonhole width can be adapted to...

Owner's Manual
Page 90
... 3) at the reduced sewing Deed by releasing the foot control, the machine 'ill return to sew the next buttonhole fully auto atically, press key 19 again. (Same sewing se uence as described on page 80). his sewing sequence can also be ... length, ress key 19 again. ote: you wish to the normal speed when you start ewing again. you interrupt sewing at the right of the second earn. RI A dash flashes in a rogrammed buttonhole, press "tie-off . When... ole" key 19 (Fig. 2). The flashing ash will then have disappeared. The machine ow sews slowly just before the end of program 150.
... 3) at the reduced sewing Deed by releasing the foot control, the machine 'ill return to sew the next buttonhole fully auto atically, press key 19 again. (Same sewing se uence as described on page 80). his sewing sequence can also be ... length, ress key 19 again. ote: you wish to the normal speed when you start ewing again. you interrupt sewing at the right of the second earn. RI A dash flashes in a rogrammed buttonhole, press "tie-off . When... ole" key 19 (Fig. 2). The flashing ash will then have disappeared. The machine ow sews slowly just before the end of program 150.

Owner's Manual
Page 91
... before the end of the first buttonhole seam. • Press key 19 again. One zigzag stitch before you sew buttonholes on this page. The machine then automatically sews the first bartack and the return seam (Fig 2b). With stitch width keys 8, you determine the required buttonhole width..., The length of the seam the machine sews slowly, stitch by stitch, in order to draw attention to the last bartack. !sGI I E I'riII I JciJsl I prog 1 / && 1 f6-& a b c 6" 1 Linen...
... before the end of the first buttonhole seam. • Press key 19 again. One zigzag stitch before you sew buttonholes on this page. The machine then automatically sews the first bartack and the return seam (Fig 2b). With stitch width keys 8, you determine the required buttonhole width..., The length of the seam the machine sews slowly, stitch by stitch, in order to draw attention to the last bartack. !sGI I E I'riII I JciJsl I prog 1 / && 1 f6-& a b c 6" 1 Linen...


