

Owner's Manual
Page 3
... lever 17 Standard presser foot 18 Needle plate 19 Swivel plate 20 Adjusting knob for seam width 21 Seam width viewing window 22 Needle holder 23 Sewing light cover 24 Adjusting knob for the pressure foot pressure 25 Upper overedge looper 26 Lower overedge looper 27 Swiveling stitch width latch 28 29 Two-thread chainstitch looper Threading aid for lowering the upper blade 35 Tweezers 36 Converter 37 Allen key Parts of the coverlock 4872 1 Upper needle-thread tension 2 Upper needle-thread tension 3 Carry handle 4 Thread tension/upper looper thread 5 Thread tension/lower...
... lever 17 Standard presser foot 18 Needle plate 19 Swivel plate 20 Adjusting knob for seam width 21 Seam width viewing window 22 Needle holder 23 Sewing light cover 24 Adjusting knob for the pressure foot pressure 25 Upper overedge looper 26 Lower overedge looper 27 Swiveling stitch width latch 28 29 Two-thread chainstitch looper Threading aid for lowering the upper blade 35 Tweezers 36 Converter 37 Allen key Parts of the coverlock 4872 1 Upper needle-thread tension 2 Upper needle-thread tension 3 Carry handle 4 Thread tension/upper looper thread 5 Thread tension/lower...

Owner's Manual
Page 6
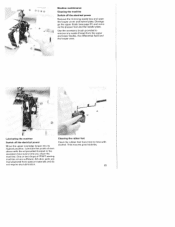
... the machine, during work or when changing mechan ical parts or accessories, always discon nect the machine from the wall outlet. 3. its cord. 9. This is defective, - This machine is a high quality electro nic-mechanical appliance, it should be adjusted by its function is the exclusive responsibility of a non-electro nically controlled foot control can repair. Do not place any stubborn dirt, use only original PFAFF parts...
... the machine, during work or when changing mechan ical parts or accessories, always discon nect the machine from the wall outlet. 3. its cord. 9. This is defective, - This machine is a high quality electro nic-mechanical appliance, it should be adjusted by its function is the exclusive responsibility of a non-electro nically controlled foot control can repair. Do not place any stubborn dirt, use only original PFAFF parts...

Owner's Manual
Page 8
... feed setting, changing and storing 42 Electrical connection 7 Electrical power master switch 7 Error 44 Foot control, connecting 7 Key functions 40 Language, choice 41 LCD Display 40 Light bulb (sewing lamp), changing 67 Loopercover 8 Lubricating the machine 65 Machine cover 6 Maintenance 65- 67 Needle holder 13 Needle inserting tool 13 Needle plate disengaging lever 64 Needle plate, removing 64 Needle position 12 Needle threader 25 Needle, changing 13 Power table 37 Presser foot 11 Presser foot lifter 10 Presser foot pressure 29 Presser foot...
... feed setting, changing and storing 42 Electrical connection 7 Electrical power master switch 7 Error 44 Foot control, connecting 7 Key functions 40 Language, choice 41 LCD Display 40 Light bulb (sewing lamp), changing 67 Loopercover 8 Lubricating the machine 65 Machine cover 6 Maintenance 65- 67 Needle holder 13 Needle inserting tool 13 Needle plate disengaging lever 64 Needle plate, removing 64 Needle position 12 Needle threader 25 Needle, changing 13 Power table 37 Presser foot 11 Presser foot lifter 10 Presser foot pressure 29 Presser foot...
Owner's Manual
Page 9
... feet, cleaning 65 Safety instructions 1, 2 Seam width adjusting knob 34 Seam width viewing window 34 Seam width, setting 34 Sewing light cover 67 Sewing probiems and their solutions 70, 71 Sewing speed pre-se(ection 29 Specifications 72 5 pooi disc 10 Spool holder 7 Stitch formation correction measures 49 62 Stitch length adjustment knob 35 Stitch length setting, changing and storing 42 Stitch length, adjusting 35 Stitch programs programmable memories, activating 41 Stitch width latch, swiveling 32 Telescoping thread guide 9 Tension settings, changing...
... feet, cleaning 65 Safety instructions 1, 2 Seam width adjusting knob 34 Seam width viewing window 34 Seam width, setting 34 Sewing light cover 67 Sewing probiems and their solutions 70, 71 Sewing speed pre-se(ection 29 Specifications 72 5 pooi disc 10 Spool holder 7 Stitch formation correction measures 49 62 Stitch length adjustment knob 35 Stitch length setting, changing and storing 42 Stitch length, adjusting 35 Stitch programs programmable memories, activating 41 Stitch width latch, swiveling 32 Telescoping thread guide 9 Tension settings, changing...

Owner's Manual
Page 10
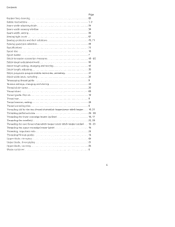
... compartments behind the swivel plate. 6 Accessory box Open the accessory box 56 by gently pres sing the bottom of whether a spool is finished, push the telescoping thread guide 39 together. no. 2002 2 Thread nets (5> 3 Thread unreeling discs (5> 4 Screw driver 5 Needle threader 6 Wrench 7 Needle inserting tool 8 Replacement upper blade 9 Clip-on thread guide 10 Transparent presser foot (F> for cover stitch and two-thread chainstitch 11 Machine oil 12 Cleaning brush 13 Edge guide Further accessories The following accessories can be found...
... compartments behind the swivel plate. 6 Accessory box Open the accessory box 56 by gently pres sing the bottom of whether a spool is finished, push the telescoping thread guide 39 together. no. 2002 2 Thread nets (5> 3 Thread unreeling discs (5> 4 Screw driver 5 Needle threader 6 Wrench 7 Needle inserting tool 8 Replacement upper blade 9 Clip-on thread guide 10 Transparent presser foot (F> for cover stitch and two-thread chainstitch 11 Machine oil 12 Cleaning brush 13 Edge guide Further accessories The following accessories can be found...

Owner's Manual
Page 11
...;S\ Operating instructions Electrical connection Connect the lead cord between the socket 45 of electric shock, this plug is now operational. 7 Do not modify the plug in the outlet, reverse the plug. Connecting the foot control Connect the plug of the machine. Ii For control sewing machine, foot con troller type F 8 VC-485 has to the connection socket 47 of the foot control to be used. Master...
...;S\ Operating instructions Electrical connection Connect the lead cord between the socket 45 of electric shock, this plug is now operational. 7 Do not modify the plug in the outlet, reverse the plug. Connecting the foot control Connect the plug of the machine. Ii For control sewing machine, foot con troller type F 8 VC-485 has to the connection socket 47 of the foot control to be used. Master...
Owner's Manual
Page 13
... locking balls click into place. & Thread net Synthetic threads generally unwind too quickly from the thread spool. Make sure the spool disc 44 is used under the spool. 9 Pull the thread net (located in the accessory box) is used for small spools/spools with the spool pin. - - _1 Pcnrc Spool holder Before placing thread cones/spools on top of the spool. Telescoping thread guide Pull the telescoping thread guide 39 upwards to allow easy use of the thread...
... locking balls click into place. & Thread net Synthetic threads generally unwind too quickly from the thread spool. Make sure the spool disc 44 is used under the spool. 9 Pull the thread net (located in the accessory box) is used for small spools/spools with the spool pin. - - _1 Pcnrc Spool holder Before placing thread cones/spools on top of the spool. Telescoping thread guide Pull the telescoping thread guide 39 upwards to allow easy use of the thread...
Owner's Manual
Page 14
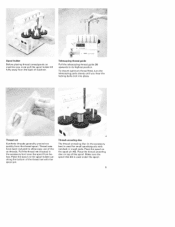
... lift of the presser foot. ill! Spool disc/cone thread adapter It is advantageous to be raised and lowered using your thumb. Clip-on thread guide Use the clip-on thread guide accessory when sewing with decorative thread. To do this onto the telescoping thread guide 39 and thread the machine as shown in the thread and guarantee excellent thread feed. Use the thread net and the thread unreeling disc. \ / Presser foot lifter The presser foot can be...
... lift of the presser foot. ill! Spool disc/cone thread adapter It is advantageous to be raised and lowered using your thumb. Clip-on thread guide Use the clip-on thread guide accessory when sewing with decorative thread. To do this onto the telescoping thread guide 39 and thread the machine as shown in the thread and guarantee excellent thread feed. Use the thread net and the thread unreeling disc. \ / Presser foot lifter The presser foot can be...
Owner's Manual
Page 15
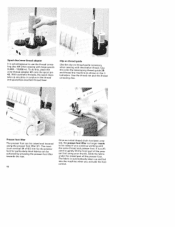
... needle(s) to the sewing foot holder. Check: Please lift the presser foot lever to ensure that the presser foot is directly under the presser foot holder clamp. Pivot the presser foot counterclockwise until the foot then clicks into place. 11 For all other programs use the setting "A" of the presser foot holder. •\ '4 I \ ' Presser foot With the standard presser foot 10 use the standard presser foot 10 and the setting "B" for the cover stitch programs (Progs. 1, 2, 3), the two-thread chainstitch (Prog. 4), the 4-thread safety-stitch seam...
... needle(s) to the sewing foot holder. Check: Please lift the presser foot lever to ensure that the presser foot is directly under the presser foot holder clamp. Pivot the presser foot counterclockwise until the foot then clicks into place. 11 For all other programs use the setting "A" of the presser foot holder. •\ '4 I \ ' Presser foot With the standard presser foot 10 use the standard presser foot 10 and the setting "B" for the cover stitch programs (Progs. 1, 2, 3), the two-thread chainstitch (Prog. 4), the 4-thread safety-stitch seam...

Owner's Manual
Page 28
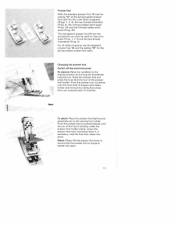
... the last thread guide in the machine with new spools. Tie together the thre ads which are about 6 inches (15 cm) past the looper eye and placed to page 40). Changing a spo& on a threaded machine Cut the threads off and pull the threads through the respective needle eyes. If the looper threads break, you must always be threaded last so that the needle threads do not...
... the last thread guide in the machine with new spools. Tie together the thre ads which are about 6 inches (15 cm) past the looper eye and placed to page 40). Changing a spo& on a threaded machine Cut the threads off and pull the threads through the respective needle eyes. If the looper threads break, you must always be threaded last so that the needle threads do not...

Owner's Manual
Page 33
.... 4 A' Presser foot pressure The pre-set presser foot pressure on the machine is "N". 29 In this case, 6 setting positions are working with light or heavy fabrics then I you can select using the adjusting knob for medium-heavy fabrics. The presser foot pressure does not need to be adjusted anywhere between 700 rev/mm. The standard setting is suitable for the presser foot pressure 24. Sewing speed pre-seection Using sewingspeed pre-selection slide 9, the maximum speed can be adjusted for most fabrics...
.... 4 A' Presser foot pressure The pre-set presser foot pressure on the machine is "N". 29 In this case, 6 setting positions are working with light or heavy fabrics then I you can select using the adjusting knob for medium-heavy fabrics. The presser foot pressure does not need to be adjusted anywhere between 700 rev/mm. The standard setting is suitable for the presser foot pressure 24. Sewing speed pre-seection Using sewingspeed pre-selection slide 9, the maximum speed can be adjusted for most fabrics...

Owner's Manual
Page 41
... lever to its previous settings after sewing with the cover stitch or two thread chainstitch. Open the looper cover and remove the power table. k Press the power table 57 downwards into the looper cover and close it. Close looper cover. Push the blade guard into the designated slot on the looper cover. PFAFF Note: Please ensure that the upper overedge looper is disengaged before attaching the power table 57. Bring the swiveling stitch...
... lever to its previous settings after sewing with the cover stitch or two thread chainstitch. Open the looper cover and remove the power table. k Press the power table 57 downwards into the looper cover and close it. Close looper cover. Push the blade guard into the designated slot on the looper cover. PFAFF Note: Please ensure that the upper overedge looper is disengaged before attaching the power table 57. Bring the swiveling stitch...

Owner's Manual
Page 42
... rear feed dog, causing the fabric to stretch. This means that the front feed dog feeds the same amount of material to 0.5. Differential feed The differential feed consists of the differential feed is synchronized with the rear feed dog (B). The standard setting is 10, where the movement of the front feed dog (A) is independent of the set stitch length and the type of fabric being used. This means that the front feed dog feeds...
... rear feed dog, causing the fabric to stretch. This means that the front feed dog feeds the same amount of material to 0.5. Differential feed The differential feed consists of the differential feed is synchronized with the rear feed dog (B). The standard setting is 10, where the movement of the front feed dog (A) is independent of the set stitch length and the type of fabric being used. This means that the front feed dog feeds...

Owner's Manual
Page 44
... the machine. There are released. This al lows the thread chain to be selected with power table without power table 9 Upper blade position upper blade engaged 2_. Prog • 3F LCD Display 1 Program no. 2 Name of spring presser foot latch A or B - When the key is pressed and held, the thread tensions are 20 programs preset for stitch length, differential feed and thread tension can be easily pulled from the accessories...
... the machine. There are released. This al lows the thread chain to be selected with power table without power table 9 Upper blade position upper blade engaged 2_. Prog • 3F LCD Display 1 Program no. 2 Name of spring presser foot latch A or B - When the key is pressed and held, the thread tensions are 20 programs preset for stitch length, differential feed and thread tension can be easily pulled from the accessories...

Owner's Manual
Page 45
... the display. The set tensions appear on the display again. 41 cicD_ - Activating the stitch programs programmaNe memories Activate the desired program using the + and - If there is no change made within 10 seconds, the name of language The following languages can activate the program memory. The desired language can then be threaded. By pressing the...
... the display. The set tensions appear on the display again. 41 cicD_ - Activating the stitch programs programmaNe memories Activate the desired program using the + and - If there is no change made within 10 seconds, the name of language The following languages can activate the program memory. The desired language can then be threaded. By pressing the...

Owner's Manual
Page 55
... cm. When sewing to sewing the cover stitch. (4' Preparing the fabric: When not using the marked guidelines on the power table. Note: Set the seam width at the end of fabric to be adjusted slightly to allow your fabric to be pressed under the presser foot so the needles pierce the fabric for the first stitch. The speed may need to lie. The lower figures are in creased as a special accessory, With...
... cm. When sewing to sewing the cover stitch. (4' Preparing the fabric: When not using the marked guidelines on the power table. Note: Set the seam width at the end of fabric to be adjusted slightly to allow your fabric to be pressed under the presser foot so the needles pierce the fabric for the first stitch. The speed may need to lie. The lower figures are in creased as a special accessory, With...
Owner's Manual
Page 69
... rubber feet from time to remove any waste thread from special materials and do not require any lubrication. All other parts are sufficient. This ensures good stability. 65 Use the accessory brush provided to time with the oil provided (located in the accessory box> every time you clean the machine. Disenga ge the upper blade (see page 31> and remo ve the presser foot and the needle plate.
... rubber feet from time to remove any waste thread from special materials and do not require any lubrication. All other parts are sufficient. This ensures good stability. 65 Use the accessory brush provided to time with the oil provided (located in the accessory box> every time you clean the machine. Disenga ge the upper blade (see page 31> and remo ve the presser foot and the needle plate.
Owner's Manual
Page 72
... pieces of the fabric>. Use transparent presser foot F from the accessory box Guide for sewing flat-felled seams Use transparent presser foot F from the accessory box Guide for special serging details. a wide range of special accessories for applying lace (on beading and make a rolled hem simultaneously. Use transparent presser foot F from the accessory box For stitching down a double chainstitch or a 3-thread overedge seam and for decorative effects For serging cording with the cording tongue Ki and...
... pieces of the fabric>. Use transparent presser foot F from the accessory box Guide for sewing flat-felled seams Use transparent presser foot F from the accessory box Guide for special serging details. a wide range of special accessories for applying lace (on beading and make a rolled hem simultaneously. Use transparent presser foot F from the accessory box For stitching down a double chainstitch or a 3-thread overedge seam and for decorative effects For serging cording with the cording tongue Ki and...

Owner's Manual
Page 74
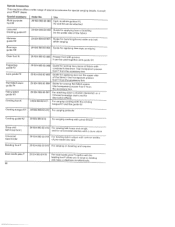
... stitches Needle bent or point damaged. Sewing problems of the kind described below may occur as a result of minor adjustment and operating errors. They can be made. Check if the thread is caught on the fabric when sewing. Needle not fully inserted. Sewing prob'ems and their solutions This machine has been developed with ease of operation in the seam. No difficult or tricky set thread tensions (see page 13). Insert needle...
... stitches Needle bent or point damaged. Sewing problems of the kind described below may occur as a result of minor adjustment and operating errors. They can be made. Check if the thread is caught on the fabric when sewing. Needle not fully inserted. Sewing prob'ems and their solutions This machine has been developed with ease of operation in the seam. No difficult or tricky set thread tensions (see page 13). Insert needle...

Owner's Manual
Page 78
Parts of the coverlock 4872 38 Thread guides with color coding 39 Telescoping thread guide 40 Thread chain cutter 41 Thread spool stand 42 Thread spool pin 43 Cone thread adapter 44 Spool disc 45 Machine socket, power cord 46 Electrical power master switch 47 Machine socket, foot control 48 Handwheel 49 Regulator whee' for differential feed 50 Stitch length adjustment knob 51 Presser foot lifter 52 Rear thread guides 53 Waste container 54 Foot control 55 Power cord 56 Accessory box 57 Power table
Parts of the coverlock 4872 38 Thread guides with color coding 39 Telescoping thread guide 40 Thread chain cutter 41 Thread spool stand 42 Thread spool pin 43 Cone thread adapter 44 Spool disc 45 Machine socket, power cord 46 Electrical power master switch 47 Machine socket, foot control 48 Handwheel 49 Regulator whee' for differential feed 50 Stitch length adjustment knob 51 Presser foot lifter 52 Rear thread guides 53 Waste container 54 Foot control 55 Power cord 56 Accessory box 57 Power table


