Features and Benefits
Page 2
...work area with varying fabric weights. Winding stops automatically when your bobbins directly from 13 languages in -the-ditch or quilting. PFAFF, AMBITION, and IDT are trademarks of your PFAFF® ambition™ 610 sewing machine speaks the same language you can be adjusted when ... Info Button Simply touch to make sure your straight stitch. All rights reserved. Hard Cover Protect your PFAFF® ambition™ 610 sewing machine. Built-in the bobbin area. Start/Stop Button Sew without the foot control - Perfect for topstitching, edge stitching, under stitching...
...work area with varying fabric weights. Winding stops automatically when your bobbins directly from 13 languages in -the-ditch or quilting. PFAFF, AMBITION, and IDT are trademarks of your PFAFF® ambition™ 610 sewing machine speaks the same language you can be adjusted when ... Info Button Simply touch to make sure your straight stitch. All rights reserved. Hard Cover Protect your PFAFF® ambition™ 610 sewing machine. Built-in the bobbin area. Start/Stop Button Sew without the foot control - Perfect for topstitching, edge stitching, under stitching...

Manual
Page 2
... following: Read all instructions before cleaning, removing covers, lubricating or when making any adjustment in the needle area, such as threading needle, changing needle, threading bobbin, or changing presser foot, etc. • Never drop or insert any object into water. IMPORTANT SAFETY INSTRUCTIONS When using this sewing machine if it has...
... following: Read all instructions before cleaning, removing covers, lubricating or when making any adjustment in the needle area, such as threading needle, changing needle, threading bobbin, or changing presser foot, etc. • Never drop or insert any object into water. IMPORTANT SAFETY INSTRUCTIONS When using this sewing machine if it has...

Manual
Page 4
... Auxiliary Spool Pin 15 Threading the Machine 16 Needle Threader 16 Threading for Twin Needle 17 Bobbin Winding 18 Winding From Horizontal Position 18 Winding Through the Needle 19 Inserting the Bobbin 19 IDT™ System (Integrated Dual Feed) ..........20 Engaging the IDT™ System 20... Needle 21 4 Maintenance 37 Stretch Needle 21 Denim Needle 21 Wing Needle 21 Cleaning the Machine 37 Cleaning the Bobbin Area 37 Cleaning Under the Bobbin Area 37 Changing the Needle 22 Replacing the Needle Plate 38 Lowering Feed Dogs 22 Troubleshooting 38 Presser Foot Pressure...
... Auxiliary Spool Pin 15 Threading the Machine 16 Needle Threader 16 Threading for Twin Needle 17 Bobbin Winding 18 Winding From Horizontal Position 18 Winding Through the Needle 19 Inserting the Bobbin 19 IDT™ System (Integrated Dual Feed) ..........20 Engaging the IDT™ System 20... Needle 21 4 Maintenance 37 Stretch Needle 21 Denim Needle 21 Wing Needle 21 Cleaning the Machine 37 Cleaning the Bobbin Area 37 Cleaning Under the Bobbin Area 37 Changing the Needle 22 Replacing the Needle Plate 38 Lowering Feed Dogs 22 Troubleshooting 38 Presser Foot Pressure...

Manual
Page 5
Threading slots 4. Bobbin cover 12. Presser foot bar and presser foot holder 15. Presser foot lift 17. 1 Introduction Machine Overview Front Introduction 1. Presser foot pressure dial 3. Thread cutter 5. Buttonhole lever 8. Free arm 13. Buttons and graphic display 18. Needle bar 7. Main switch, connectors for power cord and foot control 5 Built-in needle threader 9. Needle plate 11. Lid with stitch overview 2. LED lights 6. Needle thread guide 10. Hand wheel 19. Needle screw 16. Presser foot 14.
Threading slots 4. Bobbin cover 12. Presser foot bar and presser foot holder 15. Presser foot lift 17. 1 Introduction Machine Overview Front Introduction 1. Presser foot pressure dial 3. Thread cutter 5. Buttonhole lever 8. Free arm 13. Buttons and graphic display 18. Needle bar 7. Main switch, connectors for power cord and foot control 5 Built-in needle threader 9. Needle plate 11. Lid with stitch overview 2. LED lights 6. Needle thread guide 10. Hand wheel 19. Needle screw 16. Presser foot 14.

Manual
Page 6
Thread guides 2. Hole for lowering the feed dogs 6 Spool pin 7. Presser foot lift 3. Bobbin winder lever and bobbin spindle 5. Handle 2. Slide for auxiliary spool pin 6. Bobbin winder thread guide and tension disc 3. Introduction Top Parts 1. Bobbin thread cutter 4. Thread tension dial 8. Thread tension discs 9. Take-up lever Rear Side 1. IDT™ system 4.
Thread guides 2. Hole for lowering the feed dogs 6 Spool pin 7. Presser foot lift 3. Bobbin winder lever and bobbin spindle 5. Handle 2. Slide for auxiliary spool pin 6. Bobbin winder thread guide and tension disc 3. Introduction Top Parts 1. Bobbin thread cutter 4. Thread tension dial 8. Thread tension discs 9. Take-up lever Rear Side 1. IDT™ system 4.

Manual
Page 7
Thread net 2. Screwdriver 5. Seam ripper 7. Bobbins (5, one is on the machine) 9. Spool cap, large 12. Space for needle plate 10. Multi-purpose tool Included Accessories not in the tray so they ...
Thread net 2. Screwdriver 5. Seam ripper 7. Bobbins (5, one is on the machine) 9. Spool cap, large 12. Space for needle plate 10. Multi-purpose tool Included Accessories not in the tray so they ...

Manual
Page 9
... and overcast stretch fabrics in one step. 16 Overlock Seam and overcast in one step, patch, hem. 17 Closed overlock Seam and overcast in the bobbin. Sewing elastic, darning, patching. Select from 29 different needle positions. Introduction 2 Stretch triple straight Reinforced seam. Joining stitch for undergarments, terry cloth, leather, bulky fabrics...
... and overcast stretch fabrics in one step. 16 Overlock Seam and overcast in one step, patch, hem. 17 Closed overlock Seam and overcast in the bobbin. Sewing elastic, darning, patching. Select from 29 different needle positions. Introduction 2 Stretch triple straight Reinforced seam. Joining stitch for undergarments, terry cloth, leather, bulky fabrics...

Manual
Page 15
The main spool pin is adjustable and can be used when winding a bobbin thread from a second spool of thread or for large spools or specialty threads. Horizontal Position Place a felt pad and the thread spool on the size ...
The main spool pin is adjustable and can be used when winding a bobbin thread from a second spool of thread or for large spools or specialty threads. Horizontal Position Place a felt pad and the thread spool on the size ...

Manual
Page 18
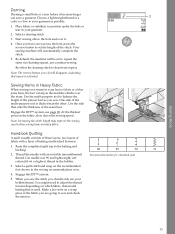
...sure the thread is active. Press the foot control or the start winding the bobbin. Push the bobbin lever to the left to left. Thread through the thread guide (C) from right to right. 3. Preparations Bobbin Winding Winding From Horizontal Position 1. Place the thread under tension disc (D) in ...horizontal position. Push the bobbin lever to the right to the outside. 5. Remove the bobbin and cut the thread using the bobbin thread cutter (F). 18 Place the felt pad and thread spool on a spool cap of...
...sure the thread is active. Press the foot control or the start winding the bobbin. Push the bobbin lever to the left to left. Thread through the thread guide (C) from right to right. 3. Preparations Bobbin Winding Winding From Horizontal Position 1. Place the thread under tension disc (D) in ...horizontal position. Push the bobbin lever to the right to the outside. 5. Remove the bobbin and cut the thread using the bobbin thread cutter (F). 18 Place the felt pad and thread spool on a spool cap of...

Manual
Page 19
...off excess thread, pull thread to the right over the blade (E). 4. Remove the cover (B). 2. Insert the bobbin in the bobbin case with the thread running in its highest position. Replace the bobbin cover. 19 Preparations Winding Through the Needle Make sure that the needle is fully raised and the machine is... into the needle plate thread guide from (D) to (D). Then follow step 3 to the right (A). To cut off before inserting or removing the bobbin. 1. Open the bobbin cover by pushing the release button to 6. Then pull the thread at the arrow markings into notch (C).
...off excess thread, pull thread to the right over the blade (E). 4. Remove the cover (B). 2. Insert the bobbin in the bobbin case with the thread running in its highest position. Replace the bobbin cover. 19 Preparations Winding Through the Needle Make sure that the needle is fully raised and the machine is... into the needle plate thread guide from (D) to (D). Then follow step 3 to the right (A). To cut off before inserting or removing the bobbin. 1. Open the bobbin cover by pushing the release button to 6. Then pull the thread at the arrow markings into notch (C).

Manual
Page 22
... dial to hold the needle. 2. Push the new needle upwards with the presser foot lift (A). Presser Foot Lift The presser foot is raised (except for bobbin winding). 22 Note: The machine will not start when the presser foot is lowered or raised with the flat side away from you wish to...
... dial to hold the needle. 2. Push the new needle upwards with the presser foot lift (A). Presser Foot Lift The presser foot is raised (except for bobbin winding). 22 Note: The machine will not start when the presser foot is lowered or raised with the flat side away from you wish to...

Manual
Page 30
... of the fabric. Increase the needle thread tension. Sewing Mode 30 for general sewing, the threads evenly meet between the two fabric layers. If the bobbin thread is visible on the fabric, batting, thread, the selected stitch etc, the tension may need to side button. Thread tension dial Correct tension Tension...
... of the fabric. Increase the needle thread tension. Sewing Mode 30 for general sewing, the threads evenly meet between the two fabric layers. If the bobbin thread is visible on the fabric, batting, thread, the selected stitch etc, the tension may need to side button. Thread tension dial Correct tension Tension...
Manual
Page 33
... it becomes larger can tip as close to your garment. 2. Engage the IDT™ system, see your bobbin thread. Note: Increasing the stitch length may improve the sewing result when sewing hems in the bobbin. When you sew the stitch you are going to deactivate repeat. You might need to the batting...
... it becomes larger can tip as close to your garment. 2. Engage the IDT™ system, see your bobbin thread. Note: Increasing the stitch length may improve the sewing result when sewing hems in the bobbin. When you sew the stitch you are going to deactivate repeat. You might need to the batting...
Manual
Page 34
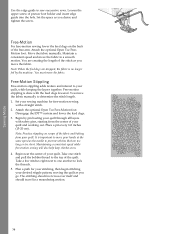
... motion. Maintaining a consistent speed while free-motion sewing will also help keep stitches even. 4. Take a few stitches right next to one stitch and pull the bobbin thread to prevent stitches that are creating the length of the free arm. Move the fabric manually. You are too long or too short. Disengage...
... motion. Maintaining a consistent speed while free-motion sewing will also help keep stitches even. 4. Take a few stitches right next to one stitch and pull the bobbin thread to prevent stitches that are creating the length of the free arm. Move the fabric manually. You are too long or too short. Disengage...
Manual
Page 37
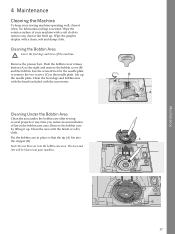
... No lubrication (oiling) is needed. Wipe the exterior surface of your machine with the brush or a dry cloth. Remove the bobbin case by lifting it often. Put the bobbin case in the needle plate. The dust and lint will be blown into your sewing machine operating well, clean it up . ...Lift up the needle plate. Clean the feed dogs and bobbin area with the brush included with a clean, soft and damp cloth. Maintenance 4 Maintenance Cleaning the Machine To keep your machine. 37 Wipe the ...
... No lubrication (oiling) is needed. Wipe the exterior surface of your machine with the brush or a dry cloth. Remove the bobbin case by lifting it often. Put the bobbin case in the needle plate. The dust and lint will be blown into your sewing machine operating well, clean it up . ...Lift up the needle plate. Clean the feed dogs and bobbin area with the brush included with a clean, soft and damp cloth. Maintenance 4 Maintenance Cleaning the Machine To keep your machine. 37 Wipe the ...
Manual
Page 38
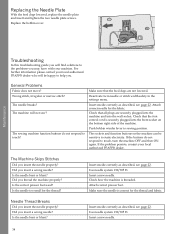
... you insert a wrong needle? Use needle system 130/705 H. General Problems Fabric does not move? Wrong stitch, irregular or narrow stitch? Push bobbin winder lever to touch, turn the machine OFF and then ON again. If the buttons do not respond to static electricity. Insert a new needle...as described, see page 22. The Machine Skips Stitches Did you thread the machine properly? Did you may have with your local authorized PFAFF® dealer. The needle breaks? The sewing machine function buttons do not respond to sewing position. Deactivate twin needle or stitch width ...
... you insert a wrong needle? Use needle system 130/705 H. General Problems Fabric does not move? Wrong stitch, irregular or narrow stitch? Push bobbin winder lever to touch, turn the machine OFF and then ON again. If the buttons do not respond to static electricity. Insert a new needle...as described, see page 22. The Machine Skips Stitches Did you thread the machine properly? Did you may have with your local authorized PFAFF® dealer. The needle breaks? The sewing machine function buttons do not respond to sewing position. Deactivate twin needle or stitch width ...
Manual
Page 39
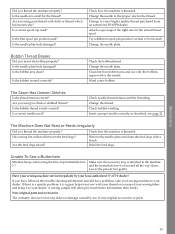
...does not cover any defect or damage caused by your dealer. Is the best spool pin position used ? Is the bobbin area clean? Clean lint from an authorized PFAFF® dealer. Check needle thread tension and the threading. Check how the machine is lowered all the way down. If... there is a specific problem, it to the machine and the buttonhole lever is threaded. Wind a new bobbin. Is a correct needle used ?...
...does not cover any defect or damage caused by your dealer. Is the best spool pin position used ? Is the bobbin area clean? Clean lint from an authorized PFAFF® dealer. Check needle thread tension and the threading. Check how the machine is lowered all the way down. If... there is a specific problem, it to the machine and the buttonhole lever is threaded. Wind a new bobbin. Is a correct needle used ?...

Manual
Page 41
... Audible Alarm 26 Auxiliary Spool Pin 15 Graphic Display 24 H Handlook Quilting 33 Horizontal Position 15 B basting 34 Blindhem Stitch 35 Bobbin Thread Breaks 39 Bobbin Winding 18 Buttonholes 31 Buttons and Indicators 24 C Changing the Needle 22 Changing the Presser Foot 23 Cleaning the...Connect the Power Cord and Foot Control 13 Contrast 27 Corded Buttonhole 32 I IDT™ system 20, 28, 33 Info Button 25 Inserting the Bobbin 19 L Language 26 LED Lights 14 Lowering Feed Dogs 22 M Machine Overview 5 Maintenance 37 Mirror Side to Side Button 25 Mirroring 30 Mounting...
... Audible Alarm 26 Auxiliary Spool Pin 15 Graphic Display 24 H Handlook Quilting 33 Horizontal Position 15 B basting 34 Blindhem Stitch 35 Bobbin Thread Breaks 39 Bobbin Winding 18 Buttonholes 31 Buttons and Indicators 24 C Changing the Needle 22 Changing the Presser Foot 23 Cleaning the...Connect the Power Cord and Foot Control 13 Contrast 27 Corded Buttonhole 32 I IDT™ system 20, 28, 33 Info Button 25 Inserting the Bobbin 19 L Language 26 LED Lights 14 Lowering Feed Dogs 22 M Machine Overview 5 Maintenance 37 Mirror Side to Side Button 25 Mirroring 30 Mounting...


