
Owner's Manual
Page 4
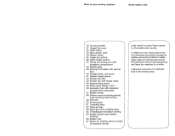
... holder with screw 41 Needle thread tension 42 Presser bar lifter 43 Presser bar with thread cutter 44 Reverse-feed control 45 Stitch chart (Model 1027) 46 Accessory box with accessory compartment underneath 47 Bobbin winder 48 Free arm cover (enclosing sewing hook and drop-feed control) 49 Free arm ...with unreeling discs 54 Threading slot for bobbin winding 55 Bobbin tension stud (bobbin winding) 56 Bobbin rack 57 Space for a while. c) Be sure to use only a 15-watt light bulb in the sewing lamp. Parts of customer service a) Be careful to avoid finger injuries by the needle when sewing.
... holder with screw 41 Needle thread tension 42 Presser bar lifter 43 Presser bar with thread cutter 44 Reverse-feed control 45 Stitch chart (Model 1027) 46 Accessory box with accessory compartment underneath 47 Bobbin winder 48 Free arm cover (enclosing sewing hook and drop-feed control) 49 Free arm ...with unreeling discs 54 Threading slot for bobbin winding 55 Bobbin tension stud (bobbin winding) 56 Bobbin rack 57 Space for a while. c) Be sure to use only a 15-watt light bulb in the sewing lamp. Parts of customer service a) Be careful to avoid finger injuries by the needle when sewing.
Owner's Manual
Page 8
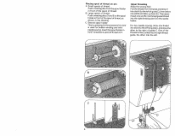
... guide C), from the spool and draw it back into slot B, into thread guide 50 and into slot Ato the left . 4 C Second spool holder: This is used for bobbin winding and twinneedle sewing. Upper threading Raise the sewing foot. Then draw it into slot A (to the right of guide C. For two-needle...
... guide C), from the spool and draw it back into slot B, into thread guide 50 and into slot Ato the left . 4 C Second spool holder: This is used for bobbin winding and twinneedle sewing. Upper threading Raise the sewing foot. Then draw it into slot A (to the right of guide C. For two-needle...
Owner's Manual
Page 16
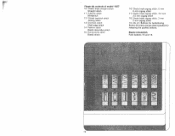
Finger-tip controls of model 1027 10 Elastic triple straight stitch Straight stitch 11 Pullover stitch Blindstitch 1 2 Closed overlock stitch Joining stitch 1 3 Overlock stitch Shell-edge stitch 14 Feather stitch Elastic ... triple zigzag stitch, 3.5 mm 3.5-mm zigzag stitch 1 8 Elastic triple zigzag stitch, 2 mm 2-mm zigzag stitch 19, 20, 21: Buttons for buttonholing Button 20 is also used as clearing button for releasing the pushed buttons. Elastic blindstitch Push buttons 15 and 16.
Finger-tip controls of model 1027 10 Elastic triple straight stitch Straight stitch 11 Pullover stitch Blindstitch 1 2 Closed overlock stitch Joining stitch 1 3 Overlock stitch Shell-edge stitch 14 Feather stitch Elastic ... triple zigzag stitch, 3.5 mm 3.5-mm zigzag stitch 1 8 Elastic triple zigzag stitch, 2 mm 2-mm zigzag stitch 19, 20, 21: Buttons for buttonholing Button 20 is also used as clearing button for releasing the pushed buttons. Elastic blindstitch Push buttons 15 and 16.

Owner's Manual
Page 17
I 1 6 Elastic triple zigzag stitch, 5 mm 5-mm zigzag stitch 1 7 Elastic triple zigzag stitch, 3.5 mm 3.5-mm zigzag stitch 1 8 Elastic triple zigzag stitch, 2 mm 2-mm zigzag stitch 19, 20, 21: Buttons for buttonholing Button 20 is also used as clearing button for releasing the pushed buttons. Finger-tip controls of model 1025 10 Elastic triple straight stitch Straight stitch 1 3 Overlock stitch Shell-edge stitch 14 Feather stitch Elastic decorative stitch 1 5 Honeycomb stitch Elastic stitch I 13 Elastic blindstitch Push buttons 15 and 16.
I 1 6 Elastic triple zigzag stitch, 5 mm 5-mm zigzag stitch 1 7 Elastic triple zigzag stitch, 3.5 mm 3.5-mm zigzag stitch 1 8 Elastic triple zigzag stitch, 2 mm 2-mm zigzag stitch 19, 20, 21: Buttons for buttonholing Button 20 is also used as clearing button for releasing the pushed buttons. Finger-tip controls of model 1025 10 Elastic triple straight stitch Straight stitch 1 3 Overlock stitch Shell-edge stitch 14 Feather stitch Elastic decorative stitch 1 5 Honeycomb stitch Elastic stitch I 13 Elastic blindstitch Push buttons 15 and 16.
Owner's Manual
Page 20
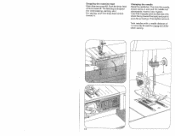
Then hold the needle, loosen screw A and pull the needle out downwards. Changing the needle Raise the needle bar. Then tighten screw A. Twin needles with the flat side of 1.4mm may be used for embroidering, darning, etc.) For sewing, push the drop-feed control toward A. The feed dog is dropped (for zigzag and utility stitch sewing. 16 Insert a new System 1 30/705 H needle (with a needle distance of its shank facing toward B. Dropping the machine feed Open free arm cover 48. Push the drop-feed control toward the back) and push it up as far as it will go.
Then hold the needle, loosen screw A and pull the needle out downwards. Changing the needle Raise the needle bar. Then tighten screw A. Twin needles with the flat side of 1.4mm may be used for embroidering, darning, etc.) For sewing, push the drop-feed control toward A. The feed dog is dropped (for zigzag and utility stitch sewing. 16 Insert a new System 1 30/705 H needle (with a needle distance of its shank facing toward B. Dropping the machine feed Open free arm cover 48. Push the drop-feed control toward the back) and push it up as far as it will go.

Owner's Manual
Page 21
When attaching a sewing foot make sure stud B enters slot C. Screw F serves to secure the sewing foot holder on the presser bar. 17 Changing the sewing foot To release the sewing foot push the red button A. Lower presser bar lifter 42 and at the same time reposition the sewing foot so that stud B fits in place with your left hand. Place the sewing foot under the sewing foot holder and hold it in slot C. Hole E and screw Dare used for attaching an edge guide.
When attaching a sewing foot make sure stud B enters slot C. Screw F serves to secure the sewing foot holder on the presser bar. 17 Changing the sewing foot To release the sewing foot push the red button A. Lower presser bar lifter 42 and at the same time reposition the sewing foot so that stud B fits in place with your left hand. Place the sewing foot under the sewing foot holder and hold it in slot C. Hole E and screw Dare used for attaching an edge guide.
Owner's Manual
Page 26
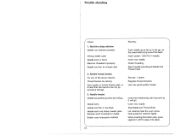
... 1 30/705 H needle. See par. 1 above reasons. Regulate thread tensions. Insert new needle. Machine threaded improperly. Bobbin case improperly inserted. Use only good-quality thread. When inserting the bobbin case, press against it until it will go . Needle bent or blunt. Thread tension too strong....as far as it will go. Only guide the material lightly. Machine skips stitches Needle not inserted correctly. Needle too thin for thread used. 2. Needle thread breaks For any of the above . Remedy: Push needle up as far as it snaps into place. 22 Insert ...
... 1 30/705 H needle. See par. 1 above reasons. Regulate thread tensions. Insert new needle. Machine threaded improperly. Bobbin case improperly inserted. Use only good-quality thread. When inserting the bobbin case, press against it until it will go . Needle bent or blunt. Thread tension too strong....as far as it will go. Only guide the material lightly. Machine skips stitches Needle not inserted correctly. Needle too thin for thread used. 2. Needle thread breaks For any of the above . Remedy: Push needle up as far as it snaps into place. 22 Insert ...
Owner's Manual
Page 27
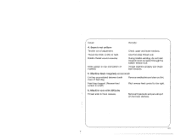
... bobbin tension stud. During bobbin winding, do not hold thread in hook raceway. Seam is at all Lint has accumulated between tooth rows of adjustment. Use first-class thread only. Machine feeds irregularly or not at left.) Flick reverse-feed control to the right. 6.
... bobbin tension stud. During bobbin winding, do not hold thread in hook raceway. Seam is at all Lint has accumulated between tooth rows of adjustment. Use first-class thread only. Machine feeds irregularly or not at left.) Flick reverse-feed control to the right. 6.


