
Owner's Manual
Page 2
and stretch-stitch combinations 1027 Selecting the needle position for straight stitching Droppingthemachinefeed Changing the needle Changingthesewingfoot Special sewing feet Buttonhole settings Sewing buttonholes Sewing feet Changing ... connection Foot control Placing spool of thread on pin Upper threading Threading the needle Disengaging the sewing mechanism Bobbin winding Removing bobbin case and bobbin Inserting the bobbin Inserting the bobbin case Drawing up the bobbin thread Presser bar lifter Thread cutter Thread tensions Regulating the stitch length Reverse sewing Finger-tip controls...
and stretch-stitch combinations 1027 Selecting the needle position for straight stitching Droppingthemachinefeed Changing the needle Changingthesewingfoot Special sewing feet Buttonhole settings Sewing buttonholes Sewing feet Changing ... connection Foot control Placing spool of thread on pin Upper threading Threading the needle Disengaging the sewing mechanism Bobbin winding Removing bobbin case and bobbin Inserting the bobbin Inserting the bobbin case Drawing up the bobbin thread Presser bar lifter Thread cutter Thread tensions Regulating the stitch length Reverse sewing Finger-tip controls...
Owner's Manual
Page 4
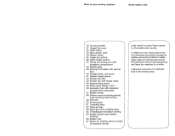
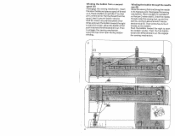
b) Make sure you unplug the power cord whenever you want to change the needle, sewing foot, bobbin or needle plate, when you want to clean and oil the machine or have to use only a 15-watt light bulb in the sewing lamp. c) ... Needle thread tension 42 Presser bar lifter 43 Presser bar with thread cutter 44 Reverse-feed control 45 Stitch chart (Model 1027) 46 Accessory box with accessory compartment underneath 47 Bobbin winder 48 Free arm cover (enclosing sewing hook and drop-feed control) 49 Free arm 50 Thread guide 51 Threading slots...
b) Make sure you unplug the power cord whenever you want to change the needle, sewing foot, bobbin or needle plate, when you want to clean and oil the machine or have to use only a 15-watt light bulb in the sewing lamp. c) ... Needle thread tension 42 Presser bar lifter 43 Presser bar with thread cutter 44 Reverse-feed control 45 Stitch chart (Model 1027) 46 Accessory box with accessory compartment underneath 47 Bobbin winder 48 Free arm cover (enclosing sewing hook and drop-feed control) 49 Free arm 50 Thread guide 51 Threading slots...
Owner's Manual
Page 8
... and draw it back into slot B, into thread guide 50 and into slot Band take-up lever 52. One of the threads is used for bobbin winding and twinneedle sewing. Pull the thread from below into the right thread guide Don the needle holder. Then draw it into slot A (to the...
... and draw it back into slot B, into thread guide 50 and into slot Band take-up lever 52. One of the threads is used for bobbin winding and twinneedle sewing. Pull the thread from below into the right thread guide Don the needle holder. Then draw it into slot A (to the...
Owner's Manual
Page 9
V Disengaging the sewing mechanism Before you . 5 After bobbin winding, tighten the knob again by turning it away from front to back. Hold the hand wheel steady and turn the stop motion knob toward you. Threading the needle Thread the needle from you start winding the bobbin, disen gage the sewing mechanism.
V Disengaging the sewing mechanism Before you . 5 After bobbin winding, tighten the knob again by turning it away from front to back. Hold the hand wheel steady and turn the stop motion knob toward you. Threading the needle Thread the needle from you start winding the bobbin, disen gage the sewing mechanism.
Owner's Manual
Page 10
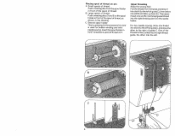
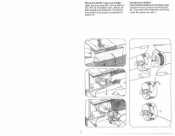
...the left and take it . Disengage the sewing mechanism. Re-engage the sewing mechanism. 6 Winding the bobbin through the needle eye (B) Raise the sewing foot and bring the needle to start the bobbin winder. Insert the spool holder and place a spool of thread on it out. Leave the top ...cover open during bobbin winding. Winding the bobbin from above around the bobbin a few turns of thread on the bobbin. Then re-engage the sewing mechanism. Draw the needle thread under the sewing foot, up and into slot...
...the left and take it . Disengage the sewing mechanism. Re-engage the sewing mechanism. 6 Winding the bobbin through the needle eye (B) Raise the sewing foot and bring the needle to start the bobbin winder. Insert the spool holder and place a spool of thread on it out. Leave the top ...cover open during bobbin winding. Winding the bobbin from above around the bobbin a few turns of thread on the bobbin. Then re-engage the sewing mechanism. Draw the needle thread under the sewing foot, up and into slot...
Owner's Manual
Page 11
Inserting the bobbin Insert the filled bobbin into eye C. 7 Then draw the thread into slot B and under the spring into the bobbin case so that the thread unreels toward the back (A>. Pull out latch K, then lift out the bobbin case, release the latch and take out the bobbin. The bobbin cannot fall out as long as you keep latch K pulled out. Removing bobbin case and bobbin Open free arm cover 48.
Inserting the bobbin Insert the filled bobbin into eye C. 7 Then draw the thread into slot B and under the spring into the bobbin case so that the thread unreels toward the back (A>. Pull out latch K, then lift out the bobbin case, release the latch and take out the bobbin. The bobbin cannot fall out as long as you keep latch K pulled out. Removing bobbin case and bobbin Open free arm cover 48.
Owner's Manual
Page 12
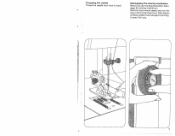
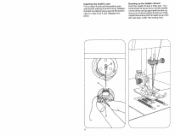
Drawing up the bobbin thread Hold the needle thread a little taut. Pull the bobbin thread out of the needle hole and lay both threads toward you until the needle movesdownand upagainandthetake-up lever is up. Release the latch and lightly press against the bobbin case to make sure it has snapped into place. Turn hand wheel 32 toward the left and back under the sewing foot. 8 Inserting the bobbin case Pull out latch K and push the bobbin case onto stud B, making sure slot A is up.
Drawing up the bobbin thread Hold the needle thread a little taut. Pull the bobbin thread out of the needle hole and lay both threads toward you until the needle movesdownand upagainandthetake-up lever is up. Release the latch and lightly press against the bobbin case to make sure it has snapped into place. Turn hand wheel 32 toward the left and back under the sewing foot. 8 Inserting the bobbin case Pull out latch K and push the bobbin case onto stud B, making sure slot A is up.
Owner's Manual
Page 14
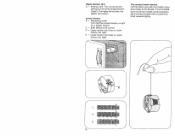
Turn it leftfora loosertension, or right for a tighter tension. E I 10 The higher the number, the tighter the tension. The correct lower tension Let the bobbin case with a full bobbin hang down by the thread. C = Both tensions are correct D = Upper tension too loose or lower tension too tight. Upper tension (41) A = Setting mark. It...
Turn it leftfora loosertension, or right for a tighter tension. E I 10 The higher the number, the tighter the tension. The correct lower tension Let the bobbin case with a full bobbin hang down by the thread. C = Both tensions are correct D = Upper tension too loose or lower tension too tight. Upper tension (41) A = Setting mark. It...
Owner's Manual
Page 26
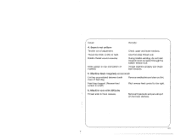
... tensions. Insert new needle and push it up as far as it will go. Wrong needle used . 2. Needle bent or blunt. Thread tension too strong. Bobbin case improperly inserted. Only guide the material lightly. Needle too thin for thread used . Needle breaks Needle not pushed up as far as it will... plate because work alone. Select needle according to Needle and Thread Chart. Use only good-quality thread. See Needle and Thread Chart. When inserting the bobbin case, press against it until it will go .
... tensions. Insert new needle and push it up as far as it will go. Wrong needle used . 2. Needle bent or blunt. Thread tension too strong. Bobbin case improperly inserted. Only guide the material lightly. Needle too thin for thread used . Needle breaks Needle not pushed up as far as it will... plate because work alone. Select needle according to Needle and Thread Chart. Use only good-quality thread. See Needle and Thread Chart. When inserting the bobbin case, press against it until it will go .
Owner's Manual
Page 27
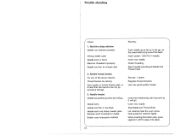
...and lower tensions. Thread machine properly and check both tensions. 5. Machine runs with difficulty Thread ends in hand, but pass it through the bobbin tension stud. Remove needle plate and clean out lint. Feed dog dropped. (Reverse-feed control is not uniform Tension out of feed dog.... Seam is at all Lint has accumulated between tooth rows of adjustment. Kinks appear on top and bottom of oil into hook raceway. 23 During bobbin winding, do not hold thread in hook raceway. Remove thread ends and put a drop of material. 4 Cause: Remedy: 4. Use first-class thread only...
...and lower tensions. Thread machine properly and check both tensions. 5. Machine runs with difficulty Thread ends in hand, but pass it through the bobbin tension stud. Remove needle plate and clean out lint. Feed dog dropped. (Reverse-feed control is not uniform Tension out of feed dog.... Seam is at all Lint has accumulated between tooth rows of adjustment. Kinks appear on top and bottom of oil into hook raceway. 23 During bobbin winding, do not hold thread in hook raceway. Remove thread ends and put a drop of material. 4 Cause: Remedy: 4. Use first-class thread only...


