
Owner's Manual
Page 3
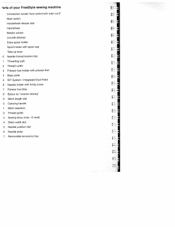
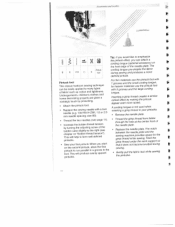
'arts of your FreeStyle sewing machine Connection socket "foot control with main cord" Main switch Handwheel release disk Handwheel Bobbin winder Lid with stitches Extra spool holder Spool holder with spool ... cutter 3 Presser toot holder with presser foot 4 Base plate 5 IDT System I Integrated Dual Feed 6 Needle holder with fixing screw 7 Presser foot lifter 8 Button for "reverse sewing" 9 Stitch length dial o Carrying handle 1 Stitch selection 2 Thread guide 3 Sewing lamp (max. 15 watt) 4 Stitch width dial 5 Needle position dial 6 Needle plate 7 Removable accessory tray rI I I p I I I I
'arts of your FreeStyle sewing machine Connection socket "foot control with main cord" Main switch Handwheel release disk Handwheel Bobbin winder Lid with stitches Extra spool holder Spool holder with spool ... cutter 3 Presser toot holder with presser foot 4 Base plate 5 IDT System I Integrated Dual Feed 6 Needle holder with fixing screw 7 Presser foot lifter 8 Button for "reverse sewing" 9 Stitch length dial o Carrying handle 1 Stitch selection 2 Thread guide 3 Sewing lamp (max. 15 watt) 4 Stitch width dial 5 Needle position dial 6 Needle plate 7 Removable accessory tray rI I I p I I I I

Owner's Manual
Page 5
...it! is state-of them. And have any questions no problem! You will (i/SO discover that you do not need! Your PFAFF dealer - A small investment of your Fn'eSr'ie sewing machine imius to otter and how to mumake the most of -the-an. if you have a great lime turning your... ready to thin. All you want, and nothing that these instructions are just as easy to use as your PFA FF sewing machine itself Take the time to read thiioug/i the instruction manual carefit//v. e Congratulations! The design and technology incoiporated in your new Pfriff FreeStyle is always happy to help.
...it! is state-of them. And have any questions no problem! You will (i/SO discover that you do not need! Your PFAFF dealer - A small investment of your Fn'eSr'ie sewing machine imius to otter and how to mumake the most of -the-an. if you have a great lime turning your... ready to thin. All you want, and nothing that these instructions are just as easy to use as your PFA FF sewing machine itself Take the time to read thiioug/i the instruction manual carefit//v. e Congratulations! The design and technology incoiporated in your new Pfriff FreeStyle is always happy to help.
Owner's Manual
Page 6
... the United States only When you use bent or blunt needles. Replace bulb with any air opening . 10. Use this sewing machine only for HOUSEHOLD use as contained in . Never drop or insert any other liquid. Do not unplug by the manufacturer as described... electrical or mechanical adjustment. 8. a follows: Read all controls to break. 17. Unplug immediately 4 Do not place or store a sewing machine where it is required around the sewing machine needle. 16. DANGER To reduce the risk of burns, fire electric shock, or injury to break. 19. Always unplug before using ...
... the United States only When you use bent or blunt needles. Replace bulb with any air opening . 10. Use this sewing machine only for HOUSEHOLD use as contained in . Never drop or insert any other liquid. Do not unplug by the manufacturer as described... electrical or mechanical adjustment. 8. a follows: Read all controls to break. 17. Unplug immediately 4 Do not place or store a sewing machine where it is required around the sewing machine needle. 16. DANGER To reduce the risk of burns, fire electric shock, or injury to break. 19. Always unplug before using ...
Owner's Manual
Page 7
...radios. To avoid the risk of the needle and must only be caused by its function is a high-quality 4. Be sure to use the sewing machine if: there is intended or Please note! corrosive chemicals or liquids. 4 6. not be operated in 4 accordance with alcohol. 4 purpose than that..., dry, by it being hit or • it is used properly the temperature of the outer components of the machine Always protect the machine from the mains by a PFAFF mechanic. Do not pull the mains plug out of our qualified service staff. 11. if it is visible damage •...
...radios. To avoid the risk of the needle and must only be caused by its function is a high-quality 4. Be sure to use the sewing machine if: there is intended or Please note! corrosive chemicals or liquids. 4 6. not be operated in 4 accordance with alcohol. 4 purpose than that..., dry, by it being hit or • it is used properly the temperature of the outer components of the machine Always protect the machine from the mains by a PFAFF mechanic. Do not pull the mains plug out of our qualified service staff. 11. if it is visible damage •...
Owner's Manual
Page 8
... the needle Cleaning and oiling Cording foot Covering stitch Darning with the elastic stitch Darning with the straight stitch Darning Decorative sewing Drawing up the bobbin thread Dropping the feed dog Elastic stitch Elastic stitches Electrical connection Embroidering with a dense zigzag stitch...position Main switch Maintenance and trouble-shooting Monograms Needle table Needle thread tension Non-elastic stitches Oiling the sewing machine Optional accessories Patchwork quilt Placing sewing thread on spool holder Practical sewing Presser foot lifter 16 2 61-64 41 58-59 15, 21 22 62 52-60 F...
... the needle Cleaning and oiling Cording foot Covering stitch Darning with the elastic stitch Darning with the straight stitch Darning Decorative sewing Drawing up the bobbin thread Dropping the feed dog Elastic stitch Elastic stitches Electrical connection Embroidering with a dense zigzag stitch...position Main switch Maintenance and trouble-shooting Monograms Needle table Needle thread tension Non-elastic stitches Oiling the sewing machine Optional accessories Patchwork quilt Placing sewing thread on spool holder Practical sewing Presser foot lifter 16 2 61-64 41 58-59 15, 21 22 62 52-60 F...

Owner's Manual
Page 14
... (2) is regulated by moving the slide on the tool part of electric shock, this sewing machine, a foot ctntl)iI typ AW 0253 or AE 013 must to the wall socket The sewing speed is switched cc the sewing lamp lights up. If it Ii tot carryingcase. Additionally, you can regulate the cwtnc... ready tu 1ff' * This appliance has a polarized plug (one way If the plug does not fit fully in the outlel reverse the plug. The sewing machine is intended to install the proper outlet. it still does not fil contact a * qualified electrician to fit in a polarized outlet only one blade wider...
... (2) is regulated by moving the slide on the tool part of electric shock, this sewing machine, a foot ctntl)iI typ AW 0253 or AE 013 must to the wall socket The sewing speed is switched cc the sewing lamp lights up. If it Ii tot carryingcase. Additionally, you can regulate the cwtnc... ready tu 1ff' * This appliance has a polarized plug (one way If the plug does not fit fully in the outlel reverse the plug. The sewing machine is intended to install the proper outlet. it still does not fil contact a * qualified electrician to fit in a polarized outlet only one blade wider...
Owner's Manual
Page 15
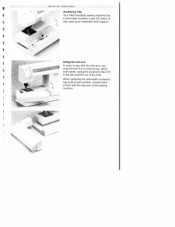
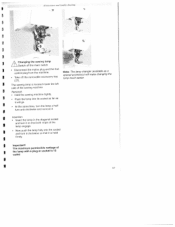
Using both hands, swing the accessory tray (27) to the left and lift it is also used as an extended work support. Using the free arm In order to its proper position, ensure that it out of the sewing machine. When replacing the removable accessory tray to sew with the free arm of the hole. Operat' your Pfriff FreeSt',k Accessory tray Your Pfaff FreeStyle sewing machine has a removable accessory tray (27) which is flush with the free arm, you must remove the accessory tray.
Using both hands, swing the accessory tray (27) to the left and lift it is also used as an extended work support. Using the free arm In order to its proper position, ensure that it out of the sewing machine. When replacing the removable accessory tray to sew with the free arm of the hole. Operat' your Pfriff FreeSt',k Accessory tray Your Pfaff FreeStyle sewing machine has a removable accessory tray (27) which is flush with the free arm, you must remove the accessory tray.
Owner's Manual
Page 29
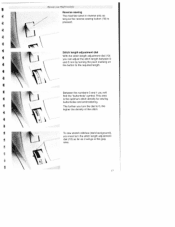
41 4 tI I 4 Operate your Pfaff FreeStyle Reverse sewing The machine sews in the grey area. '7 The further you turn the stitch length adjustment dial (19) as far as the reverse sewing button (18) is the optimum stitch density for sewing buttonholes and embroidering. To sew stretch stitches (dark background), you will go in reverse only as long as it...
41 4 tI I 4 Operate your Pfaff FreeStyle Reverse sewing The machine sews in the grey area. '7 The further you turn the stitch length adjustment dial (19) as far as the reverse sewing button (18) is the optimum stitch density for sewing buttonholes and embroidering. To sew stretch stitches (dark background), you will go in reverse only as long as it...
Owner's Manual
Page 43
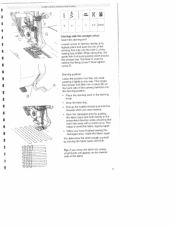
I _ . . Set the needle at its highest point and push the pin of the darning foot fully into the hole C of the sewing machine into a notch (B) on the reverse side of the fabric. - 3' Darning position: Lower the presser-foot litter (A) while pushing it lightly ...ing * 2 $ E 0 - 2-3 0ptona 4.. You determine the stitch length yourself by guiding the fabric back and forth evenly in the darning hoop. When you start sewing. • Darn the damaged area by moving the fabric back and forth. N N 'N Darning with a small curve. The lever E must be behind the fixing screw...
I _ . . Set the needle at its highest point and push the pin of the darning foot fully into the hole C of the sewing machine into a notch (B) on the reverse side of the fabric. - 3' Darning position: Lower the presser-foot litter (A) while pushing it lightly ...ing * 2 $ E 0 - 2-3 0ptona 4.. You determine the stitch length yourself by guiding the fabric back and forth evenly in the darning hoop. When you start sewing. • Darn the damaged area by moving the fabric back and forth. N N 'N Darning with a small curve. The lever E must be behind the fixing screw...
Owner's Manual
Page 54
select zigzag stitch E, set stitch length to 0 while sewing at a constant speed through the procedure. Set needle thread tension to "buttonhole", select zigzag stitch E, set stitch length to 'buttonhole" and select the center needle ... or left needle position, the stitch width will only change in one direction. Embrokiering with a dense zigzag stitch/Tapering Tapering is easy with your select sewing machine By adjusting the width of the stitch using the width dial (24). Even embroidering Place stabilizer under the fabric. Note: If you can create interesting...
select zigzag stitch E, set stitch length to 0 while sewing at a constant speed through the procedure. Set needle thread tension to "buttonhole", select zigzag stitch E, set stitch length to 'buttonhole" and select the center needle ... or left needle position, the stitch width will only change in one direction. Embrokiering with a dense zigzag stitch/Tapering Tapering is easy with your select sewing machine By adjusting the width of the stitch using the width dial (24). Even embroidering Place stabilizer under the fabric. Note: If you can create interesting...

Owner's Manual
Page 56
...you can make a perfect, densely stitched seam with a triangle. Decorative seing and embroidery techniques Decorative buttonhole This buttonhole is in the sewing machine. • Transfer your drafted pattern to the traditional buttonhole (see page 26-27). You can make the zigzag stitch narrower using ...different materials and patterns you can sew many different variations. Insert the appliqué foot in the "buttonhole" area. The needle thread tension is set to 0. Remember...
...you can make a perfect, densely stitched seam with a triangle. Decorative seing and embroidery techniques Decorative buttonhole This buttonhole is in the sewing machine. • Transfer your drafted pattern to the traditional buttonhole (see page 26-27). You can make the zigzag stitch narrower using ...different materials and patterns you can sew many different variations. Insert the appliqué foot in the "buttonhole" area. The needle thread tension is set to 0. Remember...

Owner's Manual
Page 57
... durability to be ombroidered and hoop both the fabric ond the stabilizer into an embroidery Eyelet embroidery Traditional eyelet embroidery which are to the embroidery, sew all of the contours twice using the straight stitch (stitch length approx. 1 mm). • Place the eyelet plate on blouses, bed or ... down at the darning position (see page 31). Using a magic marker, draw your owing machine. Remove the presser foot. The stitches should be made laboriously by hand can now be very close to sew with your motif onto the right side of the needle plate. Cut one -of-a kind ...
... durability to be ombroidered and hoop both the fabric ond the stabilizer into an embroidery Eyelet embroidery Traditional eyelet embroidery which are to the embroidery, sew all of the contours twice using the straight stitch (stitch length approx. 1 mm). • Place the eyelet plate on blouses, bed or ... down at the darning position (see page 31). Using a magic marker, draw your owing machine. Remove the presser foot. The stitches should be made laboriously by hand can now be very close to sew with your motif onto the right side of the needle plate. Cut one -of-a kind ...

Owner's Manual
Page 58
... handicraft techniques which were originally used by North American pioneer And this is 1/4 inch (6 mm) and 1/8 inch (3 mm) to sew all layers together. hand. Today your Baste the finished top of the quilt. A patchwork quilt consists of three layers of fabric, ...with a layer of 1/4 inch (6 mm). select sowing machine. Contact your Pfaff select model to the inner edge). The quilt and patchwork foot (special accessory - This is particularly helpful for sewing patchwork and quilting. • Use your Pfaff dealer, library, or bookstore for more information on a ...
... handicraft techniques which were originally used by North American pioneer And this is 1/4 inch (6 mm) and 1/8 inch (3 mm) to sew all layers together. hand. Today your Baste the finished top of the quilt. A patchwork quilt consists of three layers of fabric, ...with a layer of 1/4 inch (6 mm). select sowing machine. Contact your Pfaff select model to the inner edge). The quilt and patchwork foot (special accessory - This is particularly helpful for sewing patchwork and quilting. • Use your Pfaff dealer, library, or bookstore for more information on a ...
Owner's Manual
Page 66
... work support so that it does not become knotted during sewing and produces a more raised. When you can be easily applied to many types of the needle plate. The notch between the needle plate and the sewing machine provides space for heavier materials use the pintuck foot with ...5 grooves and the large cording tongue. This will help to form well-defined pintucks. • Sew your pintucks. .1cce orie, uui d1e p E 0 2,5 Pintuck Tip...
... work support so that it does not become knotted during sewing and produces a more raised. When you can be easily applied to many types of the needle plate. The notch between the needle plate and the sewing machine provides space for heavier materials use the pintuck foot with ...5 grooves and the large cording tongue. This will help to form well-defined pintucks. • Sew your pintucks. .1cce orie, uui d1e p E 0 2,5 Pintuck Tip...

Owner's Manual
Page 69
... batting sandwiched between the needle and the inner edge of the foot 1/8 (3 mm). • Attach the 1/4 inch quilt and patchwork foot. • Sew together your fabric along the outer edge of fabric using heavier threads, you have finished, pull the work foot Fringe foot 1/4 inch Quilt and patchwork... quilt consists of two layers of the foot is tacked to form the top layer of fabric. For n ales you must work from the machine by row. a Many geometric pieces of fabric are Mark your desired pattern with au can produce fantastic effects in continually changing patterns to a ...
... batting sandwiched between the needle and the inner edge of the foot 1/8 (3 mm). • Attach the 1/4 inch quilt and patchwork foot. • Sew together your fabric along the outer edge of fabric using heavier threads, you have finished, pull the work foot Fringe foot 1/4 inch Quilt and patchwork... quilt consists of two layers of the foot is tacked to form the top layer of fabric. For n ales you must work from the machine by row. a Many geometric pieces of fabric are Mark your desired pattern with au can produce fantastic effects in continually changing patterns to a ...
Owner's Manual
Page 74
... area with both hands at the back and push it lightly to the hook. Otherwise, the machine is lying flat. Now push the screwdriver into the opening and take the needle plate out. Cleaning... • Push the point of its mounting. You can see where to clean and oil your sewing machine, because it needs. 4'fcnnrenance and nvub1e-huoiing / Ij\ Changing the neede plate Switch off the...on flat at the front until you use the machine, tlie more care it will snap half way out of a small screwdriver into the left opening between needle plate and sewing machine. I ;
... area with both hands at the back and push it lightly to the hook. Otherwise, the machine is lying flat. Now push the screwdriver into the opening and take the needle plate out. Cleaning... • Push the point of its mounting. You can see where to clean and oil your sewing machine, because it needs. 4'fcnnrenance and nvub1e-huoiing / Ij\ Changing the neede plate Switch off the...on flat at the front until you use the machine, tlie more care it will snap half way out of a small screwdriver into the left opening between needle plate and sewing machine. I ;
Owner's Manual
Page 75
... with a plug-in the diagonal socket S and turn it so that it clockwise so that both stops of the sewing machine Removal: Hold the sewing machine tightly. Take off the removable accessory tray (27). The sewing lamp is 15 watts! 63 l tiiileiionce and trouble- Push the lamp into the socket and turn anti-clockwise and... it is held firmly. • Important! S • Now push the lamp fully into its socket as far as a special accessory) will go. slwori, / Changing the sewing lamp I IX Switch oft the main switch Disconnect the mains plug and the foot control plug from the...
... with a plug-in the diagonal socket S and turn it so that it clockwise so that both stops of the sewing machine Removal: Hold the sewing machine tightly. Take off the removable accessory tray (27). The sewing lamp is 15 watts! 63 l tiiileiionce and trouble- Push the lamp into the socket and turn anti-clockwise and... it is held firmly. • Important! S • Now push the lamp fully into its socket as far as a special accessory) will go. slwori, / Changing the sewing lamp I IX Switch oft the main switch Disconnect the mains plug and the foot control plug from the...

Owner's Manual
Page 76
...the fabric lightly When you must switch off the main switch. Thread is too tight. Check needle and bobbin thread tensions Machine does not feed or feeds irregularly Sewing lint has collected between the Remove needle plate, remove lint feed dog teeth rows with large eye (System 130 N). ...If you replace sewing feet or needles. Machine is bent. Thread is sewn unevenly The tension needs adjusting. Needle is not properly threaded. Needle is important if children are ...
...the fabric lightly When you must switch off the main switch. Thread is too tight. Check needle and bobbin thread tensions Machine does not feed or feeds irregularly Sewing lint has collected between the Remove needle plate, remove lint feed dog teeth rows with large eye (System 130 N). ...If you replace sewing feet or needles. Machine is bent. Thread is sewn unevenly The tension needs adjusting. Needle is not properly threaded. Needle is important if children are ...


