

Owner's Manual
Page 2
... ("0") when making any opening. • Do not use as threading needle, changing needle, threading bobbin, or changing presser foot, etc. • Always unplug the sewing machine from outlet. • Do not unplug by or near children or in the instruction manual. • Never drop or insert any other user servicing adjustments mentioned in firm person. • Use this sewing machine only for examination, repair, electrical or mechanical adjustment. • Never operate the sewing machine with same type rated 5 Watt...
... ("0") when making any opening. • Do not use as threading needle, changing needle, threading bobbin, or changing presser foot, etc. • Always unplug the sewing machine from outlet. • Do not unplug by or near children or in the instruction manual. • Never drop or insert any other user servicing adjustments mentioned in firm person. • Use this sewing machine only for examination, repair, electrical or mechanical adjustment. • Never operate the sewing machine with same type rated 5 Watt...
Owner's Manual
Page 3
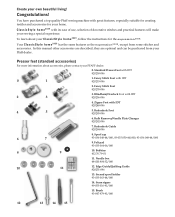
... spool holder 93-033 063-44/000 14. Standard Presser Foot with IDT 820253-096 2. Blindhem/Overlock Foot with IDT 820248-096 4 5 5. C l a s s i c S t y l e h o m e 2 0 2 9 with great features, especially suitable for creating textiles and accessories for the expression2028. Zipper Foot with IDT 820256-096 4. Bulb Remover/Needle Plate Changer 820292-096 7. To learn about accessories, please contact your C l a s s i c S t y l e h o m e 2 0 2 9 , follow the instructions for your sewing a special experience. Fancy Stitch Foot 820278-096 2 3 3. Bobbins...
... spool holder 93-033 063-44/000 14. Standard Presser Foot with IDT 820253-096 2. Blindhem/Overlock Foot with IDT 820248-096 4 5 5. C l a s s i c S t y l e h o m e 2 0 2 9 with great features, especially suitable for creating textiles and accessories for the expression2028. Zipper Foot with IDT 820256-096 4. Bulb Remover/Needle Plate Changer 820292-096 7. To learn about accessories, please contact your C l a s s i c S t y l e h o m e 2 0 2 9 , follow the instructions for your sewing a special experience. Fancy Stitch Foot 820278-096 2 3 3. Bobbins...
Owner's Manual
Page 4
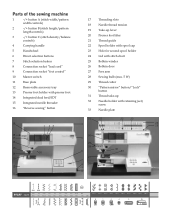
... plate 12 Removable accessory tray 13 Presser foot holder with presser foot 14 Integrated dual feed/IDT 15 Integrated needle threader 16 "Reverse sewing" button 17 Threading slots 18 Needle thread tension 19 Take-up lever 20 Presser foot lifter 21 Thread guide 22 Spool holder with spool cap 23 Hole for second spool holder 24 Lid with stitch chart 25 Bobbin winder 26 Bobbin door 27 Free arm 28 Sewing bulb (max. 5 W) 29 Thread cutter 30 "Pattern mirror" button/"Lock" button 31 Thread take-up 32 Needle holder with retaining (set) screw 33 Needle plate...
... plate 12 Removable accessory tray 13 Presser foot holder with presser foot 14 Integrated dual feed/IDT 15 Integrated needle threader 16 "Reverse sewing" button 17 Threading slots 18 Needle thread tension 19 Take-up lever 20 Presser foot lifter 21 Thread guide 22 Spool holder with spool cap 23 Hole for second spool holder 24 Lid with stitch chart 25 Bobbin winder 26 Bobbin door 27 Free arm 28 Sewing bulb (max. 5 W) 29 Thread cutter 30 "Pattern mirror" button/"Lock" button 31 Thread take-up 32 Needle holder with retaining (set) screw 33 Needle plate...
Owner's Manual
Page 6
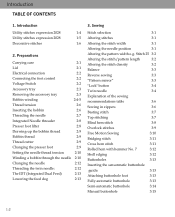
... sewing 3:3 "Pattern mirror" 3:3 "Lock" button 3:4 Twin needle 3:4 Explanation of the sewing recommendations table 3:6 Sewing in zippers 3:6 Basting stitch 3:7 Top stitching 3:7 Blind hem stitch 3:8 Overlock stitches 3:9 Free Motion Sewing 3:10 Bridging stitch 3:11 Cross hem stitch 3:11 Rolled hem with hemmer No. 7 3:12 Shell edging 3:12 Buttonholes 3:13 Inserting the sensormatic buttonhole guide: 3:13 Attaching buttonhole foot 3:13 Fully automatic buttonhole 3:13 Semi-automatic buttonhole 3:14 Manual buttonhole 3:15 1:2 Preparations Carrying case...
... sewing 3:3 "Pattern mirror" 3:3 "Lock" button 3:4 Twin needle 3:4 Explanation of the sewing recommendations table 3:6 Sewing in zippers 3:6 Basting stitch 3:7 Top stitching 3:7 Blind hem stitch 3:8 Overlock stitches 3:9 Free Motion Sewing 3:10 Bridging stitch 3:11 Cross hem stitch 3:11 Rolled hem with hemmer No. 7 3:12 Shell edging 3:12 Buttonholes 3:13 Inserting the sensormatic buttonhole guide: 3:13 Attaching buttonhole foot 3:13 Fully automatic buttonhole 3:13 Semi-automatic buttonhole 3:14 Manual buttonhole 3:15 1:2 Preparations Carrying case...
Owner's Manual
Page 8
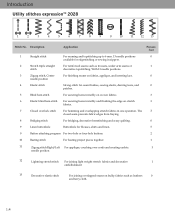
...seams on fabrics, applique, and inserting lace. 0 needle position 4 Elastic stitch Strong stitch for blouses, shirts and linen. 5 0 Button attaching program For two-hole or four-hole buttons. 2 10 Basting stitch For basting project pieces together. 1 11 Zigzag stitch Right/Left For applique, couching over cords and creating eyelets. 3 needle position 12 Lightning stretch stitch For joining light weight stretch fabrics and decorative 1 embellishment 13 Decorative elastic stitch For joining overlapped seams on stretch 3 fabrics. 7 Closed overlock stitch For hemming...
...seams on fabrics, applique, and inserting lace. 0 needle position 4 Elastic stitch Strong stitch for blouses, shirts and linen. 5 0 Button attaching program For two-hole or four-hole buttons. 2 10 Basting stitch For basting project pieces together. 1 11 Zigzag stitch Right/Left For applique, couching over cords and creating eyelets. 3 needle position 12 Lightning stretch stitch For joining light weight stretch fabrics and decorative 1 embellishment 13 Decorative elastic stitch For joining overlapped seams on stretch 3 fabrics. 7 Closed overlock stitch For hemming...
Owner's Manual
Page 14
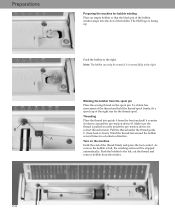
... the bobbin A several times in a clockwise direction. Wind the thread tail around the pre-tension device B. C 2:4 The Pfaff logo is pulled securely inside the pre-tension device for the thread spool. Note: The bobbin can only be stopped automatically. Make sure the B thread is facing up. Turn on the spool pin. Push the bobbin to the left, cut the thread and remove bobbin from the spool pin Place the sewing thread on the machine Hold...
... the bobbin A several times in a clockwise direction. Wind the thread tail around the pre-tension device B. C 2:4 The Pfaff logo is pulled securely inside the pre-tension device for the thread spool. Note: The bobbin can only be stopped automatically. Make sure the B thread is facing up. Turn on the spool pin. Push the bobbin to the left, cut the thread and remove bobbin from the spool pin Place the sewing thread on the machine Hold...
Owner's Manual
Page 16
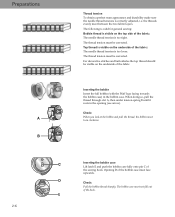
... sewing hook. Preparations A B 2:6 Thread tension To obtain a perfect seam appearance and durability make sure the needle thread tensions is too loose. Top thread is visible on the top side of the fabric: The needle thread tension is correctly adjusted, i.e. When doing so, pull the thread through slot A, then under tension spring B until it rests in the bobbin case. Check: When you look at the bobbin and pull the thread, the bobbin must turn clockwise Inserting...
... sewing hook. Preparations A B 2:6 Thread tension To obtain a perfect seam appearance and durability make sure the needle thread tensions is too loose. Top thread is visible on the top side of the fabric: The needle thread tension is correctly adjusted, i.e. When doing so, pull the thread through slot A, then under tension spring B until it rests in the bobbin case. Check: When you look at the bobbin and pull the thread, the bobbin must turn clockwise Inserting...
Owner's Manual
Page 18
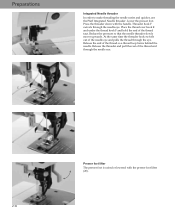
... presser foot lifter (20). 2:8 Reduce the pressure so that the needle threader slowly moves upwards. At the same time the threader hook swivels out of the thread end through the eye. Release the threader and pull the rest of the needle eye and pulls the thread through the needle eye. Threader hook F swivels through the needle eye. Preparations E F Integrated Needle threader In order to make threading the needle easier and quicker, use...
... presser foot lifter (20). 2:8 Reduce the pressure so that the needle threader slowly moves upwards. At the same time the threader hook swivels out of the thread end through the eye. Release the threader and pull the rest of the needle eye and pulls the thread through the needle eye. Threader hook F swivels through the needle eye. Preparations E F Integrated Needle threader In order to make threading the needle easier and quicker, use...
Owner's Manual
Page 20
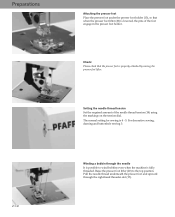
... needle thread tension Set the required amount of the foot engage in the presser foot holder. For decorative sewing, darning and buttonhole sewing 3. Raise the presser foot lifter (20) to wind bobbins even when the machine is 4 - 5. Preparations 2:10 Attaching the presser foot Place the presser foot under the presser foot holder (13), so that the presser foot is properly attached by raising the presser foot lifter. Check: Please check that when the presser foot lifter (20) is lowered, the pins of the needle thread tension (18) using...
... needle thread tension Set the required amount of the foot engage in the presser foot holder. For decorative sewing, darning and buttonhole sewing 3. Raise the presser foot lifter (20) to wind bobbins even when the machine is 4 - 5. Preparations 2:10 Attaching the presser foot Place the presser foot under the presser foot holder (13), so that the presser foot is properly attached by raising the presser foot lifter. Check: Please check that when the presser foot lifter (20) is lowered, the pins of the needle thread tension (18) using...
Owner's Manual
Page 21
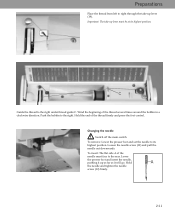
... take -up as far as it up lever (19). Wind the beginning of the thread Àrmly and press the foot control. Hold A the needle and tighten the needle screw (32) Àrmly. 2:11 Changing the needle Switch off the main switch To remove: Lower the presser foot and set the needle to its highest position. Preparations Place the thread from left to right through the take -up...
... take -up as far as it up lever (19). Wind the beginning of the thread Àrmly and press the foot control. Hold A the needle and tighten the needle screw (32) Àrmly. 2:11 Changing the needle Switch off the main switch To remove: Lower the presser foot and set the needle to its highest position. Preparations Place the thread from left to right through the take -up...
Owner's Manual
Page 23
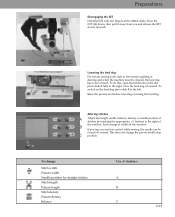
... change : Stitch width Pattern width Needle position for straight stitches Stitch length Pattern length Stitch density Pattern density Balance Use -/+ buttons: A B C 2:13 Preparations Disengaging the IDT Hold the IDT with two Àngers at the ribbed ankle. If you and release the IDT slowly upward. Lowering the feed dog For certain sewing work such as free-motion quilting or darning and when the machine must be cleaned, the feed dog has to the left. To do this, open the bobbin...
... change : Stitch width Pattern width Needle position for straight stitches Stitch length Pattern length Stitch density Pattern density Balance Use -/+ buttons: A B C 2:13 Preparations Disengaging the IDT Hold the IDT with two Àngers at the ribbed ankle. If you and release the IDT slowly upward. Lowering the feed dog For certain sewing work such as free-motion quilting or darning and when the machine must be cleaned, the feed dog has to the left. To do this, open the bobbin...
Owner's Manual
Page 26
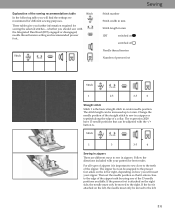
... machine from -9 to (+)9. The balance adjusts the reverse feed of the window. heavy fabric is "0". After having selected a stitch, you press the button again. The standard balance setting is fed differently than Àne silk. In the plus range the stitches are sewn shorter, and thus the overall length will see the balance symbol with a "0" after it is used for different fabrics. "Pattern...
... machine from -9 to (+)9. The balance adjusts the reverse feed of the window. heavy fabric is "0". After having selected a stitch, you press the button again. The standard balance setting is fed differently than Àne silk. In the plus range the stitches are sewn shorter, and thus the overall length will see the balance symbol with a "0" after it is used for different fabrics. "Pattern...
Owner's Manual
Page 29
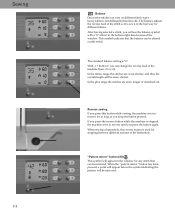
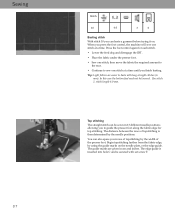
... needle must only be adjusted with the Integrated Dual Feed (IDT) engaged or disengaged, needle thread tension setting and recommended presser foot,. The expression 2028 have 13 needle positions that it is the basic straight stitch in center needle position. Stitch 1 3 3-5 4 Sewing in zippers There are different ways to the right. For all types of the 13 needle positions available. If the foot is attached on how you will insert your pattern for sewing the selected stitches...
... needle must only be adjusted with the Integrated Dual Feed (IDT) engaged or disengaged, needle thread tension setting and recommended presser foot,. The expression 2028 have 13 needle positions that it is the basic straight stitch in center needle position. Stitch 1 3 3-5 4 Sewing in zippers There are different ways to the right. For all types of the 13 needle positions available. If the foot is attached on how you will insert your pattern for sewing the selected stitches...
Owner's Manual
Page 30
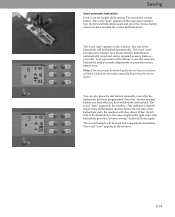
... baste with set screw F. The distance between the rows of the presser foot. Use stitch 1, stitch length 6.0 mm. In this case the bottom feed need not be sewn in cm and inches. The edge guide is inserted into hole C and is then determined by the width of topstitching is secured with long straight stitches (6 mm). Tip: Light fabrics are given in 13 different needle positions allowing you press the foot control, the machine will sew...
... baste with set screw F. The distance between the rows of the presser foot. Use stitch 1, stitch length 6.0 mm. In this case the bottom feed need not be sewn in cm and inches. The edge guide is inserted into hole C and is then determined by the width of topstitching is secured with long straight stitches (6 mm). Tip: Light fabrics are given in 13 different needle positions allowing you press the foot control, the machine will sew...
Owner's Manual
Page 37
... inserted you make adjustments or press the reverse button once. When the left side of the buttonhole is automatically saved and can also place the last bartack manually, even after you have stitched the Àrst bartack. The word "man" appears in the window. The word "man" appears in the window. 3:14 Your expression will continue to sew the same size buttonhole...
... inserted you make adjustments or press the reverse button once. When the left side of the buttonhole is automatically saved and can also place the last bartack manually, even after you have stitched the Àrst bartack. The word "man" appears in the window. The word "man" appears in the window. 3:14 Your expression will continue to sew the same size buttonhole...
Owner's Manual
Page 39
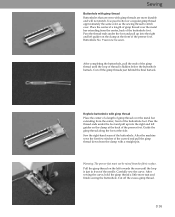
... the presser foot. Pass the thread ends under the foot and pull up into the right and left guides on the clamp at the front of the buttonhole foot. Place the center of a length of the buttonhole. Use pearl cotton or a regular gimp thread approximately the same color as the sewing thread to stitch over the metal bar extending from the fabric surface. Keyhole buttonhole with a straight pin. Sewing Buttonhole with gimp thread Buttonholes...
... the presser foot. Pass the thread ends under the foot and pull up into the right and left guides on the clamp at the front of the buttonhole foot. Place the center of a length of the buttonhole. Use pearl cotton or a regular gimp thread approximately the same color as the sewing thread to stitch over the metal bar extending from the fabric surface. Keyhole buttonhole with a straight pin. Sewing Buttonhole with gimp thread Buttonholes...
Owner's Manual
Page 46
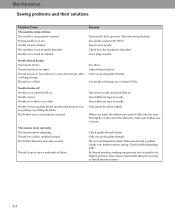
... fabric. This ensures that needle thread is too thick. Needle thread breaks See reasons above . Thread is poor or has slubs in it fully into bobbin tension spring. Re-thread machine, making sure presser foot is not properly inserted. Check needle thread tension. Use needle with large eye (system 130 N). The bobbin case is raised to make sure bobbin case is in . Insert different type of the thread to its highest position. Check bobbin threading path. Flat side facing the back. Adjust thread tension. Pull lightly...
... fabric. This ensures that needle thread is too thick. Needle thread breaks See reasons above . Thread is poor or has slubs in it fully into bobbin tension spring. Re-thread machine, making sure presser foot is not properly inserted. Check needle thread tension. Use needle with large eye (system 130 N). The bobbin case is raised to make sure bobbin case is in . Insert different type of the thread to its highest position. Check bobbin threading path. Flat side facing the back. Adjust thread tension. Pull lightly...
Owner's Manual
Page 47
...Àculty There are any defect or damage caused by use of the needle plate until you hear it back on again after approx. 10 seconds. Select the desired stitch again Non-original Parts and Accessories The warranty does not cover any children nearby. The machine does not sew the selected stitch Switch off . Push slide B to sew without fabric under the presser foot.
...Àculty There are any defect or damage caused by use of the needle plate until you hear it back on again after approx. 10 seconds. Select the desired stitch again Non-original Parts and Accessories The warranty does not cover any children nearby. The machine does not sew the selected stitch Switch off . Push slide B to sew without fabric under the presser foot.
Owner's Manual
Page 48
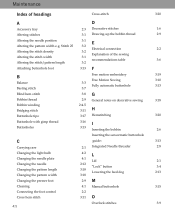
... table 3:6 Altering the stitch/pattern length 3:2 Attaching buttonhole foot 3:13 F B Balance Basting stitch Free motion embroidery 3:19 Free Motion Sewing 3:10 3:3 Fully automatic buttonhole 3:13 3:7 Blind hem stitch Bobbin thread Bobbin winding Bridging stitch Buttonhole tips: 3:8 G 2:9 General notes on decorative sewing 3:18 2:4-5 3:11 H 3:17 Hemstitching 3:20 Buttonhole with gimp thread 3:16 I Buttonholes 3:13 Inserting the bobbin 2:6 Inserting the sensormatic buttonhole C Carrying case guide: 3:13 2:1 Integrated Needle threader 2:8 Changing the light bulb...
... table 3:6 Altering the stitch/pattern length 3:2 Attaching buttonhole foot 3:13 F B Balance Basting stitch Free motion embroidery 3:19 Free Motion Sewing 3:10 3:3 Fully automatic buttonhole 3:13 3:7 Blind hem stitch Bobbin thread Bobbin winding Bridging stitch Buttonhole tips: 3:8 G 2:9 General notes on decorative sewing 3:18 2:4-5 3:11 H 3:17 Hemstitching 3:20 Buttonhole with gimp thread 3:16 I Buttonholes 3:13 Inserting the bobbin 2:6 Inserting the sensormatic buttonhole C Carrying case guide: 3:13 2:1 Integrated Needle threader 2:8 Changing the light bulb...
Owner's Manual
Page 49
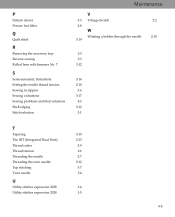
P Pattern mirror Presser foot lifter Q Quilt stitch R Removing the accessory tray Reverse sewing Rolled hem with hemmer No. 7 S Semi-automatic buttonhole Setting the needle thread tension Sewing in zippers Sewing on buttons Sewing problems and their solutions Shell edging Stitch selection Maintenance V 3:3 Voltage Switch 2:2 2:8 W Winding a bobbin through the needle 2:10 3:19 2:3 3:3 3:12 3:14 2:10 3:6 3:17 4:3 3:12 3:1 T Tapering 3:19 The IDT (Integrated Dual Feed) 2:13 Thread cutter 2:9 Thread tension 2:6 Threading the needle 2:7 Threading the twin needle: 2:12 Top ...
P Pattern mirror Presser foot lifter Q Quilt stitch R Removing the accessory tray Reverse sewing Rolled hem with hemmer No. 7 S Semi-automatic buttonhole Setting the needle thread tension Sewing in zippers Sewing on buttons Sewing problems and their solutions Shell edging Stitch selection Maintenance V 3:3 Voltage Switch 2:2 2:8 W Winding a bobbin through the needle 2:10 3:19 2:3 3:3 3:12 3:14 2:10 3:6 3:17 4:3 3:12 3:1 T Tapering 3:19 The IDT (Integrated Dual Feed) 2:13 Thread cutter 2:9 Thread tension 2:6 Threading the needle 2:7 Threading the twin needle: 2:12 Top ...


