
Owner's Manual
Page 2
... can cause the needle to break. 9. Switch the sewing machine off ("O") when making any adjustments in the instruction manual. 11.Never drop or insert any object into water. SAVE THESE INSTRUCTIONS This sewing machine is damaged, it to break. 7. WARNING -To reduce the risk of the appliance by ... cord. Never operate the appliance with 200mW, 300mW and 200mW LED lamp, which is with any opening. 12.Do not use only. 1 INSTRUCTIONS DANGER -To reduce the risk of lint, dust, and loose cloth. 5. Contact the authorized retailer or service center for examination, repair, electrical...
... can cause the needle to break. 9. Switch the sewing machine off ("O") when making any adjustments in the instruction manual. 11.Never drop or insert any object into water. SAVE THESE INSTRUCTIONS This sewing machine is damaged, it to break. 7. WARNING -To reduce the risk of the appliance by ... cord. Never operate the appliance with 200mW, 300mW and 200mW LED lamp, which is with any opening. 12.Do not use only. 1 INSTRUCTIONS DANGER -To reduce the risk of lint, dust, and loose cloth. 5. Contact the authorized retailer or service center for examination, repair, electrical...

Owner's Manual
Page 3
...unplug the cord when: Operation is required, first follow the troubleshooting guide in the back of this operation manual to keep your local authorized retailer. 2 INSTRUCTIONS up lever, needle or other hot objects. 2. Do not use . Leaving the machine unattended. 3. When ...storing this operation manual when replacing or installing any other parts to assure correct installation. Do not touch the handwheel, ...
...unplug the cord when: Operation is required, first follow the troubleshooting guide in the back of this operation manual to keep your local authorized retailer. 2 INSTRUCTIONS up lever, needle or other hot objects. 2. Do not use . Leaving the machine unattended. 3. When ...storing this operation manual when replacing or installing any other parts to assure correct installation. Do not touch the handwheel, ...
Owner's Manual
Page 18
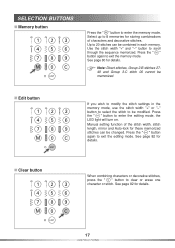
... When combining characters or decorative stitches, press the " " button to exit the editing mode. See page 82 for details. See page 80 for details. 17 INSTRUCTIONS Manual setting function of characters and decorative stitches. Use the stitch width "+" and "" button to enter the memory mode. SELECTION BUTTONS Memory button Press the...
... When combining characters or decorative stitches, press the " " button to exit the editing mode. See page 82 for details. See page 80 for details. 17 INSTRUCTIONS Manual setting function of characters and decorative stitches. Use the stitch width "+" and "" button to enter the memory mode. SELECTION BUTTONS Memory button Press the...
Owner's Manual
Page 77
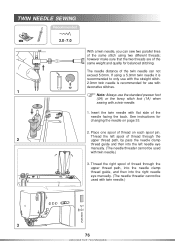
...and quality for use with decorative stitches. 1 Note: Always use with twin needle.) 3. The needle distance of thread on page 33. 2. See instructions for changing the needle on each spool pin. Place one spool of the twin needle can sew two parallel lines of thread through the upper...then into the left spool of the same stitch using a 5.0mm twin needle it is recommended for balanced stitching. Thread the left needle eye manually. (The needle threader cannot be used with the straight stitch. 2.0mm twin needle is recommended to only use the standard presser foot (0A) ...
...and quality for use with decorative stitches. 1 Note: Always use with twin needle.) 3. The needle distance of thread on page 33. 2. See instructions for changing the needle on each spool pin. Place one spool of the twin needle can sew two parallel lines of thread through the upper...then into the left spool of the same stitch using a 5.0mm twin needle it is recommended for balanced stitching. Thread the left needle eye manually. (The needle threader cannot be used with the straight stitch. 2.0mm twin needle is recommended to only use the standard presser foot (0A) ...


