

Owner's Manual
Page 2
.... Keep it handy as a reference book in a home. If you understand the machine and familiarize jabs. Ni PFAFF AG Karisruhe-Durlach Branch Western Germany Follow these simple instructions and sewing with you are to help a number of a Pfaff 80, the sewing master all ordinary sewing embroidering and darning jobs that may come true. This instruction book will...
.... Keep it handy as a reference book in a home. If you understand the machine and familiarize jabs. Ni PFAFF AG Karisruhe-Durlach Branch Western Germany Follow these simple instructions and sewing with you are to help a number of a Pfaff 80, the sewing master all ordinary sewing embroidering and darning jobs that may come true. This instruction book will...
Owner's Manual
Page 4
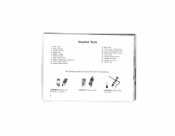
...Spool pins 5. Bobbin winder 6. Pfoff rotary sewing hook 13. Needle set screw 19. Balance wheel 7, Stop motion knob 8. Stitch length control 10. Dual-purpose needle plate 14. Light switch 16. Sewing foot The following feet ore standard with this machine: 93-838 950-00 Presser foot, (...attached to machine) 3 93.84755100 Hemmer foot 93-847 600-00 Edge stitcher, with guide 1. Face cover...
...Spool pins 5. Bobbin winder 6. Pfoff rotary sewing hook 13. Needle set screw 19. Balance wheel 7, Stop motion knob 8. Stitch length control 10. Dual-purpose needle plate 14. Light switch 16. Sewing foot The following feet ore standard with this machine: 93-838 950-00 Presser foot, (...attached to machine) 3 93.84755100 Hemmer foot 93-847 600-00 Edge stitcher, with guide 1. Face cover...

Owner's Manual
Page 6
... the motor to the inoperative position. Ta do this, flick the lever down. After you press, the faster the machine will run. (Foot-driven machines have completed sewing, flick the lever to its opera tive position. Foot Control Place the foot control under the ca binet within easy ...reach of cord into the wall outlet. Motor Disengaging Mechanism Power-driven machines feature a lever underneath the balance wheel which serves ...
... the motor to the inoperative position. Ta do this, flick the lever down. After you press, the faster the machine will run. (Foot-driven machines have completed sewing, flick the lever to its opera tive position. Foot Control Place the foot control under the ca binet within easy ...reach of cord into the wall outlet. Motor Disengaging Mechanism Power-driven machines feature a lever underneath the balance wheel which serves ...

Owner's Manual
Page 18
... is ideal for backtacking the beginning or end of the slot (see arrow). The numbers on "0", the machine ceases feeding; This feature is released, the machine re sumes forward sewing. To regulate the stitch length, turn the control until the desir ed number is set on the control ...indicate the stitch length (the higher the number, the longer the stitch). Reverse Sewing To sew in sewing backwards. Stitch Length Regulation ...
... is ideal for backtacking the beginning or end of the slot (see arrow). The numbers on "0", the machine ceases feeding; This feature is released, the machine re sumes forward sewing. To regulate the stitch length, turn the control until the desir ed number is set on the control ...indicate the stitch length (the higher the number, the longer the stitch). Reverse Sewing To sew in sewing backwards. Stitch Length Regulation ...

Owner's Manual
Page 19
.... To exchange the this thumb screw sewing foot, loosen securely again. Fundamentals of Machine Operation • Never run Place both machine. to its highest position before under unless you pulling With presser seWing now. you put fabric into the ...machine have completed a seam. foot No. 93-838950-00 attached to do is the fabric. Make sure, you can start Enjoy creative sewing with your machine, you tighten 18 wgiullidfeeetdhethweomrka. by pushing or All you the sewing have fabric foot before you have to your Pfaff. a threaded machine...
.... To exchange the this thumb screw sewing foot, loosen securely again. Fundamentals of Machine Operation • Never run Place both machine. to its highest position before under unless you pulling With presser seWing now. you put fabric into the ...machine have completed a seam. foot No. 93-838950-00 attached to do is the fabric. Make sure, you can start Enjoy creative sewing with your machine, you tighten 18 wgiullidfeeetdhethweomrka. by pushing or All you the sewing have fabric foot before you have to your Pfaff. a threaded machine...

Owner's Manual
Page 26
This anchors threads in the unworn area around the hole. Darning with short stitches. Then turn the fabric at high speed. First stitch back and forth across the hole with the machine running at right angles and sew back and forth over preceding work with Darning Hoops (See page 23 for preparing your ma chine for darning.) Clamp fabric into darning hoops, cut out small and methum-sized holes following the fabric grain. I? 8288 24
This anchors threads in the unworn area around the hole. Darning with short stitches. Then turn the fabric at high speed. First stitch back and forth across the hole with the machine running at right angles and sew back and forth over preceding work with Darning Hoops (See page 23 for preparing your ma chine for darning.) Clamp fabric into darning hoops, cut out small and methum-sized holes following the fabric grain. I? 8288 24

Owner's Manual
Page 29
with sewing silk in your left hand. To do this, hold both needle Thread Tension cStholirrgerheatcdltylyteinntschireoenabsoedbebtphienendtbhionrebgabdionnshthtohrueeladdtyappteepneosaifornfaasbaraincdfauiisnnectdr,zeiagIsfzeathgoerlitndeenescoironenatsheheastohtebheenerenseiddsleeet 27 up as instructed on It is drawn threads in the needle and Set the machine for ...,,aonakfadsen.t-hdiuPlelpuutlhtlsweltertovhaotersteerhpdaeo4droositnboepinptiiwnttasosge. and take out the sewing foot. Turn sewing foot thumb screw b to turn out the guide attached.
with sewing silk in your left hand. To do this, hold both needle Thread Tension cStholirrgerheatcdltylyteinntschireoenabsoedbebtphienendtbhionrebgabdionnshthtohrueeladdtyappteepneosaifornfaasbaraincdfauiisnnectdr,zeiagIsfzeathgoerlitndeenescoironenatsheheastohtebheenerenseiddsleeet 27 up as instructed on It is drawn threads in the needle and Set the machine for ...,,aonakfadsen.t-hdiuPlelpuutlhtlsweltertovhaotersteerhpdaeo4droositnboepinptiiwnttasosge. and take out the sewing foot. Turn sewing foot thumb screw b to turn out the guide attached.
Owner's Manual
Page 34
See your operations. Sginurgacmhefsaf,edcsdetiswticionangnalaolnsaopwpboleiocloa, tbiaotnandisnesitdnracwilguithdhte-tshtfieetclmlhinugelt,mi-gsbtrriaotcnihditereruyfsftlwietircthhainnfdgo,utrhe-epmlbybiratoshidrbeeiarndidn.egrI.nmteorensot 32 Your Pfaff can be who will be glad siderably enlarge used for many additional sewing to offer you various sewing feet the range of applications of your Pfaff dealer and attachments which will con machine.
See your operations. Sginurgacmhefsaf,edcsdetiswticionangnalaolnsaopwpboleiocloa, tbiaotnandisnesitdnracwilguithdhte-tshtfieetclmlhinugelt,mi-gsbtrriaotcnihditereruyfsftlwietircthhainnfdgo,utrhe-epmlbybiratoshidrbeeiarndidn.egrI.nmteorensot 32 Your Pfaff can be who will be glad siderably enlarge used for many additional sewing to offer you various sewing feet the range of applications of your Pfaff dealer and attachments which will con machine.

Owner's Manual
Page 35
Care and Maintenance Regular cleaning and oiling will increase the machine oil only. remove the machine base first. parts under the bed plate Use and sewing in the If your machine is a Portable Electric, loosen screw on underside of your machine. service life of base. To do this, DR 590 33 All moving and rotating arm require regular lubrication.
Care and Maintenance Regular cleaning and oiling will increase the machine oil only. remove the machine base first. parts under the bed plate Use and sewing in the If your machine is a Portable Electric, loosen screw on underside of your machine. service life of base. To do this, DR 590 33 All moving and rotating arm require regular lubrication.

Owner's Manual
Page 36
Take a toothpick and re move accumulations of oil into the raceway each day you sew. Put one drop of packed lint. The raceway in the sewing hook is the most important oiling paint. IlL From time to time, remove the needle plate and clean the machine feed with the bob bin and clean the vicinity of the sew ing hook. Take out the bobbin case with a soft brush. DR 589 DR 587 34 Do not lubricate the bobbin winder.
Take a toothpick and re move accumulations of oil into the raceway each day you sew. Put one drop of packed lint. The raceway in the sewing hook is the most important oiling paint. IlL From time to time, remove the needle plate and clean the machine feed with the bob bin and clean the vicinity of the sew ing hook. Take out the bobbin case with a soft brush. DR 589 DR 587 34 Do not lubricate the bobbin winder.

Owner's Manual
Page 42
Please remember that your Pfaff dealer carries an extensive line of zigzag and automatic sewing machines and will be glad to give you a free demonstration at any time. 40
Please remember that your Pfaff dealer carries an extensive line of zigzag and automatic sewing machines and will be glad to give you a free demonstration at any time. 40

Owner's Manual
Page 43
Essential Ports 3 Engaging the Sewing Mechanism 4 Disengaging the Sewing Mechanism 4 Foot Drive 4 Electrical Information 5 Motor Disengaging Mechanism 5 Removing the Bobbin Case 6 Winding the Bobbin 7 Inserting a Full Bobbin 8 Inserting ...Tension 16 Stitch Length Regulation . 17 Reverse Sewing 17 Fundamentals of Machine Operation 18 Inserting Patches 19 Zipper Insertion 20 Hemming 21 Quilting 22 Preparing Your Machine for Darning 23 Darning with Darning Hoops 24 Darning with Sewing Foot. 25 Cording 26 Ornamental Sewing . . 30 Care and Maintenance . 33...
Essential Ports 3 Engaging the Sewing Mechanism 4 Disengaging the Sewing Mechanism 4 Foot Drive 4 Electrical Information 5 Motor Disengaging Mechanism 5 Removing the Bobbin Case 6 Winding the Bobbin 7 Inserting a Full Bobbin 8 Inserting ...Tension 16 Stitch Length Regulation . 17 Reverse Sewing 17 Fundamentals of Machine Operation 18 Inserting Patches 19 Zipper Insertion 20 Hemming 21 Quilting 22 Preparing Your Machine for Darning 23 Darning with Darning Hoops 24 Darning with Sewing Foot. 25 Cording 26 Ornamental Sewing . . 30 Care and Maintenance . 33...


