

Owner's Manual
Page 4
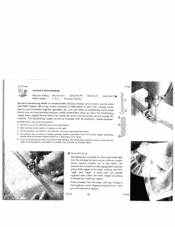
R 8024 A 21 Balance wheel 22 Collapsible spool pins 23 Top cover 24 Needle threader control 25 Face cover 26 Presser bar lifter (also used to operate the Stopmatic) 27 Sewing fool thumb screw 28 Sewing foot 3 29 Needle set screw 30 Bed plate 31 Stopmatic switch box 32 Double receptacle for speed control and power cords
R 8024 A 21 Balance wheel 22 Collapsible spool pins 23 Top cover 24 Needle threader control 25 Face cover 26 Presser bar lifter (also used to operate the Stopmatic) 27 Sewing fool thumb screw 28 Sewing foot 3 29 Needle set screw 30 Bed plate 31 Stopmatic switch box 32 Double receptacle for speed control and power cords
Owner's Manual
Page 8
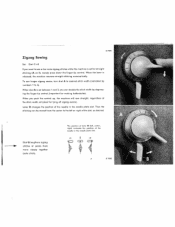
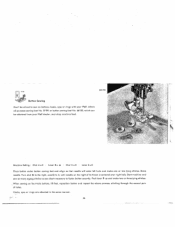
... together (satin stitch). Lever B changes the position of the needle in the needle plate slot. When dial A is released, the mochine resumes straight stitching automatically. When the lever is set between I to desired stitch width (indicated by depress ing the finger-tip control (important for making buttonholes). When you want to the left , center, right) indicotes the position of the needle in the needle plote slot. 4- -+ cD cEP 7 R7995 R 7999 Zigzag Sewing Set: Dial C=O If...
... together (satin stitch). Lever B changes the position of the needle in the needle plate slot. When dial A is released, the mochine resumes straight stitching automatically. When the lever is set between I to desired stitch width (indicated by depress ing the finger-tip control (important for making buttonholes). When you want to the left , center, right) indicotes the position of the needle in the needle plote slot. 4- -+ cD cEP 7 R7995 R 7999 Zigzag Sewing Set: Dial C=O If...
Owner's Manual
Page 9
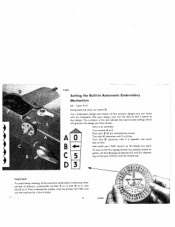
.... The numbers in Automatic Embroidery Mechanism Set: Lever E=3 Swing back the cover on control 0. Turn dial C clockwise until 3 is at top. To ensure that design. 'p ) R 8002 Setting the Built-in the slot indicate the machine dial settings which will give you the design you want. Here is an example: Aj Bli C15 Turn control A to gether, set lever E on 3, dial D on 4, and dial C on the type of fabric and the thread size. DL3...
.... The numbers in Automatic Embroidery Mechanism Set: Lever E=3 Swing back the cover on control 0. Turn dial C clockwise until 3 is at top. To ensure that design. 'p ) R 8002 Setting the Built-in the slot indicate the machine dial settings which will give you the design you want. Here is an example: Aj Bli C15 Turn control A to gether, set lever E on 3, dial D on 4, and dial C on the type of fabric and the thread size. DL3...
Owner's Manual
Page 16
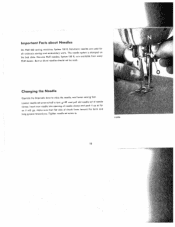
... used for all ordinary sewing and embroidery work. Insert new needle into opening of shank faces toward the back and long groove toward you. Changing the Needle Operate the Stopmatic lever to raise the needle, and lower sewing foot. Make sure that flat side of needle clamp and push it up as far as it will go. Important Facts about Needles On Pfaff 262 sewing machines, System 130 R, flat-shank needles are available from every Pfaff dealer. Loosen needle set screw...
... used for all ordinary sewing and embroidery work. Insert new needle into opening of shank faces toward the back and long groove toward you. Changing the Needle Operate the Stopmatic lever to raise the needle, and lower sewing foot. Make sure that flat side of needle clamp and push it up as far as it will go. Important Facts about Needles On Pfaff 262 sewing machines, System 130 R, flat-shank needles are available from every Pfaff dealer. Loosen needle set screw...
Owner's Manual
Page 20
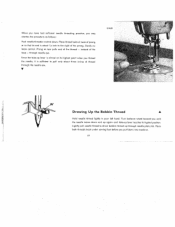
... about /s inch to draw bobbin thread up through needle eye. When you have had sufficient needle threading practice, you until the needle moves down . Place thread behind hook of prong w so that its highest point when you put fabric into machine. 19 Since the take -up lever reaches its highest position. Place both threads back under sewing foot before you thread the needle, it is almost at...
... about /s inch to draw bobbin thread up through needle eye. When you have had sufficient needle threading practice, you until the needle moves down . Place thread behind hook of prong w so that its highest point when you put fabric into machine. 19 Since the take -up lever reaches its highest position. Place both threads back under sewing foot before you thread the needle, it is almost at...

Owner's Manual
Page 22
... left c 4 < for looser tension. V The final stitch appearance can be regulated by the A upper tension dial, as you jerk your hand slightly, the bobbin case should gradually slide down by its own weight. for tighter tension. The numbers on the than for two needle work. Turn it right for tighter tension. loose to reset the tension. For ordinary sewing, the upper tension should be set at about 5. Only in...
... left c 4 < for looser tension. V The final stitch appearance can be regulated by the A upper tension dial, as you jerk your hand slightly, the bobbin case should gradually slide down by its own weight. for tighter tension. The numbers on the than for two needle work. Turn it right for tighter tension. loose to reset the tension. For ordinary sewing, the upper tension should be set at about 5. Only in...
Owner's Manual
Page 23
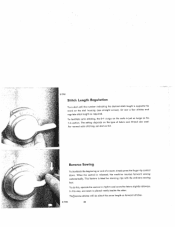
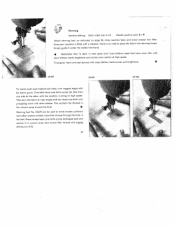
... fabric ond thread size used. When the control is ideal for darning rips with the ordinary sewing foot. Or sew a few stitches and regulate stitch length as forward stitches. 22 The setting depends on the scale is just as large as the 1-4 section. In this , operate the control in rhythm and move the fabric slightly sideways. This feature is released, the machine resumes forward sewing automatically. Far normal satin stitching, set dial on the dial...
... fabric ond thread size used. When the control is ideal for darning rips with the ordinary sewing foot. Or sew a few stitches and regulate stitch length as forward stitches. 22 The setting depends on the scale is just as large as the 1-4 section. In this , operate the control in rhythm and move the fabric slightly sideways. This feature is released, the machine resumes forward sewing automatically. Far normal satin stitching, set dial on the dial...

Owner's Manual
Page 25
Drop machine feed and lower presser bar lifter. Slip on new foot and tighten the screw securely. As the machine sews, the vibrator moves presser bar and darning foot up and down when it is thus held down . The fabric is entered by the needle, and can be clamped into hoops.) 24 DR 082 R 7085 Darning Foot and Vibrator .2 Attach darning foot No. 53670, as you move it down. Hold the fabric taut with both hands...
Drop machine feed and lower presser bar lifter. Slip on new foot and tighten the screw securely. As the machine sews, the vibrator moves presser bar and darning foot up and down when it is thus held down . The fabric is entered by the needle, and can be clamped into hoops.) 24 DR 082 R 7085 Darning Foot and Vibrator .2 Attach darning foot No. 53670, as you move it down. Hold the fabric taut with both hands...
Owner's Manual
Page 28
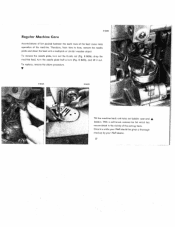
... sewing hook. R 8455), and lift it out. V 8 8454 R 8455 Tilt the machine back and take out bobbin case and A bobbin. To replace, reverse the above procedure. Once in the vicinity of the machine. With a soft brush remove the lint which has accumulated in a while your Pfaff should be given a thorough checkup by your Pfaff dealer. 27 Therefore, from time to time, remove the needle plate ond clean the feed...
... sewing hook. R 8455), and lift it out. V 8 8454 R 8455 Tilt the machine back and take out bobbin case and A bobbin. To replace, reverse the above procedure. Once in the vicinity of the machine. With a soft brush remove the lint which has accumulated in a while your Pfaff should be given a thorough checkup by your Pfaff dealer. 27 Therefore, from time to time, remove the needle plate ond clean the feed...
Owner's Manual
Page 31
... the feeding motion. Bobbin unevenly wound. Pieces of sewing hook. Machine Feeds Improperly Cause: Feed dog set too low, does nat rise up enough above needle plate level. Take off needle plate and remove lint with a stiff brush. 30 Use only first-rate thread -- Guide the material lightly. Don't run thread over finger when winding the bobbin, but lead it snap into place. 4. Remedy: Adjust tensions as instructed. the correct size for the needle and fabric. Faulty Stitch Formation...
... the feeding motion. Bobbin unevenly wound. Pieces of sewing hook. Machine Feeds Improperly Cause: Feed dog set too low, does nat rise up enough above needle plate level. Take off needle plate and remove lint with a stiff brush. 30 Use only first-rate thread -- Guide the material lightly. Don't run thread over finger when winding the bobbin, but lead it snap into place. 4. Remedy: Adjust tensions as instructed. the correct size for the needle and fabric. Faulty Stitch Formation...

Owner's Manual
Page 33
... quilting gauge). Ta sew narrow parallel seams, guide fabric edge or preceding seam along the preceding row of fabric. LeverB=' Dial C=0 . Always guide the gauge finger along right edge of straigt or zigzag stitches at various distances from the fabric edge by using no edge guide. 41 Quilting Machine Setting: DialA=O . The seam guide is fastened to right side. R 7153A Using Sewing Feet and Attachments (for settings see page 6) Zipper Insertion Edge Stitching Machine Setting: DiaIA=O Lever Dial C=0 Lever E=0 Pin or baste closed zipper on...
... quilting gauge). Ta sew narrow parallel seams, guide fabric edge or preceding seam along the preceding row of fabric. LeverB=' Dial C=0 . Always guide the gauge finger along right edge of straigt or zigzag stitches at various distances from the fabric edge by using no edge guide. 41 Quilting Machine Setting: DialA=O . The seam guide is fastened to right side. R 7153A Using Sewing Feet and Attachments (for settings see page 6) Zipper Insertion Edge Stitching Machine Setting: DiaIA=O Lever Dial C=0 Lever E=0 Pin or baste closed zipper on...
Owner's Manual
Page 35
... machine by slowing down against the needle plate an feeding. Don't crowd fabric into the hemmer foot. To the left edge of corner, cut away sewn first, as illustrated in sketch 2. 46281 Rolled Hems Machine Setting: DialA=2to4 ' LeverB=+ Dial C=O . To hem tricot fabrics, increase the tension and use the widest zigzag stitch so the hem has a rolled shell effect. 41248 R 5912 Hemming Machine Setting: DialA=eOor2to4 LeverB='I Dial C=O Lever E=O The hemmer foot...
... machine by slowing down against the needle plate an feeding. Don't crowd fabric into the hemmer foot. To the left edge of corner, cut away sewn first, as illustrated in sketch 2. 46281 Rolled Hems Machine Setting: DialA=2to4 ' LeverB=+ Dial C=O . To hem tricot fabrics, increase the tension and use the widest zigzag stitch so the hem has a rolled shell effect. 41248 R 5912 Hemming Machine Setting: DialA=eOor2to4 LeverB='I Dial C=O Lever E=O The hemmer foot...

Owner's Manual
Page 39
.... Single-Needle Cording 46121 R7162 Machine Setting: Shirrirsg DiolA=2 Lever B=4 Dial C=O Lever E=O Machine Setting: Dial A=2 to which the shirring will be exposed. :.. _%. . Fabric ond filler thread stitch length between /2 and 1. The satin stitch is Follow above directions for many sewing lobs. Follow your pattern with contrasting thread. For added effects sew place filler thread under rather than on thickness of filler thread used for shirring, but used . -% b-. V Width of zigzag depends on over embroidery with a satin stitch and Filler thread...
.... Single-Needle Cording 46121 R7162 Machine Setting: Shirrirsg DiolA=2 Lever B=4 Dial C=O Lever E=O Machine Setting: Dial A=2 to which the shirring will be exposed. :.. _%. . Fabric ond filler thread stitch length between /2 and 1. The satin stitch is Follow above directions for many sewing lobs. Follow your pattern with contrasting thread. For added effects sew place filler thread under rather than on thickness of filler thread used for shirring, but used . -% b-. V Width of zigzag depends on over embroidery with a satin stitch and Filler thread...
Owner's Manual
Page 43
... the fabric. 44088 J Imitation Hemstitching Machine Setting: Dial A 1 /=s2 Lever B= '4 Stitch Length: 1_li/s Increase Tension Dial Cw0 Lever E0 Beautiful hemstitching effects on handkerchiefs, blouses, dresses, and so forth, can be turned out far enough for a medium-wide zigzag stitch and sew along this type of work use on the right. 3 Lift sewing foot, turn fabric in fabric on the left of hemstiiching, alternotely leave needle in the direction of previous zigzag stitches as...
... the fabric. 44088 J Imitation Hemstitching Machine Setting: Dial A 1 /=s2 Lever B= '4 Stitch Length: 1_li/s Increase Tension Dial Cw0 Lever E0 Beautiful hemstitching effects on handkerchiefs, blouses, dresses, and so forth, can be turned out far enough for a medium-wide zigzag stitch and sew along this type of work use on the right. 3 Lift sewing foot, turn fabric in fabric on the left of hemstiiching, alternotely leave needle in the direction of previous zigzag stitches as...

Owner's Manual
Page 45
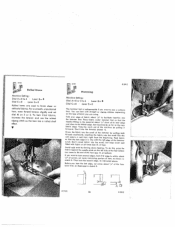
I? 8046 Sewing Buttonholes Machine Setting: Dial A 1 /z =1 Lever 8= i. The basic machine settings need not be changed in the R 8042 guide groove. The buttonhole is advisable to buttonhole length desired. You may use also the all-purpose sewing foot No. 51991. In making buttonholes in tricot and knit fabrics, insert a piece of A scrap material. All special settings are made by simply pushing lever F up (foriying off) or down (for bartacking). To get the correct stitch length, sew on buttonhole gauge...
I? 8046 Sewing Buttonholes Machine Setting: Dial A 1 /z =1 Lever 8= i. The basic machine settings need not be changed in the R 8042 guide groove. The buttonhole is advisable to buttonhole length desired. You may use also the all-purpose sewing foot No. 51991. In making buttonholes in tricot and knit fabrics, insert a piece of A scrap material. All special settings are made by simply pushing lever F up (foriying off) or down (for bartacking). To get the correct stitch length, sew on buttonhole gauge...
Owner's Manual
Page 47
... stitches. 51951 Button Sewing Don't be obtained from your Pfaff. Attach all-purpose sewing foot No. 51991 or button sewing foot No. 46120, which can be afraid to 3, until needle on the right of holes. Lever E=0 Place button under button sewing foot and align so that needle will enter left hole and make two or three tying stitches. Hooks, eyes or rings are attached in the same manner. 46 Machine Setting: Dial A=0 Lever B= • . Start machine and sew as many zigzag stitches...
... stitches. 51951 Button Sewing Don't be obtained from your Pfaff. Attach all-purpose sewing foot No. 51991 or button sewing foot No. 46120, which can be afraid to 3, until needle on the right of holes. Lever E=0 Place button under button sewing foot and align so that needle will enter left hole and make two or three tying stitches. Hooks, eyes or rings are attached in the same manner. 46 Machine Setting: Dial A=0 Lever B= • . Start machine and sew as many zigzag stitches...
Owner's Manual
Page 48
... the hole in the unworn area around the hale. Sew across damaged spat and anchor it under the needle free-hand. .4 Remember that 'a stitch in unworn area. 53670 Darning Machine Setting: Stitch width dial A=0 Needle position lever B=4 Attach darning foot, as instructed on page 24, drop machine feed, and lower presser bar lifter. Place thread back and forth across filler thread with the machine running at right angles and sew back and forth aver preceding work with the fabric...
... the hole in the unworn area around the hale. Sew across damaged spat and anchor it under the needle free-hand. .4 Remember that 'a stitch in unworn area. 53670 Darning Machine Setting: Stitch width dial A=0 Needle position lever B=4 Attach darning foot, as instructed on page 24, drop machine feed, and lower presser bar lifter. Place thread back and forth across filler thread with the machine running at right angles and sew back and forth aver preceding work with the fabric...

Owner's Manual
Page 49
Machine Setting: This technique is such as follows: Remove presser foot and increase tautness of fabric cover plate to A=2. Place fabric into darning hoops. Needle position lever B= 4 darn small holes in position with dbsinerliodpphsoitlsoimdpfeasinc(ghabeinonrdtetionpmfteoe)er.dmth. pleTlaoptelfaatNseteo(n.to4pt1h),e25tuf1erentd,o You can buy the feed cover plate Na. 41251 from your machine for darning as nylon. ietUhfsroeeleefeomefdothveecmonveeenertd. Stitch width dial used primarily to the mochine, and secure in delicate fabrics, R 5918 48 Darning without Foot ...
Machine Setting: This technique is such as follows: Remove presser foot and increase tautness of fabric cover plate to A=2. Place fabric into darning hoops. Needle position lever B= 4 darn small holes in position with dbsinerliodpphsoitlsoimdpfeasinc(ghabeinonrdtetionpmfteoe)er.dmth. pleTlaoptelfaatNseteo(n.to4pt1h),e25tuf1erentd,o You can buy the feed cover plate Na. 41251 from your machine for darning as nylon. ietUhfsroeeleefeomefdothveecmonveeenertd. Stitch width dial used primarily to the mochine, and secure in delicate fabrics, R 5918 48 Darning without Foot ...

Owner's Manual
Page 55
... pages. Sewing feet and Pfoff dealer. The Transverse Spool Holder 1 j To ensure that the thread will be obtained from a cross-wound spool, use the transverse spool holder. Push the spooi of its position on page 24. With the spring pressed together, adjust its shoe facilitates all sewing operations where it is attached as instructed on the vertical spool pin, as instructed. Pass the thread through eyelet 3, and thread the machine as required...
... pages. Sewing feet and Pfoff dealer. The Transverse Spool Holder 1 j To ensure that the thread will be obtained from a cross-wound spool, use the transverse spool holder. Push the spooi of its position on page 24. With the spring pressed together, adjust its shoe facilitates all sewing operations where it is attached as instructed on the vertical spool pin, as instructed. Pass the thread through eyelet 3, and thread the machine as required...
Owner's Manual
Page 56
... Upper Threading . Shirring Applique Work Openwork Embroidery • Scalloping Scrollwork Imitation Hemstitching • Blindstitching Automatic Blindstitching • Sewing Buttonholes • . Sewing Monograms . . Elastic Seam The Transverse Spool Holder All-Purpose Sewing Foot Page . 37 Monogram Embroidery . Button Sewing Darning Darning without Foot . Operating the Needle Threader Drawing Up the Bobbin Thread Correct Tension Regulation Regulating the Thread Tension Stitch Length Regulation Reverse Sewing Dropping the Machine Feed Changing the Sewing Foot Darning...
... Upper Threading . Shirring Applique Work Openwork Embroidery • Scalloping Scrollwork Imitation Hemstitching • Blindstitching Automatic Blindstitching • Sewing Buttonholes • . Sewing Monograms . . Elastic Seam The Transverse Spool Holder All-Purpose Sewing Foot Page . 37 Monogram Embroidery . Button Sewing Darning Darning without Foot . Operating the Needle Threader Drawing Up the Bobbin Thread Correct Tension Regulation Regulating the Thread Tension Stitch Length Regulation Reverse Sewing Dropping the Machine Feed Changing the Sewing Foot Darning...


