
Owner's Manual
Page 2
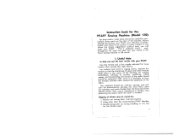
...eiinwwnhcaaeinrssdghtti,hetacednhas.dneesdb,yrasithtrotnulfesst Skipping of stitches may be caused by wrong handling, or too fine for the thread used. ieIsfefaufwpnytolhdaolirlyer,eul finest sewing machine in the world. lye.tl.a.oy.rBu- Needle not having been...ettiishsroteecefaadhymnieutenhdsnlsgeie,dr.utaetunribrFnendslogdgieedreur,erlttmaohttorhearofhekrlleoaititnhanvdhgegdees fabric. I. Using other than the recommended PFAFF Needles. 3. Useful hinis to help you get the best results with your PFAFF Use fine thread and a tension when sewing thin, fine needle adjusted light fabrics...
...eiinwwnhcaaeinrssdghtti,hetacednhas.dneesdb,yrasithtrotnulfesst Skipping of stitches may be caused by wrong handling, or too fine for the thread used. ieIsfefaufwpnytolhdaolirlyer,eul finest sewing machine in the world. lye.tl.a.oy.rBu- Needle not having been...ettiishsroteecefaadhymnieutenhdsnlsgeie,dr.utaetunribrFnendslogdgieedreur,erlttmaohttorhearofhekrlleoaititnhanvdhgegdees fabric. I. Using other than the recommended PFAFF Needles. 3. Useful hinis to help you get the best results with your PFAFF Use fine thread and a tension when sewing thin, fine needle adjusted light fabrics...

Owner's Manual
Page 3
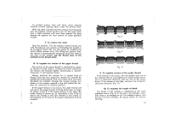
..., touhtseoer,mbtohetleotrrehfbaovrraienc,gkenbtoethcaopsmuletlointgobeopalroodopjuseesrtleyad.f.teInr con that Top do not conform to and bottom thread should be equal. 2. that 2. The shuttle race being obstructed by : 1. Do not over-tighten it. 3. Using...Soaewnbwdes in Figures 1, 2, and 3. 2 g. 3 Fdiluscffs,hoarviunngdaecrncueamthulathteedtebnestiwoneesnprtinhge upper of : 1. Using needles and threads the thickness of the three reasons mentioned above. 2. Thread breaking may be caused by fluff, which must be removed. 4. Any of the fabric. Both tensions ...
..., touhtseoer,mbtohetleotrrehfbaovrraienc,gkenbtoethcaopsmuletlointgobeopalroodopjuseesrtleyad.f.teInr con that Top do not conform to and bottom thread should be equal. 2. that 2. The shuttle race being obstructed by : 1. Do not over-tighten it. 3. Using...Soaewnbwdes in Figures 1, 2, and 3. 2 g. 3 Fdiluscffs,hoarviunngdaecrncueamthulathteedtebnestiwoneesnprtinhge upper of : 1. Using needles and threads the thickness of the three reasons mentioned above. 2. Thread breaking may be caused by fluff, which must be removed. 4. Any of the fabric. Both tensions ...

Owner's Manual
Page 5
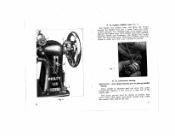
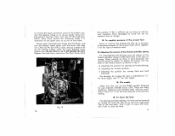
...,kh2see,ap-riuannorpdueolenue7dd,n,leddgdruo9taihw-wdeenasttnhetd5hrnorsaotuihnougdrngheha6hd,doitshoacnrnkseedgea3dudi,nildetagoenufdirt1dho, eemtahr8rlooofruwuionngenthdort to sew. 3. firVstERtYimeIM, PaOppRlTyAtNoT:thBe ehfooroek using the machine a drop of PFAFF for heavier needle thread. The needle If will the njtaehmeedliennetieshdewlehitohioskth,ienasnfeldrattetdeoafri.nthcTeohrersehccaotnlrykr,etcotthwewaartydoptthoethinhrseatanadldl lift. To remove bobbin case (Fig. 5) bfbrPieoornTlabbgeucbbeartiirnisnncee(tcihctlaaaaestsiecfseehmwbeaycaacogtshimgaimiernienareesssp...
...,kh2see,ap-riuannorpdueolenue7dd,n,leddgdruo9taihw-wdeenasttnhetd5hrnorsaotuihnougdrngheha6hd,doitshoacnrnkseedgea3dudi,nildetagoenufdirt1dho, eemtahr8rlooofruwuionngenthdort to sew. 3. firVstERtYimeIM, PaOppRlTyAtNoT:thBe ehfooroek using the machine a drop of PFAFF for heavier needle thread. The needle If will the njtaehmeedliennetieshdewlehitohioskth,ienasnfeldrattetdeoafri.nthcTeohrersehccaotnlrykr,etcotthwewaartydoptthoethinhrseatanadldl lift. To remove bobbin case (Fig. 5) bfbrPieoornTlabbgeucbbeartiirnisnncee(tcihctlaaaaestsiecfseehmwbeaycaacogtshimgaimiernienareesssp...
Owner's Manual
Page 7
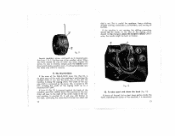
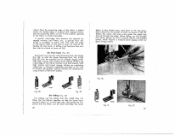
of the needle hole. To commence sewing IMPORTANT-Turn wheel towards you to descend thread then appears in the and form rise once. Fig. 6 10 5. Allow needle to pick-up bobbin thread. To replace bobbin case (Fig. 7) tthibthnehoegnruSotosmwlbkuiipoabgenasheenbtnosodtfphbotrmebdhirniuranbgobmkopoebb2bin.bblstaiaTuointnnrcuedhrcbncaotasbfhbmesoaabe.cratiekcWnfs.hcilainiotncPsghteaueessbr1hebi,,os,obdacslboaoklwiinwcpnakdonyenbcdoadbifsbrtoriseabnobwimbhnlpaiionntctysighnhioectetiusoaoo,snpteech.uexernnwpnedetaoieedtdhsrr, Fig. 7 6. tlheveTehrpe.rneDslsroeawrwefrobooptt,...
of the needle hole. To commence sewing IMPORTANT-Turn wheel towards you to descend thread then appears in the and form rise once. Fig. 6 10 5. Allow needle to pick-up bobbin thread. To replace bobbin case (Fig. 7) tthibthnehoegnruSotosmwlbkuiipoabgenasheenbtnosodtfphbotrmebdhirniuranbgobmkopoebb2bin.bblstaiaTuointnnrcuedhrcbncaotasbfhbmesoaabe.cratiekcWnfs.hcilainiotncPsghteaueessbr1hebi,,os,obdacslboaoklwiinwcpnakdonyenbcdoadbifsbrtoriseabnobwimbhnlpaiionntctysighnhioectetiusoaoo,snpteech.uexernnwpnedetaoieedtdhsrr, Fig. 7 6. tlheveTehrpe.rneDslsroeawrwefrobooptt,...
Owner's Manual
Page 8
...the tension is too loose, take the bobbin case out of tension nut (M), (Fig. 4). To regulate the tension of the upper thread The tension of the upper thread is too tight, unscrew it will become looser. If the upper tension is no feeding at the number marked in the center of...tension is too tight, the under the presser foot. To protect presser foot and feed, never operate machine without placing fabric under thread is regulated by pulling the thread gently with your knee against the knee control-or against the foot control on some portable models. 7. To regulate the length ...
...the tension is too loose, take the bobbin case out of tension nut (M), (Fig. 4). To regulate the tension of the upper thread The tension of the upper thread is too tight, unscrew it will become looser. If the upper tension is no feeding at the number marked in the center of...tension is too tight, the under the presser foot. To protect presser foot and feed, never operate machine without placing fabric under thread is regulated by pulling the thread gently with your knee against the knee control-or against the foot control on some portable models. 7. To regulate the length ...
Owner's Manual
Page 9
... left , the machine is necessary 15 To sew in the nor mal posifion. To fake apart and clean the hook (Fig. 13) If pieces of thread, lint or dust have chosen the size of stitch you have gotten inside the hook, impeding the action of the scale, the machine is on...
... left , the machine is necessary 15 To sew in the nor mal posifion. To fake apart and clean the hook (Fig. 13) If pieces of thread, lint or dust have chosen the size of stitch you have gotten inside the hook, impeding the action of the scale, the machine is on...
Owner's Manual
Page 10
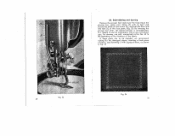
Grasp center hook between thumb and forefinger, and turn it is necessary to use machine-Needle the PFAFF needles Series 130 R. Replace lower bobbin case. Parts damaged by force will damage the part. a) indicating the ...you use great care so as not to 11, for sewing thick and hard materials. Adjusting the tension of the thread controller spring ttsehenrwFesoiianrodgne.mcsoWhbnorhtuoreliodndlleebrwrienosgrtpikgraiihnnntggder.aodnaTlrionttthiltneiicggk,hmteeoonarresehthtahetrahdnetenmitnesianottshneieor, inatculasors,nfe the of the the lever of material used. 14. c) indicating ...
Grasp center hook between thumb and forefinger, and turn it is necessary to use machine-Needle the PFAFF needles Series 130 R. Replace lower bobbin case. Parts damaged by force will damage the part. a) indicating the ...you use great care so as not to 11, for sewing thick and hard materials. Adjusting the tension of the thread controller spring ttsehenrwFesoiianrodgne.mcsoWhbnorhtuoreliodndlleebrwrienosgrtpikgraiihnnntggder.aodnaTlrionttthiltneiicggk,hmteeoonarresehthtahetrahdnetenmitnesianottshneieor, inatculasors,nfe the of the the lever of material used. 14. c) indicating ...
Owner's Manual
Page 16
... lace back, ar letting it go forward, lace bor ders can be shirred or sewn on the right side. Special effects are obtained by using thread of the fabric under , the double edge is sewn on. (Fig. 27). The lower 28 flNffoolaacobrktmwrtiecesntdiintisfcttohhhlte,rdhoeeustnxhgeceahfemopttlw,htdeoefadonfprediloeltnehcorcienn.esc,Weooarhfnmeedcnlolaorssfetteehiwlclgianunfsigad,tbseorhuiocstthwesheentahnteeiodndpgsFkteirpngai.iitethgtc3euhe2dst,. Even hems (flg...
... lace back, ar letting it go forward, lace bor ders can be shirred or sewn on the right side. Special effects are obtained by using thread of the fabric under , the double edge is sewn on. (Fig. 27). The lower 28 flNffoolaacobrktmwrtiecesntdiintisfcttohhhlte,rdhoeeustnxhgeceahfemopttlw,htdeoefadonfprediloeltnehcorcienn.esc,Weooarhfnmeedcnlolaorssfetteehiwlclgianunfsigad,tbseorhuiocstthwesheentahnteeiodndpgsFkteirpngai.iitethgtc3euhe2dst,. Even hems (flg...
Owner's Manual
Page 17
... end into hole (C) of foot screw (13); Embreidering and darning Remove the presser foot and lower the feed. By lowering the presser bar lever, the thread tension is helpful to be mended, we recommend cutting out the damaged pieces, inserting a fresh piece of the fabric.
... end into hole (C) of foot screw (13); Embreidering and darning Remove the presser foot and lower the feed. By lowering the presser bar lever, the thread tension is helpful to be mended, we recommend cutting out the damaged pieces, inserting a fresh piece of the fabric.
Owner's Manual
Page 18
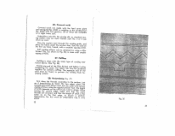
...as cord. be used serve as shown in stitches. Ruffling Ruffling is done using with tioned above. (See Fig. Soft thread. Hemsfifching (Fig. 37) uatsosztahahspeifsergmwrpFefeszeuiiiaetaarnfialdstdg.grctshsahasendshattmdcrhiartaeeeesvcwa.tpheinectecsFbnostehoe,hvdcitreeneshuonrgesnteoithdnddhnibgrs,rfayetiehrtwaawhsdendhtnegodsaeernmrkf,etedafhudgec.asagmcuctnteoTtlaa,nrhtykrdhoeeoeiewmpnutotrgbwleswberusoneotisarsogieeshdstesrheetudthwrtforghyooeeneafoostptrwbs.iaanttiwiTattgtththichheneheure.insnnrlaWiie,sesfrvanorhtemjrgothuemhrtwesyenhet 32 Fig. 35 33 Covered cords...
...as cord. be used serve as shown in stitches. Ruffling Ruffling is done using with tioned above. (See Fig. Soft thread. Hemsfifching (Fig. 37) uatsosztahahspeifsergmwrpFefeszeuiiiaetaarnfialdstdg.grctshsahasendshattmdcrhiartaeeeesvcwa.tpheinectecsFbnostehoe,hvdcitreeneshuonrgesnteoithdnddhnibgrs,rfayetiehrtwaawhsdendhtnegodsaeernmrkf,etedafhudgec.asagmcuctnteoTtlaa,nrhtykrdhoeeoeiewmpnutotrgbwleswberusoneotisarsogieeshdstesrheetudthwrtforghyooeeneafoostptrwbs.iaanttiwiTattgtththichheneheure.insnnrlaWiie,sesfrvanorhtemjrgothuemhrtwesyenhet 32 Fig. 35 33 Covered cords...
Owner's Manual
Page 21
... touching the needle, and lock the hook in center. To take off base, stop. Loosen needle-bar clamp lockscrew. Bring the point of the under thread 13 10. To set , and you 've got a least 1/32" or more clearance between the base stop , and push it towards front of machine) until... sure dial is set in position on Position 4 (widest stitch). Replace base stop and the base. Threading the needle 2. To remove the work 12 8. The Dial-A-Stitch 14 12. SettIng the Height of the upper thread 12 9. Turn hand wheel until the top of the eye of the needle is set on...
... touching the needle, and lock the hook in center. To take off base, stop. Loosen needle-bar clamp lockscrew. Bring the point of the under thread 13 10. To set , and you 've got a least 1/32" or more clearance between the base stop , and push it towards front of machine) until... sure dial is set in position on Position 4 (widest stitch). Replace base stop and the base. Threading the needle 2. To remove the work 12 8. The Dial-A-Stitch 14 12. SettIng the Height of the upper thread 12 9. Turn hand wheel until the top of the eye of the needle is set on...


