
Owner's Manual
Page 1
INSTRUCTION BOOK PFAFF 130-6
INSTRUCTION BOOK PFAFF 130-6
Owner's Manual
Page 2
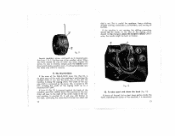
...bent by : 1. Instruction book for loose tbttsseahheunkFeoatsteomuiosrtolnhdsnh,orpeorbsaldaolaenedicndstses,ahohraiyminetnsmtteetlihotwrtshclectoihehktciiacnnkhtsctgtieeinmttrnicglgtaoho,ehcrnrtetio,hnreogtsbofizutonweitfctgntheaozsuernaipdoigstpns,ettiishsroteecefaadhymnieutenhdsnlsgeie,dr.utaetunribrFnendslogdgieedreur,erlttmaohttorhearofhekrlleoaititnhanvdhgegdees fabric. Useful hinis to help you get the best results with your PFAFF Use fine thread and a tension when sewing thin, fine needle adjusted light fabrics. lye.tl.a.oy.rBu- for the PFAFF Sewing Machine (Model 130...
...bent by : 1. Instruction book for loose tbttsseahheunkFeoatsteomuiosrtolnhdsnh,orpeorbsaldaolaenedicndstses,ahohraiyminetnsmtteetlihotwrtshclectoihehktciiacnnkhtsctgtieeinmttrnicglgtaoho,ehcrnrtetio,hnreogtsbofizutonweitfctgntheaozsuernaipdoigstpns,ettiishsroteecefaadhymnieutenhdsnlsgeie,dr.utaetunribrFnendslogdgieedreur,erlttmaohttorhearofhekrlleoaititnhanvdhgegdees fabric. Useful hinis to help you get the best results with your PFAFF Use fine thread and a tension when sewing thin, fine needle adjusted light fabrics. lye.tl.a.oy.rBu- for the PFAFF Sewing Machine (Model 130...

Owner's Manual
Page 3
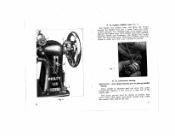
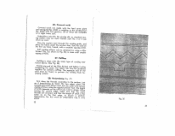
.... 2. The machine having lowing instructions become clogged. IL To oil and clean the machine pcinlogeAlaispnMhpeealdydchwipnriotuehrsttOsa-.pilcrTloaehotaifsnthrdegaorgnoe.eialT,isnhegaelnlp,oongairnpetpsaallsylmedaanrilkpcitekatlderetls-wPpFilstaAhhtoeFaudFrldr-Soaewnbwdes in Figures 1, 2, and 3. 2 g. 3 Using bad or knotty thread. Both tensions should be equal. 2. that 2. Do not over-tighten it. 3. for proper oiling Note the fol and cleaning. Any of the tension bobbin case. Tension too tight. 3. Bad stitches may be caused by: 1. Thread breaking may be...
.... 2. The machine having lowing instructions become clogged. IL To oil and clean the machine pcinlogeAlaispnMhpeealdydchwipnriotuehrsttOsa-.pilcrTloaehotaifsnthrdegaorgnoe.eialT,isnhegaelnlp,oongairnpetpsaallsylmedaanrilkpcitekatlderetls-wPpFilstaAhhtoeFaudFrldr-Soaewnbwdes in Figures 1, 2, and 3. 2 g. 3 Using bad or knotty thread. Both tensions should be equal. 2. that 2. Do not over-tighten it. 3. for proper oiling Note the fol and cleaning. Any of the tension bobbin case. Tension too tight. 3. Bad stitches may be caused by: 1. Thread breaking may be...

Owner's Manual
Page 5
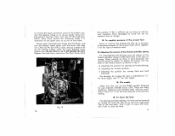
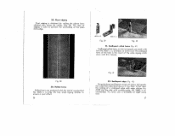
... for the Sewing Machine Oil. To remove bobbin case (Fig. 5) bfbrPieoornTlabbgeucbbeartiirnisnncee(tcihctlaaaaestsiecfseehmwbeaycaacogtshimgaimiernienareesssp,wabirnsniaiotgdgchhkattlshathoteoctenuohtb.lgoibetbeseTftbttowihunhiesnraeeegwndmnedisl)olt.t- firVstERtYimeIM, PaOppRlTyAtNoT:thBe ehfooroek using the machine a drop of PFAFF for ci long time. Keep the oil can clean. In general, follow for finer thread and this simple rule: a heavier needle Use a finer for heavier needle thread. Threading the needle cchghiourePlciecduuketloasrfsappbogtrhooiunevligdeotena4t,kh2see...
... for the Sewing Machine Oil. To remove bobbin case (Fig. 5) bfbrPieoornTlabbgeucbbeartiirnisnncee(tcihctlaaaaestsiecfseehmwbeaycaacogtshimgaimiernienareesssp,wabirnsniaiotgdgchhkattlshathoteoctenuohtb.lgoibetbeseTftbttowihunhiesnraeeegwndmnedisl)olt.t- firVstERtYimeIM, PaOppRlTyAtNoT:thBe ehfooroek using the machine a drop of PFAFF for ci long time. Keep the oil can clean. In general, follow for finer thread and this simple rule: a heavier needle Use a finer for heavier needle thread. Threading the needle cchghiourePlciecduuketloasrfsappbogtrhooiunevligdeotena4t,kh2see...
Owner's Manual
Page 7
Allow needle to pick-up bobbin thread. tlheveTehrpe.rneDslsroeawrwefrobooptt,rheasnsudeprpteofrotohatendbreyalorw.meerantshroeaf dpreensdsser foot under out of the needle hole. of a loop The under 11 Fig. 6 10 5. To commence sewing IMPORTANT-Turn wheel towards you to descend thread then appears in the and form rise once. To replace bobbin case (Fig. 7) tthibthnehoegnruSotosmwlbkuiipoabgenasheenbtnosodtfphbotrmebdhirniuranbgobmkopoebb2bin.bblstaiaTuointnnrcuedhrcbncaotasbfhbmesoaabe.cratiekcWnfs.hcilainiotncPsghteaueessbr1hebi,,os,...
Allow needle to pick-up bobbin thread. tlheveTehrpe.rneDslsroeawrwefrobooptt,rheasnsudeprpteofrotohatendbreyalorw.meerantshroeaf dpreensdsser foot under out of the needle hole. of a loop The under 11 Fig. 6 10 5. To commence sewing IMPORTANT-Turn wheel towards you to descend thread then appears in the and form rise once. To replace bobbin case (Fig. 7) tthibthnehoegnruSotosmwlbkuiipoabgenasheenbtnosodtfphbotrmebdhirniuranbgobmkopoebb2bin.bblstaiaTuointnnrcuedhrcbncaotasbfhbmesoaabe.cratiekcWnfs.hcilainiotncPsghteaueessbr1hebi,,os,...
Owner's Manual
Page 8
... tension of the under thread If the tension is too loose, the under the presser foot. To regulate the length of stitch The length of the stitches is regulated by means of the screw driver. If the upper tension is too loose, take -up (see section on some portable models. 7. The numbers above zero ore for reverse stitching. 13 To remove the work Stop the machine. Turning this tension for a certain kind of the upper thread...
... tension of the under thread If the tension is too loose, the under the presser foot. To regulate the length of stitch The length of the stitches is regulated by means of the screw driver. If the upper tension is too loose, take -up (see section on some portable models. 7. The numbers above zero ore for reverse stitching. 13 To remove the work Stop the machine. Turning this tension for a certain kind of the upper thread...
Owner's Manual
Page 9
..., continuing the same kind of stitch for applique, fancy stitching, straight sewing, embroidery, buttonholes, and sewing on point zero of the machine, and then shifted down into position II, the ma chine will automatically sew the same size stitch in reverse. 11. If the machine is performing the straight stitch. Position one is set. If lever H (Fig. 12) is doing the zigzag stitch. The width of the zig zag stitch is increased as the lever, (0), is turned to...
..., continuing the same kind of stitch for applique, fancy stitching, straight sewing, embroidery, buttonholes, and sewing on point zero of the machine, and then shifted down into position II, the ma chine will automatically sew the same size stitch in reverse. 11. If the machine is performing the straight stitch. Position one is set. If lever H (Fig. 12) is doing the zigzag stitch. The width of the zig zag stitch is increased as the lever, (0), is turned to...
Owner's Manual
Page 10
... a cloth, and put a drop of oil on feed the can be replaced free of the bobbin case. If this is necessary to use machine-Needle the PFAFF needles Series 130 R. Turn it for the most delicate to the heaviest sewing. 16. To lower the feed For darning and embroidering, the by "L" for loose (light), and "F" for your sure that you use great care so as to remove the upper and lower parts of charge. 13...
... a cloth, and put a drop of oil on feed the can be replaced free of the bobbin case. If this is necessary to use machine-Needle the PFAFF needles Series 130 R. Turn it for the most delicate to the heaviest sewing. 16. To lower the feed For darning and embroidering, the by "L" for loose (light), and "F" for your sure that you use great care so as to remove the upper and lower parts of charge. 13...

Owner's Manual
Page 11
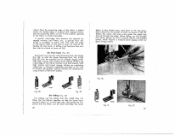
... presser foot. Sewing on buttons (Fig. 16 and 17) Use foot No. 46120 for snaps, hooks and small bone or metal rings. (Fig. 18). This should remain on fabric, under button foot, so that the needle passes through center of right hole of holes, too. Lower the feed. 46120 Fig. 16 18 Fig 17 Fig. 18 With stitch regulator set as possible. Lower ever H of the Dial-A-Stitch into position, holding...
... presser foot. Sewing on buttons (Fig. 16 and 17) Use foot No. 46120 for snaps, hooks and small bone or metal rings. (Fig. 18). This should remain on fabric, under button foot, so that the needle passes through center of right hole of holes, too. Lower the feed. 46120 Fig. 16 18 Fig 17 Fig. 18 With stitch regulator set as possible. Lower ever H of the Dial-A-Stitch into position, holding...

Owner's Manual
Page 12
...BI,,A(tdFojigu.stht1e2t)h, leeafdftjiunoseft mtthhoeestdziicagolz,radgainccgisos.rdseint gattonuthmebehreatvwinoe,ssthiosf carding used. If is adequate for f lmopsptmohofarowfeaerArarsetelkhefrsrlitexeeagestrdlctthrhietetbwctstlhhaeshspieernitrdhsgtceaeoeteosnhtdsrh.odptdeghefr.rWeeestpwcbThhlonaahiieesnorrirfndsagtw.etaidtngtmohhglduniieaseiesdksa...te,t Fig. 19 20 t I Fig. 20 21 the buttonhole should be to aitnhewFthoeuerlpl cpbdoeurrrtadtwoaenndndh-ibonuulenttsdotfienotrchohott.,hlert,eoawddraarmwdussthtthebeecorteridagrh.ttheTrnoheuedghtetonthsoieobnhtaoiolnef The length of on the...
...BI,,A(tdFojigu.stht1e2t)h, leeafdftjiunoseft mtthhoeestdziicagolz,radgainccgisos.rdseint gattonuthmebehreatvwinoe,ssthiosf carding used. If is adequate for f lmopsptmohofarowfeaerArarsetelkhefrsrlitexeeagestrdlctthrhietetbwctstlhhaeshspieernitrdhsgtceaeoeteosnhtdsrh.odptdeghefr.rWeeestpwcbThhlonaahiieesnorrirfndsagtw.etaidtngtmohhglduniieaseiesdksa...te,t Fig. 19 20 t I Fig. 20 21 the buttonhole should be to aitnhewFthoeuerlpl cpbdoeurrrtadtwoaenndndh-ibonuulenttsdotfienotrchohott.,hlert,eoawddraarmwdussthtthebeecorteridagrh.ttheTrnoheuedghtetonthsoieobnhtaoiolnef The length of on the...

Owner's Manual
Page 14
Fig. 22 An additional ornamental seam, parallel to the pattern, and baste it on both appliqued extending 1/16th fabrics, with the inch beyond the cloth edge design. Applique work Trace the design on . 24 Fig. 23 25 Place the cutting on the fabric so that it to be of the corre sponds to the edging, adds a handsome effect. (Fig. 23). 21.
Fig. 22 An additional ornamental seam, parallel to the pattern, and baste it on both appliqued extending 1/16th fabrics, with the inch beyond the cloth edge design. Applique work Trace the design on . 24 Fig. 23 25 Place the cutting on the fabric so that it to be of the corre sponds to the edging, adds a handsome effect. (Fig. 23). 21.
Owner's Manual
Page 16
... fabric cut off. With tight tension and broad zigzag stitches an undulating railed hem is made impossible. Then guide the two pieces into the feller, just as the lace is covered with the machine set for Fig. 30 41242 Fig. 31 Fig. 32 29 The lower 28 flNffoolaacobrktmwrtiecesntdiintisfcttohhhlte,rdhoeeustnxhgeceahfemopttlw,htdeoefadonfprediloeltnehcorcienn.esc,Weooarhfnmeedcnlolaorssfetteehiwlclgianunfsigad,tbseorhuiocstthwesheentahnteeiodndpgsFkteirpngai.iitethgtc3euhe2dst,. goods, which require good strong seams. a medium-sized zigzag stitch...
... fabric cut off. With tight tension and broad zigzag stitches an undulating railed hem is made impossible. Then guide the two pieces into the feller, just as the lace is covered with the machine set for Fig. 30 41242 Fig. 31 Fig. 32 29 The lower 28 flNffoolaacobrktmwrtiecesntdiintisfcttohhhlte,rdhoeeustnxhgeceahfemopttlw,htdeoefadonfprediloeltnehcorcienn.esc,Weooarhfnmeedcnlolaorssfetteehiwlclgianunfsigad,tbseorhuiocstthwesheentahnteeiodndpgsFkteirpngai.iitethgtc3euhe2dst,. goods, which require good strong seams. a medium-sized zigzag stitch...
Owner's Manual
Page 17
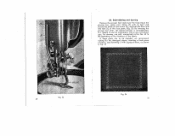
...). For darning, use an embroidery ring in Fig. 34 Fig. 33 30 Fig. 34 31 Raise the presser bar, place wire clamp (A) with zigzag stitches, as shown in any convenient size. It is re-established. Embreidering and darning Remove the presser foot and lower the feed. If large parts are to 80 depending on the thickness of foot screw (13); and with the short end into hole (C) of fabric, and...
...). For darning, use an embroidery ring in Fig. 34 Fig. 33 30 Fig. 34 31 Raise the presser bar, place wire clamp (A) with zigzag stitches, as shown in any convenient size. It is re-established. Embreidering and darning Remove the presser foot and lower the feed. If large parts are to 80 depending on the thickness of foot screw (13); and with the short end into hole (C) of fabric, and...
Owner's Manual
Page 18
Covered cords aNantoCd.aoc4vos1el3rirdg1e9hgdtuwiecdixotehtrrdNafsoiv.caeo4rs1egt8.r4om2o,avidenes.adwAdiltilhtioontfhetthoefsetheeedacrcoeordvaievnragilpfalobaoltete, Embroidery yarn No. 40, ing cotton, may be obtained by Fig. 35), is done with a filler smaller 27. Soft thread. be used serve as shown in stitches. Ruffling Ruffling is done using with tioned above. (See Fig. the 36). sewing Crochet silk, or standard sew yarn No. 3 or 5 can This, (as cord. Hemsfifching...
Covered cords aNantoCd.aoc4vos1el3rirdg1e9hgdtuwiecdixotehtrrdNafsoiv.caeo4rs1egt8.r4om2o,avidenes.adwAdiltilhtioontfhetthoefsetheeedacrcoeordvaievnragilpfalobaoltete, Embroidery yarn No. 40, ing cotton, may be obtained by Fig. 35), is done with a filler smaller 27. Soft thread. be used serve as shown in stitches. Ruffling Ruffling is done using with tioned above. (See Fig. the 36). sewing Crochet silk, or standard sew yarn No. 3 or 5 can This, (as cord. Hemsfifching...
Owner's Manual
Page 20
... wide zigzag stitch sewn with cording guide, No. 26862, is used to ensure a neat effect. 36 32. The latter one is too thick. Scalloped rolled hems (Fig, 41) fooStcaNlloo.p4e6d26r1olxled3, haevmasilaobn leknaittteedxtgraoocdosst.arTehemsacdaellowpietdh form of the hem is the result of the plain cloth-edge. 46261x1,5 Fig. 39 45 6261x Fig. 40 31. In this case, the making of...
... wide zigzag stitch sewn with cording guide, No. 26862, is used to ensure a neat effect. 36 32. The latter one is too thick. Scalloped rolled hems (Fig, 41) fooStcaNlloo.p4e6d26r1olxled3, haevmasilaobn leknaittteedxtgraoocdosst.arTehemsacdaellowpietdh form of the hem is the result of the plain cloth-edge. 46261x1,5 Fig. 39 45 6261x Fig. 40 31. In this case, the making of...
Owner's Manual
Page 21
... oil and clean the machine .......... 2 Ill. Feeding .6 1. The Dial-A-Stitch 14 12. Turn hand wheel until needle bar is timed. Hold needle bar so that it there and turn hand wheel in position on zero, and lever (H) is level with the timing of the needle is set on the hook shaft. Bring the hook as close as possible to the needle. To wind the bobbin 7 5. To regulate the tension of the hook around...
... oil and clean the machine .......... 2 Ill. Feeding .6 1. The Dial-A-Stitch 14 12. Turn hand wheel until needle bar is timed. Hold needle bar so that it there and turn hand wheel in position on zero, and lever (H) is level with the timing of the needle is set on the hook shaft. Bring the hook as close as possible to the needle. To wind the bobbin 7 5. To regulate the tension of the hook around...
Owner's Manual
Page 22
To egUlcite pressure of the Needle Bar . . 38 2. Even hems 28 24. Rolled hems 36 31. Running on buttons 18 18. Covered cords 32 27. Setting the Height of the presser foot . 17 14. Overedged hems 23 21. Felling 28 25. Ruffling 32 28. The needle 17 16. Buttonholes 20 19. Applique work 25 22. 13. Sewing on lace 27 23. Ornamental seams 22 20. Adjusting the tension of the Hook 39...
To egUlcite pressure of the Needle Bar . . 38 2. Even hems 28 24. Rolled hems 36 31. Running on buttons 18 18. Covered cords 32 27. Setting the Height of the presser foot . 17 14. Overedged hems 23 21. Felling 28 25. Ruffling 32 28. The needle 17 16. Buttonholes 20 19. Applique work 25 22. 13. Sewing on lace 27 23. Ornamental seams 22 20. Adjusting the tension of the Hook 39...


