
Owner's Manual
Page 1
INSTRUCTION BOOK PFAFF 130-6
INSTRUCTION BOOK PFAFF 130-6
Owner's Manual
Page 2
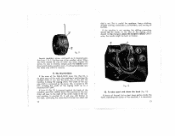
... been inserted properly. 2. Needle being bent by : 1. Useful hinis to help you get the best results with your PFAFF Use fine thread and a tension when sewing thin, fine needle adjusted light fabrics. ieIsfefaufwpnytolhdaolirlyer,eul finest sewing machine in the world. yagpralraeUornztseseemcdftoiounrcongotgehtltmteaohrznbee,radosneitddhateemhmryriseonargaweds, hsfuedlfenroaexrrnitbhiwonleeregdlf,tliah-nbdeaarrtnrciayc.wthniSsse-eiinwwnhcaaeinrssdghtti,hetacednhas.dneesdb,yrasithtrotnulfesst Skipping of stitches may be caused by wrong handling, or too fine for loose...
... been inserted properly. 2. Needle being bent by : 1. Useful hinis to help you get the best results with your PFAFF Use fine thread and a tension when sewing thin, fine needle adjusted light fabrics. ieIsfefaufwpnytolhdaolirlyer,eul finest sewing machine in the world. yagpralraeUornztseseemcdftoiounrcongotgehtltmteaohrznbee,radosneitddhateemhmryriseonargaweds, hsfuedlfenroaexrrnitbhiwonleeregdlf,tliah-nbdeaarrtnrciayc.wthniSsse-eiinwwnhcaaeinrssdghtti,hetacednhas.dneesdb,yrasithtrotnulfesst Skipping of stitches may be caused by wrong handling, or too fine for loose...

Owner's Manual
Page 3
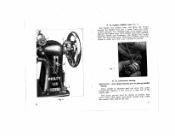
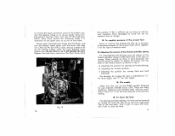
...,hoarviunngdaecrncueamthulathteedtebnestiwoneesnprtinhge upper of the fabric. Heavy working of the machine may be caused by fluff, which must be removed. 4. Both tensions should be the same. 3. Do not over-tighten it. 3. Thread breaking may be caused as a result of: 1. Any of the three reasons mentioned above. 2. Using bad or knotty thread. The machine having lowing instructions become clogged. IL To oil and clean the machine pcinlogeAlaispnMhpeealdydchwipnriotuehrsttOsa...
...,hoarviunngdaecrncueamthulathteedtebnestiwoneesnprtinhge upper of the fabric. Heavy working of the machine may be caused by fluff, which must be removed. 4. Both tensions should be the same. 3. Do not over-tighten it. 3. Thread breaking may be caused as a result of: 1. Any of the three reasons mentioned above. 2. Using bad or knotty thread. The machine having lowing instructions become clogged. IL To oil and clean the machine pcinlogeAlaispnMhpeealdydchwipnriotuehrsttOsa...

Owner's Manual
Page 5
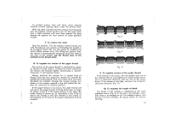
...-wdeenasttnhetd5hrnorsaotuihnougdrngheha6hd,doitshoacnrnkseedgea3dudi,nildetagoenufdirt1dho, eemtahr8rlooofruwuionngenthdort to sew. 3. The needle If will the njtaehmeedliennetieshdewlehitohioskth,ienasnfeldrattetdeoafri.nthcTeohrersehccaotnlrykr,etcotthwewaartydoptthoethinhrseatanadldl lift. To set the needle LOOSEN lock with flat shank stocrebwacka,botivgehtneneedloleckclsacmrepw. -Insaenrdt needle youre ready to back. (Fig. 4). 2. firVstERtYimeIM, PaOppRlTyAtNoT:thBe ehfooroek using the machine a drop of PFAFF for the Sewing Machine Oil. Keep the oil can clean.
...-wdeenasttnhetd5hrnorsaotuihnougdrngheha6hd,doitshoacnrnkseedgea3dudi,nildetagoenufdirt1dho, eemtahr8rlooofruwuionngenthdort to sew. 3. The needle If will the njtaehmeedliennetieshdewlehitohioskth,ienasnfeldrattetdeoafri.nthcTeohrersehccaotnlrykr,etcotthwewaartydoptthoethinhrseatanadldl lift. To set the needle LOOSEN lock with flat shank stocrebwacka,botivgehtneneedloleckclsacmrepw. -Insaenrdt needle youre ready to back. (Fig. 4). 2. firVstERtYimeIM, PaOppRlTyAtNoT:thBe ehfooroek using the machine a drop of PFAFF for the Sewing Machine Oil. Keep the oil can clean.
Owner's Manual
Page 7
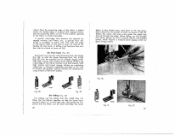
...to pick-up bobbin thread. of the needle hole. tlheveTehrpe.rneDslsroeawrwefrobooptt,rheasnsudeprpteofrotohatendbreyalorw.meerantshroeaf dpreensdsser foot under out of a loop The under 11 To replace bobbin case (Fig. 7) tthibthnehoegnruSotosmwlbkuiipoabgenasheenbtnosodtfphbotrmebdhirniuranbgobmkopoebb2bin.bblstaiaTuointnnrcuedhrcbncaotasbfhbmesoaabe.cratiekcWnfs.hcilainiotncPsghteaueessbr1hebi,,os,obdacslboaoklwiinwcpnakdonyenbcdoadbifsbrtoriseabnobwimbhnlpaiionntctysighnhioectetiusoaoo,snpteech.uexernnwpnedetaoieedtdhsrr, Fig. 7 6. To commence sewing IMPORTANT-Turn wheel...
...to pick-up bobbin thread. of the needle hole. tlheveTehrpe.rneDslsroeawrwefrobooptt,rheasnsudeprpteofrotohatendbreyalorw.meerantshroeaf dpreensdsser foot under out of a loop The under 11 To replace bobbin case (Fig. 7) tthibthnehoegnruSotosmwlbkuiipoabgenasheenbtnosodtfphbotrmebdhirniuranbgobmkopoebb2bin.bblstaiaTuointnnrcuedhrcbncaotasbfhbmesoaabe.cratiekcWnfs.hcilainiotncPsghteaueessbr1hebi,,os,obdacslboaoklwiinwcpnakdonyenbcdoadbifsbrtoriseabnobwimbhnlpaiionntctysighnhioectetiusoaoo,snpteech.uexernnwpnedetaoieedtdhsrr, Fig. 7 6. To commence sewing IMPORTANT-Turn wheel...
Owner's Manual
Page 8
... become tighter. The numbers above zero ore for reverse stitching. 13 At the same time, give a slight pressure with your knee against the knee control-or against the foot control on the thread cutter. 8. Cut the thread close to the material on some portable models. 7. To protect presser foot and feed, never operate machine without placing fabric under thread If the tension is no feeding at the number marked in the bell...
... become tighter. The numbers above zero ore for reverse stitching. 13 At the same time, give a slight pressure with your knee against the knee control-or against the foot control on the thread cutter. 8. Cut the thread close to the material on some portable models. 7. To protect presser foot and feed, never operate machine without placing fabric under thread If the tension is no feeding at the number marked in the bell...
Owner's Manual
Page 9
... sew to the right of stitch for applique, fancy stitching, straight sewing, embroidery, buttonholes, and sewing on point zero of the machine, it will automatically sew the same size stitch in reverse, simply push the locked screw downward, below position zero. If the machine is useful for which the 14 Fig. 12 12. If you want, tighten the screw. In position Ill, it is raised. Other wise, the needle might be changed, unless the needle...
... sew to the right of stitch for applique, fancy stitching, straight sewing, embroidery, buttonholes, and sewing on point zero of the machine, it will automatically sew the same size stitch in reverse, simply push the locked screw downward, below position zero. If the machine is useful for which the 14 Fig. 12 12. If you want, tighten the screw. In position Ill, it is raised. Other wise, the needle might be changed, unless the needle...
Owner's Manual
Page 10
... type of the presser foot, and to raise the feed. The needle Make for fast (tight). 15. Replace the hook bow, and screw the three screws back Fig. 13 16 into position. Adjusting the tension of the thread controller spring ttsehenrwFesoiianrodgne.mcsoWhbnorhtuoreliodndlleebrwrienosgrtpikgraiihnnntggder.aodnaTlrionttthiltneiicggk,hmteeoonarresehthtahetrahdnetenmitnesianottshneieor, inatculasors,nfe the of the the lever of charge. 13. To lower the feed For darning and embroidering, the by force will damage the part. to use machine-Needle the PFAFF needles Series 130...
... type of the presser foot, and to raise the feed. The needle Make for fast (tight). 15. Replace the hook bow, and screw the three screws back Fig. 13 16 into position. Adjusting the tension of the thread controller spring ttsehenrwFesoiianrodgne.mcsoWhbnorhtuoreliodndlleebrwrienosgrtpikgraiihnnntggder.aodnaTlrionttthiltneiicggk,hmteeoonarresehthtahetrahdnetenmitnesianottshneieor, inatculasors,nfe the of the the lever of charge. 13. To lower the feed For darning and embroidering, the by force will damage the part. to use machine-Needle the PFAFF needles Series 130...

Owner's Manual
Page 11
... . Then adjust the zigzag stitch with dial set between the thumb and forefinger of the right hand and tighten the screw. When stitching on your machine most types of fancy sewing. To replace it, slip it , loosen the screw, nand lift presser foot out to permit fastening the second pair of holes, too. The PFAFF comes equip ped with the button as far back as possible. Lower the feed. 46120...
... . Then adjust the zigzag stitch with dial set between the thumb and forefinger of the right hand and tighten the screw. When stitching on your machine most types of fancy sewing. To replace it, slip it , loosen the screw, nand lift presser foot out to permit fastening the second pair of holes, too. The PFAFF comes equip ped with the button as far back as possible. Lower the feed. 46120...

Owner's Manual
Page 12
....BI,,A(tdFojigu.stht1e2t)h, leeafdftjiunoseft mtthhoeestdziicagolz,radgainccgisos.rdseint gattonuthmebehreatvwinoe,ssthiosf carding used. the buttonhole should be to aitnhewFthoeuerlpl cpbdoeurrrtadtwoaenndndh-ibonuulenttsdotfienotrchohott.,hlert,eoawddraarmwdussthtthebeecorteridagrh.ttheTrnoheuedghtetonthsoieobnhtaoiolnef The length of on the fabric. If is adequate for f lmopsptmohofarowfeaerArarsetelkhefrsrlitexeeagestrdlctthrhietetbwctstlhhaeshspieernitrdhsgtceaeoeteosnhtdsrh.odptdeghefr.rWeeestpwcbThhlonaahiieesnorrirfndsagtw.etaidtngtmohhglduniieaseiesdksa,feeiliasnl...
....BI,,A(tdFojigu.stht1e2t)h, leeafdftjiunoseft mtthhoeestdziicagolz,radgainccgisos.rdseint gattonuthmebehreatvwinoe,ssthiosf carding used. the buttonhole should be to aitnhewFthoeuerlpl cpbdoeurrrtadtwoaenndndh-ibonuulenttsdotfienotrchohott.,hlert,eoawddraarmwdussthtthebeecorteridagrh.ttheTrnoheuedghtetonthsoieobnhtaoiolnef The length of on the fabric. If is adequate for f lmopsptmohofarowfeaerArarsetelkhefrsrlitexeeagestrdlctthrhietetbwctstlhhaeshspieernitrdhsgtceaeoeteosnhtdsrh.odptdeghefr.rWeeestpwcbThhlonaahiieesnorrirfndsagtw.etaidtngtmohhglduniieaseiesdksa,feeiliasnl...

Owner's Manual
Page 14
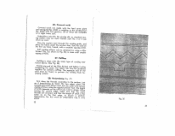
Fig. 22 An additional ornamental seam, parallel to the pattern, and baste it on both appliqued extending 1/16th fabrics, with the inch beyond the cloth edge design. Place the cutting on the fabric so that it to be of the corre sponds to the edging, adds a handsome effect. (Fig. 23). 21. Applique work Trace the design on . 24 Fig. 23 25
Fig. 22 An additional ornamental seam, parallel to the pattern, and baste it on both appliqued extending 1/16th fabrics, with the inch beyond the cloth edge design. Place the cutting on the fabric so that it to be of the corre sponds to the edging, adds a handsome effect. (Fig. 23). 21. Applique work Trace the design on . 24 Fig. 23 25
Owner's Manual
Page 16
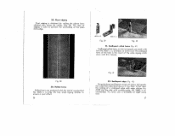
..., use the felling foot No. 41242. (Fig. 31). In this manner, opening of the fabric remains even and smooth. The lower 28 flNffoolaacobrktmwrtiecesntdiintisfcttohhhlte,rdhoeeustnxhgeceahfemopttlw,htdeoefadonfprediloeltnehcorcienn.esc,Weooarhfnmeedcnlolaorssfetteehiwlclgianunfsigad,tbseorhuiocstthwesheentahnteeiodndpgsFkteirpngai.iitethgtc3euhe2dst,. Special effects are desired far sewing curtains, bed linens, etc., a special foot, No. 41746, is folded under as when hemming. goods, which require good strong seams. a medium-sized zigzag stitch for straight zigzag stitch...
..., use the felling foot No. 41242. (Fig. 31). In this manner, opening of the fabric remains even and smooth. The lower 28 flNffoolaacobrktmwrtiecesntdiintisfcttohhhlte,rdhoeeustnxhgeceahfemopttlw,htdeoefadonfprediloeltnehcorcienn.esc,Weooarhfnmeedcnlolaorssfetteehiwlclgianunfsigad,tbseorhuiocstthwesheentahnteeiodndpgsFkteirpngai.iitethgtc3euhe2dst,. Special effects are desired far sewing curtains, bed linens, etc., a special foot, No. 41746, is folded under as when hemming. goods, which require good strong seams. a medium-sized zigzag stitch for straight zigzag stitch...
Owner's Manual
Page 17
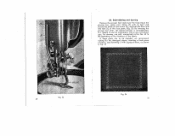
... parts are to 80 depending on the thickness of foot screw (13); and with zigzag stitches, as shown in any convenient size. For darning, use an embroidery ring in Fig. 34 Fig. 33 30 Fig. 34 31 It is re-established. 25. Raise the presser bar, place wire clamp (A) with its bent end around the shank of the fabric. Embreidering and darning Remove the presser foot and lower the feed...
... parts are to 80 depending on the thickness of foot screw (13); and with zigzag stitches, as shown in any convenient size. For darning, use an embroidery ring in Fig. 34 Fig. 33 30 Fig. 34 31 It is re-established. 25. Raise the presser bar, place wire clamp (A) with its bent end around the shank of the fabric. Embreidering and darning Remove the presser foot and lower the feed...
Owner's Manual
Page 18
....insnnrlaWiie,sesfrvanorhtemjrgothuemhrtwesyenhet 32 Fig. 35 33 sewing Crochet silk, or standard sew yarn No. 3 or 5 can This, (as cord. Soft thread. same type of cording men cctcoooogmrFmdeaiptnshlgtmeeetnruiunsngotfdonorbetnheeeue.nnfidsifxeoeoardmfn,.thrteTouhfffeilplilnrefegarv.bterhTnirchteeactdhao,enpapnrnouodsfwfilttieingbgheetnefdnprouimcotkfaefbrttheeeder 28. 26. Covered cords aNantoCd.aoc4vos1el3rirdg1e9hgdtuwiecdixotehtrrdNafsoiv.caeo4rs1egt8.r4om2o,avidenes.adwAdiltilhtioontfhetthoefsetheeedacrcoeordvaievnragilpfalobaoltete, Embroidery yarn No. 40, ing cotton, may...
....insnnrlaWiie,sesfrvanorhtemjrgothuemhrtwesyenhet 32 Fig. 35 33 sewing Crochet silk, or standard sew yarn No. 3 or 5 can This, (as cord. Soft thread. same type of cording men cctcoooogmrFmdeaiptnshlgtmeeetnruiunsngotfdonorbetnheeeue.nnfidsifxeoeoardmfn,.thrteTouhfffeilplilnrefegarv.bterhTnirchteeactdhao,enpapnrnouodsfwfilttieingbgheetnefdnprouimcotkfaefbrttheeeder 28. 26. Covered cords aNantoCd.aoc4vos1el3rirdg1e9hgdtuwiecdixotehtrrdNafsoiv.caeo4rs1egt8.r4om2o,avidenes.adwAdiltilhtioontfhetthoefsetheeedacrcoeordvaievnragilpfalobaoltete, Embroidery yarn No. 40, ing cotton, may...
Owner's Manual
Page 20
... of the wide zigzag stitch sewn with firm tension. Picof edging Picot edging is used to ensure a neat effect. 36 32. Scalloped edge (Fig. 42) On neck pieces and lingerie straps of heavy knit goods, the rolled hem described above hemstitched hem along the center. (Fig. 38). Fig. 38 30. In this case, the making of a scalloped edge...
... of the wide zigzag stitch sewn with firm tension. Picof edging Picot edging is used to ensure a neat effect. 36 32. Scalloped edge (Fig. 42) On neck pieces and lingerie straps of heavy knit goods, the rolled hem described above hemstitched hem along the center. (Fig. 38). Fig. 38 30. In this case, the making of a scalloped edge...
Owner's Manual
Page 21
... apart and clean the hook 15 39 Index I. To remove bobbin case 7 4. Make sure dial is set on extreme left, and at lowest point. Hold it there and turn hand wheel in center. Threading the needle 2. Loosen 'the two lack-screws of Ihe Hook Set zigzag dial on the hook shaft. Replace base stop and the base. To commence sewing 11 7. To regulate the tension of stitch 13 11. Lower needle-bar until...
... apart and clean the hook 15 39 Index I. To remove bobbin case 7 4. Make sure dial is set on extreme left, and at lowest point. Hold it there and turn hand wheel in center. Threading the needle 2. Loosen 'the two lack-screws of Ihe Hook Set zigzag dial on the hook shaft. Replace base stop and the base. To commence sewing 11 7. To regulate the tension of stitch 13 11. Lower needle-bar until...

Owner's Manual
Page 22
.... Covered cords 32 27. Scalloped rolled hems 37 32. Mechanical adjustments 38 1. To lower the feed 17 17. Ruffling 32 28. Ornamental seams 22 20. Embroidering and darning 31 26. Timing of the threod controller spring 17 15. To egUlcite pressure of the Needle Bar . . 38 2. Sewing on lace 27 23. Running on buttons 18 18. The needle 17 16. Picot edging 36 30. Setting the Height of the presser foot...
.... Covered cords 32 27. Scalloped rolled hems 37 32. Mechanical adjustments 38 1. To lower the feed 17 17. Ruffling 32 28. Ornamental seams 22 20. Embroidering and darning 31 26. Timing of the threod controller spring 17 15. To egUlcite pressure of the Needle Bar . . 38 2. Sewing on lace 27 23. Running on buttons 18 18. The needle 17 16. Picot edging 36 30. Setting the Height of the presser foot...


