
PZ-20 Manual
Page 3
...Predictive Autofocus, Image Size Tracking and Zoom Clip Modes, Zoom Effect shooting capabilities are listed on your Pentax camera. This camera is an outstanding AF SLR camera. Incorporating a broad range of advanced technologies and highly accurate automation, this manual. With its unmatched ...performance, versatility and reliability, this manual. PENTAX mit • The names of the camera's working parts are made possible. Keep the flaps unfolded for quick reference while reading this camera will enjoy taking memorable photographs with , or actual damage...
...Predictive Autofocus, Image Size Tracking and Zoom Clip Modes, Zoom Effect shooting capabilities are listed on your Pentax camera. This camera is an outstanding AF SLR camera. Incorporating a broad range of advanced technologies and highly accurate automation, this manual. With its unmatched ...performance, versatility and reliability, this manual. PENTAX mit • The names of the camera's working parts are made possible. Keep the flaps unfolded for quick reference while reading this camera will enjoy taking memorable photographs with , or actual damage...
PZ-20 Manual
Page 5
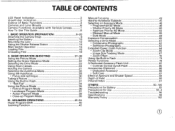
BASIC OPERATION (PREPARATION) Attaching the Camera Strap Inserting the Battery Mounting the Lens Using the Shutter Release Button Main Switch Operation ' Loading Film Unloading Film II. ADVANCED OPERATIONS Hyper Program-Shift Learning Function 2 3 4 6 7 8 9-20 9 10 12 14 14 15 19 21-39 21... the Green Operation Mode Selecting the Drive Mode Using Zoom Lenses Holding the Camera Selecting the Autofocus Mode Using the Autofocus • Focus-lock technique Taking a Picture Using the Built-in Flash Pentax Functions A Dedicated Accessory Flash Unit • Contrast Control Synch Flash Accessories ...
BASIC OPERATION (PREPARATION) Attaching the Camera Strap Inserting the Battery Mounting the Lens Using the Shutter Release Button Main Switch Operation ' Loading Film Unloading Film II. ADVANCED OPERATIONS Hyper Program-Shift Learning Function 2 3 4 6 7 8 9-20 9 10 12 14 14 15 19 21-39 21... the Green Operation Mode Selecting the Drive Mode Using Zoom Lenses Holding the Camera Selecting the Autofocus Mode Using the Autofocus • Focus-lock technique Taking a Picture Using the Built-in Flash Pentax Functions A Dedicated Accessory Flash Unit • Contrast Control Synch Flash Accessories ...
PZ-20 Manual
Page 7
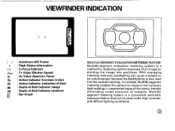
In contrast, Multi(6)-segment metering enables the camera to be used under -exposure of an image by dividing the image into the overall metering. VIEWFINDER INDICATION ova C : Autofocus (AF) Frame : Flash Status Information O : ...
In contrast, Multi(6)-segment metering enables the camera to be used under -exposure of an image by dividing the image into the overall metering. VIEWFINDER INDICATION ova C : Autofocus (AF) Frame : Flash Status Information O : ...
PZ-20 Manual
Page 8
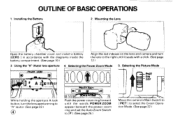
ON OFF I Move the camera's Main Switch to [ PICT I .(See page 25.) - Installing the Battery 2. PICT - Selecting the Power Zoom Mode 5. Selecting the Picture Mode Ito POWER ZOOM til A 41611 ... power zoom ring forward until it seats with the diagrams inside the battery compartment. (See page 10.) Align the red indexes on the lens and camera and turn the lens aperture ring to select the Green Operation Mode. (See page 22. 1 Using the "A" (Auto) lens aperture 4. Mounting the Lens Open the...
ON OFF I Move the camera's Main Switch to [ PICT I .(See page 25.) - Installing the Battery 2. PICT - Selecting the Power Zoom Mode 5. Selecting the Picture Mode Ito POWER ZOOM til A 41611 ... power zoom ring forward until it seats with the diagrams inside the battery compartment. (See page 10.) Align the red indexes on the lens and camera and turn the lens aperture ring to select the Green Operation Mode. (See page 22. 1 Using the "A" (Auto) lens aperture 4. Mounting the Lens Open the...

PZ-20 Manual
Page 10
...-information contacts K-mount lens KA-mount Pentax A-lens D. CAMERAS AND LENS MOUNTS Lens Mount and Camera Body Compatibility Chart Mount Type Lens Type A. Screw mount Pentax M-lens/Pentax lens SMC TAKUMAR lens Camera Model Z-10/PZ-10, Z-20/PZ-20, SFXN/SF1N, SF7/SF10 Super A/...Super Program, P30N/P3N, P30T LX, K1000 ESII, SP Z-1/PZ-1 (A) through (D): basically K -mount lenses. (A) and (B1: autofocus lenses...
...-information contacts K-mount lens KA-mount Pentax A-lens D. CAMERAS AND LENS MOUNTS Lens Mount and Camera Body Compatibility Chart Mount Type Lens Type A. Screw mount Pentax M-lens/Pentax lens SMC TAKUMAR lens Camera Model Z-10/PZ-10, Z-20/PZ-20, SFXN/SF1N, SF7/SF10 Super A/...Super Program, P30N/P3N, P30T LX, K1000 ESII, SP Z-1/PZ-1 (A) through (D): basically K -mount lenses. (A) and (B1: autofocus lenses...
PZ-20 Manual
Page 11
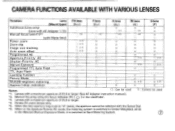
CAMERA FUNCTIONS AVAILABLE WITH VARIOUS LENSES Function Lens FA lens F lens A lens M lens S lens (Mount type) [KAF2] [KAF] [KA] [K] [P] Autofocus (Lens only) (Lens with AF Adapter 1.... Aperture-Priority AE mode, the metering system is switched to "A" (auto), the aperture cannot be used X : Cannot be selected with a maximum aperture of f/5.6 or larger. *4. Pentax-FA zoom lenses only. *5. Manual focusing using the focus indicator (FI) I p I in the Metered Manual Exposure Mode, it is switched to Center-Weighted, while in...
CAMERA FUNCTIONS AVAILABLE WITH VARIOUS LENSES Function Lens FA lens F lens A lens M lens S lens (Mount type) [KAF2] [KAF] [KA] [K] [P] Autofocus (Lens only) (Lens with AF Adapter 1.... Aperture-Priority AE mode, the metering system is switched to "A" (auto), the aperture cannot be used X : Cannot be selected with a maximum aperture of f/5.6 or larger. *4. Pentax-FA zoom lenses only. *5. Manual focusing using the focus indicator (FI) I p I in the Metered Manual Exposure Mode, it is switched to Center-Weighted, while in...
PZ-20 Manual
Page 12
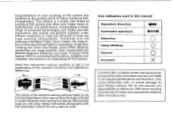
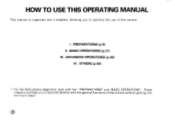
ADVANCED OPERATIONS (p.40) IV. BASIC OPERATIONS (p.21) III. OTHERS (p.92) • For the SLR camera beginners, start with the general functions of the camera. I. These chapters will help you to optimize the use of the camera without getting into 4 chapters, allowing you to become familiar with the " PREPARATIONS" and "BASIC OPERATIONS" . HOW TO USE THIS OPERATING MANUAL This manual is organized into too much detail. PREPARATIONS (p.9) II.
ADVANCED OPERATIONS (p.40) IV. BASIC OPERATIONS (p.21) III. OTHERS (p.92) • For the SLR camera beginners, start with the general functions of the camera. I. These chapters will help you to optimize the use of the camera without getting into 4 chapters, allowing you to become familiar with the " PREPARATIONS" and "BASIC OPERATIONS" . HOW TO USE THIS OPERATING MANUAL This manual is organized into too much detail. PREPARATIONS (p.9) II.
PZ-20 Manual
Page 13
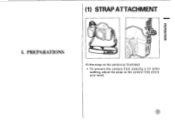
PREPARATIONS Fit the strap on the camera as illustrated. • To prevent the camera from swaying a lot while walking, adjust the strap so the camera rides above your waist. (1) STRAP ATTACHMENT SNOUVHVd3Hd I.
PREPARATIONS Fit the strap on the camera as illustrated. • To prevent the camera from swaying a lot while walking, adjust the strap so the camera rides above your waist. (1) STRAP ATTACHMENT SNOUVHVd3Hd I.
PZ-20 Manual
Page 14
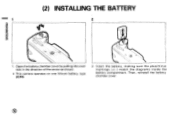
Then, reinstall the battery chamber cover. Open the battery chamber cover by pulling the cover lock in the direction of the arrow as shown. • This camera operates on one lithium battery, type 2CR5. 2. Insert the battery, making sure the plus/minus markings (+/-) match the diagrams inside the battery compartment. SNOLLVI4Vd3Hd (2) INSTALLING THE BATTERY yr 0 g7. 1.
Then, reinstall the battery chamber cover. Open the battery chamber cover by pulling the cover lock in the direction of the arrow as shown. • This camera operates on one lithium battery, type 2CR5. 2. Insert the battery, making sure the plus/minus markings (+/-) match the diagrams inside the battery compartment. SNOLLVI4Vd3Hd (2) INSTALLING THE BATTERY yr 0 g7. 1.
PZ-20 Manual
Page 15
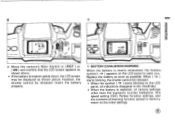
3 U uu uu SNOI1VUVAHd DO 'a 05 Ay - - however, the shutter cannot be displayed as shown above; Insert the battery properly. * BATTERY EXHAUSTION WARNING When the battery is loaded upside down, the LCD screen may be released. Move the camera's Main Switch to [ PICT ] or [ ON I and confirm that the LCD screen appears as shown above. • If the battery is nearly exhausted, the battery symbol [ M a[ OpFFA DRIVE MOE r t25 aF Ib a [irae 3.
3 U uu uu SNOI1VUVAHd DO 'a 05 Ay - - however, the shutter cannot be displayed as shown above; Insert the battery properly. * BATTERY EXHAUSTION WARNING When the battery is loaded upside down, the LCD screen may be released. Move the camera's Main Switch to [ PICT ] or [ ON I and confirm that the LCD screen appears as shown above. • If the battery is nearly exhausted, the battery symbol [ M a[ OpFFA DRIVE MOE r t25 aF Ib a [irae 3.
PZ-20 Manual
Page 16
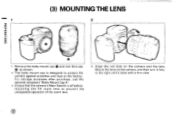
... red dots on the camera, and then turn it locks with a firm click. 12 (3) MOUNTING THE LENS 2 SNOIIVIIVd3ild O 0 0 1. For storage purposes after purchase, use the optional accessory "Body Mount Cap K". • Ensure that the camera's Main Switch is designed to protect the camera against scratches and dust ...at the factory. Mount the lens on the camera and the lens. Remove the body mount cap and rear lens cap e as shown...
... red dots on the camera, and then turn it locks with a firm click. 12 (3) MOUNTING THE LENS 2 SNOIIVIIVd3ild O 0 0 1. For storage purposes after purchase, use the optional accessory "Body Mount Cap K". • Ensure that the camera's Main Switch is designed to protect the camera against scratches and dust ...at the factory. Mount the lens on the camera and the lens. Remove the body mount cap and rear lens cap e as shown...
PZ-20 Manual
Page 17
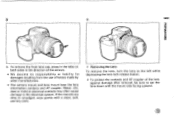
... the left while depressing the lens-lock-release button. • To protect the contacts and AF coupler of lenses made by other manufacturers. • The camera mount and lens mount bear the lens information contacts and AF coupler.
... the left while depressing the lens-lock-release button. • To protect the contacts and AF coupler of lenses made by other manufacturers. • The camera mount and lens mount bear the lens information contacts and AF coupler.
PZ-20 Manual
Page 18
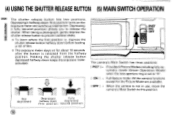
... taking a photograph, gently depress the shutter release button to release the shutter. f ON ) = Full-feature mode: All the camera functions except for about 10 seconds after the button is set to this position. Not depressed Depressed Fully halfway down keeps the exposure ...meter activated. ,0 4 t PICT -ON OFF The camera's Main Switch has three positions. [ PICT ] Provides 5 Picture Modes including fully automatic mode (Green Operation Mode) when the lens aperture ring...
... taking a photograph, gently depress the shutter release button to release the shutter. f ON ) = Full-feature mode: All the camera functions except for about 10 seconds after the button is set to this position. Not depressed Depressed Fully halfway down keeps the exposure ...meter activated. ,0 4 t PICT -ON OFF The camera's Main Switch has three positions. [ PICT ] Provides 5 Picture Modes including fully automatic mode (Green Operation Mode) when the lens aperture ring...
PZ-20 Manual
Page 19
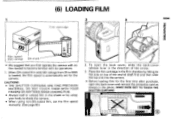
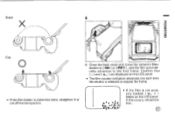
... cover, slide the back-coverrelease lever in the direction of the rewind shaft first and then slide the top end into the camera. • Before loading film for the camera. Place the film cartridge in the shade or by fitting its operations. 1. (6) LOADING FILM SNOLLVEIVd3kld 1 Film cartridge 4 loo Film ...co 10 000000000 0000 'U- 24 00 D DX -mark • We suggest that you first operate the camera with no film loaded to become familiar with ISO ratings from 25 to shade the camera. • When using non-DX-coded film, set for the first time after purchase, open the back...
... cover, slide the back-coverrelease lever in the direction of the rewind shaft first and then slide the top end into the camera. • Before loading film for the camera. Place the film cartridge in the shade or by fitting its operations. 1. (6) LOADING FILM SNOLLVEIVd3kld 1 Film cartridge 4 loo Film ...co 10 000000000 0000 'U- 24 00 D DX -mark • We suggest that you first operate the camera with no film loaded to become familiar with ISO ratings from 25 to shade the camera. • When using non-DX-coded film, set for the first time after purchase, open the back...
PZ-20 Manual
Page 21
Close the back cover and move the camera's Main Switch to [ ON ] or PICT 1 , and the film automatically advances to expose the frame. • If the film leader is extremely bent, straighten it ...
Close the back cover and move the camera's Main Switch to [ ON ] or PICT 1 , and the film automatically advances to expose the frame. • If the film leader is extremely bent, straighten it ...
PZ-20 Manual
Page 23
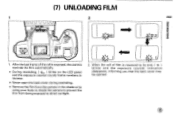
... the roll is rewound to direct sunlight. SNOIIVUVd3Ild (7) UNLOADING FILM 1 2 00 DD lAt 6-367 1. After the last frame of film is exposed, the camera rewinds the film automatically. • During rewinding, [ e__ ] blinks on the LCD panel and the exposure counter counts frame numbers in reverse. •... Never open the back cover during rewinding. • Remove the film from the camera in the shade or by using your body to shade the camera to prevent the film from being exposed to its end, a I blinks and the exposure counter indication disappears, ...
... the roll is rewound to direct sunlight. SNOIIVUVd3Ild (7) UNLOADING FILM 1 2 00 DD lAt 6-367 1. After the last frame of film is exposed, the camera rewinds the film automatically. • During rewinding, [ e__ ] blinks on the LCD panel and the exposure counter counts frame numbers in reverse. •... Never open the back cover during rewinding. • Remove the film from the camera in the shade or by using your body to shade the camera to prevent the film from being exposed to its end, a I blinks and the exposure counter indication disappears, ...
PZ-20 Manual
Page 24
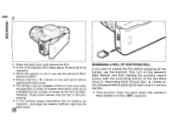
REWINDING A ROLL OF FILM IN MID-ROLL If you wish to remove the film. • This function does not work when the camera's Main Switch is not in the pro- Ensure that the I O I position. First, turn on the LCD panel before opening the back cover to unload the ... have been used up as indicated by the number of the Hot Shoe Cover FE. cessing. • If the camera stops rewinding due to [OFF]. • Ensure that [ O 1 blinks on the camera's Main Switch, and then depress the auxiliary rewind button with the protruding section of shots on the LCD panel before...
REWINDING A ROLL OF FILM IN MID-ROLL If you wish to remove the film. • This function does not work when the camera's Main Switch is not in the pro- Ensure that the I O I position. First, turn on the LCD panel before opening the back cover to unload the ... have been used up as indicated by the number of the Hot Shoe Cover FE. cessing. • If the camera stops rewinding due to [OFF]. • Ensure that [ O 1 blinks on the camera's Main Switch, and then depress the auxiliary rewind button with the protruding section of shots on the LCD panel before...
PZ-20 Manual
Page 25
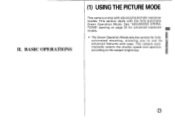
The camera automatically selects the shutter speed and aperture according to use its advanced features with ease. BASIC OPERATIONS (1) USING THE PICTURE MODE This camera comes with the fully-automatic Green Operation Mode. II. This section deals with advanced automatic exposure modes. See "ADVANCED OPERATIONS" starting on page 35 for advanced exposure modes. • The Green Operation Mode sets the camera for fully automated shooting, allowing you to the subject brightness.
The camera automatically selects the shutter speed and aperture according to use its advanced features with ease. BASIC OPERATIONS (1) USING THE PICTURE MODE This camera comes with the fully-automatic Green Operation Mode. II. This section deals with advanced automatic exposure modes. See "ADVANCED OPERATIONS" starting on page 35 for advanced exposure modes. • The Green Operation Mode sets the camera for fully automated shooting, allowing you to the subject brightness.

PZ-20 Manual
Page 26
OFF Selecting the Green Operation Mode 1. Move the camera's Main Switch to turn the aperture ring to "A" (Auto) as shown. • To move the lens aperture to "A" (auto) or to a manual f-stop setting, hold ...
OFF Selecting the Green Operation Mode 1. Move the camera's Main Switch to turn the aperture ring to "A" (Auto) as shown. • To move the lens aperture to "A" (auto) or to a manual f-stop setting, hold ...
PZ-20 Manual
Page 27
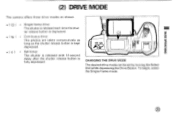
...-second delay after the shutter release button is kept depressed. • I c.1) I Continuous drive: The photos are taken consecutively as long as shown. . (2) DRIVE MODE The camera offers three drive modes as the shutter release button is fully depressed. 00 CHANGING THE DRIVE MODE The desired drive mode can be set by...
...-second delay after the shutter release button is kept depressed. • I c.1) I Continuous drive: The photos are taken consecutively as long as shown. . (2) DRIVE MODE The camera offers three drive modes as the shutter release button is fully depressed. 00 CHANGING THE DRIVE MODE The desired drive mode can be set by...


